Have you heard about Storage Spaces introduced by Windows Server 2012? Well, this is a very interesting storage feature that allows us to deal with functionalities like storage virtualization, RAID capabilities, thin or thick provisioning, cluster shared volume (CSV), efficiently file repair and so on. In addition, the Windows 2012 R2 version has also introduced some enhancements like storage tiering, write-back caching, datadeduplication, parity space support for failover clusters, JBOD enclosure awareness… A bunch of enterprise storage features and we are far from the old basic Windows RAID level capabilities for sure.
To be honest, I have never implemented myself or seen Storage Space in action at any customer shops so far because in my area, most of my customers already own a SAN. On another side, we have to deal with some scaling and hardware limitations that probably have delayed the adoption of this feature. Indeed, Scale-Out File Servers (SOFS) are recommended in replacement of SAN in this context and all SOFS nodes must be physically connected to every JBOD chassis. Therefore, if one of the SOFS nodes fails for some reason, the IO traffic will be redirected so fast that the server won’t notice, but at the price to either be limited by the number of SAS cables that can be wired to each SOFS node or by the maximum number of disks per disk. Even the storage pool expansion comes with some limitations as well. Finally, its usage is limited to SAS disks and no other technologies work even it seems not to be a big problem for my customers to be honest. In short, suitable scenarios seem to be very limited for customers (at least in my context).
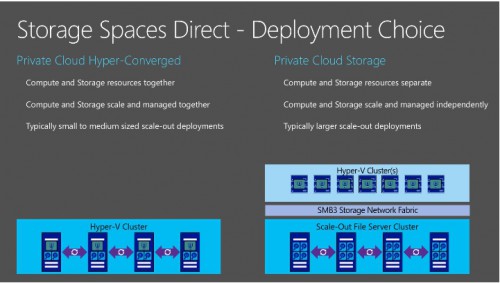
Picture from https://blogs.technet.microsoft.com/clausjor/2015/05/14/storage-spaces-direct/
But fortunately, Windows Server 2016 seems to change the game by introducing the new Storage Spaces Direct feature (aka S2D). In fact, this is simply the enhancement of the old Storage Spaces feature and I have to say that some key points have caught my attention. Indeed, we may pool together local storage from each node using Storage Spaces for data protection. A big improvement that will simplify some scenarios for sure! Moreover, there is no limitation of disk types and now we are able to include SAS, SATA and NVMe technologies as well. The latter one is probably the most interesting item because it is based on flash memory on PCI express card and I may imagine some scenarios as SQL Server FCIs that may benefit from high performance and low latency storage in conjunction of RDMA (with Mellanox Connect cards for example) either in physical or virtualization context. One another important point is that S2D runs on the top of a new designed storage bus transport by Microsoft to transfer data between nodes over the SMB or SMB direct protocol.
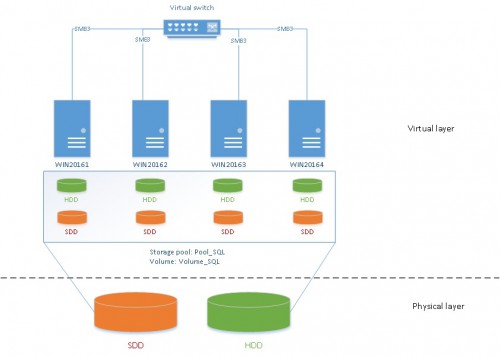
In this blog post let’s just introduce S2D by a first simple implementation. Unfortunately, my lab environment is very limited because it includes only one computer (Lenovo T530) that includes one SSD disk and HDD disk (SATA/600 – 7200 rpm) that will be used as storage layout by my Hyper-V server. I have installed 4 virtual machines that run on Windows 2016 TP4 and that have 2 virtual disks (SSD + HDD) installed regardless the operation system disk. Each set of virtual disks (SSD + HDD) will be enrolled in a S2D pool later in this blog post. So it is obvious that executing some performance tests doesn’t make sense here. But I hope to get a more sized environment for that but at this moment let’s focus on how to implement S2D. Here a picture of my lab architecture:
First let’s install a simple Windows Failover Cluster that will include my four nodes (WiN20161, WIN20162, WIN20163 and WIN20164). Before installing the cluster itself, let’s test my current environment. You may notice that I have included the Storage Spaces Direct capabilities to my test by using the well-known Test-Cluster cmdlet:
Test-Cluster –Node WIN20161, WIN20162, WIN20163, WIN20164 –Include “Storage Spaces Direct”,Inventory,Network,”System Configuration”
Perfect! My configuration seems to be suitable to implement S2D as stated below:

The next step will consists in finding which disks may be included to my storage pool. In my case, disks with size higher or equal to 10GB concern HDD disks (rotational disk) whereas those with a size equal to 10GB are SSD disks. Here the command to get this info:
# HDD
Get-PhysicalDisk -CanPool $true | ? Size -ge 10GB | Sort Size | FT -AutoSize
# SSD
Get-PhysicalDisk -CanPool $true | ? Size -le 5GB | Sort Size | FT -AutoSize

Let’s create a storage pool by using the New-StoragePool cmdlet.
# Create storage pool
$s = Get-StorageSubSystem
New-StoragePool -StorageSubSystemId $s.UniqueId -FriendlyName Pool_SQL -PhysicalDisks (Get-PhysicalDisk -CanPool $true)
One another capability of S2D is to use multi resilient virtual disks according to the Clauds Joergensen blog post by using both storage tiers and ReFs real time tiering. How important is this feature? Well, let’s say you want to dedicate a virtual disk for SQL Server data files with a 70/30 read write IO pattern. In this case it may be interesting to use multi resilient virtual disks with both Mirror and Parity tiers. Indeed, from one side, ReFs will always perform IO writes on the Mirror Tier before Parity Tier, improving IO writes in this case. On another side, using parity Tiers may improve random IO read pattern. This is my understanding of potential benefits from multi resilient feature. Please feel free to reach me out if I’m wrong.
Well, let’s implement storage tiers to achieve this goal. SSD disks will be used by the Mirror tier and HDD disks by the Parity tier. However before implementing storage tiers, it remains one important task that will consists in defining disk media types (HDD or SSD). In my context, the virtual layer may prevent the media type detection of my physical disks from the operating system. But fortunately we may use the Set-PhysicalDisk cmdlet to achieve this task as shown below:
# Configure media type for virtual SAS disks
Get-StoragePool Pool_SQL | Get-PhysicalDisk | ? Size -lt 8GB | Set-PhysicalDisk –MediaType SSD
Get-StoragePool Pool_SQL | Get-PhysicalDisk | ? Size -gt 8GB | Set-PhysicalDisk –MediaType HDD
After defining my storage tiers, let’s verify the total size of the Pool_SQL storage pool :
# Get storage pool info
Get-StoragePool -FriendlyName Pool_SQL | select FriendlyName, Size, AllocatedSize

So we may benefit from a total capacity size of 54GB but let’s notice that 2GB is already in use. In fact, 256MB is reserved from each disk for internal metadata management. So let’s perform a simple math: 8 disks x 256MB = 2GB that corresponds to the AllocatedSize column value.
Let’s then have a look at the physical disks in the Pool_SQL storage pool:
# Get storage pool physical disks
Get-StoragePool Pool_SQL | Get-PhysicalDisk | Group MediaType, Size, BusType | Sort Name | select Count, Name
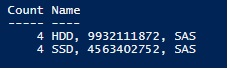
As expected, the storage pool includes 4 SSD disks for a total size of 4GB as well as 4 HDD disks for a total size of 9GB according to the above picture. Don’t forget to take into account the reserved space as said earlier.
Now it’s time to create our two storage tiers. As a reminder, my lab environment is very limited with only 4 virtual disks that may be pooled. It means that I may only define one mirror resilient based configuration with mirror two-way layout that requires a minimum of 2 disks (one disk for the source data and one disk dedicated for data copy that corresponds respectively to NumberofColumns= 1 and PhysicalDiskRedundancy = 1 parameters). A mirror three-way layout would require a minimum number of 5 disks, so it is not affordable in my case. I also have defined a parity resilient based configuration (with LRC erasure) that requires a minimum of 3 disks and will support one drive failure (in my case, I enrolled 4 disks).
$s = New-StorageTier –StoragePoolFriendlyName Pool_SQL -FriendlyName SSDTier -MediaType SSD -ResiliencySettingName Mirror -NumberOfColumns 1 -PhysicalDiskRedundancy 1
$h = New-StorageTier –StoragePoolFriendlyName Pool_SQL -FriendlyName HDDTier -MediaType HDD -ResiliencySettingName Parity -NumberOfColumns 4 -PhysicalDiskRedundancy 1
After defining each storage tier, let’s have a look at the supported size in each case (mirror or parity):
- SSD tier
Get-StorageTierSupportedSize SSDTier -ResiliencySettingName Mirror | FT -AutoSize
Get-StorageTierSupportedSize SSDTier -ResiliencySettingName Parity | FT -AutoSize
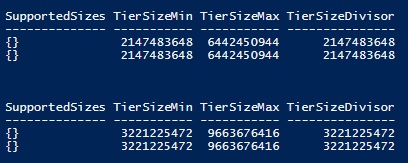
For either the mirror or parity resilient based configuration, the minimum pool size will be 2GB. However for mirror resilient based configuration the maximum size will be 6GB (3GB * 4 disks / 2) whereas for parity resilient based configuration the maximum size will be 9GB (3GB * 3 disks). The remaining disk will be used to store parity data.
- HDD tier
Get-StorageTierSupportedSize HDDTier -ResiliencySettingName Mirror | FT -AutoSize
Get-StorageTierSupportedSize HDDTier -ResiliencySettingName Parity | FT -AutoSize
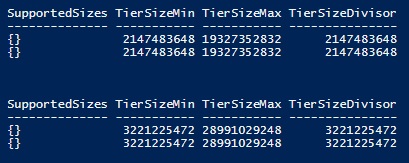
I let you perform the math by yourself:-)
So we have defined two tiers and we are now able to create a new virtual disk that uses multi-resiliency capability. The new virtual disk will be created as a clustered shared volume (CSV) and formatted by using ReFs filesystem (CSVFS_ReFS).
# Create new volume with multi-resiliency tiers
New-Volume -StoragePoolFriendlyName Pool_SQL -FriendlyName Volume_SQL -FileSystem CSVFS_ReFS -StorageTiers $s,$h -StorageTierSizes 4GB,6GB -ProvisioningType Fixed

Let’s take a look at the new created volume:
Get-Volume | ? FileSystemLabel -eq "Volume_SQL" | ft FileSystemLabel, FileSystemType, AllocationUnitSize, @{Name="Size_GB";Expression={$_.Size / 1GB}}

… and at the new virtual disk
Get-VirtualDisk Volume_SQL | ft FriendlyName, NumberOf*, ResiliencySettingName -AutoSize

At this point, we could be surprised to see only the Mirror Resiliency setting name (instead of viewing both Mirror + Parity resiliency setting names). At this point, my assumption is that Refs always writes into the mirror tier as stated by Klaus in his blog post so viewing only the Mirror doesn’t make sense.

Ok, our storage and our virtual disks are ready for use. That’s all for this blog post. Of course, there are many other interesting items to study about this feature. I hope to have the opportunity to take a closer look at what we can really do with this storage feature in the future. Stay tuned!
By David Barbarin
![Thumbnail [60x60]](https://www.dbi-services.com/blog/wp-content/uploads/2022/12/microsoft-square.png)
![Thumbnail [90x90]](https://www.dbi-services.com/blog/wp-content/uploads/2022/11/TBR-web-min-scaled.jpg)
![Thumbnail [90x90]](https://www.dbi-services.com/blog/wp-content/uploads/2022/08/FRJ_web-min-scaled.jpg)
![Thumbnail [90x90]](https://www.dbi-services.com/blog/wp-content/uploads/2024/03/AHI_web.jpg)