In Rancher, if you make use of node drivers to provision your RKE2 nodes, you can also make use of the cluster autoscaler. In this article, I will show you how simply you can configure the autoscaler for your cluster.
Rancher official documentation: Rancher
RKE2 official documentation: RKE2
Cluster autoscaler
Cluster autoscaler is a tool that automatically adjusts the size of the Kubernetes cluster when one of the following conditions is true:
- There are pods that failed to run in the cluster due to insufficient resources.
- There are nodes in the cluster that have been underutilized for an extended period of time and their pods can be placed on other existing nodes.
For more details: https://github.com/kubernetes/autoscaler/tree/master/cluster-autoscaler
Get started
As stated previously, as long as you use node drivers for your RKE2 cluster, the cluster autoscaler should work. There are multiple cloud providers for Cluster Autoscaler, in our case, we will use Rancher.
Cluster autoscaler will use the API of Rancher to adjust the size of the cluster.
RKE2 cluster
We will provision an RKE2 cluster with node drivers. We want at least two pools of machines, one for the control plane and another one for workers that will be autoscale automatically.
- Control plane pool: 1 machine (control plane and etcd)
- Worker pool: 1 machine (worker)
This section will show an example for AWS.
Let’s start an RKE2 cluster on AWS with node drivers.
For the IAM configuration, creation of access key, and cloud credentials, please follow the prerequisite provided by Rancher: https://ranchermanager.docs.rancher.com/how-to-guides/new-user-guides/launch-kubernetes-with-rancher/use-new-nodes-in-an-infra-provider/create-an-amazon-ec2-cluster#prerequisites
Once you have a cloud credential for AWS, you can create the cluster as follows.
Be sure to select RKE2.
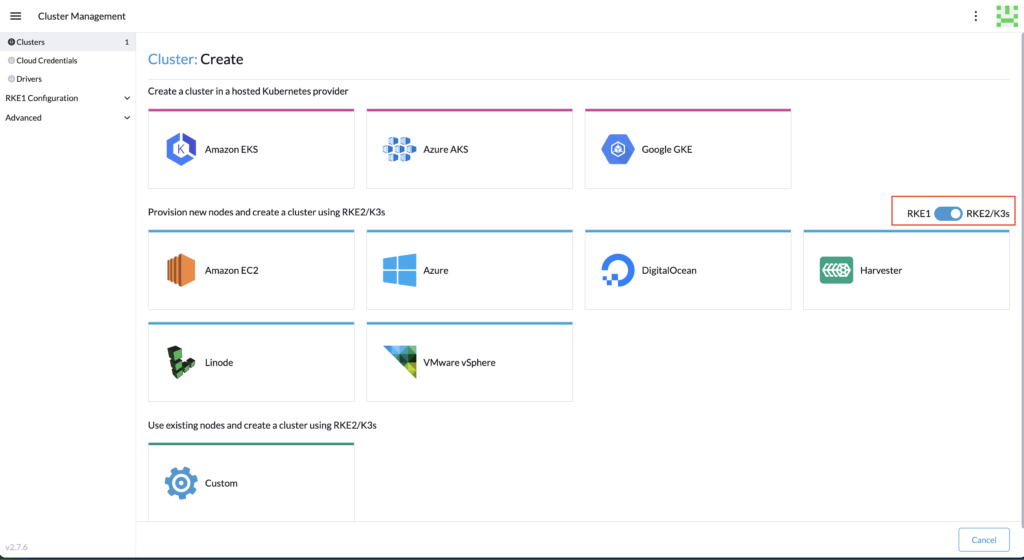
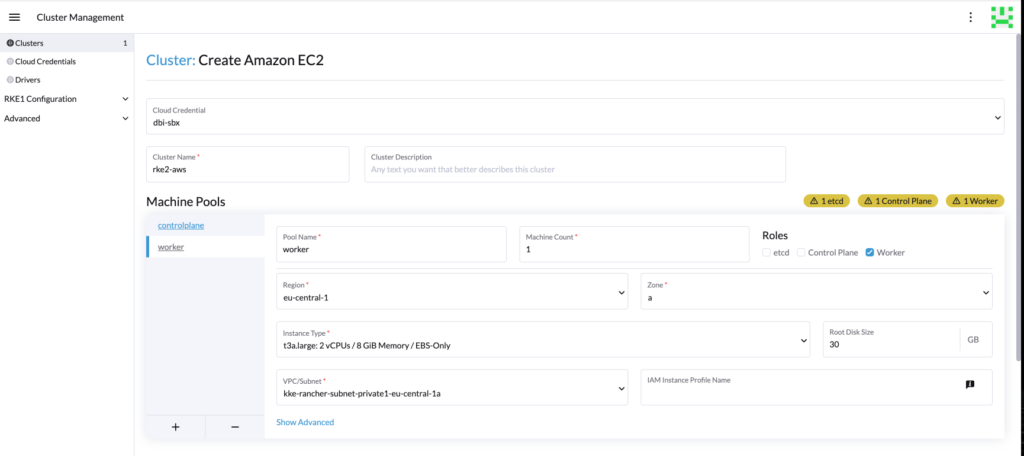
Create at least two pools, one for the control plane, and another one for the workers. Adapt the configuration (region, instance, VPC, etc.).
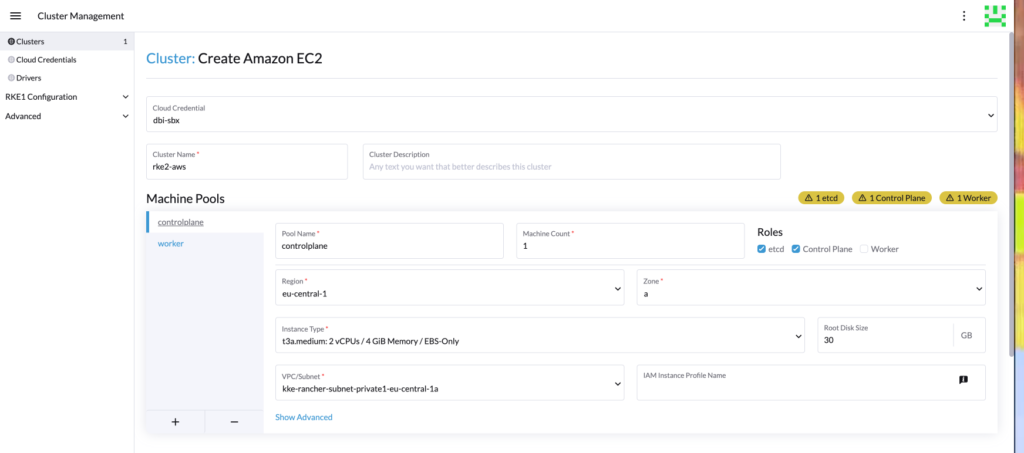
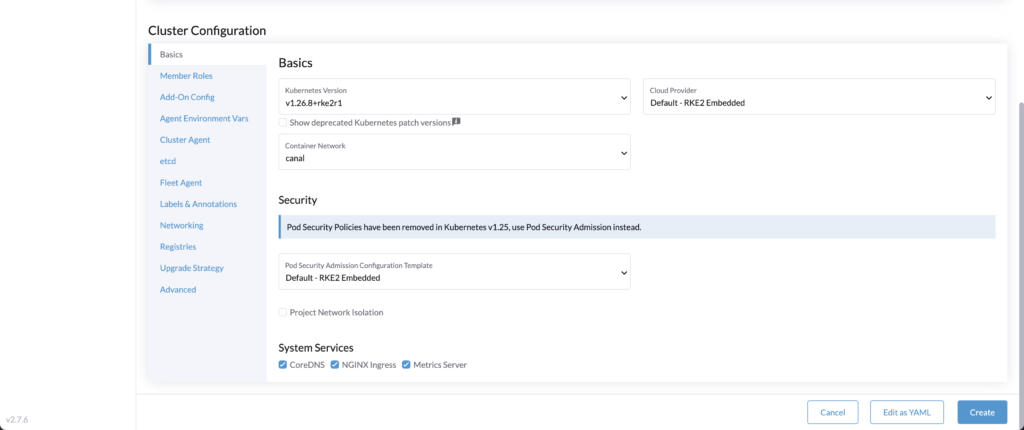
Then setup the RKE2 configuration as you wish, for our demo, we are using a 1.26 version.
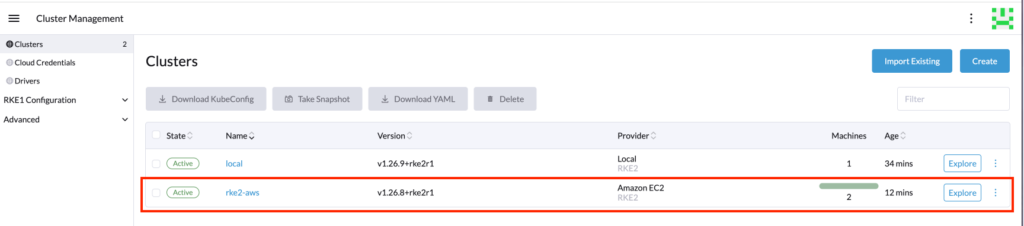
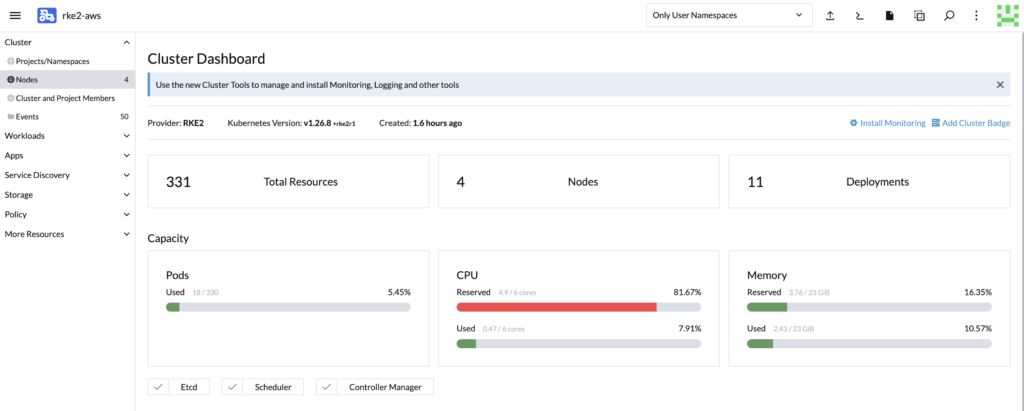
Now that we have the following RKE2 cluster:
- Control plane pool: 1 machine (control plane and etcd)
- Worker pool: 1 machine (worker)
We will see how to install and configure the autoscaler.
Deployment of configuration
To enable the cluster autoscaler, we need to deploy it into the cluster with the correct configuration.
First, we need to setup the service account and roles into the RKE2 cluster.
Deploy the following:
---
apiVersion: v1
kind: ServiceAccount
metadata:
  labels:
    k8s-addon: cluster-autoscaler.addons.k8s.io
    k8s-app: cluster-autoscaler
  name: cluster-autoscaler
  namespace: kube-system
---
apiVersion: rbac.authorization.k8s.io/v1
kind: ClusterRole
metadata:
  name: cluster-autoscaler
  labels:
    k8s-addon: cluster-autoscaler.addons.k8s.io
    k8s-app: cluster-autoscaler
rules:
  - apiGroups: [""]
    resources: ["events", "endpoints"]
    verbs: ["create", "patch"]
  - apiGroups: [""]
    resources: ["pods/eviction"]
    verbs: ["create"]
  - apiGroups: [""]
    resources: ["pods/status"]
    verbs: ["update"]
  - apiGroups: [""]
    resources: ["endpoints"]
    resourceNames: ["cluster-autoscaler"]
    verbs: ["get", "update"]
  - apiGroups: [""]
    resources: ["nodes"]
    verbs: ["watch", "list", "get", "update"]
  - apiGroups: [""]
    resources:
      - "pods"
      - "services"
      - "replicationcontrollers"
      - "persistentvolumeclaims"
      - "persistentvolumes"
      - "namespaces"
    verbs: ["watch", "list", "get"]
  - apiGroups: ["extensions"]
    resources: ["replicasets", "daemonsets"]
    verbs: ["watch", "list", "get"]
  - apiGroups: ["policy"]
    resources: ["poddisruptionbudgets"]
    verbs: ["watch", "list"]
  - apiGroups: ["apps"]
    resources: ["statefulsets", "replicasets", "daemonsets"]
    verbs: ["watch", "list", "get"]
  - apiGroups: ["storage.k8s.io"]
    resources: ["storageclasses", "csinodes","csistoragecapacities","csidrivers"]
    verbs: ["watch", "list", "get"]
  - apiGroups: ["batch", "extensions"]
    resources: ["jobs"]
    verbs: ["get", "list", "watch", "patch"]
  - apiGroups: ["coordination.k8s.io"]
    resources: ["leases"]
    verbs: ["create"]
  - apiGroups: ["coordination.k8s.io"]
    resourceNames: ["cluster-autoscaler"]
    resources: ["leases"]
    verbs: ["get", "update"]
---
apiVersion: rbac.authorization.k8s.io/v1
kind: Role
metadata:
  name: cluster-autoscaler
  namespace: kube-system
  labels:
    k8s-addon: cluster-autoscaler.addons.k8s.io
    k8s-app: cluster-autoscaler
rules:
  - apiGroups: [""]
    resources: ["configmaps"]
    verbs: ["create","list","watch"]
  - apiGroups: [""]
    resources: ["configmaps"]
    resourceNames: ["cluster-autoscaler-status", "cluster-autoscaler-priority-expander"]
    verbs: ["delete", "get", "update", "watch"]
---
apiVersion: rbac.authorization.k8s.io/v1
kind: ClusterRoleBinding
metadata:
  name: cluster-autoscaler
  labels:
    k8s-addon: cluster-autoscaler.addons.k8s.io
    k8s-app: cluster-autoscaler
roleRef:
  apiGroup: rbac.authorization.k8s.io
  kind: ClusterRole
  name: cluster-autoscaler
subjects:
  - kind: ServiceAccount
    name: cluster-autoscaler
    namespace: kube-system

---
apiVersion: rbac.authorization.k8s.io/v1
kind: RoleBinding
metadata:
  name: cluster-autoscaler
  namespace: kube-system
  labels:
    k8s-addon: cluster-autoscaler.addons.k8s.io
    k8s-app: cluster-autoscaler
roleRef:
  apiGroup: rbac.authorization.k8s.io
  kind: Role
  name: cluster-autoscaler
subjects:
  - kind: ServiceAccount
    name: cluster-autoscaler
    namespace: kube-system
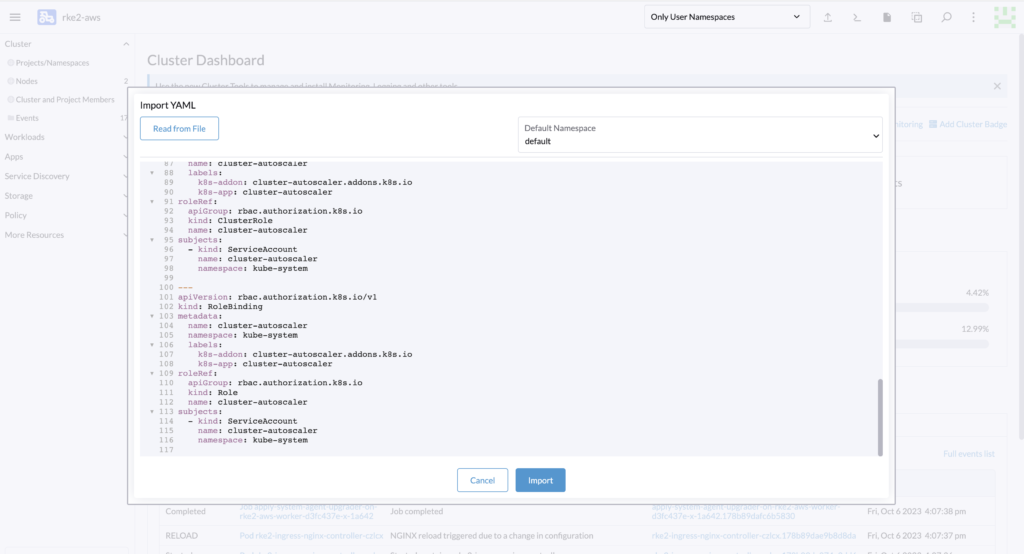
You can copy-paste and import it easily with the Rancher web interface.
Then to allow the autoscaler to directly call Rancher and adjust the size of the cluster via API call, we will need to get the following:
- Rancher URL
- Rancher token
- Cluster name
- Rancher CA certificate
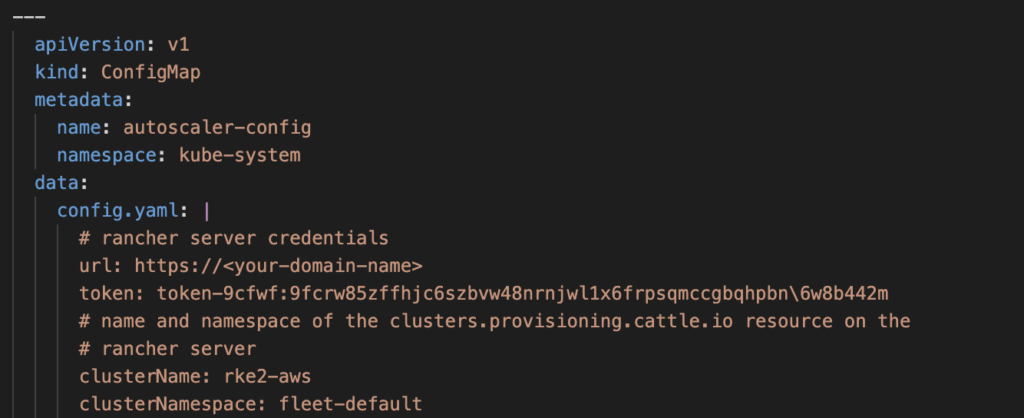
This information will be inserted into the following YAML.
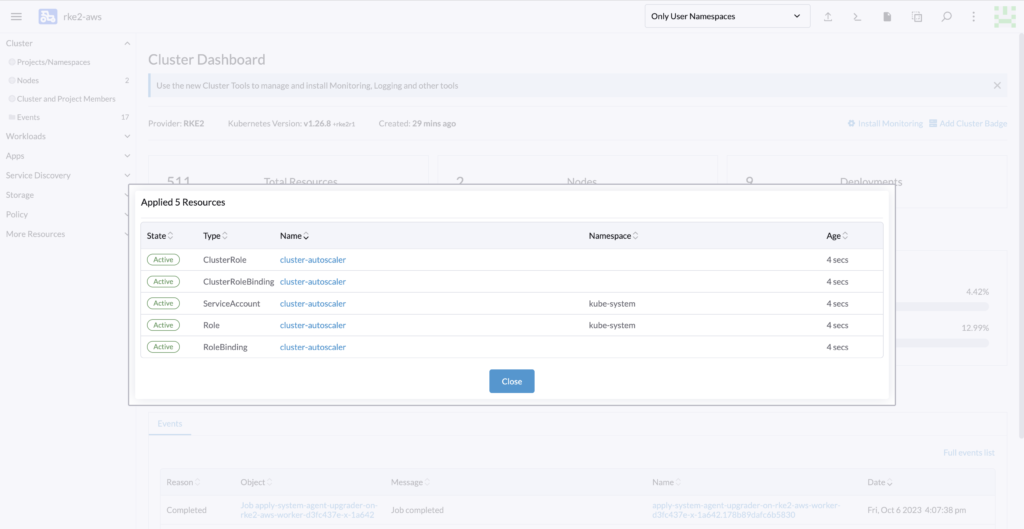
All those resources are needed to monitor and communicate with Rancher to scale the cluster.
---
apiVersion: v1
kind: ConfigMap
metadata:
name: autoscaler-config
namespace: kube-system
data:
config.yaml: |
# rancher server credentials
url: <rancher-url>
token: <rancher-token>
# name and namespace of the clusters.provisioning.cattle.io resource on the
# rancher server
clusterName: <cluster-name>
clusterNamespace: fleet-default
---
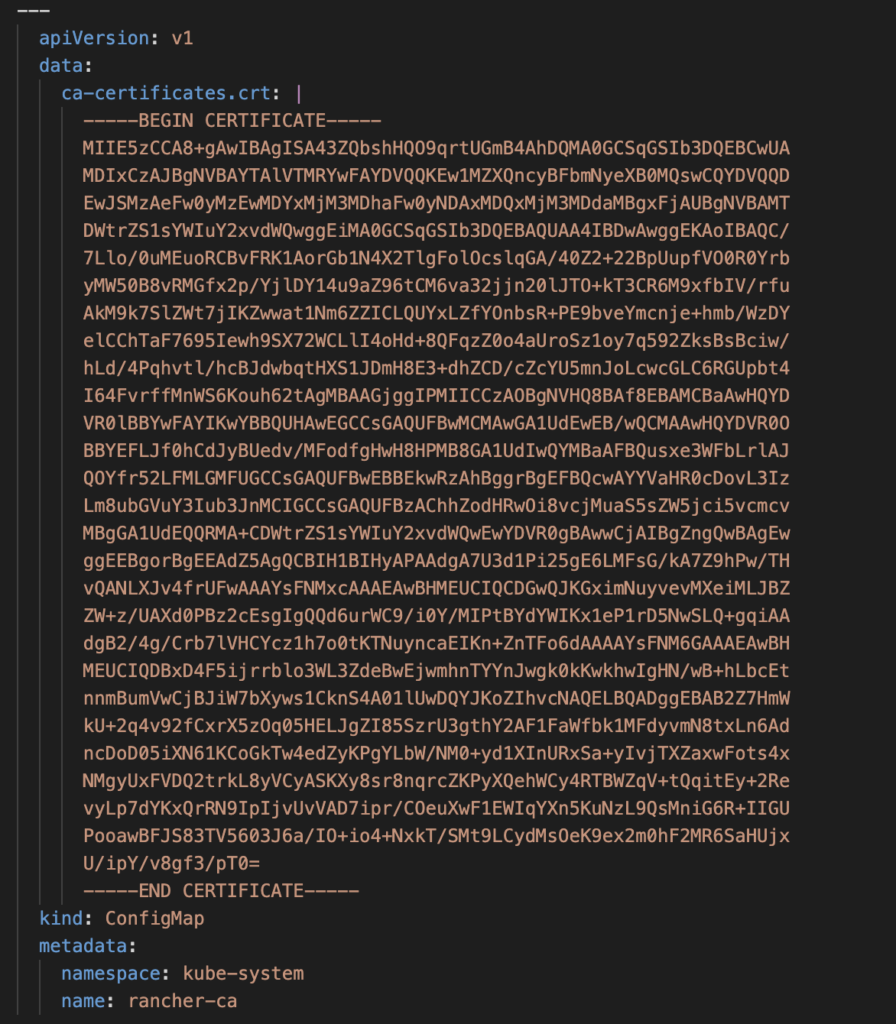
apiVersion: v1
data:
ca-certificates.crt: |
-----BEGIN CERTIFICATE-----
xxxxxxxxxxxxxxxxxxxxxxxxxxxxxxxxxxxxxxxxxxxxxxxxxxxxxxxxxxxx
xxxxxxxxxxxxxxxxxxxxxxxxxxxxxxxxxxxxxxxxxxxxxxxxxxxxxxxxxxxx
xxxxxxxxxxxxxxxxxxxxxxxxxxxxxxxxxxxxxxxxxxxxxxxxxxxxxxxxxxxx
xxxxxxxxxxxxxxxxxxxxxxxxxxxxxxxxxxxxxxxxxxxxxxxxxxxxxxxxxxxx
xxxxxxxxxxxxxxxxxxxxxxxxxxxxxxxxxxxxxxxxxxxxxxxxxxxxxxxxxxxx
xxxxxxxxxxxxxxxxxxxxxxxxxxxxxxxxxxxxxxxxxxxxxxxxxxxxxxxxxxxx
xxxxxxxxxxxxxxxxxxxxxxxxxxxxxxxxxxxxxxxxxxxxxxxxxxxxxxxxxxxx
xxxxxxxxxxxxxxxxxxxxxxxxxxxxxxxxxxxxxxxxxxxxxxxxxxxxxxxxxxxx
xxxxxxxxxxxxxxxxxxxxxxxxxxxxxxxxxxxxxxxxxxxxxxxxxxxxxxxxxxxx
xxxxxxxxxxxxxxxxxxxxxxxxxxxxxxxxxxxxxxxxxxxxxxxxxxxxxxxxxxxx
xxxxxxxxxxxxxxxxxxxxxxxxxxxxxxxxxxxxxxxxxxxxxxxxxxxxxxxxxxxx
xxxxxxxxxxxxxxxxxxxxxxxxxxxxxxxxxxxxxxxxxxxxxxxxxxxxxxxxxxxx
xxxxxxxxxxxxxxxxxxxxxxxxxxxxxxxxxxxxxxxxxxxxxxxxxxxxxxxxxxxx
xxxxxxxxxxxxxxxxxxxxxxxxxxxxxxxxxxxxxxxxxxxxxxxxxxxxxxxxxxxx
xxxxxxxxxxxxxxxxxxxxxxxxxxxxxxxxxxxxxxxxxxxxxxxxxxxxxxxxxxxx
xxxxxxxxxxxxxxxxxxxxxxxxxxxxxxxxxxxxxxxxxxxxxxxxxxxxxxxxxxxx
-----END CERTIFICATE-----
kind: ConfigMap
metadata:
namespace: kube-system
name: rancher-ca
---
apiVersion: apps/v1
kind: Deployment
metadata:
name: cluster-autoscaler
namespace: kube-system
labels:
app: cluster-autoscaler
spec:
replicas: 1
selector:
matchLabels:
app: cluster-autoscaler
template:
metadata:
labels:
app: cluster-autoscaler
annotations:
prometheus.io/scrape: 'true'
prometheus.io/port: '8085'
spec:
priorityClassName: system-cluster-critical
securityContext:
runAsNonRoot: true
runAsUser: 65534
fsGroup: 65534
seccompProfile:
type: RuntimeDefault
serviceAccountName: cluster-autoscaler
tolerations:
- effect: NoSchedule
operator: "Exists"
key: node-role.kubernetes.io/control-plane
- effect: NoExecute
operator: "Exists"
key: node-role.kubernetes.io/etcd
nodeSelector:
node-role.kubernetes.io/control-plane: 'true'
containers:
- image: registry.k8s.io/autoscaling/cluster-autoscaler:v1.26.1
name: cluster-autoscaler
resources:
limits:
cpu: 100m
memory: 600Mi
requests:
cpu: 100m
memory: 600Mi
command:
- ./cluster-autoscaler
- --v=4
- --stderrthreshold=info
- --cloud-provider=rancher
- --cloud-config=/mnt/config.yaml
- --skip-nodes-with-local-storage=false
volumeMounts:
- name: ssl-certs
mountPath: /etc/ssl/certs
readOnly: true
- name: autoscaler-config
mountPath: /mnt/config.yaml
subPath: config.yaml
readOnly: true
imagePullPolicy: "Always"
securityContext:
allowPrivilegeEscalation: false
capabilities:
drop:
- ALL
readOnlyRootFilesystem: true
volumes:
- name: autoscaler-config
configMap:
name: autoscaler-config
- name: ssl-certs
configMap:
name: rancher-ca
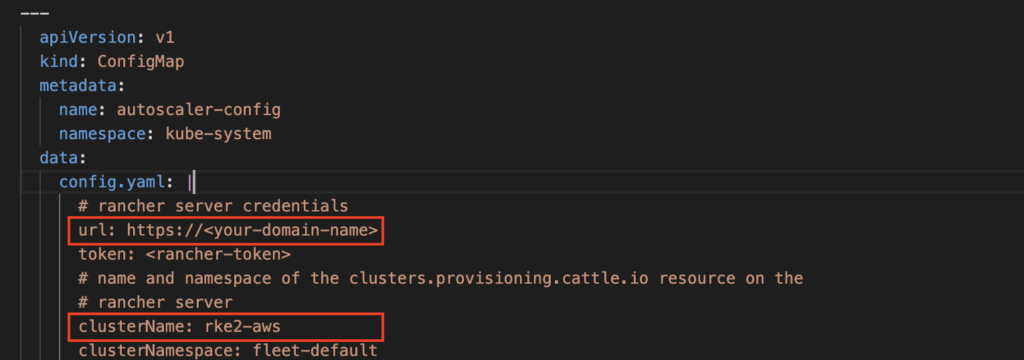
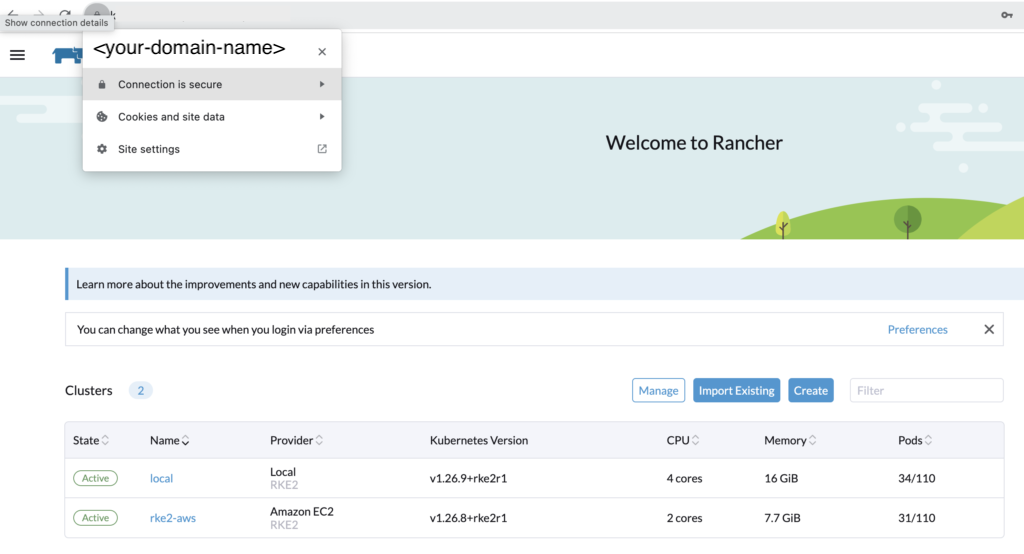
Let’s first add the URL and name of the cluster. In my demo it will be “https://<your-domain-name>” and rke2-aws”.
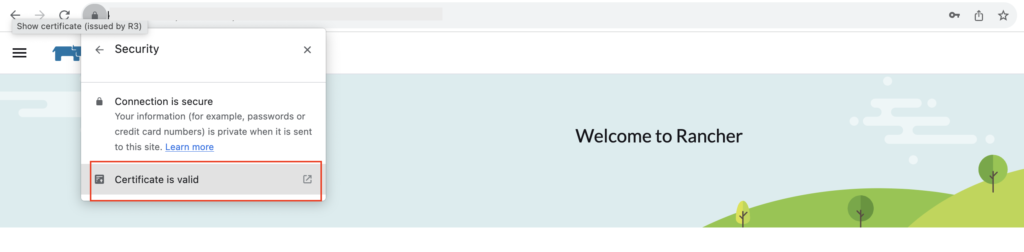
Let’s get the CA certificate directly from the browser:
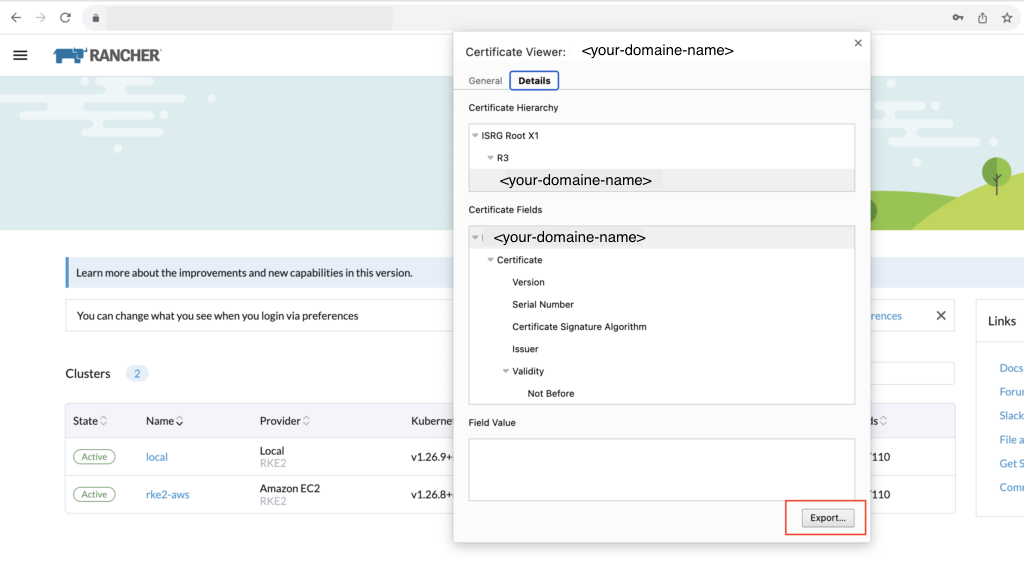
Copy the content of the file into the YAML.
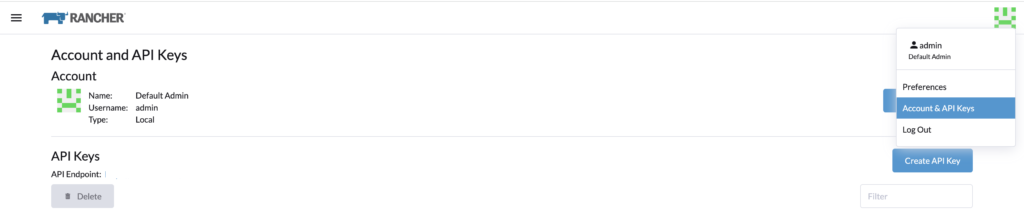
Generate a token in Rancher. I am using the admin account and I select no scope.


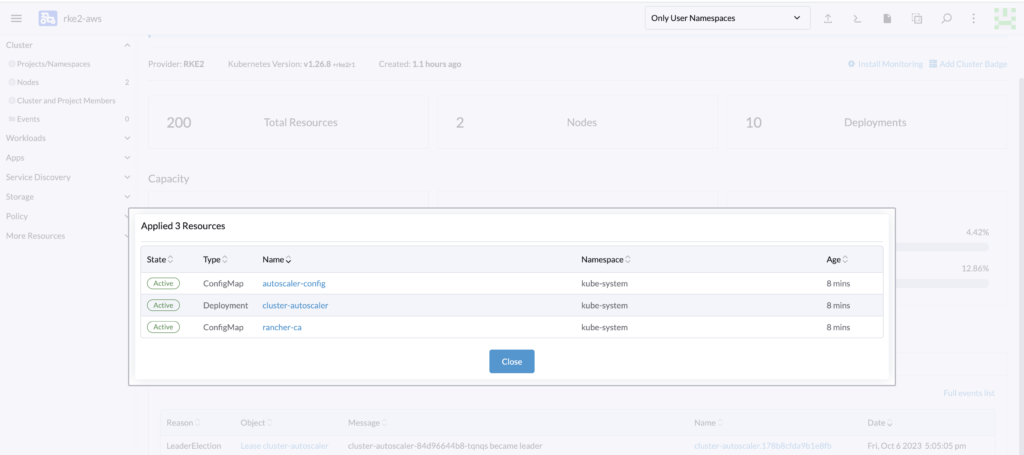
Proceed to deploy the YAML file into the cluster.
Now there is a final step, to specify which pools to scale and the minimum and maximum node for those pools.
Enable autoscaling on the cluster
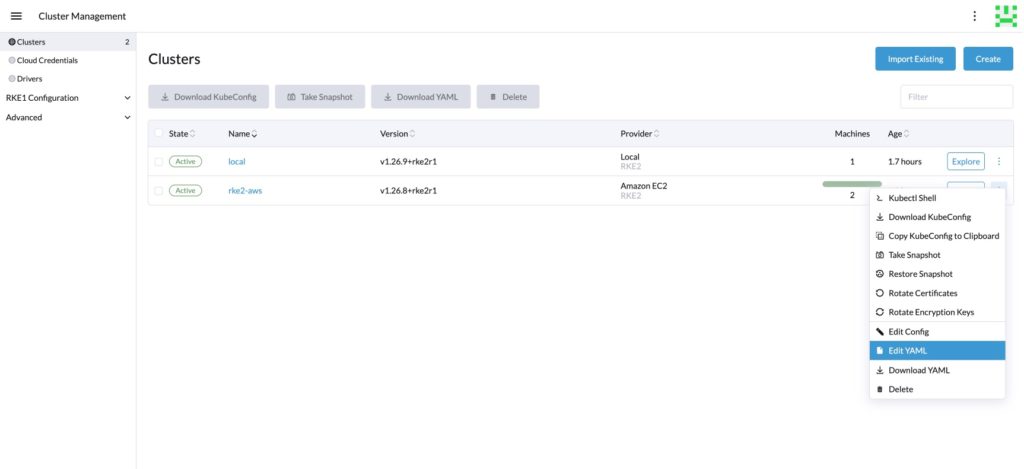
Now that the resources are ready, the last step to enable the autoscaling on the cluster is to modify the YAML of the cluster.
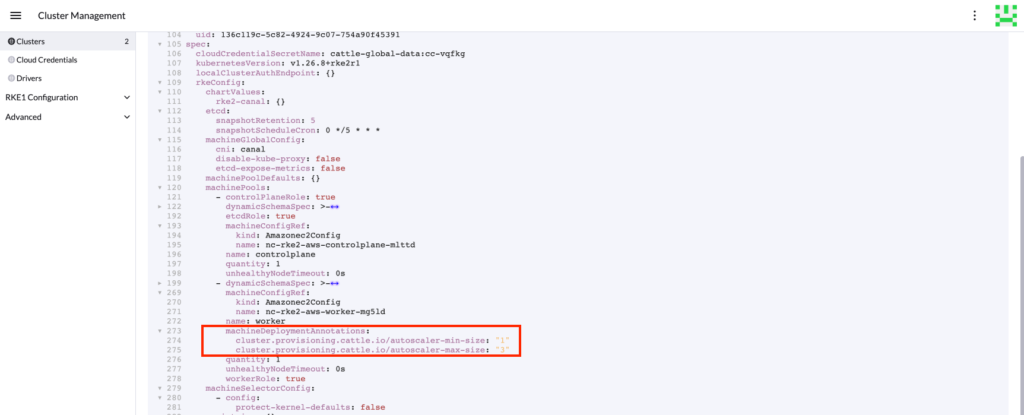
Find the machinePools to autoscale, add the following annotations, and save it.
machineDeploymentAnnotations:
  cluster.provisioning.cattle.io/autoscaler-min-size: "1"
  cluster.provisioning.cattle.io/autoscaler-max-size: "3"
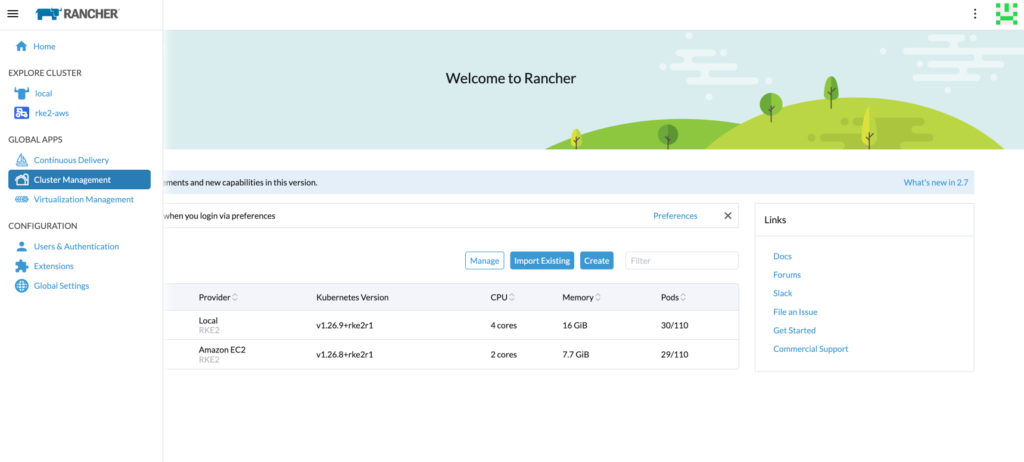
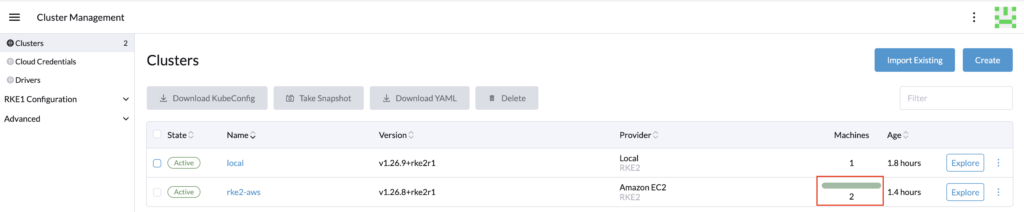
Testing
Our current cluster has two machines.
Let’s run the following deployment and see how it affects our cluster.
---
apiVersion: apps/v1
kind: Deployment
metadata:
  labels:
    app: nginx
  name: nginx
spec:
  replicas: 3
  selector:
    matchLabels:
      app: nginx
  strategy:
    rollingUpdate:
      maxSurge: 1
      maxUnavailable: 0
    type: RollingUpdate
  template:
    metadata:
      labels:
        app: nginx
    spec:
      containers:
      - image: nginx:latest
        imagePullPolicy: Always
        name: nginx
        ports:
        - containerPort: 80
          protocol: TCP
        resources:
          limits:
            cpu: 1000m
            memory: 1024Mi
          requests:
            cpu: 1000m
            memory: 1024Mi
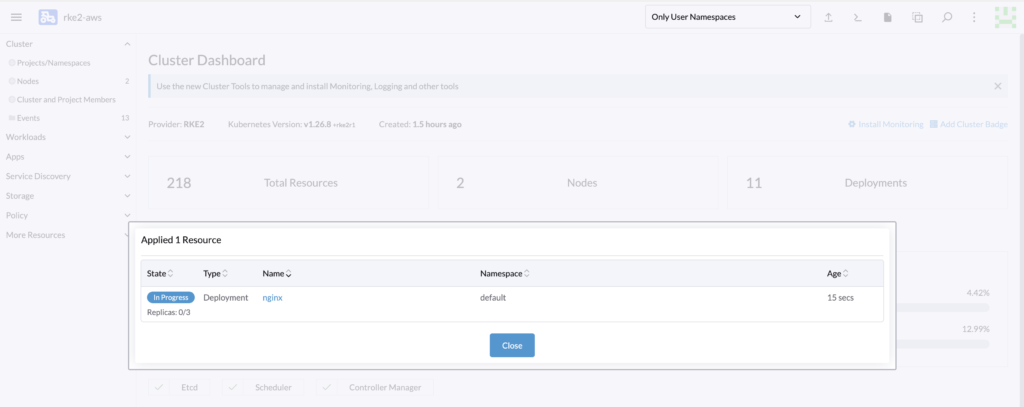
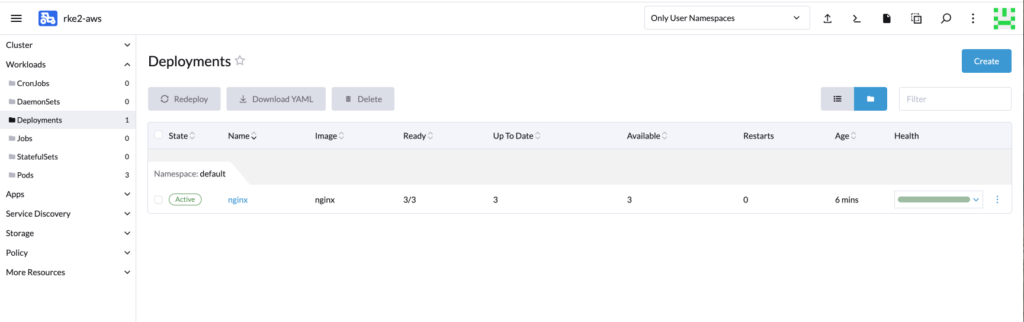
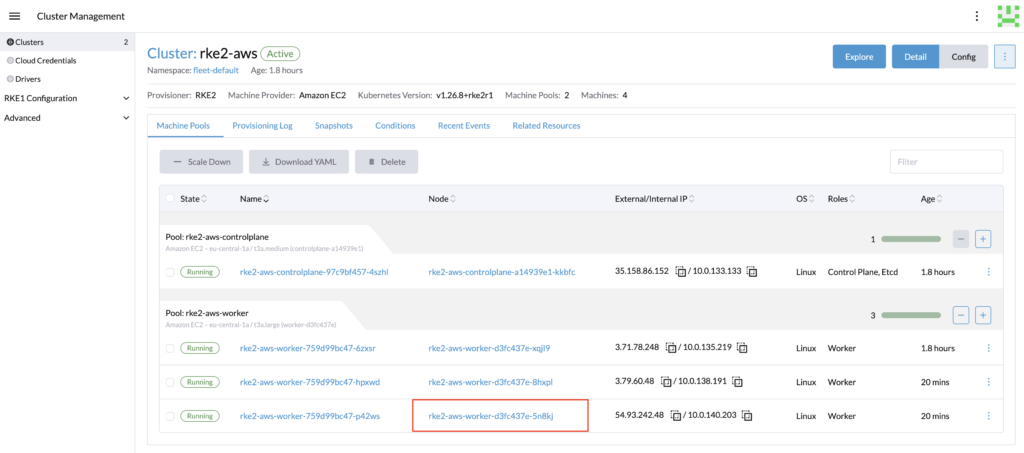
Do not hesitate to modify the number of replicas of the deployment to force your cluster to scale up if needed. In this cluster, the deployment cannot create all the replicas due to insufficient resources.
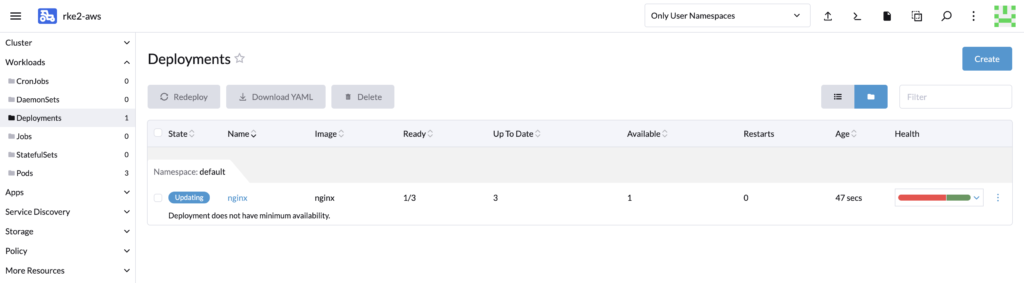
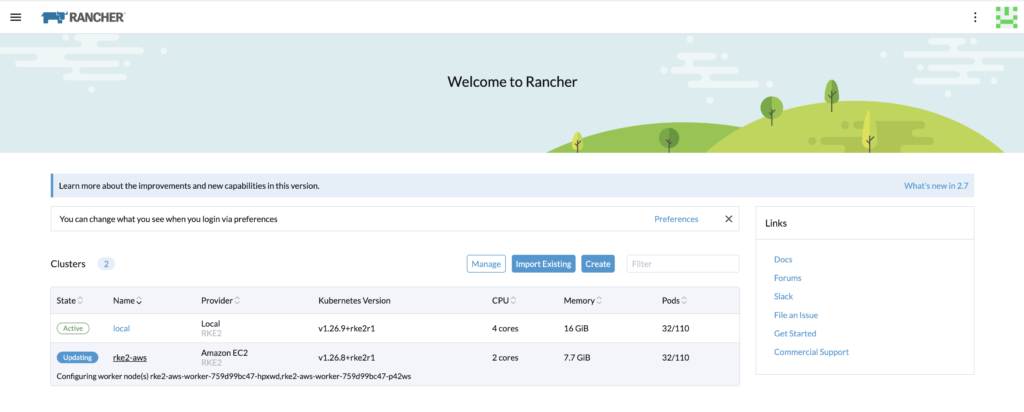
We can see that the cluster has been scaled up automatically.
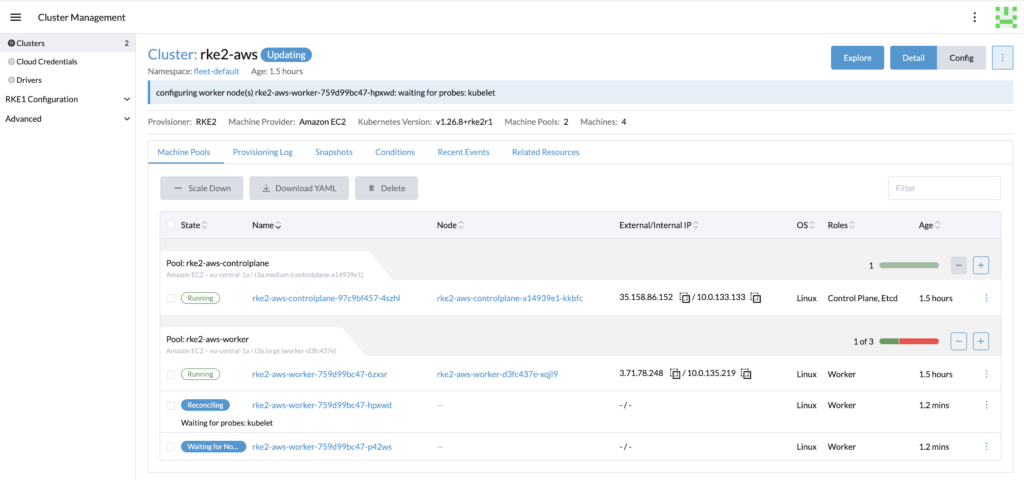
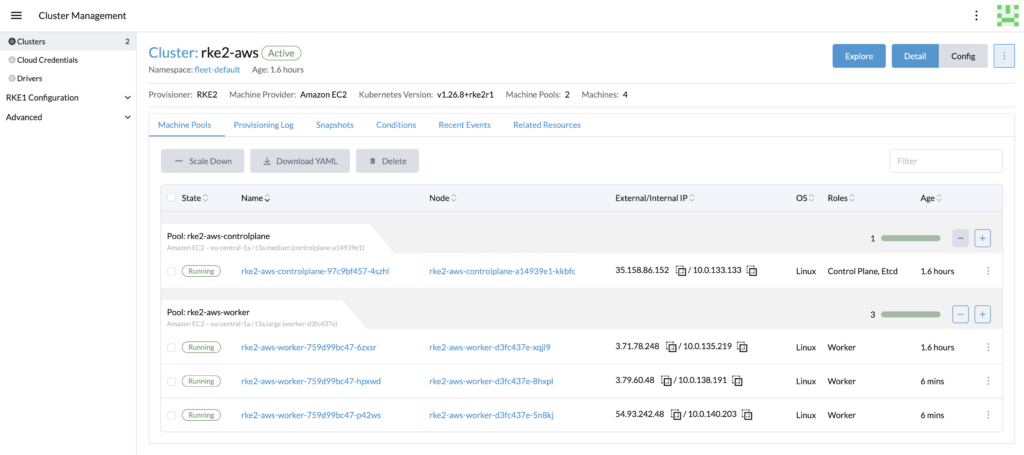
Once the provisioning of the new worker nodes is complete, the deployment should be good.
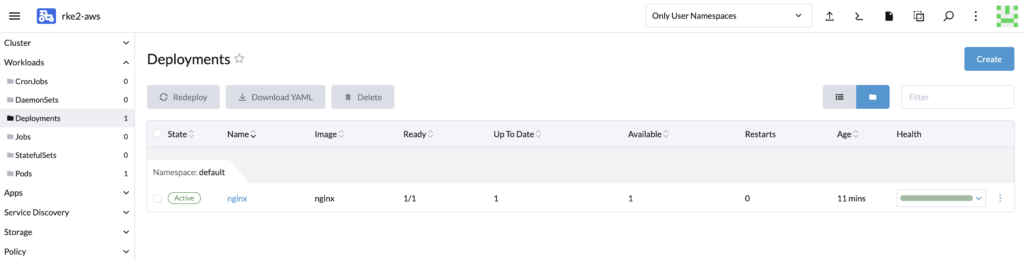
Now let’s scale down the replicas of the deployment and wait 10 minutes.
While waiting, you can also monitor the logs of the autoscaler to verify that it is indeed monitoring the cluster.
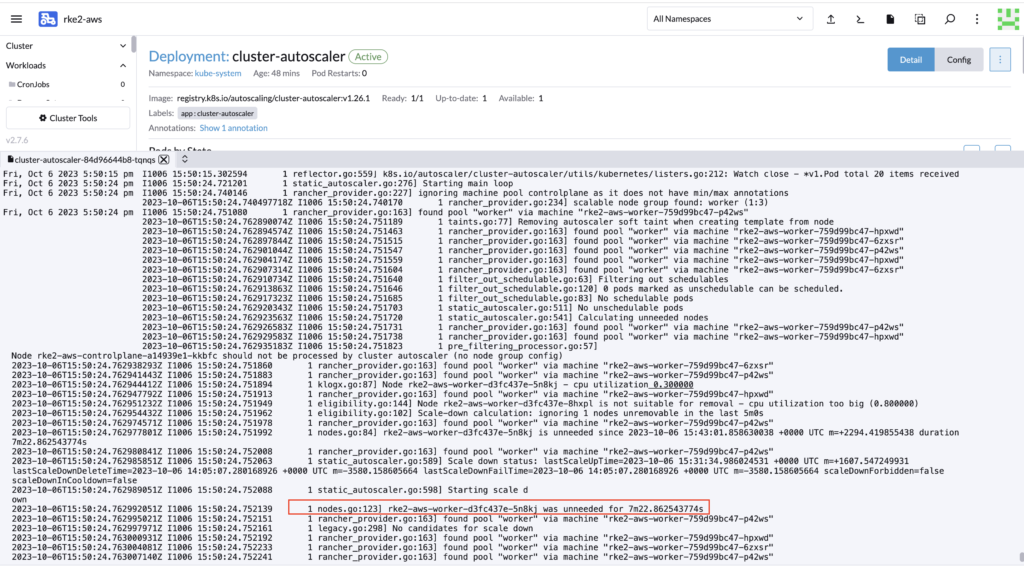
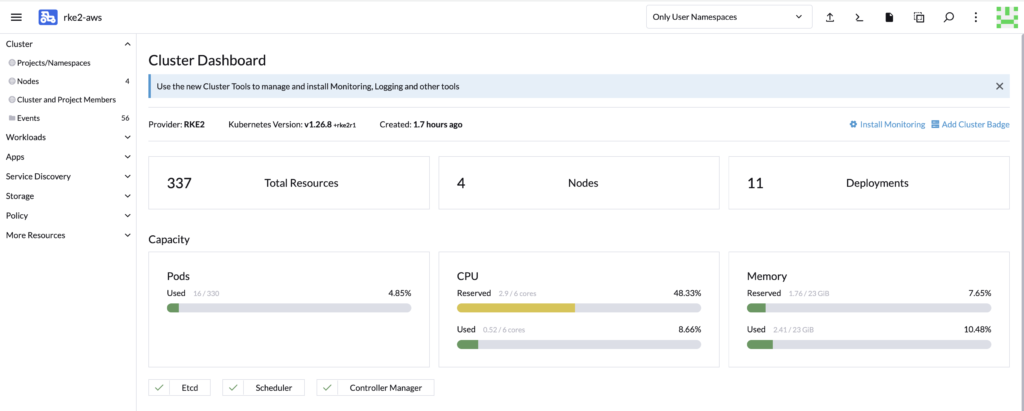
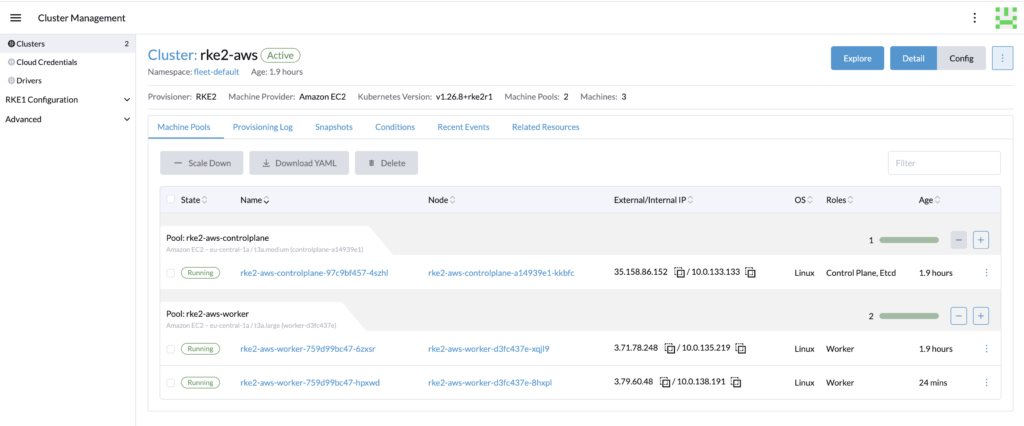
The cluster should has been automatically scale down.
Conclusion
Cluster autoscaling is a great feature that greatly enhances your cluster health by adding more nodes if needed. And it is quite fast and easy to set up for RKE2 clusters! To go even further, check this article that explains how to set up Rancher roles for the cluster autoscaler to avoid using an admin token.
Links
Rancher official documentation: Rancher
RKE2 official documentation: RKE2
GitHub cluster autoscaler: https://github.com/kubernetes/autoscaler/tree/master/cluster-autoscaler
Blog – Rancher RKE2: Rancher roles for cluster autoscaler
https://www.dbi-services.com/blog/rancher-rke2-rancher-roles-for-cluster-autoscaler/
Blog – Reestablish administrator role access to Rancher users
https://www.dbi-services.com/blog/reestablish-administrator-role-access-to-rancher-users/
Blog – Introduction and RKE2 cluster template for AWS EC2
https://www.dbi-services.com/blog/rancher-rke2-cluster-templates-for-aws-ec2
Blog – Rancher RKE2 templates – Assign members to clusters
https://www.dbi-services.com/blog/rancher-rke2-templates-assign-members-to-clusters
![Thumbnail [90x90]](https://www.dbi-services.com/blog/wp-content/uploads/2022/08/GRE_web-min-scaled.jpg)
![Thumbnail [90x90]](https://www.dbi-services.com/blog/wp-content/uploads/2022/08/ADE_WEB-min-scaled.jpg)
![Thumbnail [90x90]](https://www.dbi-services.com/blog/wp-content/uploads/2022/08/NME_web-min-scaled.jpg)
alfiann11
07.06.2024Hi, thanks for your comprehensive how-to.
I had followed carefully your steps, however I've encountered an issue in autoscaler pods, it says:
│ I0607 20:53:54.304401 1 cloud_provider_builder.go:29] Building rancher cloud provider. │
│ F0607 20:53:54.522891 1 rancher_provider.go:69] failed to create rancher cloud provider: failed to find API group "cluster.x-k8s.io"
I have added to my ClusterRole, according to this new docs: https://github.com/kubernetes/autoscaler/blob/master/cluster-autoscaler/cloudprovider/rancher/README.md:
```
- apiGroups: ["provisioning.cattle.io"]
resources: ["clusters"]
verbs: ["get", "update"]
- apiGroups: ["cluster.x-k8s.io"]
resources: ["machines"]
verbs: ["list"]
```
However, it stays the same state.
My RKE2 is v1.28.9 +rke2r1.
Any help will be appreciated, thanks!
Hello,
This role should be added in the cluster role of Rancher and not on the downstream cluster.
You can follow this other article where I talk about the cluster roles for Rancher for the autoscaler.
https://www.dbi-services.com/blog/rancher-rke2-rancher-roles-for-cluster-autoscaler/
Here I was using an admin account, therefore the token used already have all the permissions. That's why I skipped that part.