Welcome back in this blog post series about Kubernetes Networking by using Cilium. In the previous post about network interfaces, we’ve looked at how we can identify all the interfaces that will be involved in the routing between pods. I’ve also explained the routing in a Kubernetes cluster with Cilium in a non technical language in this blog post. Let’s now see it into actions for the techies!
Below is the drawing of where we left off:
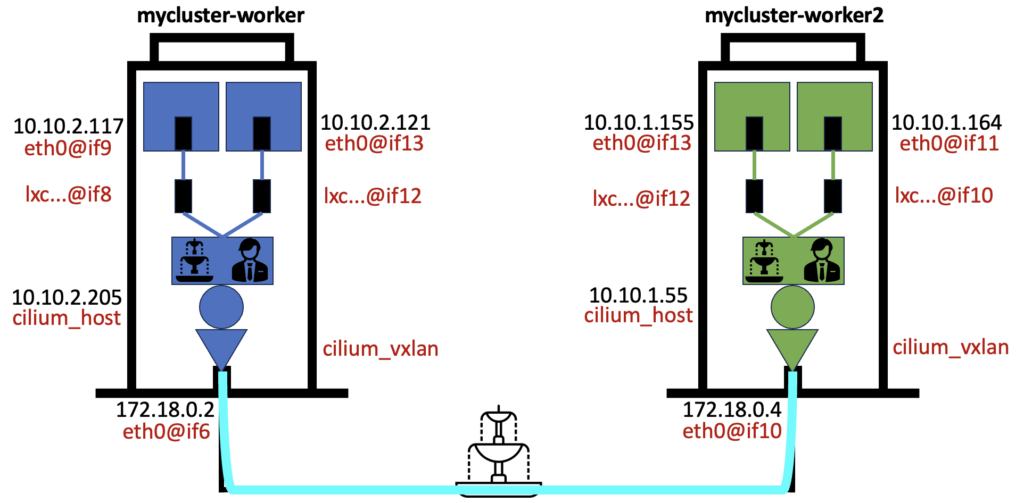
We will continue to use the same method, you are the packet that will travel from your apartment (pod) 10.10.2.117 on the top left to other pods in this Kubernetes cluster. But first, let’s take this opportunity to talk about namespace and enrich our drawing with a new analogy.
Routing between namespaces
A namespace is a logical group of objects that provide isolation in the cluster. However, by default, all pods can communicate together in a “vanilla” Kubernetes. Whatever they belong to the same namespace or not. So this isolation provided by namespace doesn’t mean the pods can’t communicate together. To allow or deny such communication, you will need to create network policies. That could be the topic for another blog post!
We can use the analogy of a namespace being the same floor number of all building of our cluster. All apartments on the same floor in each building will be logically grouped into the same namespace. This is what we can see below in our namespace called networking101:
$ kubectl get po -n networking101 -owide
NAME                        READY   STATUS    RESTARTS       AGE    IP            NODE                NOMINATED NODE   READINESS GATES
busybox-c8bbbbb84-fmhwc     1/1     Running   1 (125m ago)   4d1h   10.10.1.164   mycluster-worker2   <none>           <none>
busybox-c8bbbbb84-t6ggh     1/1     Running   1 (125m ago)   4d1h   10.10.2.117   mycluster-worker    <none>           <none>
netshoot-7d996d7884-fwt8z   1/1     Running   0              103m   10.10.2.121   mycluster-worker    <none>           <none>
netshoot-7d996d7884-gcxrm   1/1     Running   0              103m   10.10.1.155   mycluster-worker2   <none>           <none>
That’s our 4 apartments / pods on the same floor, grouped together in one namespace:

The routing process doesn’t care about the pod’s namespace, only its destination IP Address will be used. Let’s now see how we can go from the apartment 10.10.2.117 to the apartment 10.10.2.121 in the same building (node).
Pod to pod routing on the same node
From the pod 10.10.2.117, you’ve then decided to go to pay a visit to 10.10.2.121. You first look at the routing table in order to know how to reach this destination. But you can’t go out if you don’t also have the MAC Address of your destination. You need both destination information (IP Address and MAC Address) before you can start to travel. You then look at the ARP table to find out this information. The ARP table contains the known mapping of a MAC Address to an IP Address in your IP subnet. If it is not there, you send first a scout to knock at the door of each apartment in your community until you find the MAC Address of your destination. This is called the ARP request. When the scout comes back with that information, you write it into the ARP table. You thank the scout for his help and are now ready to start your travel by exiting the pod.
Let’s see how we can trace this in our source pod 10.10.2.117
$ kubectl exec -it -n networking101 busybox-c8bbbbb84-t6ggh -- ip route
default via 10.10.2.205 dev eth0
10.10.2.205 dev eth0 scope link
Very simple routing instruction! For every destination, you go through 10.10.2.205 by using your only network interface eth0 in the pod. You can see from the drawing above that 10.10.2.205 is the IP Address of the cilium_host. You then check your ARP table:
$ kubectl exec -it -n networking101 busybox-c8bbbbb84-t6ggh -- arp -a
The arp -a command list the content of the ARP table and we can see there is nothing in there.
A way to send a scout out is by using the arping tool toward our destination. You may have noticed that for my pods I’m using busybox and netshoot images. Both provide networking tools that are useful for troubleshooting:
$ kubectl exec -it -n networking101 busybox-c8bbbbb84-t6ggh -- arping 10.10.2.121
ARPING 10.10.2.121 from 10.10.2.117 eth0
Unicast reply from 10.10.2.121 [d6:21:74:eb:67:6b] 0.028ms
Unicast reply from 10.10.2.121 [d6:21:74:eb:67:6b] 0.092ms
Unicast reply from 10.10.2.121 [d6:21:74:eb:67:6b] 0.123ms
^CSent 3 probe(s) (1 broadcast(s))
Received 3 response(s) (0 request(s), 0 broadcast(s))
We now have the piece of information that was missing, the MAC address of our destination. We can then just check it is written into our ARP table of our source pod:
$ kubectl exec -it -n networking101 busybox-c8bbbbb84-t6ggh -- arp -a
? (10.10.2.205) at d6:21:74:eb:67:6b [ether]  on eth0
Here it is! However you may wonder why we don’t see here the IP Address of our destination 10.10.2.121 right? In traditional networking this is what you will see but here we are in a Kubernetes cluster and we are using Cilium that is taking care of the networking in it. Also we have seen above from the routing table of the source pod that for every destination we go to this cilium_host interface.
So the cilium_host on that node is attracting all the traffic even for communication between pods in the same IP subnet.
As a side note, below is a command where you can quickly display all the IP Addresses of the cilium_host and the nodes in your cluster in one shot:
$ kubectl get ciliumnodes
NAME                      CILIUMINTERNALIP   INTERNALIP   AGE
mycluster-control-plane   10.10.0.54         172.18.0.3   122d
mycluster-worker          10.10.2.205        172.18.0.2   122d
mycluster-worker2         10.10.1.55        172.18.0.4   122d
In traditional networking, doing L2 switching, the MAC Address of the destination is the one related to the destination IP Address. That is not the case here in Kubernetes networking. So which interface has the MAC Address d6:21:74:eb:67:6b ? Let’s respond to that question immediately:
$ sudo docker exec -it mycluster-worker ip a | grep -iB1 d6:21:74:eb:67:6b
9: lxc4a891387ff1a@if8: <BROADCAST,MULTICAST,UP,LOWER_UP> mtu 1500 qdisc noqueue state UP group default qlen 1000
    link/ether d6:21:74:eb:67:6b brd ff:ff:ff:ff:ff:ff link-netns cni-67a5da05-a221-ade5-08dc-64808339ad05
That is the LXC interface of the node as it is indeed our next step from the source pod to reach our destination. You’ve learned from my first post blog of this networking series that there is a servant waiting here at the LXC interface to direct us toward our destination.
From there, we don’t see much of the travel to the destination from the traditional Linux routing point of view. This is because the routing is done by the Cilium agent using eBPF. As the destination is in the same IP subnet as the source, the Cilium agent just switch it directly to the destination LXC interface and then reach the destination pod.
When the destination pod responds to the source, the same process occurs and for the sake of completeness let’s look at the routing table and ARP table in the destination pod:
$ kubectl exec -it -n networking101 netshoot-7d996d7884-fwt8z -- ip route
default via 10.10.2.205 dev eth0 mtu 1450
10.10.2.205 dev eth0 scope link

$ kubectl exec -it -n networking101 netshoot-7d996d7884-fwt8z -- arp -a
? (10.10.2.205) at 92:65:df:09:dd:28 [ether]  on eth0

$ sudo docker exec -it mycluster-worker ip a | grep -iB1 92:65:df:09:dd:28
13: lxce84a702bb02c@if12: <BROADCAST,MULTICAST,UP,LOWER_UP> mtu 1500 qdisc noqueue state UP group default qlen 1000
    link/ether 92:65:df:09:dd:28 brd ff:ff:ff:ff:ff:ff link-netns cni-d259ef79-a81c-eba6-1255-6e46b8d1c779
So from the traditional Linux routing point of view, everything goes to the cilium_host and the destination MAC address is the LXC interface of the node that is linked to our pod. This is exactly the same we have seen with our source pod.
Pod to pod routing on a different node
Let’s now have a look at how we could reach the pod 10.10.1.155 from the source pod 10.10.2.117 which is hosted in another node. The routing is the same at the beginning but when talking to the servant at the LXC interface, he sees that the destination IP Address doesn’t belong to the same IP subnet and so directs us to the cilium_host in the Lobby. From there we are routed to the cilium_vxlan interface to reach the node that host our destination pod.
Let’s now have a look at the routing table of the host:
$ sudo docker exec -it mycluster-worker ip route
default via 172.18.0.1 dev eth0
10.10.0.0/24 via 10.10.2.205 dev cilium_host proto kernel src 10.10.2.205 mtu 1450
10.10.1.0/24 via 10.10.2.205 dev cilium_host proto kernel src 10.10.2.205 mtu 1450
10.10.2.0/24 via 10.10.2.205 dev cilium_host proto kernel src 10.10.2.205
10.10.2.205 dev cilium_host proto kernel scope link
172.18.0.0/16 dev eth0 proto kernel scope link src 172.18.0.2
We don’t see much here as the routing is using eBPF and is managed by the Cilium agent as we’ve seen before.
As a side note and to share everything with you, the output of the network interfaces as well as the ip route in the Cilium agent pod is identical to the one of the node. This is because at startup the Cilium agent provides these information to the node. You can check the Cilium agent with the following commands:
$ kubectl exec -it -n kube-system cilium-dprvh -- ip a
$ kubectl exec -it -n kube-system cilium-dprvh -- ip route
So you go through the VXLAN tunnel and you reach the node mycluster-worker2. Here is the routing table of this node:
$ sudo docker exec -it mycluster-worker2 ip route
default via 172.18.0.1 dev eth0
10.10.0.0/24 via 10.10.1.55 dev cilium_host proto kernel src 10.10.1.55 mtu 1450
10.10.1.0/24 via 10.10.1.55 dev cilium_host proto kernel src 10.10.1.55
10.10.1.55 dev cilium_host proto kernel scope link
10.10.2.0/24 via 10.10.1.55 dev cilium_host proto kernel src 10.10.1.55 mtu 1450
172.18.0.0/16 dev eth0 proto kernel scope link src 172.18.0.4
Again from the traditional Linux routing point of view there isn’t much to see, except that all the traffic for the pods subnet are going to the cilium_host that is managed by the Cilium agent. This is identical as what we’ve learned in the other node. When we reach the cilium_vxlan interface, a servant is waiting for us with his magical eBPF map and directs us through a secret passage to the LXC corridor interface of the top left pod where we can reach our destination.
Wrap up
We’ve explored all that can be seen in routing from the traditional Linux point of view by using the common networking tools.
Maybe you feel frustrated to not understand it completely because there are some gaps in this step-by-step packet routing? Cilium uses eBPF for routing the packets so it adds some complexity to the routing understanding. However it is much faster than the traditional Linux routing due to the secret passages opened by the eBPF servants.
If you want to know more about this, don’t miss my next blog post where I’ll dive deep into the meanders of eBPF routing. See you there!
![Thumbnail [90x90]](https://www.dbi-services.com/blog/wp-content/uploads/2022/08/GRE_web-min-scaled.jpg)
![Thumbnail [90x90]](https://www.dbi-services.com/blog/wp-content/uploads/2022/08/ADE_WEB-min-scaled.jpg)
![Thumbnail [90x90]](https://www.dbi-services.com/blog/wp-content/uploads/2022/08/NME_web-min-scaled.jpg)