There seems to be a strong interest these days about understanding better networking in Kubernetes. This blog post is my contribution on this topic. I’ll do my best to explain it in a visual way and translate the techie part to an understandable language so that anybody can actually enjoy it.
The best way to learn networking is by doing what is called “Follow the packet” or “The life of a packet”. Basically, you follow the packet from the sender to the receiver by stopping at each step of this journey. I did that a while ago with a communication from a Pod to another Pod by using Calico. This time I’ll use another Container Network Interface (CNI) called Cilium which is based on eBPF (understand fast and flexible routing) and comes with a lot of powerful features and tools. Let’s hit that packet road!

Traditional Networking without Kubernetes
We are going to start from the beginning. I’ll consider you know nothing about networking. Maybe you already know what an IP Address is? The IP Address is the numerical Address of a network interface in a computer. This is how your computer can connect for example to your Wi-Fi network and give you access to the Internet. If you are using a laptop, your Wi-Fi network interface has one IP Address. This network interface also has another address that is unique and burnt on it by the hardware provider. This address is called the Medium Access Control (MAC) Address.
The IP Address belongs to a group (the IP Subnet). To know to which group it belongs to, it uses something called the Subnet Mask. This mask when applied to the IP Address gives a result and this result is identical for every IP Address that belong to the same group. This is like your community.
Let’s use the drawing below to make analogies:
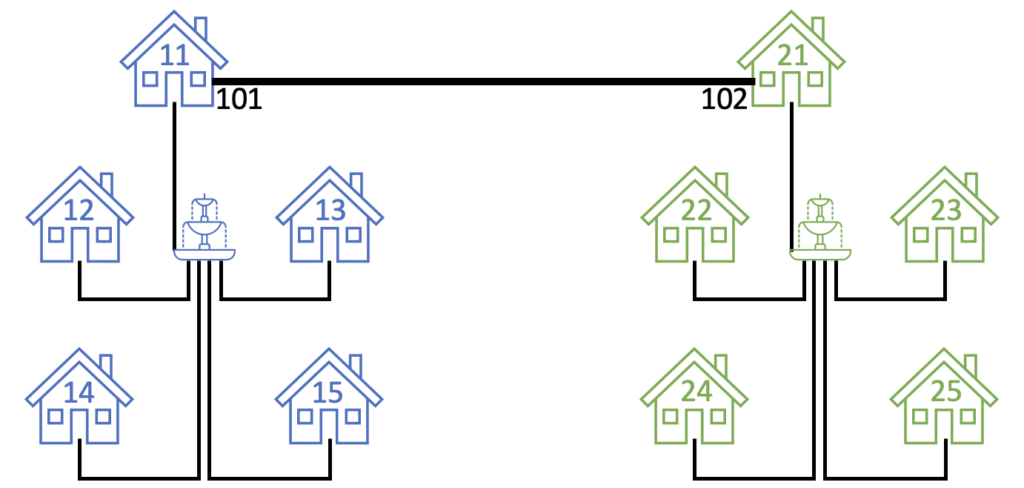
The house is a computer, a server or a virtual machine. It could be of different sizes according to its CPU and memory but let use the same one for simplicity sake. A house has a door that is your network interface. The serial number of that door is your MAC Address and the number on your house (which is usually nailed on the door) is your IP Address. It is only if you change your door that your serial number will change. However, your house number has been assigned to you by the architect of your community and could change if there is a reassignment or a change in the design.
The community 10th (using numbers from 10 to 19) in blue belong to the same group (same IP subnet) and the community 20th in green is another group. In each group there are five houses so there is space for the community to grow. In each community the door has a direct link to a fountain which represents a Switch. At the fountain, there is a sign for each path to indicate which door you can reach. Yes, the fountain doesn’t know the house number but only the serial number of the door. For humans it is not very practical so we use a map (called the ARP table) that gives the translation between the house number and the serial number of its door.
If you live in house 14 and want to visit house 15, you’ll use the path (there is only one and it is yours so no traffic jams!) to the fountain first and then look at the signs. You know from your map which serial number correspond to which house and so you use the path to house 15. In this star topology you always go to the fountain first and not directly to the house you want to visit because there is no direct path. A path inside your community represents a Layer 2 link. You can’t reach another community by using these paths.
Traveling between communities
What now if from your house 14, you want to pay a visit to house 24? This is another community which means the couple IP Address / Subnet mask for 14 doesn’t produce the same result as for 24. Indeed the 10th and the 20th communities are different. So you know the destination is another community and in that case you have to go first to your gatekeeper (but always through the fountain as we have seen). He is the default gateway of your community and he lives in house 11. The rule is to go to him for any destinations that is outside of your community.
Only he has a map (the Routing Table) to reach community 20th and know which road to take (This is called Layer 3 routing because you are traveling outside of your community). This map shows that to reach 24 in the 20th community you have to use another door. Wait a minute, if a door is a network interface, does it mean that the gatekeeper house has another door? Absolutely correct! The house 11 has another door with another number on it (101) and of course this door has another serial number (MAC Address).
By exiting this door you can now take the path to reach community 20th which has its own gatekeeper in house 21. The map (Routing Table) of this gatekeeper directs you to the proper door to reach your destination. This door gives you access to community 20th as your destination 24 belongs to it. The gatekeeper also give you the map (ARP table) so you can orientate yourself at the fountain. You can now walk on the path to the green fountain. From there, you just have to follow the sign and the path to house 24. When you want to get back home, you travel back using the same path in the opposite direction.
Networking in Kubernetes
Now you know the basics about networking, let’s see how it works in comparison in Kubernetes. Yes it is slightly more complicated but let’s go step by step and use the picture below to understand it better:
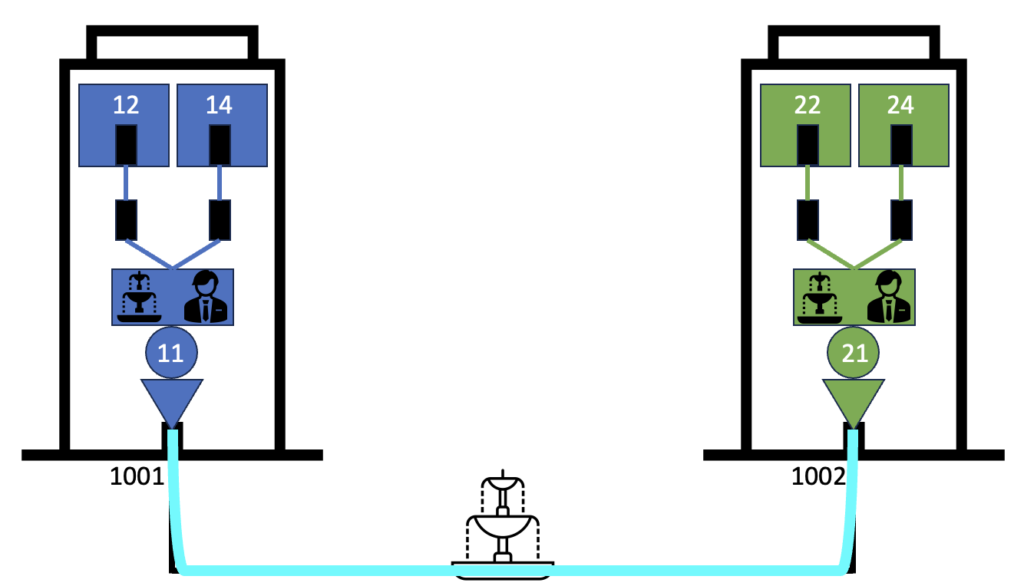
Instead of houses, we now have buildings. The networking between the buildings is still the same as the traditional one with a Switch/fountain in the middle. The entrance of the building has a door with the building number on it (its IP Address) that is part of a 1000th community. One building will represent one node of our Kubernetes cluster.
You know Kubernetes is a container orchestrator. A container is wrapped into a pod. For simplicity sake, let’s consider a pod has only one container and so both terms are here equivalent. This pod will be one appartement in our building and so is like a private part of it. The apartment could be of different size in the building as it could have 2, 3 or 4 bedrooms for example. This will be the CPU and memory capacities your container will need on the node. Some appartement are empty so the building still has some capacity. However in Kubernetes, pods are created and deleted as needed. So in our building that would mean sometimes a 2 bedrooms appartement is created and when not used anymore, it could be removed from the building. Then a 5 bedrooms appartement could be created next if the building has enough space for it. Imagine then that it is a LEGO building and inside it you can build and demolish apartments of various size according to your need! Isn’t it awesome?
In each building, the containers/pods have their own community (IP subnet). The function of a CNI in Kubernetes is basically to assign numbers (IP Addresses) to pods so they can communicate together. By default Cilium uses different community for each building. When an apartment is created, Cilium assigns a number to it. When an apartment is deleted an recreated, it will get another number so it is ephemeral. Here the blue community uses the 10th range and the green one uses the 20th. You can notice that the number ranges of the blue and green communities are different than the range of the buildings. Just for you to know, this design is called an Overlay network. There are other ones possible but that is a commonly used. It is a network of pods on top of the network of nodes.
Traveling between apartments in the same building
Now, you live in the apartment 12, how are you going to pay a visit to apartment 14? Like we did with the traditional networking example, you are the packet we are going to follow! Of course you leave the apartment (container) through its door (its network interface). The difference with our previous example is that you are now not out of the house, you are just out of your apartment but still inside of the building. You then follow a private corridor and reach another door (this is the LXC interface).
This door gives you access to a common space of the building where the routing and dispatching occurs. We call it the Cilium Lobby (the blue rectangle). This Lobby has been installed by the Cilium Agent of this building when Cilium was selected to provide communications in this Kubernetes cluster. There is one Cilium Agent per building and he is taking care of everything related to networking. In this Lobby there is a gatekeeper that doesn’t live in an apartment but waits at a deck in the Lobby. He has a team of servants that wait at different doors in the building to provide directions. This is because Cilium is using a magic routing map called eBPF that efficiently helps the travellers.
So when you reach the door at the end of the corridor, you show the servant who is waiting here you want to go to number 14. He finds a match in his magic eBPF map with number 14 and shows you directly the corridor door on the top right. You don’t have to go to the Lobby, he shows you a secret passage to go straight to it. You then open that door, follow the corridor and reach apartment number 14. You would go back to apartment number 12 following the same path and process but in the opposite direction.
So this dispatching is different from traditional switching and it is very fast thanks to the magic eBPF map!
Traveling between apartments in different buildings
Now from apartment 12 you want to pay a visit to the apartment number 22 which is in another building. The beginning of your travel is the same as previously, you exit your apartment, follow the corridor and ask the servant waiting here for directions. As the destination number 22 belongs to another community, he directs you to the Lobby this time. Here and as with traditional networking, you need the help of the gatekeeper in the Lobby. The gatekeeper looks at his map (the Routing table) for direction to number 22 and shows you the door number 11 to use (the cilium_host).
When you open that door, you see another door behind it: It is the blue triangle and it is called the VXLAN interface. This door open to a nice transparent tunnel that goes through the main door of the building. You are protected from the rain and can enjoy the landscape while walking to the other building. You even spot the outdoor fountain! When you reach the green building you exit the tunnel and go meet the servant that is waiting for you at the green triangle (VXLAN interface). You give him your destination, he finds a match in his magic eBPF map with number 22 and shows you a secret passage to the corridor door on the top left. From there you follow the corridor and reach your destination. As before, your way back will follow the same journey in the opposite direction.
This is Layer 3 routing as the destination community is different than yours. You can see it is a bit more complex in Kubernetes than in traditional routing.
Wrap up
I hope this helped you understand the difference between the traditional networking and Kubernetes networking and also that the latter is clearer now for you. If that is all you needed, then I’m glad you’ve read this blog post, I hope you’ve enjoyed it. If you now want to learn more about Kubernetes Networking, stay tuned because I’ll write an intermediate level where you’ll see what a building really looks like on a real cluster!
![Thumbnail [90x90]](https://www.dbi-services.com/blog/wp-content/uploads/2022/08/GRE_web-min-scaled.jpg)
![Thumbnail [90x90]](https://www.dbi-services.com/blog/wp-content/uploads/2022/08/ADE_WEB-min-scaled.jpg)
![Thumbnail [90x90]](https://www.dbi-services.com/blog/wp-content/uploads/2022/08/NME_web-min-scaled.jpg)
Ric
10.04.2024Hey, thanks for the article.