We have come a long way regarding networking in Kubernetes using Cilium. From a high level picture in this post, we moved to discovering the Kubernetes networking interfaces in this post and dived into linux routing in Kubernetes in this post.
If you still want to know more, then you are in the right place. Fasten your seat belt because in this blog post we will dive deep into the eBPF routing. When using Cilium for networking in your Kubernetes cluster, you will automatically use eBPF for routing between pods. I’ll stick to the same 2 examples of routing between pods on the same node and on different nodes. You’ll then see the continuity on the same drawing that will hopefully help you understand this routing topic completely.
Discovering eBPF
eBPF Routing
In my high level blog and in the previous one about routing, I’ve talked about servants that are waiting at some network interfaces to help and direct you in the Kubernetes cluster. I’ve told you they were using a magical eBPF map to guide you through a secret passage toward your destination. Let’s now see what these servants are exactly in our Kubernetes cluster.
A servant is actually an eBPF program attached to a network interface at the kernel level. That is what eBPF allows you to do, modify the kernel dynamically. The advantage is that you can attach your own program (that is C code transformed to machine code) to some events and network interfaces in the kernel and trigger any action you have programmed. An action could be routing a packet or report and act on any interaction with the kernel. This is why eBPF fits nicely for observability because anything happening in a node interact with the kernel. It could be running a process, opening a file, routing a packet,… Regarding routing, it is very fast because it shortcuts the traditional Linux routing process. That is the reason why we couldn’t see all the routing steps in the previous post by using our traditional networking tools. We now need eBPF tools to inspect this routing in more details.
Cilium Agent and eBPF routing
You know from the previous posts that there is a Cilium agent pod on each node in the cluster. This agent takes care of everything about networking on that node and so also eBPF routing. It comes with some eBPF tools packed with it that will allow us to explore it more deeply.
Let’s now see what these servants really look like in our cluster. As a reminder and to gather all the information here, below are all our Cilium agents in our cluster:
$ kubectl get po -n kube-system -owide|grep cilium
cilium-9zh9s                                      1/1     Running   5 (65m ago)   113d   172.18.0.3    mycluster-control-plane   <none>           <none>
cilium-czffc                                      1/1     Running   5 (65m ago)   113d   172.18.0.4    mycluster-worker2         <none>           <none>
cilium-dprvh                                      1/1     Running   5 (65m ago)   113d   172.18.0.2    mycluster-worker          <none>           <none>
cilium-operator-6b865946df-24ljf                  1/1     Running   5 (65m ago)   113d   172.18.0.2    mycluster-worker          <none>           <none>
As before in this series, we will trace the routing from a pod on the node mycluster-worker and so we will need to interact with the Cilium agent of that node: cilium-dprvh. We use into that agent pod the tool bpftool to list all the network interfaces and the eBPF programs attached to them:
$ kubectl exec -it -n kube-system cilium-dprvh -- bpftool net show
Defaulted container "cilium-agent" out of: cilium-agent, config (init), mount-cgroup (init), apply-sysctl-overwrites (init), mount-bpf-fs (init), clean-cilium-state (init), install-cni-binaries (init)
xdp:

tc:
cilium_net(2) clsact/ingress cil_to_host-cilium_net id 1209
cilium_host(3) clsact/ingress cil_to_host-cilium_host id 1184
cilium_host(3) clsact/egress cil_from_host-cilium_host id 1197
cilium_vxlan(4) clsact/ingress cil_from_overlay-cilium_vxlan id 1154
cilium_vxlan(4) clsact/egress cil_to_overlay-cilium_vxlan id 1155
lxc_health(6) clsact/ingress cil_from_container-lxc_health id 1295
eth0(7) clsact/ingress cil_from_netdev-eth0 id 1223
lxc4a891387ff1a(9) clsact/ingress cil_from_container-lxc4a891387ff1a id 1285
lxc5b7b34955e61(11) clsact/ingress cil_from_container-lxc5b7b34955e61 id 1303
lxc73d2e1d7cf4(13) clsact/ingress cil_from_container-lxc73d2e1d7cf4 id 1294
Yes these programs are our servants! Armed with the knowledge of the network interfaces in a previous post you should recognize their names. The one that will be used at the starting point of our travel is lxc4a891387ff1a. In parenthesis you have the interface id 9 that is on the node side of this link to this container. The Cilium agent assigned to this interface the id 1285. The name of the program attached to this interface is called cil_from_container. From this name, you know for which direction the program will operate. Here it is for the traffic coming from the container to the node, in the other direction there is no processing. As the Cilium community edition is open source, you can read its code directly here. In the file bpf_lxc.c just search for the program name and you will see all the details. Yes, this is advanced but don’t worry, I did the hard work for you, so you just have to read along!
Before we move on to trace the eBPF routing, let’s update our drawing to show these eBPF servants:
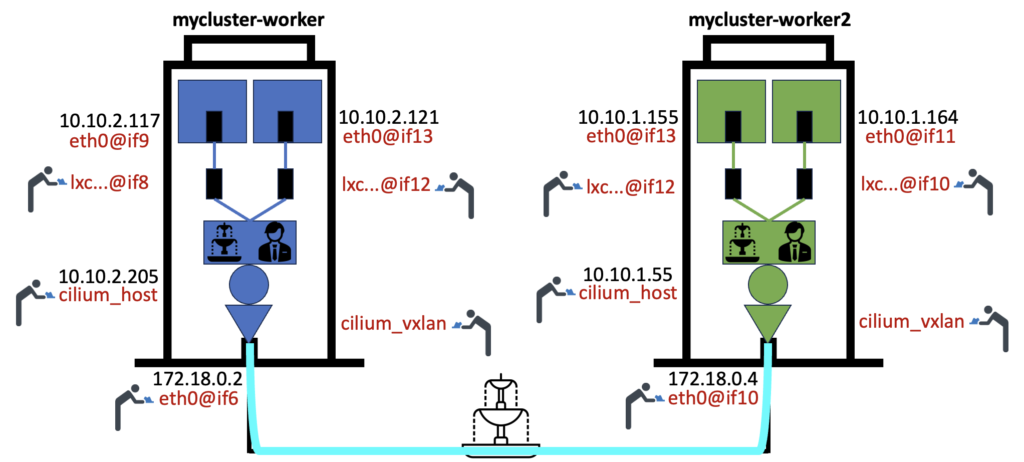
Don’t be confused about the lxc network interface id. For example lxc4a891387ff1a(9) from the command output above. It means it is linked to id 9 which is on the node side, on the interface called lxc….@if8. Id 8 being the id inside of the container (you will see in it 8: eth0@if9).
Pod to pod routing on the same node
I don’t want to lose you with all the details so I’ll give you only the key information to follow along this eBPF routing. Yes, from here it is becoming more complicated but I’ll try to make it smooth for you to enjoy it anyway.
As we did in the previous post, let’s now see how eBPF routes the traffic thanks to its servants from 10.10.2.117 to 10.10.2.121. The Cilium agent gives information to the eBPF program and receives information from them. For exchanging information, it uses what is called maps (yes these are our magic maps!) in the eBPF terminology. There are several of them that are used for different purposes. These maps are stored in the folder /sys/fs/bpf/tc/globals into the Cilium agent pod and we can manually interact with them by using the bpftool. We can then trace the eBPF routing that way. When the packet leaves the container, it reaches the lxc interface on the node and the program cil_from_container is triggered to route that packet. The program sees the destination IP Address is in the same subnet as the source and will then just forward the traffic to the destination lxc network interface by using the map called cilium_lxc.
Below is how we can trace that eBPF routing:
$ kubectl exec -it -n kube-system cilium-dprvh -- bpftool map lookup pinned /sys/fs/bpf/tc/globals/cilium_lxc key hex 0a 0a 02 79 00 00 00 00  00 00 00 00 00 00 00 00 01 00 00 00
Defaulted container "cilium-agent" out of: cilium-agent, config (init), mount-cgroup (init), apply-sysctl-overwrites (init), mount-bpf-fs (init), clean-cilium-state (init), install-cni-binaries (init)
key:
0a 0a 02 79 00 00 00 00  00 00 00 00 00 00 00 00
01 00 00 00
value:
0b 00 00 00 00 00 33 06  00 00 00 00 00 00 00 00
ea c4 71 d6 4f a0 00 00  f6 87 b6 c3 a6 45 00 00
2c 0d 00 00 00 00 00 00  00 00 00 00 00 00 00 00
We have to give to the bpftool an hexadecimal string that it expects (the details of this format can be found in the source code). The destination IP Address we want to trace is 10.10.2.121 which is 0a 0a 02 79 in hexadecimal. This information is at the beginning of the string in our command.
In the output of this command you can see the key section, which is the hexadecimal string we have provided as well as the result in the value section.
In this result we get the MAC Address of the destination lxc interface on the pod side which is ea c4 71 d6 4f a0. We also get the MAC Address of the destination lxc interface on the node side which is f6 87 b6 c3 a6 45. Finally we get the lxc id of the destination pod which is 33 06. A little trick here is that this value is stored in reverse order (you can do a search about big endian and little endian if you want to know more on this) so we have to read 06 33 which converted to decimal gives 1587. This value is the endpoint ID used by Cilium to identify the pods. You can get this general information in the cluster with the following command:
$ kubectl get ciliumendpoint -n networking101
NAME                        ENDPOINT ID   IDENTITY ID   INGRESS ENFORCEMENT   EGRESS ENFORCEMENT   VISIBILITY POLICY   ENDPOINT STATE   IPV4          IPV6
busybox-c8bbbbb84-fmhwc     897           3372          <status disabled>     <status disabled>    <status disabled>   ready            10.10.1.164
busybox-c8bbbbb84-t6ggh     715           3372          <status disabled>     <status disabled>    <status disabled>   ready            10.10.2.117
netshoot-7d996d7884-fwt8z   1587          10388         <status disabled>     <status disabled>    <status disabled>   ready            10.10.2.121
netshoot-7d996d7884-gcxrm   3564          10388         <status disabled>     <status disabled>    <status disabled>   ready            10.10.1.155
So the destination pod is netshoot-7d996d7884-fwt8z and it is reached directly through its lxc interface. And that’s it! Of course the routing occurs much faster than me explaining it but more importantly it is faster than the traditional Linux routing.
Pod to pod routing on a different node
Let’s now check the eBPF routing from 10.10.2.117 to 10.10.1.155 which is then on a different node. The packet is also intercepted by the program cil_from_container but this time the destination IP Address belongs to another subnet so it is going to use another map called cilium_ipcache to route that packet.
As before, we have to provide an hexadecimal string in the expected format to trace the routing of this packet. Here, our destination IP Address is 10.10.1.155 so 0a 0a 01 9b in hexadecimal.
$ kubectl exec -it -n kube-system cilium-dprvh -- bpftool map lookup pinned /sys/fs/bpf/tc/globals/cilium_ipcache key hex 40 00 00 00 00 00 00 01 0a 0a 01 9b 00 00 00 00 00 00 00 00 00 00 00 00
Defaulted container "cilium-agent" out of: cilium-agent, config (init), mount-cgroup (init), apply-sysctl-overwrites (init), mount-bpf-fs (init), clean-cilium-state (init), install-cni-binaries (init)
key:
40 00 00 00 00 00 00 01  0a 0a 01 9b 00 00 00 00
00 00 00 00 00 00 00 00
value:
94 28 00 00 ac 12 00 04  00 00 00 00
In the value section we can see the destination IP Address of the node mycluster-worker2 which is ac 12 00 04 (172.18.0.4). From there, the packet is encapsulated and goes straight to the egress VXLAN interface to reach that node. Once there, it is now the eBPF programs of the Cilium agent pod on this node that will be used. Let’s check them as we did before for the other node:
$ kubectl exec -it -n kube-system cilium-czffc -- bpftool net show
Defaulted container "cilium-agent" out of: cilium-agent, config (init), mount-cgroup (init), apply-sysctl-overwrites (init), mount-bpf-fs (init), clean-cilium-state (init), install-cni-binaries (init)
xdp:

tc:
cilium_net(2) clsact/ingress cil_to_host-cilium_net id 1254
cilium_host(3) clsact/ingress cil_to_host-cilium_host id 1242
cilium_host(3) clsact/egress cil_from_host-cilium_host id 1246
cilium_vxlan(4) clsact/ingress cil_from_overlay-cilium_vxlan id 1163
cilium_vxlan(4) clsact/egress cil_to_overlay-cilium_vxlan id 1164
lxc_health(6) clsact/ingress cil_from_container-lxc_health id 1414
lxc0a97661d8043(8) clsact/ingress cil_from_container-lxc0a97661d8043 id 1387
eth0(9) clsact/ingress cil_from_netdev-eth0 id 1261
lxc174c023046ff(11) clsact/ingress cil_from_container-lxc174c023046ff id 1391
lxce84a702bb02c(13) clsact/ingress cil_from_container-lxce84a702bb02c id 1419
The output is similar to the other node. So, once the packet exits the VXLAN tunnel, it is caught by another program on the ingress VXLAN interface called cil_from_overlay-cilium_vxlan. This program sees the destination IP Address belongs to this node. It will then use the map cilium_lxc to forward the traffic to the lxc interface of the destination pod as we have seen before. Note that there is no programs in the list above called to_container so the packet in not processed further. We can then trace that eBPF routing part as before by using the hexadecimal value of our destination IP Address 10.10.1.155:
$ kubectl exec -it -n kube-system cilium-dprvh -- bpftool map lookup pinned /sys/fs/bpf/tc/globals/cilium_lxc key hex 0a 0a 01 9b 00 00 00 00  00 00 00 00 00 00 00 00 01 00 00 00
Defaulted container "cilium-agent" out of: cilium-agent, config (init), mount-cgroup (init), apply-sysctl-overwrites (init), mount-bpf-fs (init), clean-cilium-state (init), install-cni-binaries (init)
key:
0a 0a 01 9b 00 00 00 00  00 00 00 00 00 00 00 00
01 00 00 00
value:
0b 00 00 00 00 00 ec 0d  00 00 00 00 00 00 00 00
be 57 3d 54 40 f1 00 00  92 65 df 09 dd 28 00 00
2c 0d 00 00 00 00 00 00  00 00 00 00 00 00 00 00
The result gives us the following information:
- 92 65 df 09 dd 28: This is the MAC Address of the destination lxc interface on the node side
- be 57 3d 54 40 f1: This is the MAC Address of the destination lxc interface on the pod side
- ec 0d: We reverse it to 0d ec which we convert to 3564. This is the Cilium endpoint of the destination pod netshoot-7d996d7884-gcxrm as we have seen previously (you can check the output of the command above and find that pod).
As before, from here the packet is directly forwarded to this destination pod. This is how an eBPF routing plan comes up together!
Wrap up
Wow! Congratulations if you’ve reached that point! You are champions! You now have the complete and detailed picture of how the basic networking between pods is working with Cilium in a Kubernetes cluster. There is more to cover as I’ve mentioned network policies in a previous post but we didn’t talk about services, ingress or name resolution. Also in addition to these basic Kubernetes networking topics, Cilium provides a lot of other features that enrich what can be done in a cluster. So stay tuned!
![Thumbnail [90x90]](https://www.dbi-services.com/blog/wp-content/uploads/2022/08/GRE_web-min-scaled.jpg)
![Thumbnail [90x90]](https://www.dbi-services.com/blog/wp-content/uploads/2022/08/ADE_WEB-min-scaled.jpg)
![Thumbnail [90x90]](https://www.dbi-services.com/blog/wp-content/uploads/2022/08/NME_web-min-scaled.jpg)