Once Rancher is up and running, it makes the deployment and management of Kubernetes clusters quite easy. In this post we’ll deploy a brand new cluster on top of EC2. If you want to have a simple and quick Rancher playground you can follow this post, which will give you a Rancher setup on SLES 15. If you want to have a more production like Rancher setup, you can follow these posts: Rancher, up and running, on EC2 – 1 – One node, Rancher, up and running, on EC2 – 2 – Three nodes and Rancher, up and running, on EC2 – 3 – Rancher setup. Those will give you a three nodes cluster on top of EC2, running on Debian.
Before you start with this, make sure, that you meet these requirements:
- The host on which you run Rancher needs to communicate with all instances you deploy on EC2, in both directions. If you have Rancher running locally this will only work if the EC2 instances will be able to reach your local Rancher installation.
- You need to setup the correct IAM policies and groups. If you don’t get this right you will not be able to deploy the cluster.
Because this is the most important point, lets start with the IAM policies. I’ve created three of them:
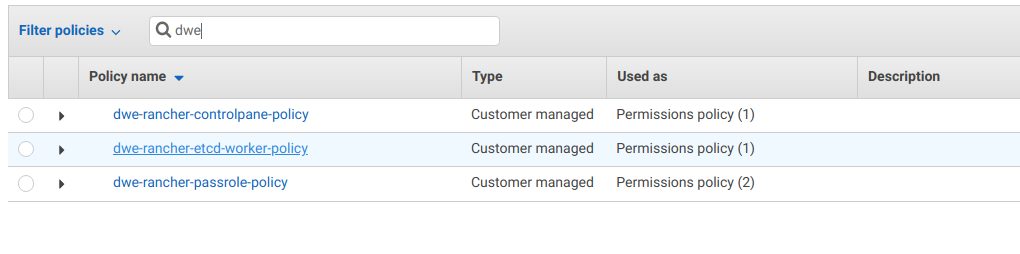
- dwe-rancher-controlpane-policy: This is the policy that will be used for the control pane
- dwe-rancher-etcd-worker-policy: This is the policy that will be used for the etcd and worker nodes
- dwe-rancher-passrole-policy: This is the policy that will be attached to the AWS user that will be registered in Rancher with the cloud credentials
Here is the dwe-rancher-controlpane-policy (replace [YOUR_AWS_ACCOUNT_ID] with your AWS account ID):
{
    "Version": "2012-10-17",
    "Statement": [
        {
            "Sid": "VisualEditor0",
            "Effect": "Allow",
            "Action": [
                "ec2:AttachVolume",
                "ec2:AuthorizeSecurityGroupIngress",
                "ec2:DescribeInstances",
                "autoscaling:DescribeLaunchConfigurations",
                "ec2:DescribeRegions",
                "elasticloadbalancing:DescribeLoadBalancerPolicyTypes",
                "elasticloadbalancing:SetWebAcl",
                "elasticloadbalancing:DescribeLoadBalancers",
                "ec2:DeleteVolume",
                "elasticloadbalancing:DescribeListeners",
                "autoscaling:DescribeAutoScalingGroups",
                "ec2:CreateRoute",
                "ec2:CreateSecurityGroup",
                "ec2:DescribeVolumes",
                "elasticloadbalancing:DescribeLoadBalancerPolicies",
                "kms:DescribeKey",
                "elasticloadbalancing:DescribeListenerCertificates",
                "elasticloadbalancing:DescribeInstanceHealth",
                "ec2:ModifyInstanceAttribute",
                "ec2:DescribeRouteTables",
                "elasticloadbalancing:DescribeSSLPolicies",
                "ec2:DetachVolume",
                "ec2:ModifyVolume",
                "ec2:CreateTags",
                "autoscaling:DescribeTags",
                "ec2:DeleteRoute",
                "elasticloadbalancing:*",
                "ec2:DescribeSecurityGroups",
                "ec2:CreateVolume",
                "elasticloadbalancing:DescribeLoadBalancerAttributes",
                "ec2:RevokeSecurityGroupIngress",
                "iam:CreateServiceLinkedRole",
                "elasticloadbalancing:DescribeTargetGroupAttributes",
                "ec2:DescribeVpcs",
                "elasticloadbalancing:DescribeAccountLimits",
                "ec2:DeleteSecurityGroup",
                "elasticloadbalancing:DescribeTargetHealth",
                "elasticloadbalancing:DescribeTargetGroups",
                "elasticloadbalancing:DescribeRules",
                "ec2:DescribeSubnets"
            ],
            "Resource": "*"
        },
        {
            "Sid": "VisualEditor1",
            "Effect": "Allow",
            "Action": "elasticloadbalancing:*",
            "Resource": "*"
        },
        {
            "Sid": "VisualEditor2",
            "Effect": "Allow",
            "Action": "elasticloadbalancing:*",
            "Resource": "arn:aws:elasticloadbalancing:*:[YOUR_AWS_ACCOUNT_ID]:loadbalancer/*"
        },
        {
            "Sid": "VisualEditor3",
            "Effect": "Allow",
            "Action": "elasticloadbalancing:*",
            "Resource": [
                "arn:aws:elasticloadbalancing:*:[YOUR_AWS_ACCOUNT_ID]:targetgroup/*/*",
                "arn:aws:elasticloadbalancing:*:[YOUR_AWS_ACCOUNT_ID]:listener-rule/app/*/*/*/*",
                "arn:aws:elasticloadbalancing:*:[YOUR_AWS_ACCOUNT_ID]:listener-rule/net/*/*/*/*",
                "arn:aws:elasticloadbalancing:*:[YOUR_AWS_ACCOUNT_ID]:listener/net/*/*/*",
                "arn:aws:elasticloadbalancing:*:[YOUR_AWS_ACCOUNT_ID]:listener/app/*/*/*",
                "arn:aws:elasticloadbalancing:*:[YOUR_AWS_ACCOUNT_ID]:loadbalancer/net/*/*",
                "arn:aws:elasticloadbalancing:*:[YOUR_AWS_ACCOUNT_ID]:loadbalancer/app/*/*"
            ]
        },
        {
            "Sid": "VisualEditor4",
            "Effect": "Allow",
            "Action": "elasticloadbalancing:*",
            "Resource": [
                "arn:aws:elasticloadbalancing:*:[YOUR_AWS_ACCOUNT_ID]:targetgroup/*/*",
                "arn:aws:elasticloadbalancing:*:[YOUR_AWS_ACCOUNT_ID]:listener-rule/app/*/*/*/*",
                "arn:aws:elasticloadbalancing:*:[YOUR_AWS_ACCOUNT_ID]:listener-rule/net/*/*/*/*",
                "arn:aws:elasticloadbalancing:*:[YOUR_AWS_ACCOUNT_ID]:listener/net/*/*/*",
                "arn:aws:elasticloadbalancing:*:[YOUR_AWS_ACCOUNT_ID]:listener/app/*/*/*",
                "arn:aws:elasticloadbalancing:*:[YOUR_AWS_ACCOUNT_ID]:loadbalancer/net/*/*",
                "arn:aws:elasticloadbalancing:*:[YOUR_AWS_ACCOUNT_ID]:loadbalancer/app/*/*"
            ]
        },
        {
            "Sid": "VisualEditor5",
            "Effect": "Allow",
            "Action": "elasticloadbalancing:*",
            "Resource": [
                "arn:aws:elasticloadbalancing:*:[YOUR_AWS_ACCOUNT_ID]:loadbalancer/app/*/*",
                "arn:aws:elasticloadbalancing:*:[YOUR_AWS_ACCOUNT_ID]:loadbalancer/net/*/*",
                "arn:aws:elasticloadbalancing:*:[YOUR_AWS_ACCOUNT_ID]:targetgroup/*/*",
                "arn:aws:elasticloadbalancing:*:[YOUR_AWS_ACCOUNT_ID]:listener-rule/app/*/*/*/*",
                "arn:aws:elasticloadbalancing:*:[YOUR_AWS_ACCOUNT_ID]:listener-rule/net/*/*/*/*",
                "arn:aws:elasticloadbalancing:*:[YOUR_AWS_ACCOUNT_ID]:listener/net/*/*/*",
                "arn:aws:elasticloadbalancing:*:[YOUR_AWS_ACCOUNT_ID]:listener/app/*/*/*"
            ]
        }
    ]
}
Here is the dwe-rancher-etcd-worker-policy (replace [YOUR_AWS_ACCOUNT_ID] with your AWS account ID):
{
    "Version": "2012-10-17",
    "Statement": [
        {
            "Sid": "VisualEditor0",
            "Effect": "Allow",
            "Action": "ec2:*",
            "Resource": "*"
        },
        {
            "Sid": "VisualEditor1",
            "Effect": "Allow",
            "Action": "secretsmanager:*",
            "Resource": "arn:aws:secretsmanager:*:[YOUR_AWS_ACCOUNT_ID]:secret:*"
        }
    ]
}
Finally, here is the content of dwe-rancher-passrole-policy (here you need to reference the other two policies):
{
    "Version": "2012-10-17",
    "Statement": [
        {
            "Sid": "VisualEditor0",
            "Effect": "Allow",
            "Action": [
                "ec2:ModifyInstanceMetadataOptions",
                "ec2:AuthorizeSecurityGroupIngress",
                "ec2:Describe*",
                "ec2:ImportKeyPair",
                "ec2:CreateKeyPair",
                "ec2:CreateSecurityGroup",
                "ec2:CreateTags",
                "eks:*",
                "ec2:DeleteKeyPair"
            ],
            "Resource": "*"
        },
        {
            "Sid": "VisualEditor1",
            "Effect": "Allow",
            "Action": "ec2:RunInstances",
            "Resource": [
                "arn:aws:ec2:eu-central-1::image/ami-*",
                "arn:aws:ec2:eu-central-1:[YOUR_AWS_ACCOUNT_ID]:security-group/*",
                "arn:aws:ec2:eu-central-1:[YOUR_AWS_ACCOUNT_ID]:subnet/*",
                "arn:aws:ec2:eu-central-1:[YOUR_AWS_ACCOUNT_ID]:network-interface/*",
                "arn:aws:iam::[YOUR_AWS_ACCOUNT_ID]:role/dwe-rancher-controlpane-role",
                "arn:aws:iam::[YOUR_AWS_ACCOUNT_ID]:role/dwe-rancher-etcd-worker-role",
                "arn:aws:ec2:eu-central-1:[YOUR_AWS_ACCOUNT_ID]:instance/*",
                "arn:aws:ec2:eu-central-1:[YOUR_AWS_ACCOUNT_ID]:volume/*",
                "arn:aws:ec2:eu-central-1:[YOUR_AWS_ACCOUNT_ID]:placement-group/*",
                "arn:aws:ec2:eu-central-1:[YOUR_AWS_ACCOUNT_ID]:key-pair/*"
            ]
        },
        {
            "Sid": "VisualEditor2",
            "Effect": "Allow",
            "Action": [
                "ec2:RebootInstances",
                "ec2:TerminateInstances",
                "ec2:StartInstances",
                "ec2:StopInstances"
            ],
            "Resource": "arn:aws:ec2:eu-central-1:[YOUR_AWS_ACCOUNT_ID]:instance/*"
        },
        {
            "Sid": "VisualEditor3",
            "Effect": "Allow",
            "Action": "iam:PassRole",
            "Resource": [
                "arn:aws:iam::[YOUR_AWS_ACCOUNT_ID]:role/dwe-rancher-controlpane-role",
                "arn:aws:iam::[YOUR_AWS_ACCOUNT_ID]:role/dwe-rancher-etcd-worker-role"
            ]
        }
    ]
}
Once you have that ready, create two IAM roles with the same name as the policies you created above. This is required, because you need to specify those later when you setup the node templates in Rancher:

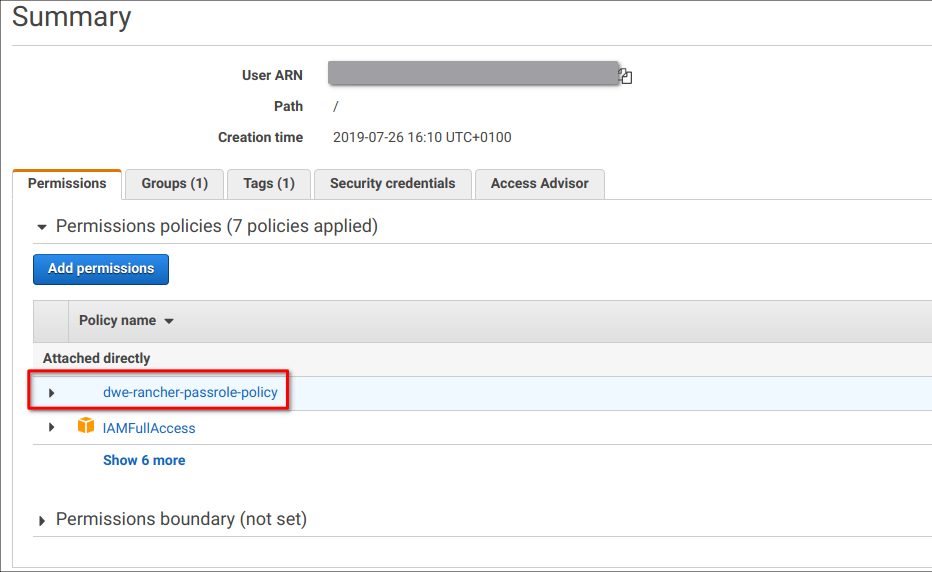
The final step for the permissions in AWS is to assign the last policy as a permission to the AWS user you will be using for deploying the cluster:
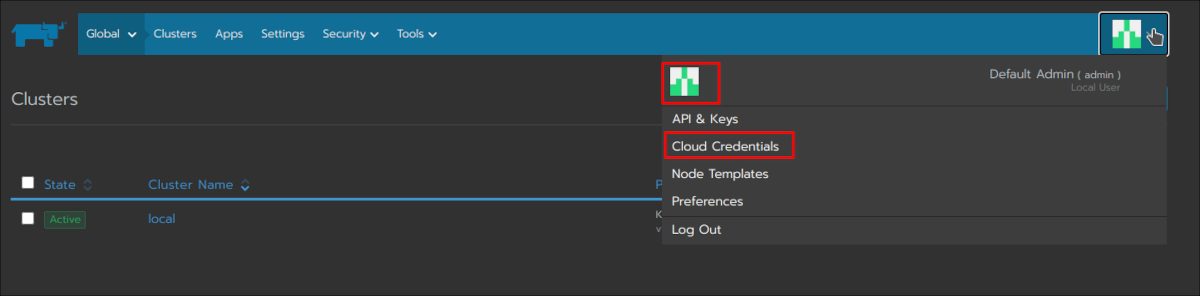
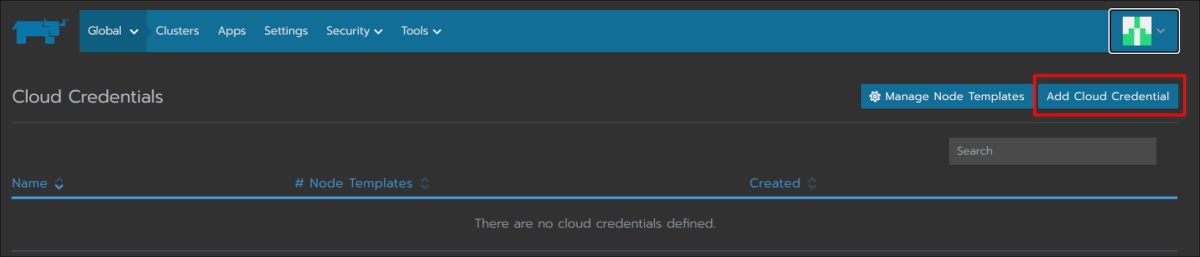
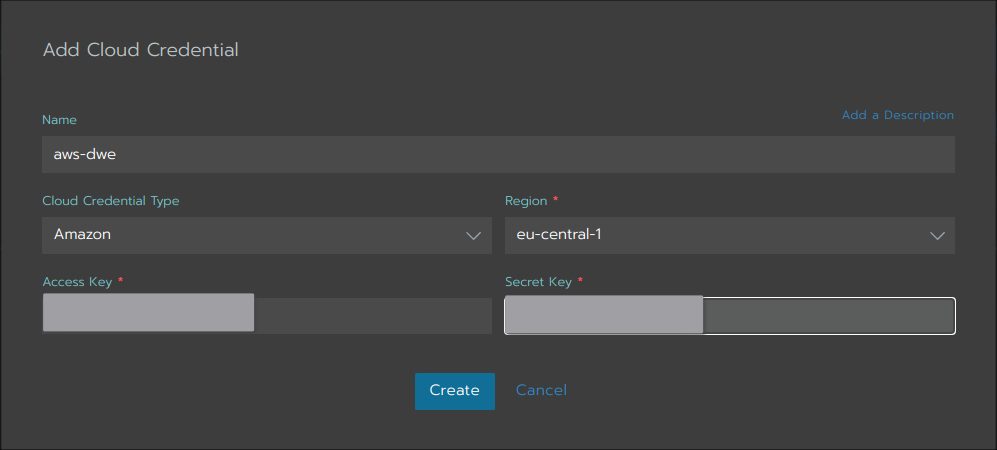
As Rancher needs to communicate with AWS you need to create your credentials:
Here you need to provide your AWS access key and the secret:
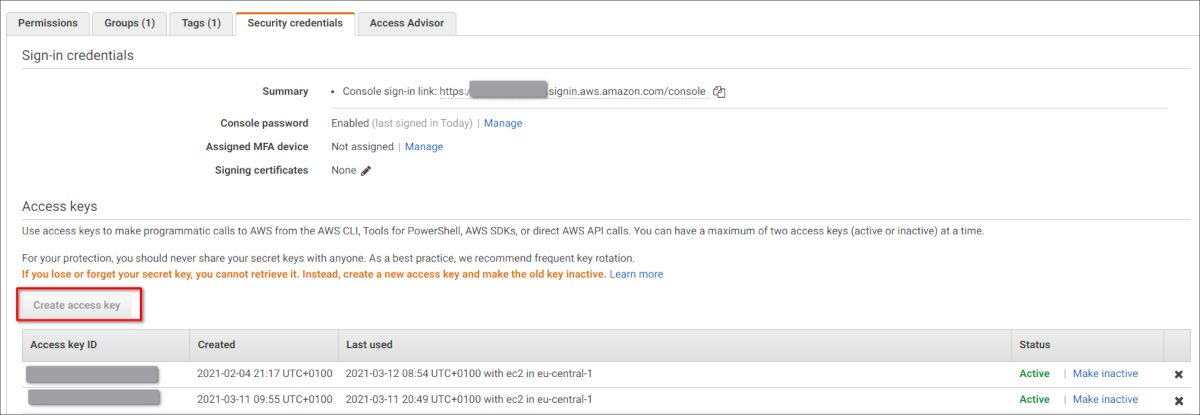
If you do not know, how to get the access key and the secret, you can generate that in the IAM console for your AWS user:
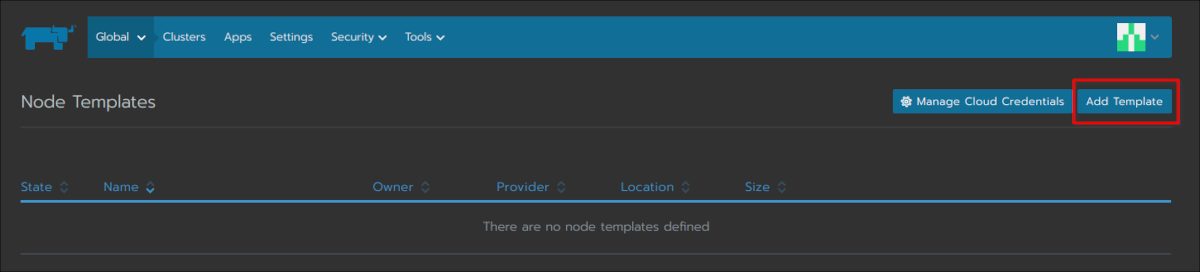
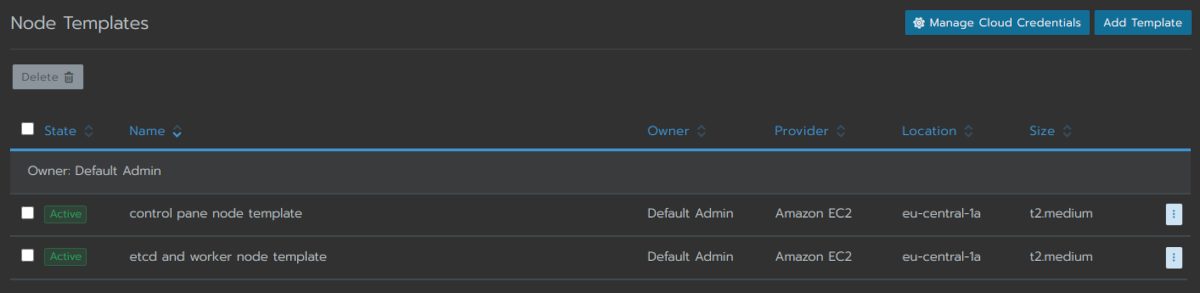
The next piece to get in place are the “node templates”. These templates describe which EC2 instance types you want to use, which AWS region to go for and a few other properties that describe your nodes:

Here you need to reference the cloud credentials you’ve created above:

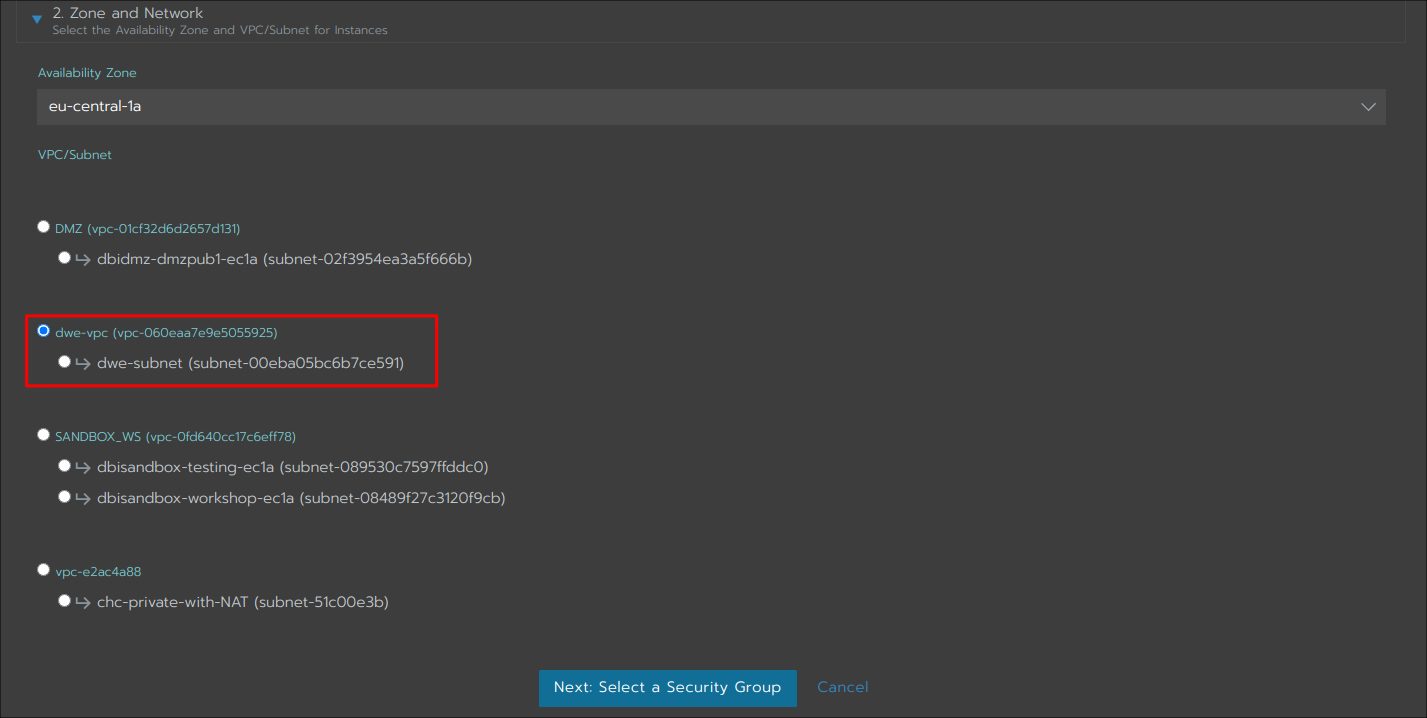
Your VPC and Subnets are should be configured in AWS as you need to specify those in the next step:
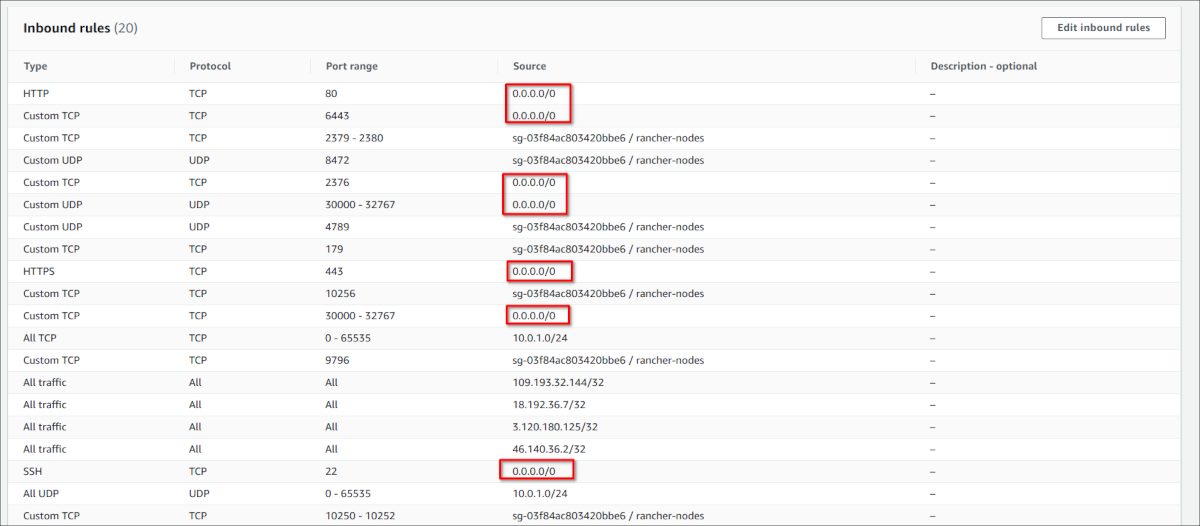
You can either let Rancher create a security group for you, or you can use an existing one:

Be careful if you let Rancher do it, as the security group that gets created in the background is quite open and you should _not_ do it like this:
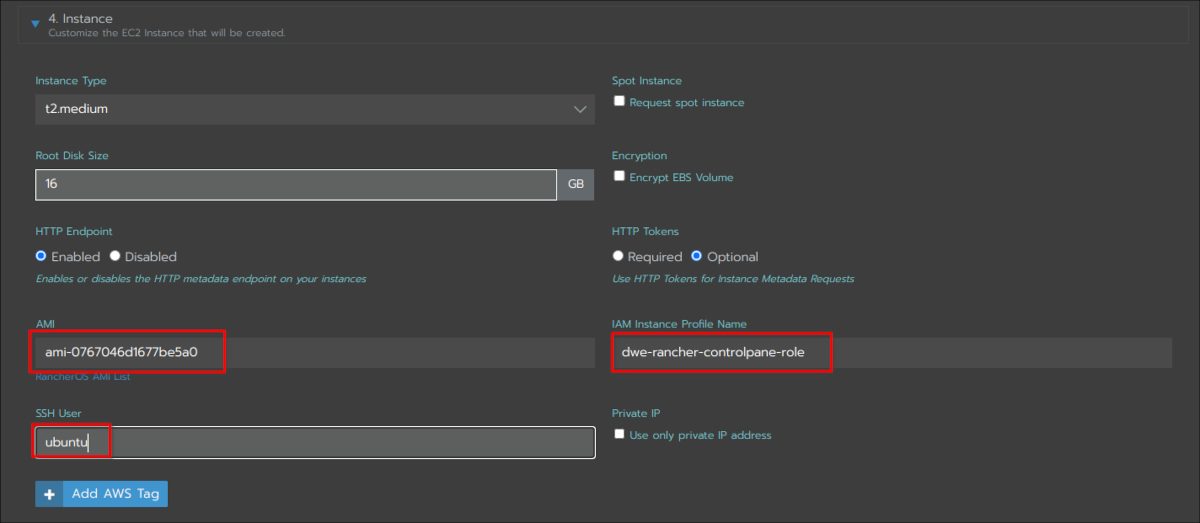
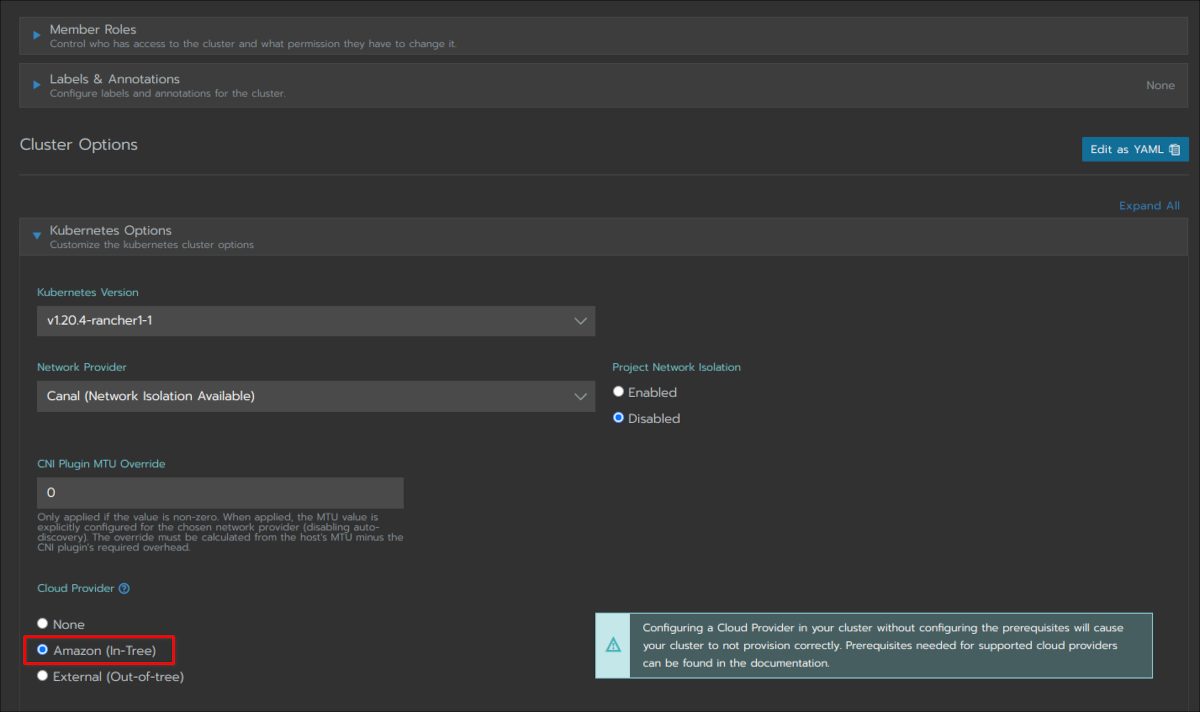
This is the most important section: The AMI ID you see, is the latest Ubuntu 20.04 AMI. The user for that AMI is “ubuntu”. If you want to go with a Debian, CentOS or whatever AMI you need to adjust those (The user for Debian would be “admin”, for CentOS it would be “centos” ). The “IAM instance profile name” is the role you created above, and this is important. Here you see “dwe-rancher-controlpane-role” because this will be the node template for the controller pane:
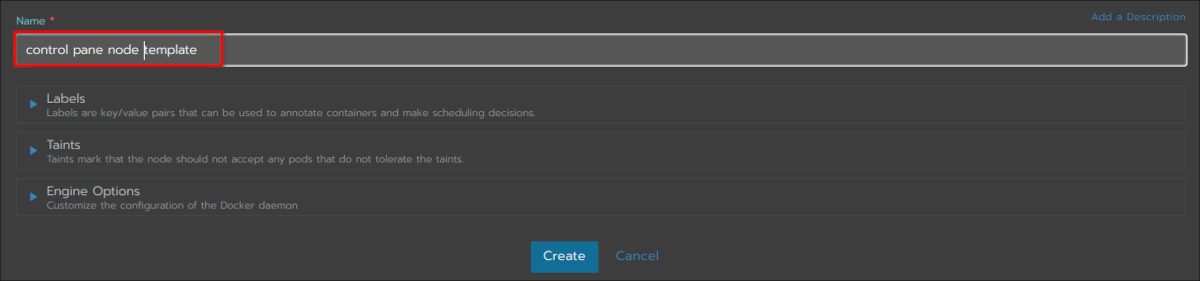
Give your template a name and stick to the dedaults for the rest:

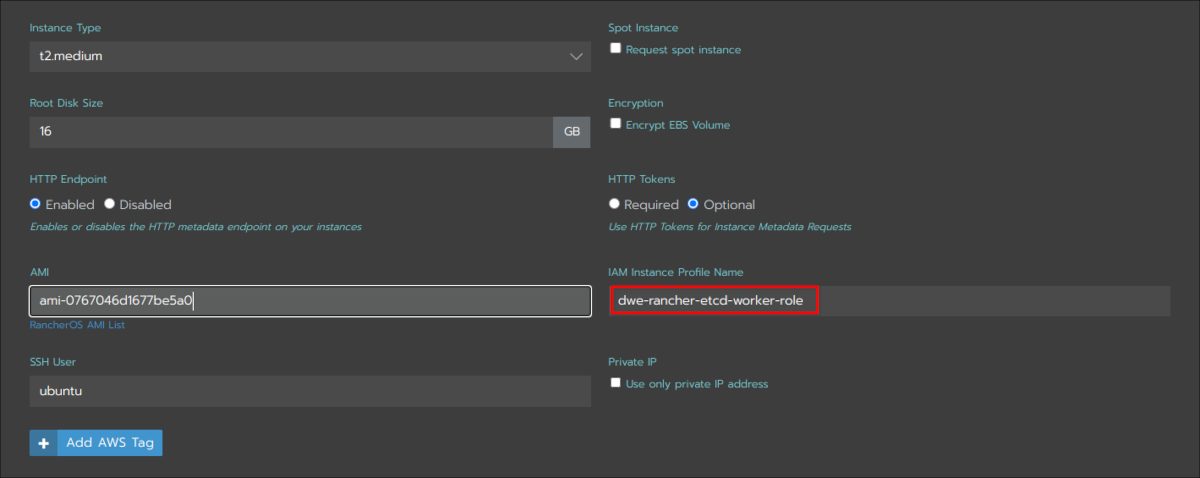
Create a nother node template in exactly the same way as the last one. The only difference is the name and the “IAM instance profile name”, which is now the one for the etcd and the worker nodes:
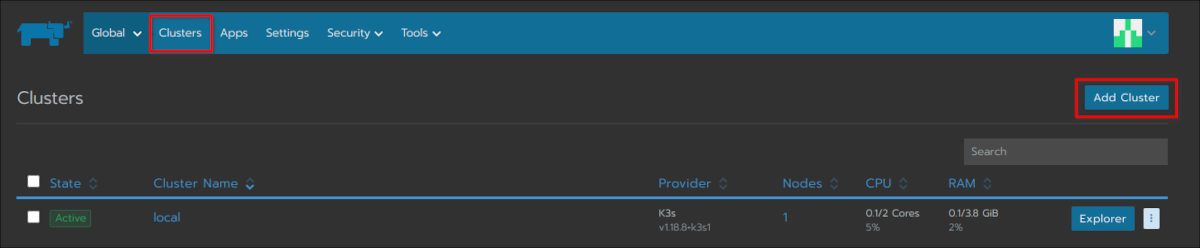
Now we are ready to deploy a brand new Kubernetes cluster on top of EC2:
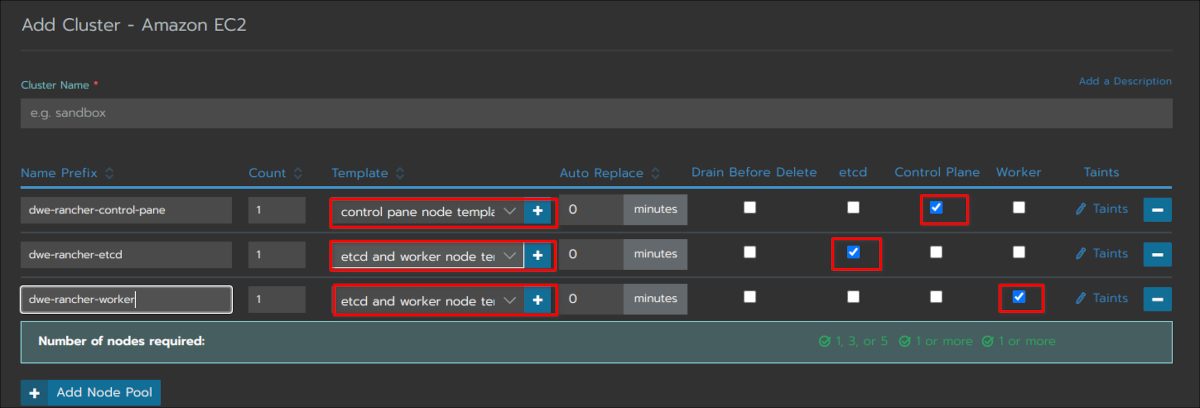
Here you reference the node templates. Make sure you use the control pane template for the control pane, and the other templates for etcd and worker nodes:
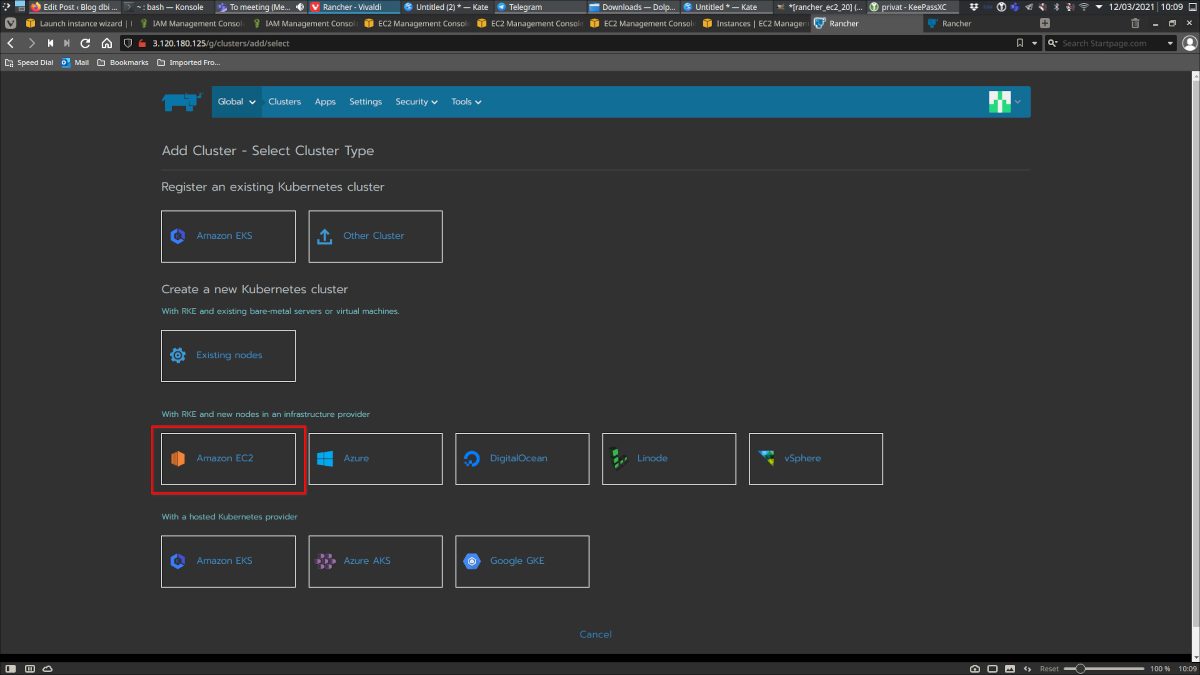
Go with the default and select “AWS” as cloud provider:

Before you press “Create”, it is a good idea to log into your Rancher host and tail the logs of the Rancher container. If anything goes wrong it shows up there:
admin@ip-10-0-1-69:~$ docker ps
CONTAINER ID        IMAGE               COMMAND             CREATED             STATUS              PORTS                                      NAMES
82a08d1aba46        rancher/rancher     "entrypoint.sh"     3 hours ago         Up 3 hours          0.0.0.0:80->80/tcp, 0.0.0.0:443->443/tcp   infallible_hugle
admin@ip-10-0-1-69:~$ docker logs 82a08d1aba46 -f
2021/03/12 06:24:20 [INFO] Rancher version v2.5.6 (65f7c8442) is starting
2021/03/12 06:24:20 [INFO] Rancher arguments {ACMEDomains:[] AddLocal:true Embedded:false BindHost: HTTPListenPort:80 HTTPSListenPort:443 K8sMode:auto Debug:false Trace:false NoCACerts:false AuditLogPath:/var/log/auditlog/rancher-api-audit.log AuditLogMaxage:10 AuditLogMaxsize:100 AuditLogMaxbackup:10 AuditLevel:0 Agent:false Features:}
2021/03/12 06:24:20 [INFO] Listening on /tmp/log.sock
Once you started the cluster creation, you can also monitor the EC2 console and watch the EC instances coming up:
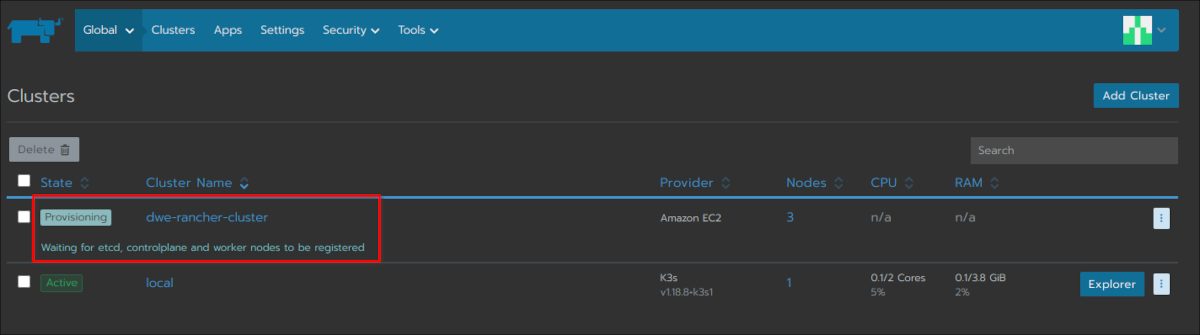


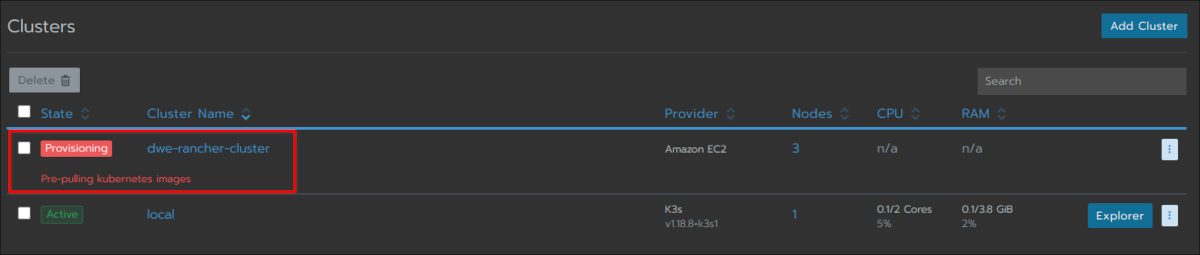
Have a look at the main cluster screen and you should see the status changing several times until the cluster is fully provisioned:


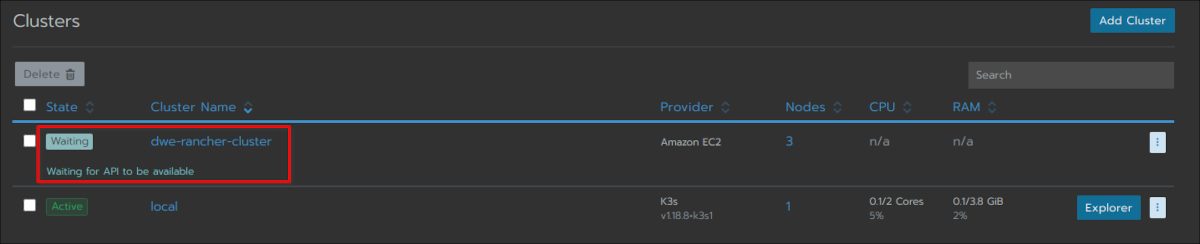


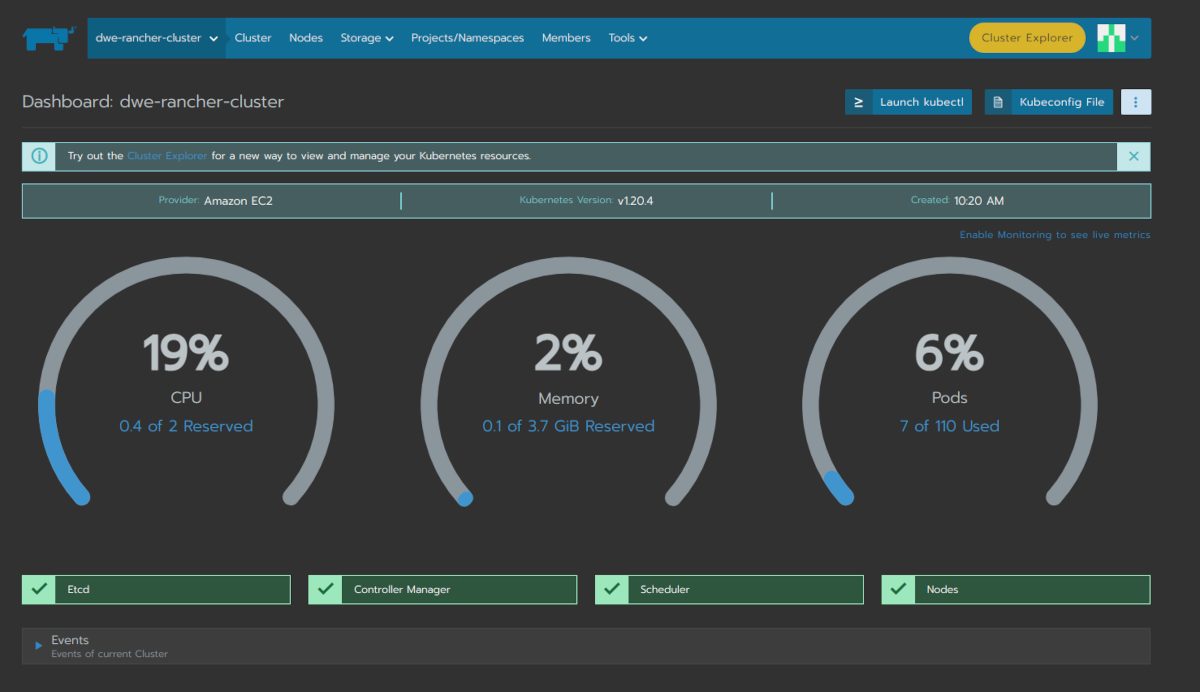
The cluster is fully ready and you can drill into the cluster section:
![Thumbnail [60x60]](https://www.dbi-services.com/blog/wp-content/uploads/2022/08/DWE_web-min-scaled.jpg)
![Thumbnail [90x90]](https://www.dbi-services.com/blog/wp-content/uploads/2022/08/GRE_web-min-scaled.jpg)
![Thumbnail [90x90]](https://www.dbi-services.com/blog/wp-content/uploads/2024/03/AHI_web.jpg)
![Thumbnail [90x90]](https://www.dbi-services.com/blog/wp-content/uploads/2025/07/ALK_MIN.jpeg)
![Thumbnail [90x90]](https://www.dbi-services.com/blog/wp-content/uploads/2025/05/JDE_Web-1-scaled.jpg)