Introduction
Today we will check how to use notification by using shout destination table, indeed sometime it could be useful to be notified about our jobs status ( long execution, late submission failure etc..).
For that kind of need we can use job notifications through shout method. We will explain it below:
- We will use shout destination table to manage notification
- To call scripts
- We will define shout destination and test it with jobs.
Configuration used:
For my tests Iam using Control M 9.0.18 running on a Centos 8
Create a shout destination table:
Using CCM GUI :
- First step we will use the CCM graphical interface to create our shout destinations:
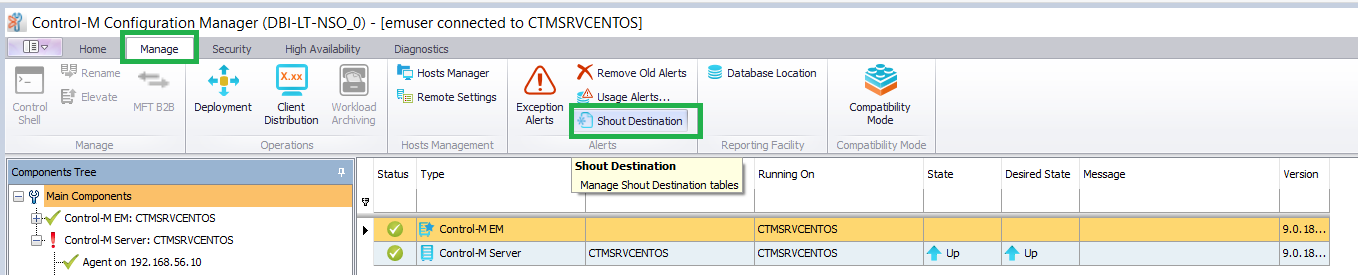
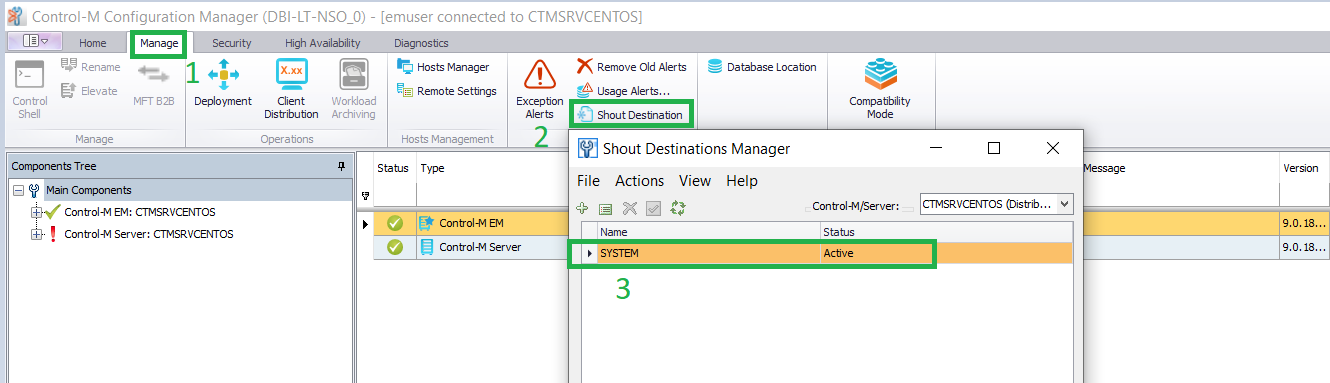
Select SYSTEM
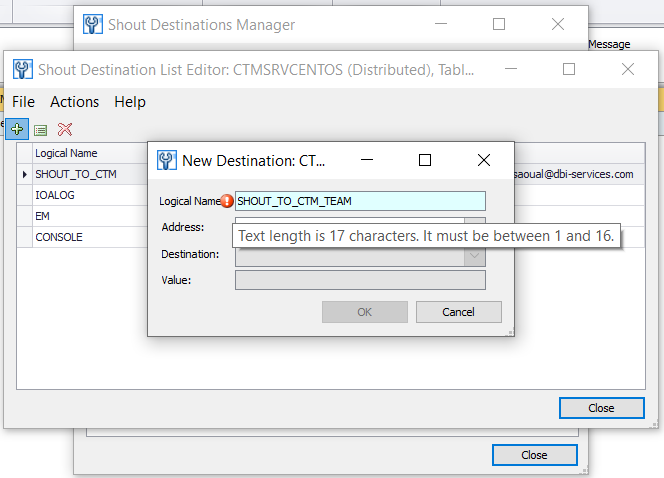
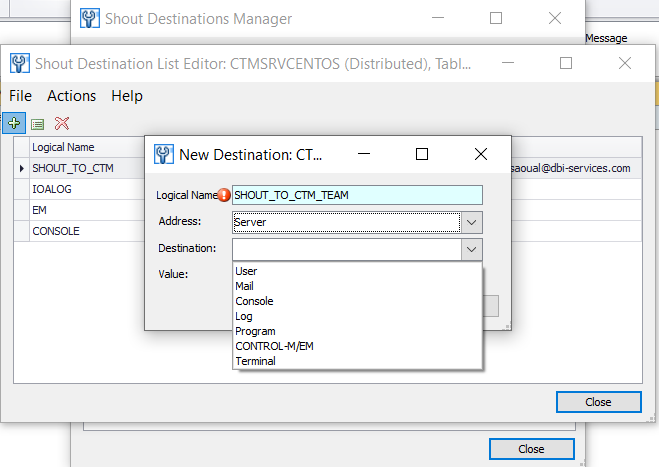
- Now we can create a New destination for our job notifications
Be careful of the maximum number of characters , as you can see on the screen the logical name allows only a max of 16 characters:
- Let’s rename it and select our destination, we will select “server” in the destination’s drop down panel.
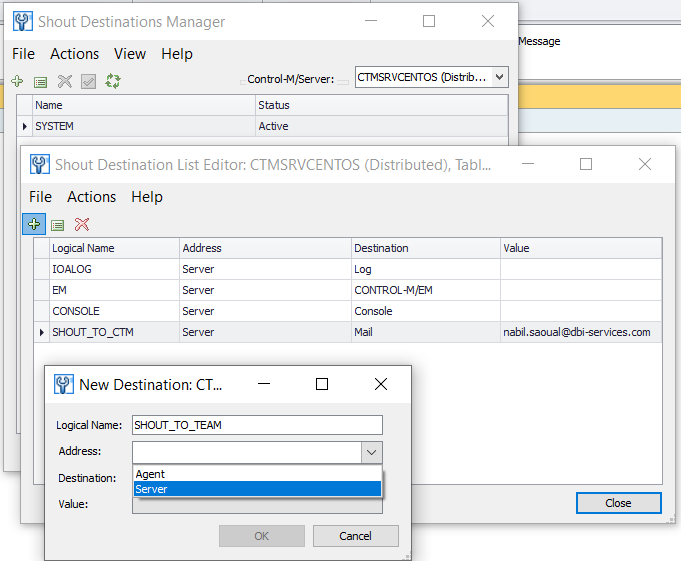
- Now we will check the “destination” which is the most interesting part of this shout configuration because it offers many choices and many ways to use the shout destination manager:
We will come back later to these options especially the “command” option
For the moment as we want to send a mail notification, we will select the “Mail” option:
Warning:
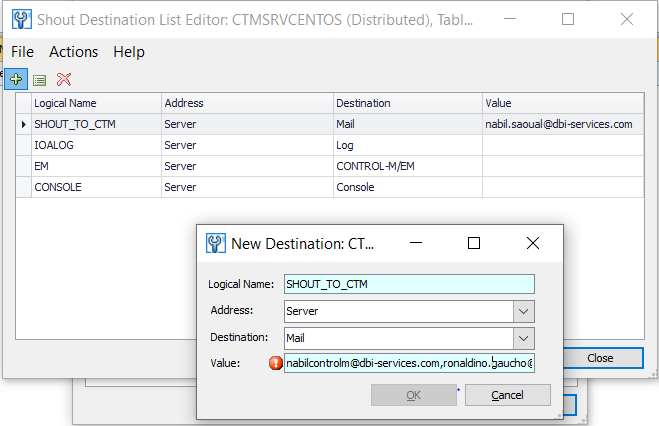
Max number of characters for mail addresses is 98 characters ( but later we will do an interesting test during our job notification sending )
In your configuration you have to separate your mails with a “,” to be effective.
Using cmd mode CTMSYS utility:
You can use also the ctmsys utility by connecting on your controlm server with user controlm
serveurctmv919% ctmsys
+------------------------------------------------+
|      CONTROL-M System Maintenance Utility      |
|                  Main Menu                     |
+------------------------------------------------+

 1)   Shout Destination Tables
 2)   System Parameters
- q) Quit
Enter Option:1
Shout Destination Tables Menu
-----------------------------

Active Shout Destination Table: SYSTEM

1)    Create/Modify a Table
2)    Set Active Table
3)    List Tables
4)    Delete Table
- q) Quit and return to main menu
Enter Option:1

Shout Destination Tables
------------------------
SYSTEM

Table to create/modify or 'q' to quit [SYSTEM]:1

Shout Destination Table '1'
---------------------------

#    Destination Type Adr Logical Name       Physical Name
---  ---------------- --- ----------------- ----------------------------------------------------------------------------------------------------------------------------------------------------------------------------------------------------------------------------------------------------------------
- q) Quit e#) Edit entry # n) New entry d#) Delete entry #
Enter Option:n

Dest. Type: (U)ser, (M)ail, (T)erminal, c(O)nsole, (L)og, (P)rogram, CONTROL-M/(E)M:M
Address Type: (S)erver or (A)gent:S
Logical Name:SHOUT_TO_CTM_TEAM
WARNING we have the same issue than on CCM when we defined the logical name

Logical Name will be truncated to 16 characters.
Physical Name:[email protected]

add completed successfully

you can also edit the shout table by user the second option edit entry with e and the line you want to edit ( here table 1 for example ) :

Shout Destination Table 'SYSTEM'
--------------------------------

#    Destination Type Adr Logical Name       Physical Name
---  ---------------- --- ----------------- ----------------------------------------------------------------------------------------------------------------------------------------------------------------------------------------------------------------------------------------------------------------

  1  O                S   CONSOLE

  2  E                S   EM

  3  L                S   IOALOG

  4  M                S   SHOUT_TO_CTM      [email protected],[email protected]
- q) Quit e#) Edit entry # n) New entry d#) Delete entry #
Enter Option:e4
- q) Quit e#) Edit entry # n) New entry d#) Delete entry #
Enter Option:e4

Dest. Type: (U)ser, (M)ail, (T)erminal, c(O)nsole, (L)og, (P)rogram, CONTROL-M/(E)M [M ]:m
Address Type: (S)erver or (A)gent [S ]:s
Physical Name [[email protected],[email protected]]:[email protected]
- Once we have completed the shout definition then we can use it in a job:
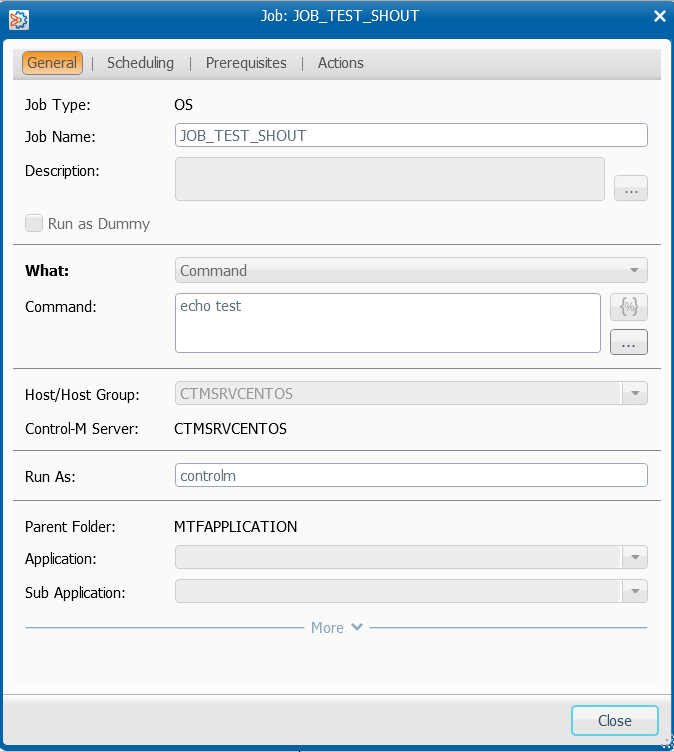
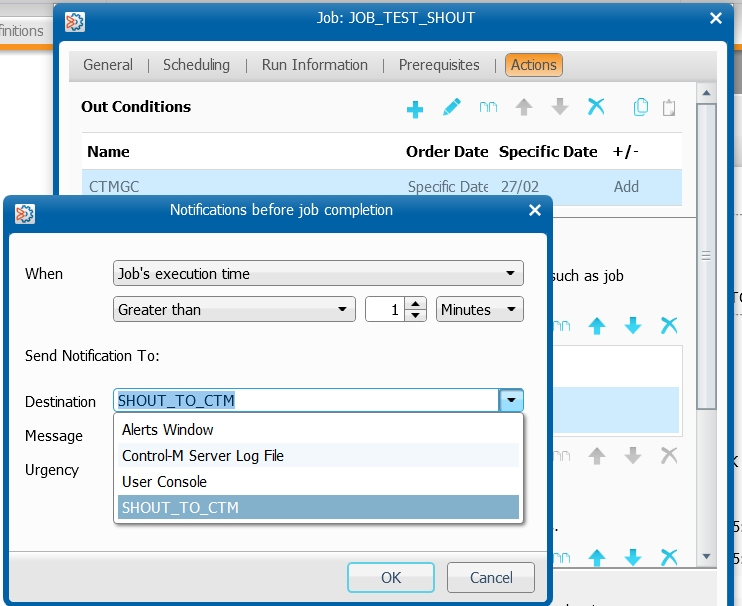
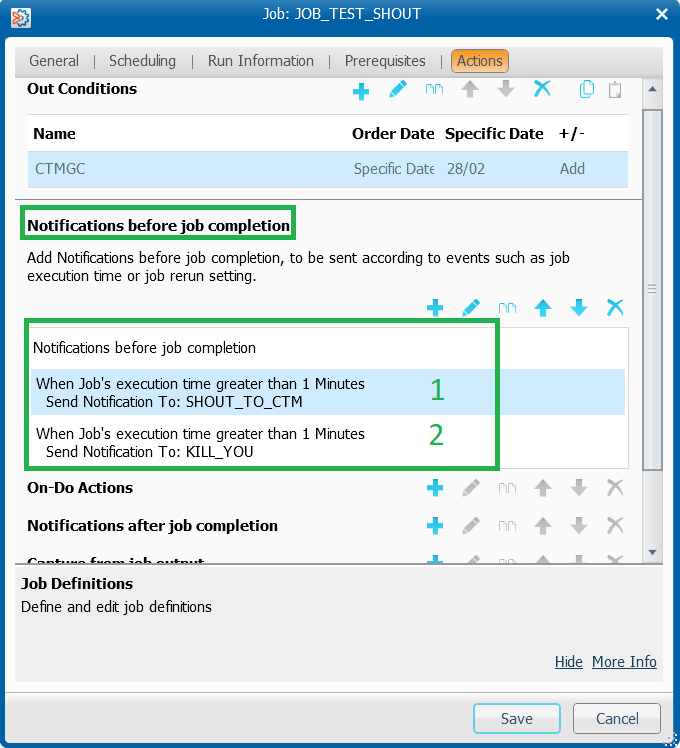
- Go to the actions tab , we will configure the job to generate a notification following a statement or a condition ( for example late execution,in our case the notification will be sent past a minute of execution)
We will update the job with some parameters to call the command
You can notice that you have ton enter the SHOUT NAME the first time to be taken in account ( you can’t see the destination “SHOUT_TO_CTM” until we add it manually .)
When checking the log we can see that the shout is not performed even though job’s configuration is correct.
But Why?
As you know the shout destination table works on smtp protocol so let’s have a look on it
- We will do a check on controlm smtp configuration :
First you have to go to ctm_menu with user controlm and select the choice 4 then make a test with choice 6
CTMSRVCENTOS% ctm_menu
CONTROL-M Main Menu
-----------------------------
Select one of the following menus:
1 - CONTROL-M Manager
2 - Database Menu
3 - Security Authorization
4 - Parameter Customization
5 - Host Group
6 - View HostID details
7 - Agent Status
8 - Troubleshooting
q - Quit

Enter option number ---> []:4
Parameter Customization Menu
-----------------------------
Select one of the following options:
1 - Basic Communication and Operational Parameters
2 - Advanced Communication and Operational Parameters
3 - System Parameters and Shout Destination Tables
4 - Default Parameters for Communicating with Agent Platforms
5 - Parameters for Communicating with Specific Agent Platforms
6 - Simple Mail Transfer Protocol Parameters
q - Quit
Enter option number ---> []:6
Simple Mail Transfer Protocol Parameters Menu
----------------------------------------------
Select one of the following options:
1 - SMTP Server (Relay) Name : localhost.localdomain
2 - Sender Email : CONTROL@M
3 - Port Number : 25
4 - Sender Friendly Name : NabilfromCTMSRV
5 - Reply-To Email : [email protected]
6 - Test SMTP Settings
s - Save Parameters
q - Quit
Enter option number ---> []:6
Testing SMTP Settings...
Enter To-Email []:[email protected]
Test SMTP Setting Failed.
The smtp test failed 🙁 ,the fact is that the service sendmail was not installed and configured !(fresh machine ,hope on your environment you are already up to date!)
- So lets go for installing sendmail!
[root@CTMSRVCENTOS ~]# yum install sendmail*
Dernière vérification de l’expiration des métadonnées effectuée il y a 0:05:23 le jeu. 27 févr. 2020 16:52:04 CET.
Dépendances résolues.
=============================================================================================================================================================
Paquet Architecture Version Dépôt Taille
=============================================================================================================================================================
Installing:
sendmail x86_64 8.15.2-32.el8 AppStream 773 k
sendmail-cf noarch 8.15.2-32.el8 AppStream 198 k
sendmail-doc noarch 8.15.2-32.el8 AppStream 581 k
sendmail-milter x86_64 8.15.2-32.el8 AppStream 82 k
Installation des dépendances:
procmail x86_64 3.22-47.el8 AppStream 180 k
Résumé de la transaction
=============================================================================================================================================================
Installer 5 Paquets
Taille totale des téléchargements : 1.8 M
Taille des paquets installés : 4.7 M
Voulez-vous continuer ? [o/N] : o
Téléchargement des paquets :
(1/5): procmail-3.22-47.el8.x86_64.rpm 62 kB/s | 180 kB 00:02
(2/5): sendmail-cf-8.15.2-32.el8.noarch.rpm 58 kB/s | 198 kB 00:03
(3/5): sendmail-milter-8.15.2-32.el8.x86_64.rpm 247 kB/s | 82 kB 00:00
(4/5): sendmail-8.15.2-32.el8.x86_64.rpm 168 kB/s | 773 kB 00:04
(5/5): sendmail-doc-8.15.2-32.el8.noarch.rpm 343 kB/s | 581 kB 00:01
-------------------------------------------------------------------------------------------------------------------------------------------------------------
Total 279 kB/s | 1.8 MB 00:06
Test de la transaction en cours
La vérification de la transaction a réussi.
Lancement de la transaction de test
Transaction de test réussie.
Exécution de la transaction
Préparation en cours : 1/1
Installing : procmail-3.22-47.el8.x86_64 1/5
Exécution du scriptlet: sendmail-8.15.2-32.el8.x86_64 2/5
Installing : sendmail-8.15.2-32.el8.x86_64 2/5
Exécution du scriptlet: sendmail-8.15.2-32.el8.x86_64 2/5
Installing : sendmail-cf-8.15.2-32.el8.noarch 3/5
Installing : sendmail-doc-8.15.2-32.el8.noarch 4/5
Installing : sendmail-milter-8.15.2-32.el8.x86_64 5/5
Exécution du scriptlet: sendmail-milter-8.15.2-32.el8.x86_64 5/5
Vérification de : procmail-3.22-47.el8.x86_64 1/5
Vérification de : sendmail-8.15.2-32.el8.x86_64 2/5
Vérification de : sendmail-cf-8.15.2-32.el8.noarch 3/5
Vérification de : sendmail-doc-8.15.2-32.el8.noarch 4/5
Vérification de : sendmail-milter-8.15.2-32.el8.x86_64 5/5
Installé:
sendmail-8.15.2-32.el8.x86_64 sendmail-cf-8.15.2-32.el8.noarch sendmail-doc-8.15.2-32.el8.noarch sendmail-milter-8.15.2-32.el8.x86_64
procmail-3.22-47.el8.x86_64
Terminé !
- After the completion of sendmail service installation,you have to configure it.
Let’s follow this link to make you own configuration:
Once the sendmail configurations step is done we will make again a quick check to the controlm smtp parameters:
Simple Mail Transfer Protocol Parameters Menu
----------------------------------------------

Select one of the following options:

1 - SMTP Server (Relay) Name : localhost.localdomain
2 - Sender Email             : CONTROL@M
3 - Port Number              : 25
4 - Sender Friendly Name     : NabilfromCTMSRV
5 - Reply-To Email           : [email protected]
6 - Test SMTP Settings

s - Save Parameters

q - Quit

 Enter option number --->   [6]:6

Testing SMTP Settings...
Enter To-Email [[email protected]]:[email protected]

Test SMTP Setting completed successfully.

Press Enter to continue
The test is now OK we are able to send mails using notifications.
In the job’s log we have the shout that is performed:

And on the email destination defined in ctmsys we have the notification:
![]()
Using a script with shout destination table
How about killing a job executing a too long time using shout destination table?
We can use the script ctmkilljob in association with shout destination table to activate it on a job with notification:
We have to add the order ID after the command in order to kill the job:
Lets try the command line to kill a job :
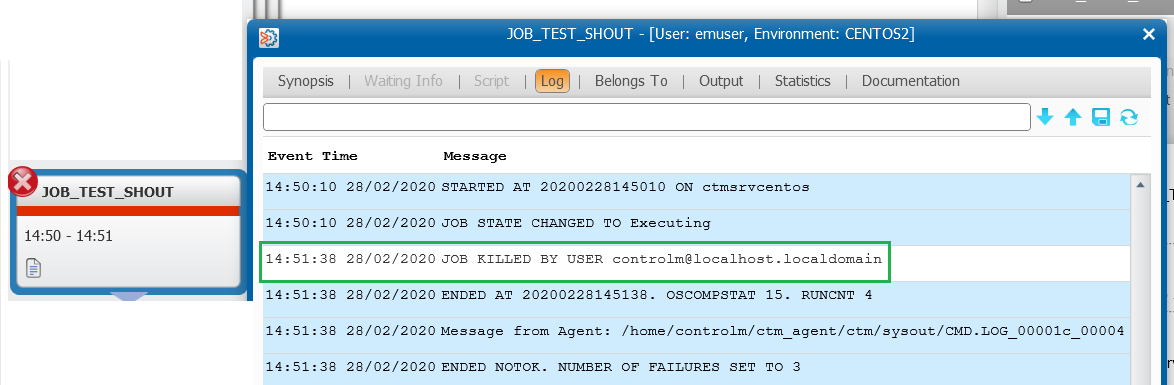
[ctmag900@CTMSRVCENTOS exe_9.0.18.200]$ /home/controlm/ctm_agent/ctm/exe_9.0.18.200/ctmkilljob -ORDERID 0001C
Output:
Job was killed. Result: Success.
You have to add the orderid (reminder: it’s a unique identifier for a job following his order date ) after the script to have your job killed on the workflow
Lets have a look on controlm workflow:
Job is killed as expected
- So next step is to call this command through ctmsys ( shout destination table ).
To make the thing more interesting we will make our own script and configure the jobs to be killed following the conditions we want ( late sub,too long execution etc etc…)
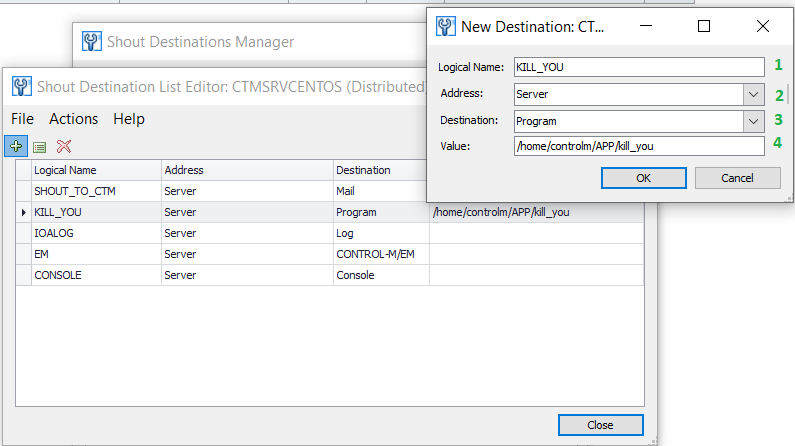
Create the script and adding it in ctmsys shout destination table:
Following this way we can configure jobs to be killed depending on the conditions we want ( late sub,too long execution etc etc.)
- To kill a too long execution of a job using CTMSYS ,we will create a script in a folder you have chosen and give it the correct level rights to be executed by user control for example:
CTMSRVCENTOS% cat /home/controlm/APP/kill_you
#!/bin/sh
ctmkilljob -ORDERID $2 &
CTMSRVCENTOS% chmod 755 /home/controlm/APP/kill_you
CTMSRVCENTOS% id
uid=1001(controlm) gid=3110(controlm) groups=3110(controlm)
CTMSRVCENTOS% ls -lart /home/controlm/APP/kill_you
-rwxr-xr-x. 1 controlm controlm 35 Feb 28 08:19 /home/controlm/APP/kill_you
- Once your script is prepared, we have to add it in ctmsys as below:
Select in destination drop down menu program
Add the name of your script with the complete path:
- Be careful to add in the message the variable ORDERID in order to be used by the script called in CTMSYS:
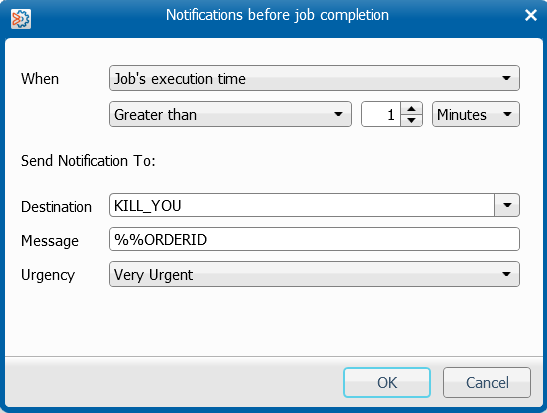
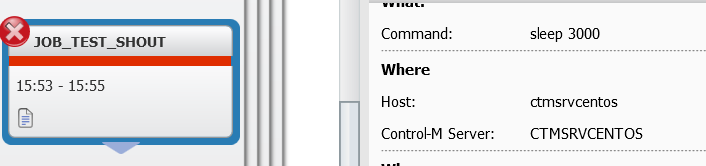
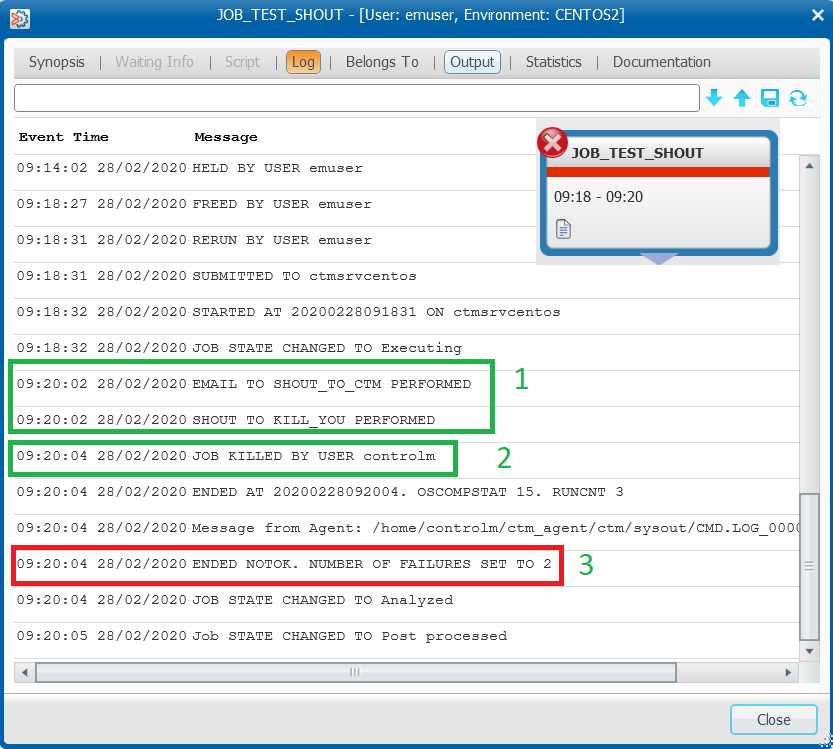
- After this preparation we will now be able to run our job and see if it will send a late execution mail and also if the shout will kill it after 1 minute:
- After having run the job we can see in job’s log that he was killed after a minute as required :
Conclusion
There are many ways to use ctmsys,indeed we only have used a small part of its possibilities for our examples,so you can adapt this tool to your needs,don’t hesitate to give a feed back about what you tried from your side!
Once again you can consult the BMC support site to get more info and check also this video
https://www.youtube.com/watch?v=e2U7wJcMutg
Be sure to check every blog updates on dbi-services especially on Control M 😀 and enjoy trying other action using ctmsys utility!
Next time we will see how to use the mass update and see some useful examples.
![Thumbnail [90x90]](https://www.dbi-services.com/blog/wp-content/uploads/2022/09/DDI_web-min-scaled.jpg)