After showing you an overview and the preparation of Control-M for Kubernetes, it is time to deep in with the installation of this solution. In fact, without the installation of Control-M for Kubernetes you can’t modernize your batch!
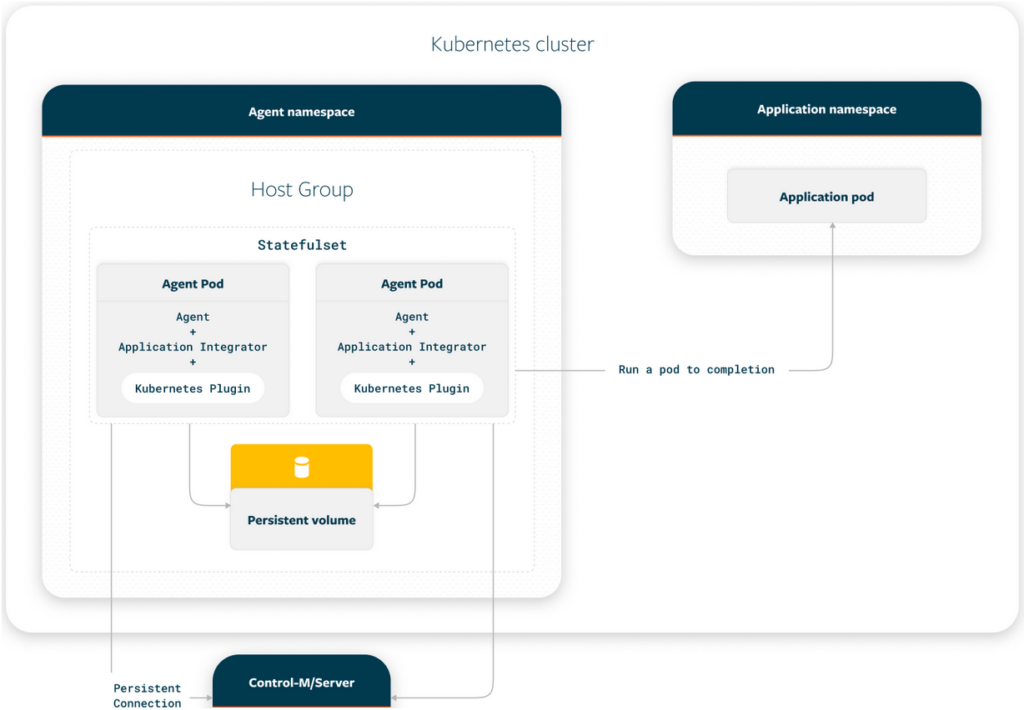
In this blog, I will share with you how to do the installation of this solution step by step. Let’s remember the architecture.

Deploy kubernetes Plug-in
Firstly, download the Kubernetes Plugin, download the version 2.0.00 from the Kubernetes plug-in download page in the Electronic Product Distribution site.

Once downloaded, publish the plug-in by putting the zip file in the following location:
$HOME_CTM/ctm_em/AUTO_DEPLOY
Generate an API Token
Basically, the API Token will be used later in the next step. In fact, we need to set up access to Control-M to register the Control-M/Agents, for sure, this step should be done by a Control-M Administrator.
I assume that you know what is an API Token, and how to generate it, below are the steps quickly.
To generate the API Token, go to the Control-M UI -> Configuration, from the drop-down list, select API Tokens.
The API Token tab appears, click Add Token.

To generate the API Token, fill the following:
- The Token Name field.
- The Roles field, remove or select the roles that you want to associate with the API Token (by default all roles are selected, which is not recommended).
- Expiration Date, select Indefinitely from the drop-down list.
Click on Generate button.
Prepare the Control-M Agent deployment
I recommend to deploy the agent using the Helm shared by BMC! It is easy to configure and to maintain in a Kubernetes cluster.
First of all, add a repository named controlm to contain the helm charts of the Control-M/Agent that is obtained from the Control-M Repository by running the following:
helm repo add controlm https://controlm-charts.s3.us-west-2.amazonaws.com/
Then, ensure that the Control-M repository is listed as one of your repositories by running the following command line:
helm repo listYou can also list the charts within the new controlm repo by running the following command:
helm search repo controlmCreate the namespace, by executing the following:
kubectl create namespace ctmagt
Control-M Agent deployment
To deploy the Control-M Agent you should execute the Helm Install inside your kubernetes cluster:
helm install ctm-dbi controlm/controlm-agent --version 9.21.200 \
--set server.name=dbitest --set server.host=dbitest --set server.port=7005 --set server.ip=XX.XX.XX.XX \
--set api.endpoint=https://dbitest.x.com:8446/automation-api \
--set api.token=b2XXXXXXXXXXXXXXXXXXXXXXXXXXXXXXXXXXX== \
--set pvc.storageClass=dbistorage
Adapt the command line to your environment!
Check the pod status on the namespace (ctmagt) just created, once the agents pods are ready, check if they appear in Control-M -> Configuration.
By default, two pods should be created, two agents deployed. Sometimes agents are not available directly, don’t hesitate to disable and enable them.
Conclusion
Finally, we have two Control-M agents deployed on Kubernetes.
In the next blog we will see how to create the connection profile, and how to create Control-M jobs to execute Kubernetes jobs.
![Thumbnail [60x60]](https://www.dbi-services.com/blog/wp-content/uploads/2022/09/DDI_web-min-scaled.jpg)
![Thumbnail [90x90]](https://www.dbi-services.com/blog/wp-content/uploads/2025/05/martin_bracher_2048x1536.jpg)
![Thumbnail [90x90]](https://www.dbi-services.com/blog/wp-content/uploads/2024/03/AHI_web.jpg)
![Thumbnail [90x90]](https://www.dbi-services.com/blog/wp-content/uploads/2022/08/HER_web-min-scaled.jpg)
raghavendra
21.04.2025In the next blog we will see how to create the connection profile, and how to create Control-M jobs to execute Kubernetes jobs.
May i know the next blog link?
David Diab
22.04.2025Hi,
Unfortunately, I didn't get the time yet to publish the next blog. Please contact me on LinkedIn to see how I can help.
https://www.linkedin.com/in/david-diab-19596045/
Regards,
David