Introduction:
Security is an important matter when using or allowing access to your database.You need to be sure that nobody will harm your infrastructure by passing some dangerous commands.
Aim is to limit the access to user to specifics rights when he will authenticate on the database.
For that we will use the Redis ACL feature.
Let’s see how it works!
Definition
ACL stands for access control list.
It is the functionality that allows certain connections to be limited in terms of the commands that can be executed and the keys that can be accessed.
It works as follows:
After logging in, a client must provide a valid username and password to authenticate itself. If authentication is successful, the connection is associated with a given user and the limits available to that user.
Redis can be configured so that new connections are already authenticated with a “default” user (this is the default configuration).
Note:
The default user configuration has the side effect of only providing a specific subset of functionality to connections that are not explicitly authenticated.
In the default configuration, Redis 6 (the first version to have ACL) works exactly like older versions of Redis.
Each new connection is able to call all possible commands and access all keys, so the ACL functionality is backwards compatible with older clients and applications.
The old way of setting a password, using the “requirepass” configuration directive, still works as expected. However, it now defines a password for the default user
Know your Redis version
To check your Redis version you have many ways:
- Use the redis-server –version in the terminal
nso@DBI-LT-NSO:~> redis-server --version
- Use the INFO in the redis CLI , this command will give you all kind of information on your redis server
If you are not in the CLI use directly redis-cli INFO in the terminal
127.0.0.1:6379> INFO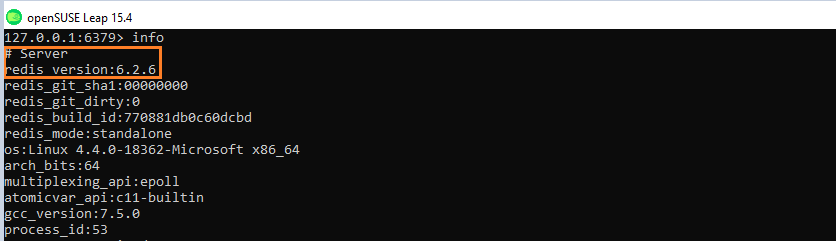
Authentication command
- The Redis
AUTHcommand was extended in Redis 6, so now it is possible to use it in the two-arguments form:

- Log with your username and password, Redis CLi will prompt you with a OK in case of success

- Check that you are with the correct user ( we will see how to create and how to allow identification later )
Use the ACL whoami command
127.0.0.1:6379> ACL WHOAMI( remember commands are not case sensitive )

When ACL is efficient
There is two main reasons to use ACL:
- You want to improve security by limiting access to commands and keys, so that untrusted clients have no access at all and trusted clients have just the minimum level of access to the database to do the necessary work. For example, you can allow clients to only execute read-only commands.
- You want to improve operational security, so that processes or people accessing Redis cannot damage data or configuration due to software errors or manual mistakes. For example, there is no reason why an working trying to fetch delayed jobs from Redis should be able to call dangerous commands such as the FLUSHALL command
You can get more info and use case of ACL by checking the Redis official site
Configure ACL
To configure the right access for our users, we will use the DSL command ACL command
Note:
Such rules are always implemented from the first to the last, left-to-right, because sometimes the order of the rules is important to understand what the user is really able to do.
List your users
- The default user defined in Redis is called default
You can list all the users created by using the command ACL LIST
127.0.0.1:6379> ACL LIST
As you can see I have created other users with different ACL, we will analyze also the different component of this ACL LIST output
ACL LIST description and format
ACL list command reports the list of users in the same format that is used in the Redis configuration files, by translating the current ACLs set for the users back into their description.
let’s take the default user as example:
"user default on nopass ~* &* +@all"- The first two words in each line are “user” ,then you have the username (here default).
- The on/off part shows if account is active (on) or not (off)
- Next part is related to password to require no password (nopass) otherwise a password is set it is displayed as a long hex string that looks pseudo random ( note: Redis Redis internally stores passwords hashed with SHA256.the password topic will be seen later )
- To access every possible key (
~*) - To acces Pub/Sub channel (
&*) - To be able to call every possible command
+@all.To disable use-@all
Also, in the special case of the default user, having the nopass rule means that new connections are automatically authenticated with the default user without any explicit AUTH call needed.
ACL Rules
The following is the list of valid ACL rules extracted from the Redis site.
Certain rules are just single words that are used in order to activate or remove a flag, or to perform a given change to the user ACL.
Other rules are char prefixes that are concatenated with command or category names, key patterns, and so forth.
Enable and disallow users:
As explained above with the default user we know now how to enable or disable the user:
on: Enable the user: it is possible to authenticate as this user.off: Disallow the user: it’s no longer possible to authenticate with this user; however, previously authenticated connections will still work. Note that if the default user is flagged as off, new connections will start as not authenticated and will require the user to sendAUTHorHELLOwith the AUTH option in order to authenticate in some way, regardless of the default user configuration.

Allow/Disallow commands:
+<command>: Add the command to the list of commands the user can call. Can be used with|for allowing subcommands (e.g “+config|get”).-<command>: Remove the command to the list of commands the user can call. Starting Redis 7.0, it can be used with|for blocking subcommands (e.g “-config|set”).+@<category>: Add all the commands in such category to be called by the user, with valid categories being like @admin, @set, @sortedset, … and so forth, see the full list by calling theACL CATcommand. The special category @all means all the commands, both the ones currently present in the server, and the ones that will be loaded in the future via modules.-@<category>: Like+@<category>but removes the commands from the list of commands the client can call.+<command>|first-arg: Allow a specific first argument of an otherwise disabled command. It is only supported on commands with no sub-commands, and is not allowed as negative form like -SELECT|1, only additive starting with “+”. This feature is deprecated and may be removed in the future.allcommands: Alias for +@all. Note that it implies the ability to execute all the future commands loaded via the modules system.nocommands: Alias for -@all.
Allow and disallow certain keys and key permissions:
~<pattern>: Add a pattern of keys that can be mentioned as part of commands. For instance~*allows all the keys. The pattern is a glob-style pattern like the one ofKEYS. It is possible to specify multiple patterns.%R~<pattern>: (Available in Redis 7.0 and later) Add the specified read key pattern. This behaves similar to the regular key pattern but only grants permission to read from keys that match the given pattern. See key permissions for more information.%W~<pattern>: (Available in Redis 7.0 and later) Add the specified write key pattern. This behaves similar to the regular key pattern but only grants permission to write to keys that match the given pattern. See key permissions for more information.%RW~<pattern>: (Available in Redis 7.0 and later) Alias for~<pattern>.allkeys: Alias for~*.resetkeys: Flush the list of allowed keys patterns. For instance the ACL~foo:* ~bar:* resetkeys ~objects:*, will only allow the client to access keys that match the patternobjects:*.
Allow or disallow Pub/Sub channels:
&<pattern>: (Available in Redis 6.2 and later) Add a glob style pattern of Pub/Sub channels that can be accessed by the user. It is possible to specify multiple channel patterns. Note that pattern matching is done only for channels mentioned byPUBLISHandSUBSCRIBE, whereasPSUBSCRIBErequires a literal match between its channel patterns and those allowed for user.allchannels: Alias for&*that allows the user to access all Pub/Sub channels.resetchannels: Flush the list of allowed channel patterns and disconnect the user’s Pub/Sub clients if these are no longer able to access their respective channels and/or channel patterns.
Configure valid passwords for the user:
><password>: Add this password to the list of valid passwords for the user. For example>mypasswill add “mypass” to the list of valid passwords. This directive clears the nopass flag (see later). Every user can have any number of passwords.<<password>: Remove this password from the list of valid passwords. Emits an error in case the password you are trying to remove is actually not set.#<hash>: Add this SHA-256 hash value to the list of valid passwords for the user. This hash value will be compared to the hash of a password entered for an ACL user. This allows users to store hashes in theacl.conffile rather than storing cleartext passwords. Only SHA-256 hash values are accepted as the password hash must be 64 characters and only contain lowercase hexadecimal characters.!<hash>: Remove this hash value from the list of valid passwords. This is useful when you do not know the password specified by the hash value but would like to remove the password from the user.nopass: All the set passwords of the user are removed, and the user is flagged as requiring no password: it means that every password will work against this user. If this directive is used for the default user, every new connection will be immediately authenticated with the default user without any explicit AUTH command required. Note that the resetpass directive will clear this condition.resetpass: Flushes the list of allowed passwords and removes the nopass status. After resetpass, the user has no associated passwords and there is no way to authenticate without adding some password (or setting it as nopass later).
Note: if a user is not flagged with nopass and has no list of valid passwords, that user is effectively impossible to use because there will be no way to log in as that user.
Configure selectors for the user:
(<rule list>): (Available in Redis 7.0 and later) Create a new selector to match rules against. Selectors are evaluated after the user permissions, and are evaluated according to the order they are defined. If a command matches either the user permissions or any selector, it is allowed. See selectors for more information.clearselectors: (Available in Redis 7.0 and later) Delete all of the selectors attached to the user.
Reset the user:
resetPerforms the following actions: resetpass, resetkeys, resetchannels, allchannels (if acl-pubsub-default is set), off, clearselectors, -@all. The user returns to the same state it had immediately after its creation.
Allow and block commands
To allow and block commands you must use the @all argument (You can be more granular by using +/- to add or disable commands).
+@all will enable all commands , even the most critical
-@all will disable the commands
Create and edit user ACLs
- Let’s create a user and grant him only “GET” command ( we will test if all is working as expected then give more rights)

If you input the above command it will send you OK but when you will try to authenticate you will get an issue because we didn’t set a password and also the on option is not activated

- Let’s add a password and see if we can login ( the argument to add password is >[your_password])
127.0.0.1:6379> ACL SETUSER NEW_USER on N4b1l +getExample:

- We are able to login but still not able to use the “GET” command on the keys,let’s add the correct pattern
~* ( wildcard stands for all the keys )
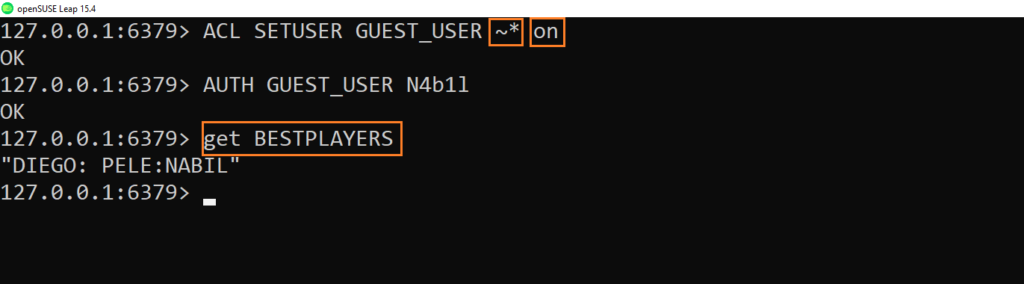
- That’s it, we can display the keys by using the “GET” command
- Let’s try to add an element to the BESTPLAYERS key

- Redis output indicate that we are not allowed to use the “SET” command
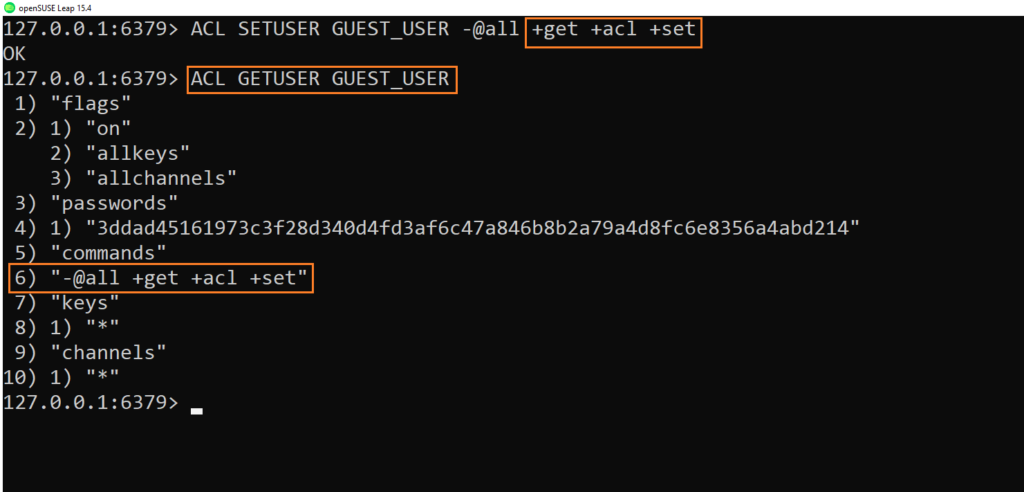
We will add specific commands by using -@all followed by the command you want to enable ( here SET and also ACL command to have the whoami feature)
127.0.0.1:6379> ACL SETUSER GUEST_USER -@all +get +acl +setThe command will give the right to user GUEST_USER for the command get for the “ACL” command and for the “SET” command
- We can check also if the rights are set as expected :
127.0.0.1:6379> ACL GETUSER GUEST_USER
- Try again to the pass the SET command

- It is working and also we are able to use “ACL WHOAMI” command to know what is our current user session.
Conclusion
This is the end of the first part , now you know how and why you can use Redis ACL.
You can enhance your database security by limiting the access to users in order to let them do only what they have to do.We know also how to list the users and see their right access level.
Next time we will see how to give specific rights and also the different command categories.
We will also see how to allow or block sub-commands and even more security features 🙂
Don’t hesitate to view or review my previous blogs and also my colleagues blogs.
Stay tuned for the part 2 of how to use Redis ACL 😉 .
![Thumbnail [90x90]](https://www.dbi-services.com/blog/wp-content/uploads/2025/05/JDE_Web-1-scaled.jpg)