Welcome to this comprehensive guide on implementing persistent data in your Vue application using Pinia! If you’re already running a Vue application with Pinia, you’re in the right place. But if you’re not there yet, don’t worry – I’ve got you covered.
Before we dive into the details, if you haven’t set up a Vue app with Pinia yet, make sure to check out my previous blog post titled “Setting Up Your First Pinia Store in Vue with TypeScript: A Comprehensive Guide”, that explains how to create a Vue app using Pinia store and typescript support.
If you’re already comfortable with Vue and Pinia, you can jump right into the action with the Stackblitz I created for you:
https://stackblitz.com/edit/vitejs-vite-cbygxb?file=.vscode%2Fsnippets.json
There are multiple of way of getting persistent data with Pinia, we will study two of them:
The use of the pinia-plugin-persistedstate and the use of the localStorage from Vue.
Pinia-plugin-persistedstate

Introduction
The goal of the pinia-plugin-persistedstate plugin is to offer persistence to Pinia stores, making it accessible to everyone and in any project through a unified API. Whether you prefer the default settings to save an entire store or require detailed customization with multiple storages and a personalized serializer, this plugin is made for you. It conveniently provides the persist option within the store you wish to persist, ensuring a seamless and consistent experience.
Is this plugin needed ?
“Short answer: “no”. There are a lot of solutions to persist store data in storages such as localStorage that don’t even involve injecting a plugin into Pinia.”
Note: We’ll see a solution using localStorage in the second part of this blog.
Installation
First, we need to get the depency
npm i pinia-plugin-persistedstatethen, add the plugin to your Pinia instance inside the main.ts file
import { createApp } from 'vue'
import { createPinia } from 'pinia'
import piniaPluginPersistedstate from 'pinia-plugin-persistedstate'

import App from './App.vue'
import router from './router'

const app = createApp(App)

const pinia = createPinia()
pinia.use(piniaPluginPersistedstate)
app.use(pinia)
app.use(router)

app.mount('#app')
Configuration
Finally, in your store, add the persist option and set it to true
import { ref, computed } from 'vue'
import { defineStore } from 'pinia'

export const useCounterStore = defineStore(
  'counter',
  () => {
    const count = ref(0)
    const doubleCount = computed(() => count.value * 2)
    function increment() {
      count.value++
    }

    return { count, doubleCount, increment }
  },
  {
    persist: true
  }
)
Test
Start your application and open it in the browser:
npm run devClick on the increment button
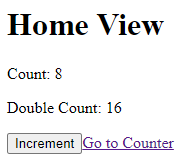
Refresh the page and … Tada, the value for the count property is still here.
Bonus
By default with the plugin, it’s important to notice that when using the persist option, the data are saved in the localStorage. The id of the store is used as a default key for storage (in our case, “counter”). The default serializer/deserializer used is JSON.stringify / JSON.parse.
If you wish to change this default behavior, it’s possible by passing an object to the persist property. You can find more information in the documentation of the plugin.
Default LocalStorage Method
Introduction
Using localStorage with Pinia is one of the best way to persist values without installing additional plugins.
Without Pinia you would usually use the Vue watch function combined with localStorage. The watch function allows you to observe changes to the properties and execute custom logic when the property changes.
Pinia stores are inherently reactive, meaning that any changes made to the store’s data will automatically trigger reactivity updates in any component that is using that data. When you update the state in a Pinia store, all components that are using that state will automatically re-render to reflect the updated data.
To achieve persistent data with Pinia, you’ll need to combine it with some form of data storage, such as local storage. And this is exactly what we are going to do now.
Configuration
First, update your store to save counter state into the local storage.
Comment the persist object used previously.
import { ref, computed } from 'vue'
import { defineStore } from 'pinia'

export const useCounterStore = defineStore(
  'counter',
  () => {
    // Load the initial data from localStorage or default to 0
    const initialCount = JSON.parse(localStorage.getItem('counterData') || '0')
    const count = ref(initialCount)
    const doubleCount = computed(() => count.value * 2)
    function increment() {
      count.value++
      // Save the updated data to localStorage whenever it changes
      localStorage.setItem('counterData', JSON.stringify(count.value))
    }

    return { count, doubleCount, increment }
  }
  // {
  //   persist: true
  // }
)
Test
If you restart your application and play with it, you’ll notice that data are still in the localStorage.
We might want to have the possibilities to clear our localStorage.
How to clear localStorage
The easiest idea is to add a button that clears our localStorage when we want to. To achieve that, we’ll start by adding a new action “clearLocalStorage” to our store:
...
function clearLocalStorage() {
      localStorage.removeItem('counterData');
    }

    return { count, doubleCount, increment, clearLocalStorage }
...
Add a button in the template of our views to call the clearLocalStorage() action:
<button @click="counter.clearLocalStorage()">Clear</button>Click the clear button. The data are not reset to 0, you need to refresh the page, why is that?
We are currently clearing the data from the localStorage, but the state of our store is not impacted by that. The value of the count property is reset to 0 after a refresh of the page, because it takes its value from the localStorage on store initialization.
Let’s edit our code to fix that:
function clearLocalStorage() {
      count.value = 0;
      localStorage.removeItem('counterData');
}
With this update, the reset action will set the count value 0 before clearing the localStorage. As a result, the count will be reset to its initial value every time you click the “Reset” button, ensuring that the store state and localStorage stay in sync.
Conclusion
In conclusion, making data persistent with Pinia offers a powerful way to maintain state across sessions and ensure a seamless user experience. In this blog, we explored two methods of achieving persistence: using the pinia-plugin-persistedstate and leveraging the default LocalStorage method.
Both methods have their merits, and the choice between them depends on the complexity and requirements of the project.
In the end, whether you opt for the pinia-plugin-persistedstate or use the default LocalStorage method, Pinia empowers you to create robust Vue applications with persistent data. To delve deeper into the pinia-plugin-persistedstate and explore its full capabilities, you can refer to the documentation provided.
References
https://prazdevs.github.io/pinia-plugin-persistedstate/guide/
![Thumbnail [60x60]](https://www.dbi-services.com/blog/wp-content/uploads/2022/08/FRJ_web-min-scaled.jpg)
![Thumbnail [90x90]](https://www.dbi-services.com/blog/wp-content/uploads/2022/08/NME_web-min-scaled.jpg)