Adding a parallax effect to your website brings a smooth, professional feel, making it more interactive and visually appealing. With Swiper for Vue, you can easily implement parallax effects for a slideshow. In this guide, we’ll create a parallax effect using Vue 3 and explore additional features to enhance this effect.
I. Create a New Vue 3 Project
Let’s start from scratch to create a Vue 3 app and set up Swiper to create a parallax slider. Here’s a step-by-step guide to set up the environment and build an awesome parallax effect.
blogger@PC MINGW64 ~/Documents/Blogs/parallax-vue-awesome
$ npm init vue@latest my-parallax-app
Need to install the following packages:
  [email protected]
Ok to proceed? (y) y

Vue.js - The Progressive JavaScript Framework

√ Add TypeScript? ... No / Yes
√ Add JSX Support? ... No / Yes
√ Add Vue Router for Single Page Application development? ... No / Yes
√ Add Pinia for state management? ... No / Yes
√ Add Vitest for Unit Testing? ... No / Yes
√ Add an End-to-End Testing Solution? » No
√ Add ESLint for code quality? ... No / Yes
√ Add Prettier for code formatting? ... No / Yes
√ Add Vue DevTools 7 extension for debugging? (experimental) ... No / Yes

Scaffolding project in C:\Users\blogger\Documents\Blogs\parallax-vue-awesome\my-parallax-app...

Done. Now run:

  cd my-parallax-app
  npm install
  npm run format
  npm run dev
II. Install Vue Swiper
Next, install Swiper:
npm install swiper
III. Set Up the Project Structure
Inside the project, let’s create a new component for our parallax slider. We’ll place this in the components folder for organization.
Create a file named AwesomeParallax.vue in the src/components folder:
src
└── components
    └── ParallaxSlider.vue
I also added the pictures that I’ll be using for the Parallax into the assets directory (Pictures are mine 📷). In the end, you should have at least the following structure:
src
├── assets
│   ├── parallax1.jpg
├── components
│   └── AwesomeParallax.vue
├── views
│   └── HomeView.vue
└── App.vue
IV. Create the Parallax Slider Component
Add the following code to AwesomeParallax.vue. This component will import the required Swiper modules for navigation, pagination, and the parallax effect. You can find the official documentation from Swiper here: https://swiperjs.com/demos#parallax.
<template>
<swiper
:style="{
'--swiper-navigation-color': '#fff',
'--swiper-pagination-color': '#fff',
}"
:speed="600"
:parallax="true"
:pagination="{
clickable: true,
}"
:navigation="true"
:modules="modules"
class="mySwiper"
data-swiper-parallax-x
>
<template v-slot:container-start>
<div class="parallax-bg" data-swiper-parallax="-23%"></div>
</template>
<swiper-slide>
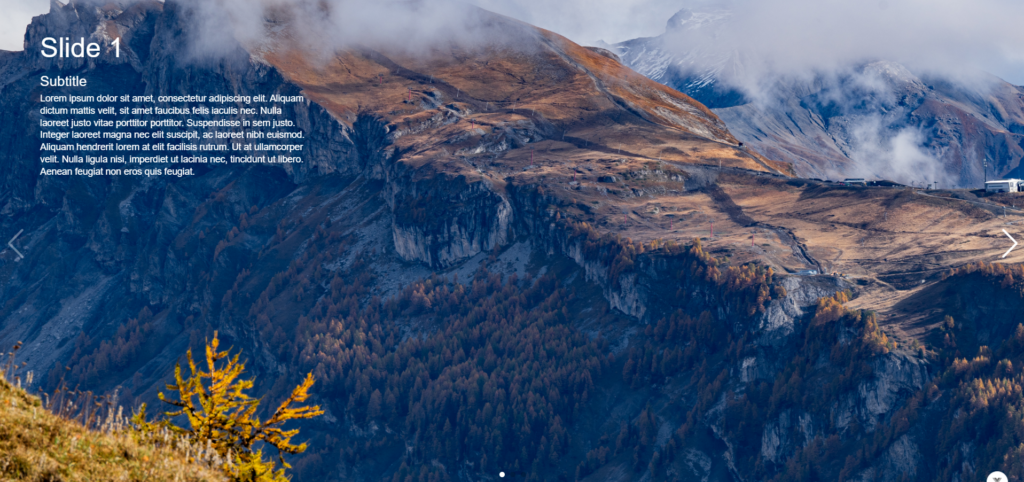
<div class="title" data-swiper-parallax="-300">Slide 1</div>
<div class="subtitle" data-swiper-parallax="-200">Subtitle</div>
<div class="text" data-swiper-parallax="-100">
<p>
Lorem ipsum dolor sit amet, consectetur adipiscing elit. Aliquam
dictum mattis velit, sit amet faucibus felis iaculis nec. Nulla
laoreet justo vitae porttitor porttitor. Suspendisse in sem justo.
Integer laoreet magna nec elit suscipit, ac laoreet nibh euismod.
Aliquam hendrerit lorem at elit facilisis rutrum. Ut at ullamcorper
velit. Nulla ligula nisi, imperdiet ut lacinia nec, tincidunt ut
libero. Aenean feugiat non eros quis feugiat.
</p>
</div> </swiper-slide
><swiper-slide>
<div class="title" data-swiper-parallax="-300">Slide 2</div>
<div class="subtitle" data-swiper-parallax="-200">Subtitle</div>
<div class="text" data-swiper-parallax="-100">
<p>
Lorem ipsum dolor sit amet, consectetur adipiscing elit. Aliquam
dictum mattis velit, sit amet faucibus felis iaculis nec. Nulla
laoreet justo vitae porttitor porttitor. Suspendisse in sem justo.
Integer laoreet magna nec elit suscipit, ac laoreet nibh euismod.
Aliquam hendrerit lorem at elit facilisis rutrum. Ut at ullamcorper
velit. Nulla ligula nisi, imperdiet ut lacinia nec, tincidunt ut
libero. Aenean feugiat non eros quis feugiat.
</p>
</div> </swiper-slide
><swiper-slide>
<div class="title" data-swiper-parallax="-300">Slide 3</div>
<div class="subtitle" data-swiper-parallax="-200">Subtitle</div>
<div class="text" data-swiper-parallax="-100">
<p>
Lorem ipsum dolor sit amet, consectetur adipiscing elit. Aliquam
dictum mattis velit, sit amet faucibus felis iaculis nec. Nulla
laoreet justo vitae porttitor porttitor. Suspendisse in sem justo.
Integer laoreet magna nec elit suscipit, ac laoreet nibh euismod.
Aliquam hendrerit lorem at elit facilisis rutrum. Ut at ullamcorper
velit. Nulla ligula nisi, imperdiet ut lacinia nec, tincidunt ut
libero. Aenean feugiat non eros quis feugiat.
</p>
</div>
</swiper-slide>
</swiper>
</template>
<script lang="ts">
// Import Swiper Vue.js components
import { Swiper, SwiperSlide } from 'swiper/vue'
// Import Swiper styles
import 'swiper/css'
import 'swiper/css/pagination'
import 'swiper/css/navigation'
// import required modules
import { Parallax, Pagination, Navigation } from 'swiper/modules'
export default {
components: {
Swiper,
SwiperSlide,
},
setup() {
return {
modules: [Parallax, Pagination, Navigation],
}
},
}
</script>
<style>
#app {
height: 100%;
display: contents;
}
html,
body {
position: relative;
height: 100%;
}
body {
background: #eee;
font-family:
Helvetica Neue,
Helvetica,
Arial,
sans-serif;
font-size: 14px;
color: #000;
margin: 0;
padding: 0;
}
.swiper {
width: 100%;
height: 100%;
background: #000;
}
.swiper-slide {
font-size: 18px;
color: #fff;
-webkit-box-sizing: border-box;
box-sizing: border-box;
padding: 40px 60px;
}
.parallax-bg {
position: absolute;
left: 0;
top: 0;
width: 130%;
height: 100%;
-webkit-background-size: cover;
background-size: cover;
background-position: center;
background-image: url('../assets/parallax1.jpg');
}
.swiper-slide .title {
font-size: 41px;
font-weight: 300;
}
.swiper-slide .subtitle {
font-size: 21px;
}
.swiper-slide .text {
font-size: 14px;
max-width: 400px;
line-height: 1.3;
}
</style>
To achieve a full-screen parallax effect, I used display: contents; on the #app element. This allows the background to stretch across the viewport without being constrained by the parent element’s dimensions.
However, setting the .parallax-bg width to 130% can cause height issues, as the image might not scale proportionately, leading to excess height. Still, this is needed to achieve the parallax effect in our case, so it means that you need to choose your background image knowing that it is going to be cropped.
V. Use the Component in HomeView.vue
Now that we’ve created the AwesomeParallax component, we can add it to HomeView.vue to display it on the main page.
Open src/HomeView.vue and replace its content with the following:
<template>
    <AwesomeParallax />
</template>

<script setup lang="ts">
import AwesomeParallax from '@/components/AwesomeParallax.vue'
</script>
Then open src/App.vue and replace its content with the following:
<template>
  <HomeView />
</template>

<script setup lang="ts">
import HomeView from '@/views/HomeView.vue'
</script>
VI. Run the application
With everything in place, you can start the development server to see the parallax effect in action:
npm run dev
Navigate to http://localhost:3000 in your browser to see your parallax slider. You should see a smoothly animated slider with a parallax background and Swiper’s navigation and pagination controls.
VII. Enhancing the Parallax Effect
Now that you have a working parallax slider, you can experiment with additional features, such as:
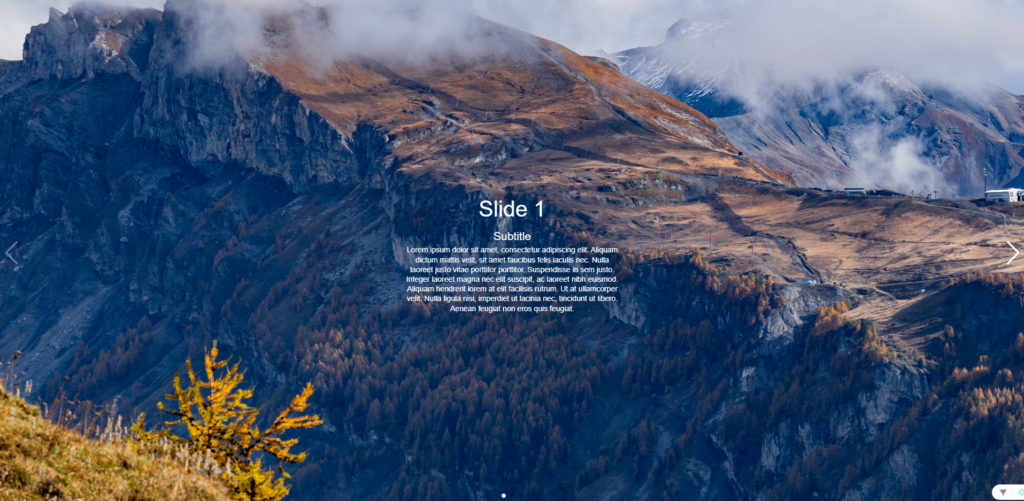
- Slide Transition Duration: Customize the transition duration for smoother animations by editing the
:speedprop adjustments on theswipercomponent. - Center the text: To center the text, title, and subtitle in the middle of your screen, you can use flexbox properties on the
.swiper-slideelements. Here’s how you can adjust your CSS:
.swiper-slide {
  font-size: 18px;
  color: #fff;
  box-sizing: border-box;
  padding: 40px 60px;

  /* Flexbox properties for centering */
  display: flex;
  flex-direction: column; /* Stack elements vertically */
  justify-content: center; /* Center vertically */
  align-items: center; /* Center horizontally */
}

.swiper-slide .title {
  font-size: 41px;
  font-weight: 300;
  text-align: center; /* Center text */
}

.swiper-slide .subtitle {
  font-size: 21px;
  text-align: center; /* Center text */
}

.swiper-slide .text {
  font-size: 14px;
  max-width: 400px;
  line-height: 1.3;
  text-align: center; /* Center text */
}
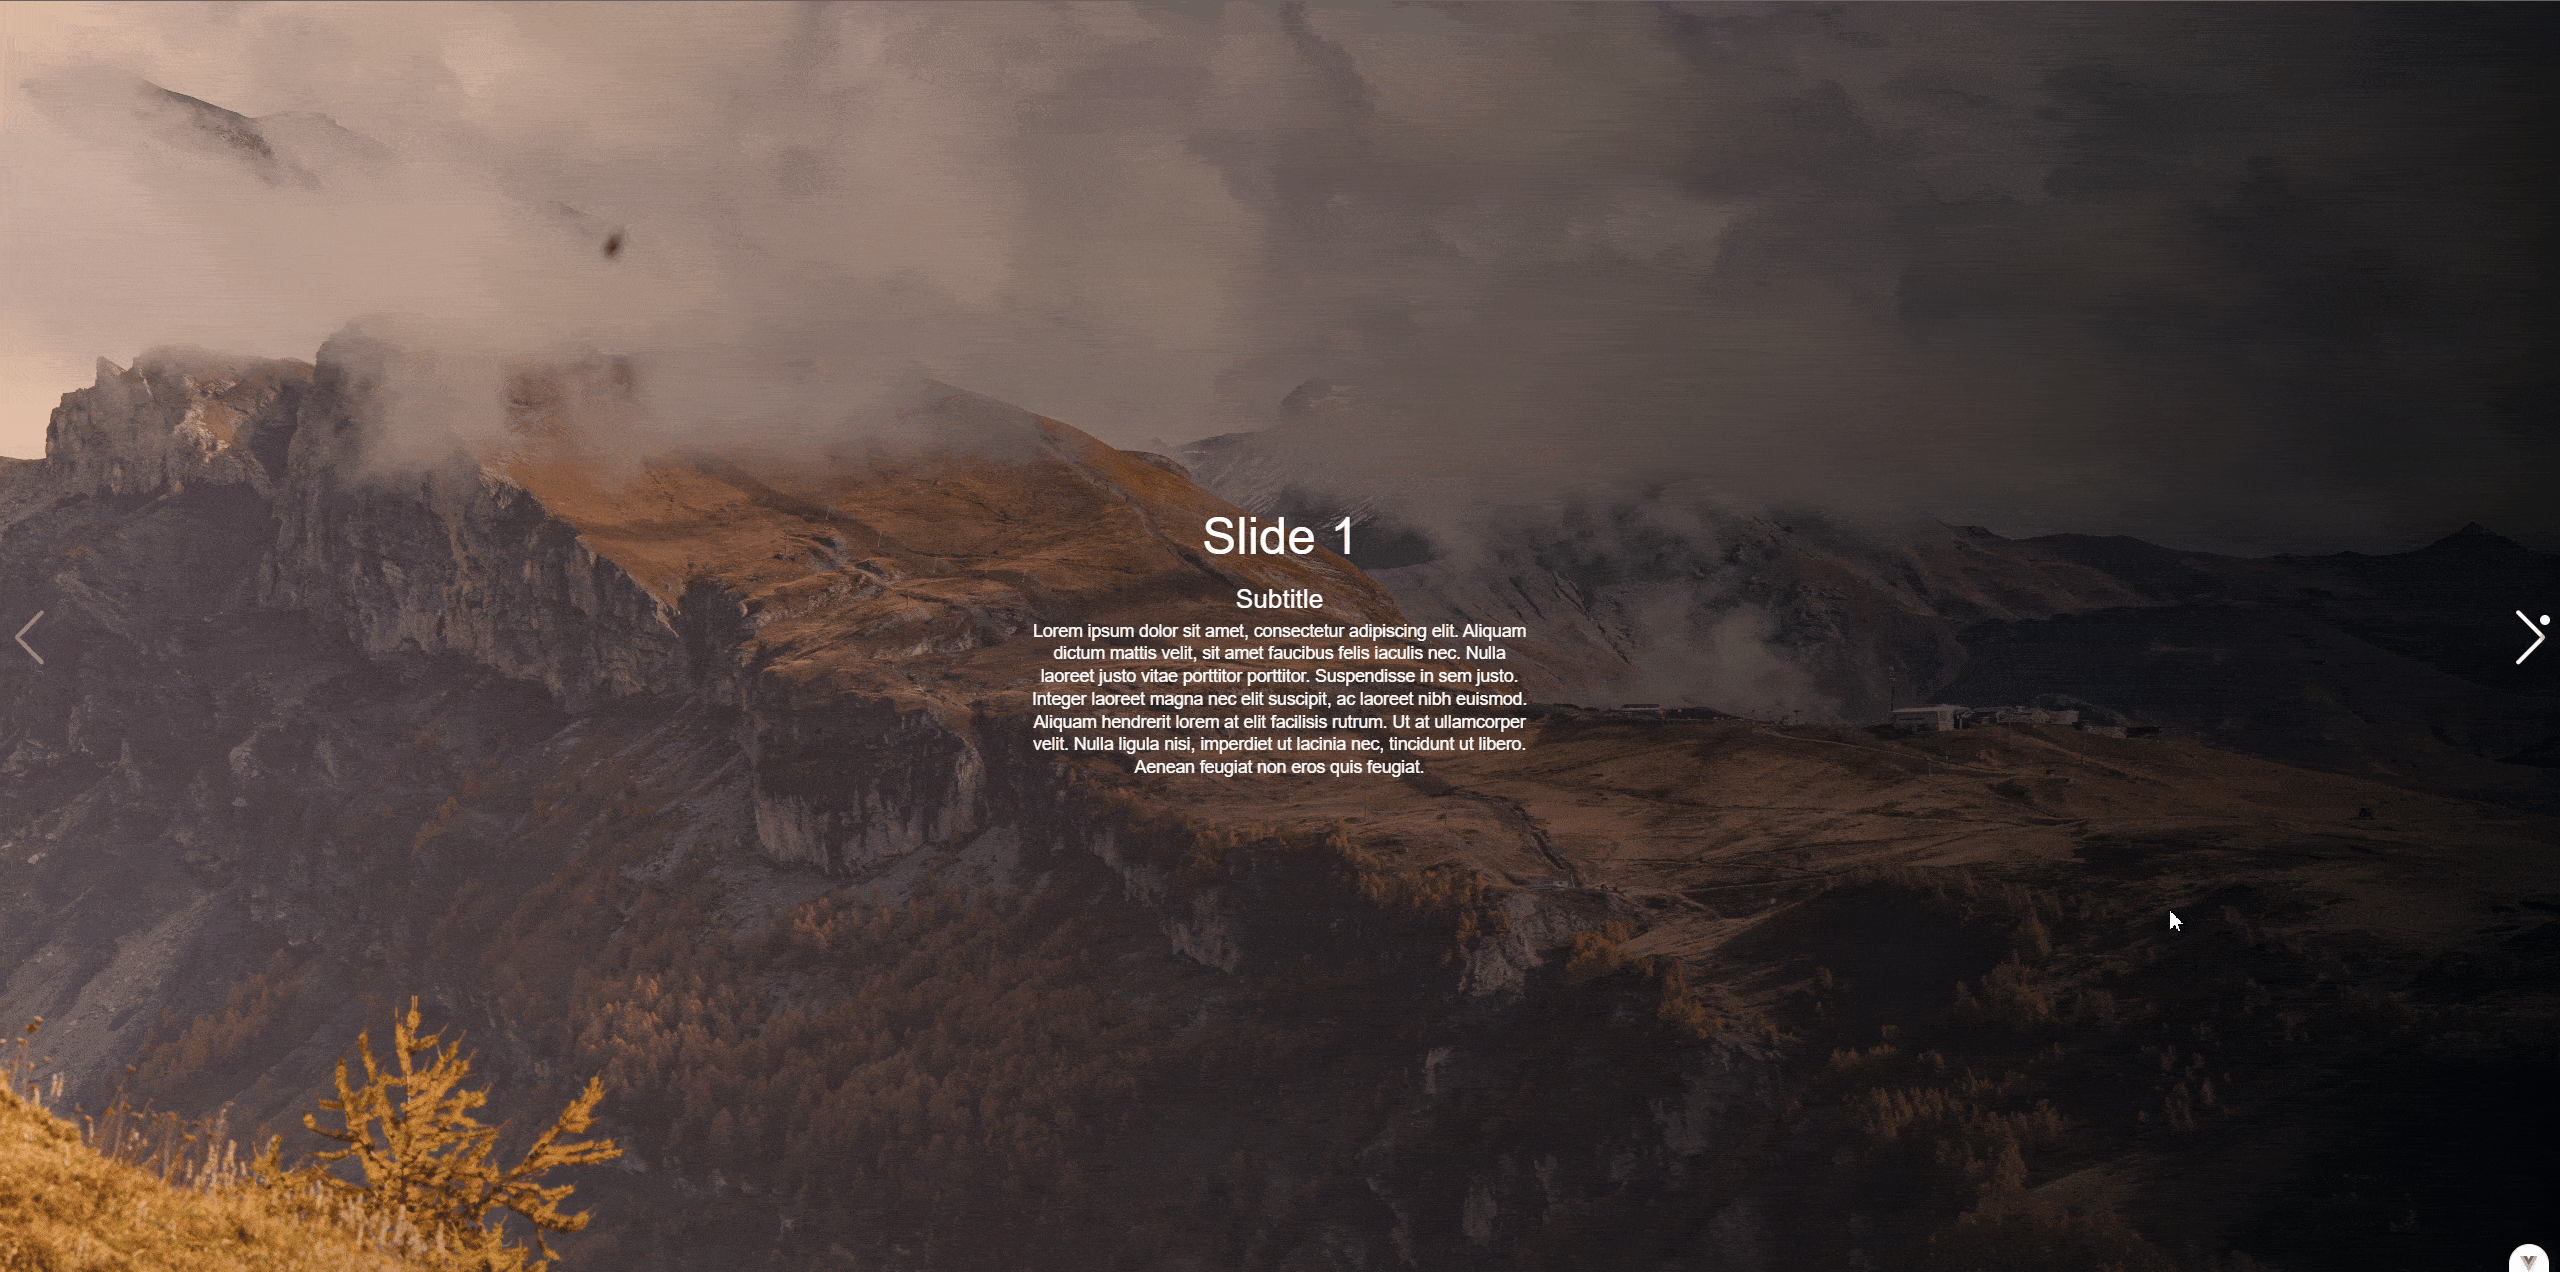
- Adding Image Gradients: Layering gradients over the background images to create depth. To apply a gradient overlay on top of your background image while keeping the image itself, you can modify the
.parallax-bgclass to use both the background image and the gradient. Here’s how you can do it:
.parallax-bg {
  position: absolute;
  left: 0;
  top: 0;
  width: 130%;
  height: 100%;
  background-image:
    linear-gradient(to right, rgba(255, 128, 0, 0.3), rgba(0, 0, 0, 0.9)),
    /* Gradient overlay */ url('../assets/parallax1.jpg'); /* Background image */
  background-size: cover;
  background-position: center;
}

- Vertical parallax: Add the props
:direction="'vertical'"to create a vertical parallax. In this case, don’t forget to edit the class parallax-bg to adjust the height and width property as needed:
<swiper
    :style="{
      '--swiper-navigation-color': '#fff',
      '--swiper-pagination-color': '#fff',
    }"
    :speed="600"
    :parallax="true"
    :pagination="{
      clickable: true,
    }"
    :navigation="true"
    :modules="modules"
    :direction="'vertical'"
    class="mySwiper"
    data-swiper-parallax-x
  >

.parallax-bg {
  position: absolute;
  left: 0;
  top: 0;
  width: 100%;
  height: 130%;
  background-image:
    linear-gradient(to right, rgba(255, 128, 0, 0.3), rgba(0, 0, 0, 0.9)),
    /* Gradient overlay */ url('../assets/parallax1.jpg'); /* Background image */
  background-size: cover;
  background-position: center;
}
Conclusion
This guide demonstrated how to set up a Vue 3 application with a parallax effect, creating visually engaging user experiences. You can further enhance the parallax by adjusting animation speeds, or even incorporating dynamic slide content. This setup is highly flexible for building beautiful, interactive sliders in Vue apps. Don’t forget to check Swiper API to learn more about what is doable with this component.
![Thumbnail [60x60]](https://www.dbi-services.com/blog/wp-content/uploads/2022/08/FRJ_web-min-scaled.jpg)
![Thumbnail [90x90]](https://www.dbi-services.com/blog/wp-content/uploads/2022/08/NME_web-min-scaled.jpg)