I’m on a mission to tackle scary topics around DevOps these days! In my 2 previous blog posts (Part 1 and Part 2) I’ve tried to demystified the DevOps word (and world!) by describing what it actually is with a simple example.
But there is an even scarier topic (true story!), which is… deploying a database in Kubernetes! Database is to Kubernetes what the garlic is to the vampires! Yes you get the picture below but it doesn’t have to be that way!

It is a common belief that it is not recommended or even possible for production databases and some people just move away from it. However other people have thought it twice and have actually deployed production databases on Kubernetes with no loss of data for years. If you want to give it a try, I’ll show you an example of how you can test it very quickly.
The choice of technology
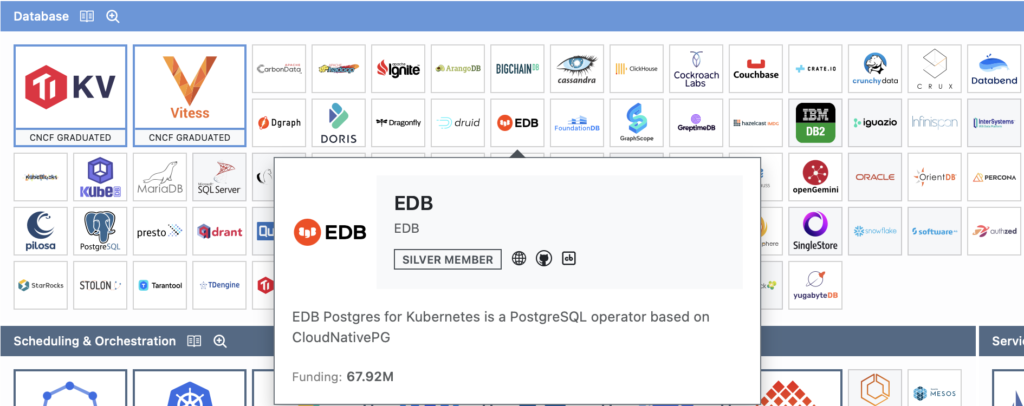
First you have to select a database technology and I’m going with the widely used PostgreSQL. It is one of the many database choices that is part of the CNCF landscape as shown below. CNCF is a vendor-neutral hub for all applications that can run as containers. They are then called cloud native:

Then, all the magic for installing a database in a Kubernetes cluster is related to its Operator. The choice of a mature operator is important as it will do all the hard work for us. For PostgreSQL there are several choices and a popular one used by many companies is CloudNativePG. In addition, it is also part of the database CNCF landscape through EDB so it deserves serious consideration:
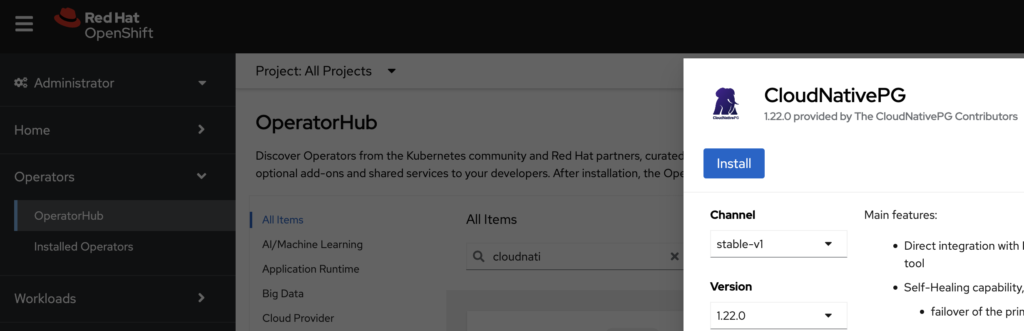
CloudNativePG can be installed on any flavour of Kubernetes and I’ve chosen the one from Red Hat called OpenShift (if you need a QuickStart on it, you can check my blog posts here then here). With its OperatorHub it is very easy and quick to deploy an Operator and have one PostgreSQL cluster ready to play with in your Kubernetes cluster. If you are like me, you want to play with your new toy right now!
For those of you that are already familiar with this topic, you may wonder why not use the Operator crunchydata that is also part of the CNCF and suits OpenShift very well. That is a fantastic question and it would also be an excellent choice. That may be the topic for another blog post!
Operator installation in OpenShift with the Web UI
Let’s install CloudNativePG (CNPG) and look how easy it is in OpenShift. First I like to create a separate project (or namespace) to keep everything tidy but it is not mandatory. I cheat a bit by using the command line interface here as I have a shell open to my OpenShift cluster:
$ oc new-project cloudnativepg
Then just use the UI Web console from OpenShift to install and deploy everything. If you like click-click-click-click you are in for a treat!
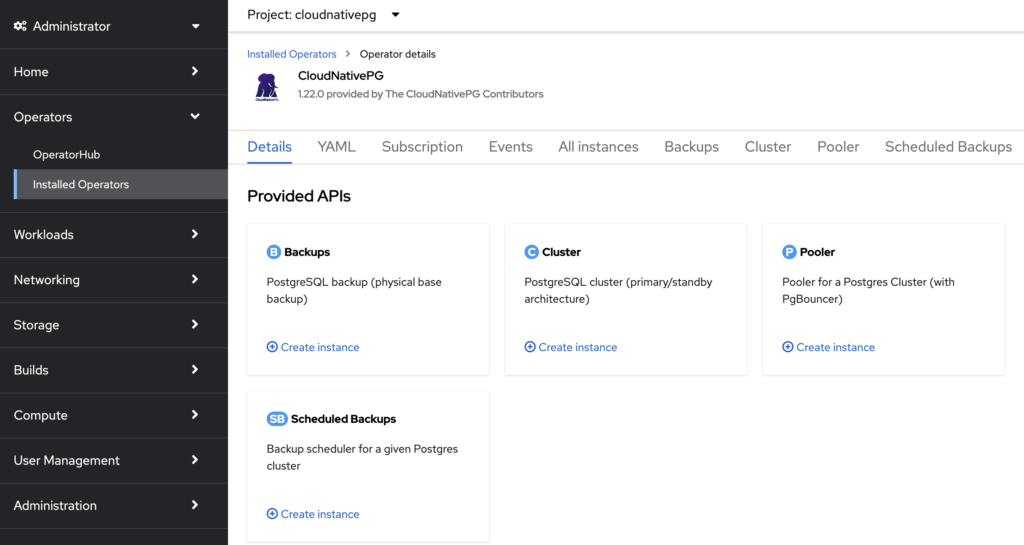
Click on “Create instance” in the Cluster panel:
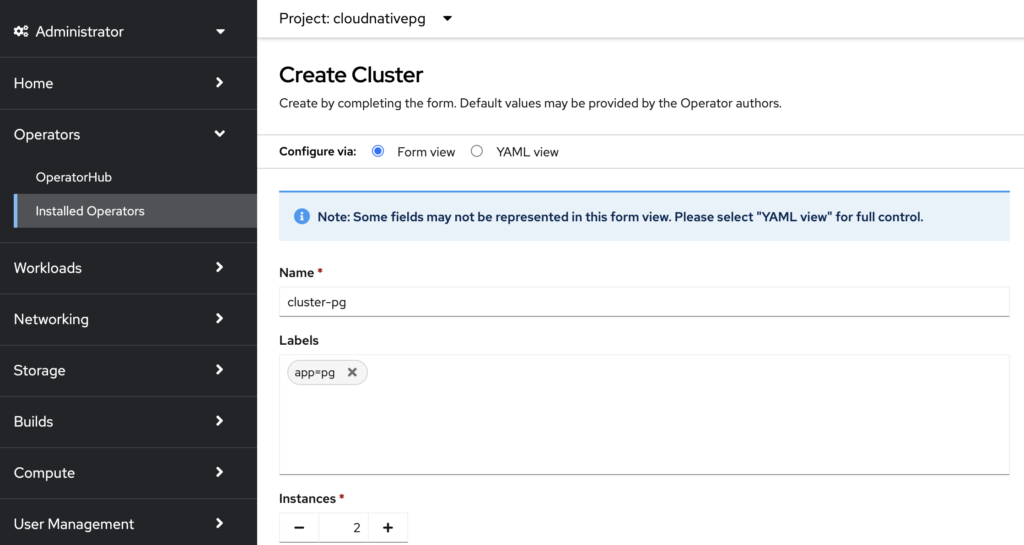
Click the button “Create” to install a PostgreSQL cluster with 2 instances and that’s it!
Check the installation process and result in CLI
If you are familiar with Kubernetes in general, you are also used to the Command Line Interface (CLI). After you’ve clicked on the button “Create”, you can follow along all this installation process as shown below:
$ oc get po -n cloudnativepg -w
NAME                                      READY   STATUS     RESTARTS   AGE
cluster-pg-1-initdb-zdthn                 0/1     Init:0/1   0          20s
cnpg-controller-manager-bd7c97dc7-kw4pk   1/1     Running    0          5m14s
cluster-pg-1-initdb-zdthn                 0/1     Init:0/1   0          20s
cluster-pg-1-initdb-zdthn                 0/1     PodInitializing   0          23s
cluster-pg-1-initdb-zdthn                 1/1     Running           0          102s
cluster-pg-1-initdb-zdthn                 0/1     Completed         0          2m11s
cluster-pg-1-initdb-zdthn                 0/1     Completed         0          2m14s
cluster-pg-1-initdb-zdthn                 0/1     Completed         0          2m15s
cluster-pg-1-initdb-zdthn                 0/1     Completed         0          2m15s
cluster-pg-1                              0/1     Pending           0          0s
cluster-pg-1                              0/1     Pending           0          0s
cluster-pg-1                              0/1     Init:0/1          0          0s
cluster-pg-1                              0/1     Init:0/1          0          3s
cluster-pg-1                              0/1     Init:0/1          0          6s
cluster-pg-1                              0/1     PodInitializing   0          7s
cluster-pg-1                              0/1     Running           0          9s
cluster-pg-1                              0/1     Running           0          15s
cluster-pg-1                              0/1     Running           0          21s
cluster-pg-1                              1/1     Running           0          21s
cluster-pg-2-join-x5cdh                   0/1     Pending           0          0s
cluster-pg-2-join-x5cdh                   0/1     Pending           0          0s
cluster-pg-2-join-x5cdh                   0/1     Pending           0          3s
cluster-pg-2-join-x5cdh                   0/1     Init:0/1          0          3s
cluster-pg-2-join-x5cdh                   0/1     Init:0/1          0          5s
cluster-pg-2-join-x5cdh                   0/1     Init:0/1          0          7s
cluster-pg-2-join-x5cdh                   0/1     PodInitializing   0          9s
cluster-pg-2-join-x5cdh                   1/1     Running           0          11s
cluster-pg-2-join-x5cdh                   0/1     Completed         0          21s
cluster-pg-2-join-x5cdh                   0/1     Completed         0          24s
cluster-pg-2-join-x5cdh                   0/1     Completed         0          24s
cluster-pg-2-join-x5cdh                   0/1     Completed         0          25s
cluster-pg-2                              0/1     Pending           0          0s
cluster-pg-2                              0/1     Pending           0          0s
cluster-pg-2                              0/1     Init:0/1          0          0s
cluster-pg-2                              0/1     Init:0/1          0          4s
cluster-pg-2                              0/1     Init:0/1          0          7s
cluster-pg-2                              0/1     PodInitializing   0          7s
cluster-pg-2                              0/1     Running           0          9s
cluster-pg-2                              0/1     Running           0          12s
cluster-pg-2                              0/1     Running           0          13s
cluster-pg-2                              1/1     Running           0          21s
cluster-pg-1-initdb-zdthn                 0/1     Terminating       0          3m29s
cluster-pg-2-join-x5cdh                   0/1     Terminating       0          49s
cluster-pg-1-initdb-zdthn                 0/1     Terminating       0          3m29s
cluster-pg-2-join-x5cdh                   0/1     Terminating       0          49s
In a few minutes we can see each of our PostgreSQL instance in 2 separate Pods: cluster-pg-1 and cluster-pg-2
You may have heard that databases in Kubernetes are based on the object StatefulSet but CNPG doesn’t use it as you can see below:
$ oc get sts -n cloudnativepg
No resources found in cloudnativepg namespace.
The Operator install all the Kubernetes Objects required to run PostgreSQL in it. I’ll keep this blog post at the high level so I will not dive into it. However it would be interesting to see a simple example of data being creating in our instance-1 and then see they have been replicated into instance-2. Let’s just do that.
The username and password to connect to the PostgreSQL database are stored in a secret. You can get these credentials as follows:
$ oc get secrets -n cloudnativepg cluster-pg-app -oyaml
Username and password are coded in base64 so you can decode them as shown below (for example for the username):
$ echo -n "YXBw" | base64 --decode
app
With these credentials information you can now jump into the pod and connect to the PostgreSQL database:
$ oc exec -it -n cloudnativepg cluster-pg-1 -- bash

1000660000@cluster-pg-1:/$ psql -h localhost -U app
Password for user app: <enter the decoded password here>
psql (16.1 (Debian 16.1-1.pgdg110+1))
SSL connection (protocol: TLSv1.3, cipher: TLS_AES_256_GCM_SHA384, compression: off)
Type "help" for help.

app=> CREATE TABLE customers (firstname text,lastname text, id serial);
CREATE TABLE

app=> INSERT INTO customers (firstname, lastname) VALUES ( 'John', 'Doe');
INSERT 0 1

app=> \dt
         List of relations
 Schema |   Name    | Type  | Owner
--------+-----------+-------+-------
 public | customers | table | app
(1 row)

app=> SELECT * FROM customers;
 firstname | lastname | id
-----------+----------+-------------
 John       | Doe    |           1
(1 row)
We have created a table with one entry in it. Let’s check if we can find it into the other instance:
$ oc exec -it -n cloudnativepg cluster-pg-2 -- bash

1000660000@cluster-pg-2:/$ psql -h localhost -U app
Password for user app:
psql (16.1 (Debian 16.1-1.pgdg110+1))
SSL connection (protocol: TLSv1.3, cipher: TLS_AES_256_GCM_SHA384, compression: off)
Type "help" for help.

app=> \dt
         List of relations
 Schema |   Name    | Type  | Owner
--------+-----------+-------+-------
 public | customers | table | app
(1 row)

app=> SELECT * FROM customers;
 firstname | lastname | customer_id
-----------+----------+-------------
 John       | Doe    |           1
(1 row)
Our data have been replicated from our first instance (pod cluster-pg-1) to our second instance (pod cluster-pg-2)! Our PostgreSQL cluster is working!
Wrap up
With this simple example you can now play with your PostgreSQL cluster like you would if it was installed on a Bare-Metal or in a Virtual Machine. Of course this PostgreSQL cluster is not optimized at all for performance but you can see that it is possible to install a database in Kubernetes. If you want to learn more about PostgreSQL you can check out our several Training courses on this topic.
So, don’t be afraid of running databases in Kubernetes, try it and you’ll love it!
![Thumbnail [90x90]](https://www.dbi-services.com/blog/wp-content/uploads/2022/08/FRJ_web-min-scaled.jpg)
![Thumbnail [90x90]](https://www.dbi-services.com/blog/wp-content/uploads/2022/08/GRE_web-min-scaled.jpg)
![Thumbnail [90x90]](https://www.dbi-services.com/blog/wp-content/uploads/2023/01/APY_web-scaled.jpg)
![Thumbnail [90x90]](https://www.dbi-services.com/blog/wp-content/uploads/2025/03/OBA_web-scaled.jpg)