If you want to learn and test OpenShift 4 (the last release is 4.14 at this time of writing), you may not want to go straight with the installation of a full cluster. Using the OpenShift Service of a cloud provider is costly. Even if you want to install it all by yourself in the cloud, you’ll still need several virtual machines with enough CPU and memory that will also not be cheap in the end.
If like me, you want to quickly set it up and play with it at low or even no cost then read on, I’ve cleared the path for you.
For those of you who are not sure what OpenShift is, it is the Kubernetes solution provided by Red Hat. It is very much used because Red Hat is a popular and stable operating system used in production by many companies. It is then a natural path to use OpenShift for deploying microservice applications in Kubernetes.
Easiest solution at no cost!
If you are a developper and just want to do some tests to deploy your workload in an OpenShift cluster, then there is an easy solution provided by Red Hat at no cost. Just register for free and get access to a Developer Sandbox. You can find all the information here. In a few minutes you have a cluster ready for you to play with. Your data are kept for 30 days, after that time you can create another Sandbox to continue your exploration.
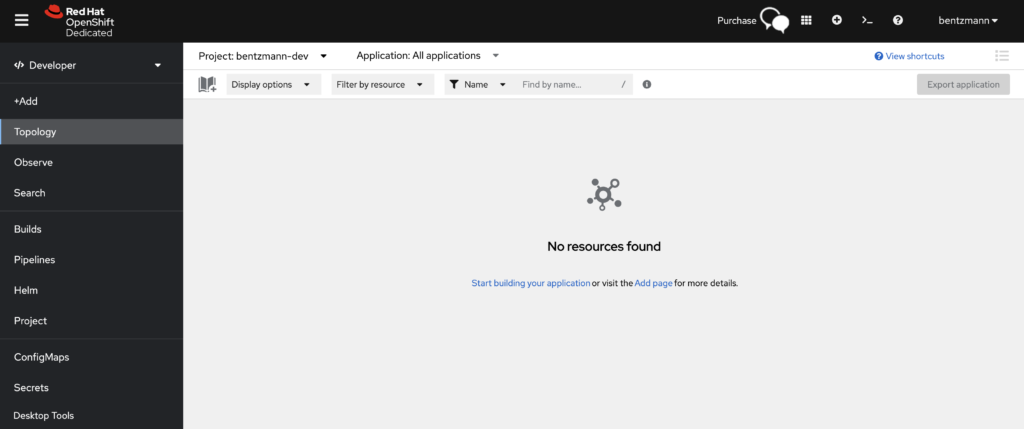
Above is the OpenShift Web console you can access from your browser. On the top left you can have the Developer or Administrator view and on the top right you can also get a prompt where you can use the oc tool to interact with the cluster. So there are already a lot of things you can do, but you are not kubeadmin of this cluster.
If you need to completely administer an OpenShift cluster, you can then move to the next step: Install a mini cluster that will use just one node. This solution is now called OpenShift Local and you’ll find all the information here. It was formerly called CodeReady Containers. In the version of OpenShift 3, you could use minishift that provided the same kind of experience. This solution is at no cost if you install it on your laptop/workstation but you need to have enough CPU and memory. In my case I didn’t want to clutter my laptop so I’ve decided to use a virtual machine in the cloud instead.
Moderately difficult solution at low cost
This solution is not as easy as the previous one because there are a few flaming hoops to go through. However as you’ve found this blog, congratulations! You can just sit back, relax and follow all the instructions along!
The first flaming hoop is that the virtual machine from the cloud provider needs to support nested virtualization. OpenShift Local itself creates a virtual machine which will be the node used to deploy our cluster. Hence the nested virtualization. AWS EC2 doesn’t support it. At least not at a good price as you need to choose an EC2 type that is an OnPrem machine. Azure and Google Cloud Platform have some virtual machine types that supports nested virtualization at a decent price. I’ve chosen Azure with which I’m familiar with.
After a few attempts, I’ve found the right configuration required to make it all work and I’ll share it with you so you will be successful on your first try!
I’ve selected the operating system Red Hat 8.7 with the size Standard D4s_v3 that supports nested virtualization with 4xCPU, 16GiB memory (and 64GiB Disk by default). This VM will cost US$175 per month if it stays up 24/7. This is not cheap but still low cost in comparison of setting up a real OpenShift cluster in the cloud that can cost several thousands a month. Now here comes the second flaming hoop! In the way OpenShift Local run its installation, a disk of 64GiB is not enough, you need to choose 128GiB for the OS disk size (and standard SSD is fine). For the other parameters you can keep the default values or adjust according to your preferences. At this point you can create and launch your virtual machine.
Before connecting to it through ssh, you can already plan to open some ports to be able to later connect to the OpenShift Web Console from your laptop. In the NSG that is bound to your public IP Address, modify the Inbound Security Rule with the following destination ports 80,6443,443 in addition to 22. I also like to put my IP Address as source as a good security practice. You can now ssh to the public IP Address of your virtual machine:
$ ssh -i ".ssh/mykey.pem" enb@<public_ip_of_your_vm>
The third flaming hoop
The first thing to notice is that even if I’ve chosen 128GiB of disk, only the default 64GiB are setup in my virtual machine. Second, OpenShift Local will download and install its packages in my home folder. It needs a bit more than 32G of free space to do so. Here comes the flaming:
[enb@enb-OpenShift ~]$ df -Th
Filesystem                Type      Size  Used Avail Use% Mounted on
devtmpfs                  devtmpfs  7.8G     0  7.8G   0% /dev
tmpfs                     tmpfs     7.8G     0  7.8G   0% /dev/shm
tmpfs                     tmpfs     7.8G  8.6M  7.8G   1% /run
tmpfs                     tmpfs     7.8G     0  7.8G   0% /sys/fs/cgroup
/dev/mapper/rootvg-rootlv xfs       2.0G   74M  2.0G   4% /
/dev/mapper/rootvg-usrlv  xfs        10G  1.8G  8.3G  18% /usr
/dev/sda1                 xfs       496M  107M  390M  22% /boot
/dev/mapper/rootvg-tmplv  xfs       2.0G   47M  2.0G   3% /tmp
/dev/mapper/rootvg-homelv xfs      1014M   40M  975M   4% /home
/dev/mapper/rootvg-varlv  xfs       8.0G  325M  7.7G   4% /var
/dev/sda15                vfat      495M  5.8M  489M   2% /boot/efi
tmpfs                     tmpfs     1.6G     0  1.6G   0% /run/user/1000
My /home mount is using a filesystem that has a size of 1014M with 975M available! We then need to do a bit of system administration and use our superpower as root. If you are not comfortable with this part, I promise it will not be too long, just a few commands and you will be done with it:
[enb@enb-OpenShift ~]$ sudo -i
[root@enb-OpenShift ~]#

[root@enb-OpenShift ~]# lsblk -f
NAME              FSTYPE      LABEL UUID                                   MOUNTPOINT
sda
|-sda1            xfs               3be24f71-c584-4997-908f-de8c77fbf988   /boot
|-sda2            LVM2_member       R2fg21-J3fd-S6As-1YPg-wMhi-fKhB-APlRLl
| |-rootvg-tmplv  xfs               a6a26328-7157-41ea-a6ed-e4a89da00d2d   /tmp
| |-rootvg-usrlv  xfs               d0a5ec53-dea1-4bfa-83ef-fb9ee85b868c   /usr
| |-rootvg-homelv xfs               2658b270-62cc-458d-afd3-b63ce143aeac   /home
| |-rootvg-varlv  xfs               3aba65b1-d5fb-496d-a2be-dfa187b6bfd2   /var
| `-rootvg-rootlv xfs               3549dfce-5fcb-4def-b8ad-12436f2d5da8   /
|-sda14
`-sda15           vfat              3328-E458                              /boot/efi
sdb
`-sdb1            ext4              5ddb46ed-6a87-4958-9fa4-a38a00abd666
sr0
Our /home mount is on the logical volume rootvg-homelv and use the disk sda2. So let’s check that physical volume as well as the sda2 disk:
[root@enb-OpenShift ~]# pvscan
  PV /dev/sda2   VG rootvg          lvm2 [<63.02 GiB / <40.02 GiB free]
  Total: 1 [<63.02 GiB] / in use: 1 [<63.02 GiB] / in no VG: 0 [0   ]

root@enb-OpenShift ~]# lsblk /dev/sda2
NAME            MAJ:MIN RM SIZE RO TYPE MOUNTPOINT
sda2              8:2    0  63G  0 part
|-rootvg-tmplv  253:0    0   2G  0 lvm  /tmp
|-rootvg-usrlv  253:1    0  10G  0 lvm  /usr
|-rootvg-homelv 253:2    0   1G  0 lvm  /home
|-rootvg-varlv  253:3    0   8G  0 lvm  /var
`-rootvg-rootlv 253:4    0   2G  0 lvm  /
There is 40 GiB free in LVM2 and sda2 uses only 63G. We will then install the growpart package to extend its storage capacity:
[root@enb-OpenShift ~]# yum install cloud-utils-growpart gdisk

[root@enb-OpenShift ~]# growpart /dev/sda 2
CHANGED: partition=2 start=2050048 old: size=132165632 end=134215679 new: size=266385375 end=268435422

[root@enb-OpenShift ~]# lsblk /dev/sda2
NAME            MAJ:MIN RM  SIZE RO TYPE MOUNTPOINT
sda2              8:2    0  127G  0 part
|-rootvg-tmplv  253:0    0    2G  0 lvm  /tmp
|-rootvg-usrlv  253:1    0   10G  0 lvm  /usr
|-rootvg-homelv 253:2    0    1G  0 lvm  /home
|-rootvg-varlv  253:3    0    8G  0 lvm  /var
`-rootvg-rootlv 253:4    0    2G  0 lvm  /
Now sda2 has a size of 127G and we can finally resize our physical and logical volume:
[root@enb-OpenShift ~]# pvresize /dev/sda2
  Physical volume "/dev/sda2" changed
  1 physical volume(s) resized or updated / 0 physical volume(s) not resized

[root@enb-OpenShift ~]# pvscan
  PV /dev/sda2   VG rootvg          lvm2 [<127.02 GiB / <104.02 GiB free]
  Total: 1 [<127.02 GiB] / in use: 1 [<127.02 GiB] / in no VG: 0 [0   ]

[root@enb-OpenShift ~]# lvresize -r -L +64G /dev/mapper/rootvg-homelv
  Size of logical volume rootvg/homelv changed from 1.00 GiB (256 extents) to 65.00 GiB (16640 extents).
  Logical volume rootvg/homelv successfully resized.
meta-data=/dev/mapper/rootvg-homelv isize=512    agcount=4, agsize=65536 blks
         =                       sectsz=4096  attr=2, projid32bit=1
         =                       crc=1        finobt=1, sparse=1, rmapbt=0
         =                       reflink=1    bigtime=0 inobtcount=0
data     =                       bsize=4096   blocks=262144, imaxpct=25
         =                       sunit=0      swidth=0 blks
naming   =version 2              bsize=4096   ascii-ci=0, ftype=1
log      =internal log           bsize=4096   blocks=2560, version=2
         =                       sectsz=4096  sunit=1 blks, lazy-count=1
realtime =none                   extsz=4096   blocks=0, rtextents=0
data blocks changed from 262144 to 17039360
And that’s it! Let’s check out the result and get out of here!
[root@enb-OpenShift ~]# df -Th
Filesystem                Type      Size  Used Avail Use% Mounted on
devtmpfs                  devtmpfs  7.8G     0  7.8G   0% /dev
tmpfs                     tmpfs     7.8G     0  7.8G   0% /dev/shm
tmpfs                     tmpfs     7.8G  8.6M  7.8G   1% /run
tmpfs                     tmpfs     7.8G     0  7.8G   0% /sys/fs/cgroup
/dev/mapper/rootvg-rootlv xfs       2.0G   74M  2.0G   4% /
/dev/mapper/rootvg-usrlv  xfs        10G  1.8G  8.3G  18% /usr
/dev/sda1                 xfs       496M  107M  390M  22% /boot
/dev/mapper/rootvg-tmplv  xfs       2.0G   47M  2.0G   3% /tmp
/dev/mapper/rootvg-homelv xfs        65G  516M   65G   1% /home
/dev/mapper/rootvg-varlv  xfs       8.0G  574M  7.5G   8% /var
/dev/sda15                vfat      495M  5.8M  489M   2% /boot/efi
tmpfs                     tmpfs     1.6G     0  1.6G   0% /run/user/1000

[root@enb-OpenShift ~]# exit
logout
[enb@enb-OpenShift ~]$
We can see now that our /home partition has 65G available which is enough for the installation of OpenShift Local. Let’s do it!
OpenShift local installation
With our virtual machine now correctly configured, this is a walk in the park:
$ mkdir crc
$ wget https://mirror.openshift.com/pub/openshift-v4/clients/crc/latest/crc-linux-amd64.tar.xz
$ tar -xvf crc-linux-amd64.tar.xz
$ mv crc-linux-2.29.0-amd64/* ./crc
$ rm crc-linux-amd64.tar.xz && sudo rm -r crc-linux-2.29.0-amd64
$ cd crc && sudo chmod +x crc
$ export PATH=$PATH:/home/enb/crc
$ crc setup
$ crc start
After the command “crc setup” you can choose to contribute or not to statistics and after the “crc start” you will have to enter a pull secret. You are given the link to connect to and you need to connect to your free Red Hat Developper account to get it.
It takes several minutes to start and when finished, the administrator and developer account information are given to connect to the cluster. You can for example connect to it as a developer by using the oc tool to interact with the cluster:
$ eval $(crc oc-env)
$ oc login -u developer -p developer https://api.crc.testing:6443
Last flaming hoop
At this stage there are a few more tips I’d like to share to keep your VM persistent. At some point you are going to shut your VM down and start it again later. The first thing to do is to check and keep note of the DNS configuration of your VM:
$ cat /etc/resolv.conf
This configuration will change at some point (more on that in my next blog) when you restart the NetworkManager service and so also your VM. So copy the content of this file somewhere safe as you may need to restore it later before starting up your cluster again.
Now, before shutting your VM down, it is important to exit and stop your cluster properly with the following command:
$ oc logout
$ crc stop
This will keep your cluster stable and consistent then you can shut down the VM. When you will start it again, check the content of /etc/resolv.conf is identical to its original configuration (at this stage it may be) otherwise modify it. Then only start your cluster:
$ crc start
Wrap up
Congratulations! You have successfully installed an OpenShift cluster and have access to it through the command line interface. However at this stage you are still connected to the Azure VM through ssh. Wouldn’t it be great to interact with the cluster directly from you laptop? Interact in command line but also by using the OpenShift Web console. That will be the topic of my next blog. Stay tuned!
![Thumbnail [90x90]](https://www.dbi-services.com/blog/wp-content/uploads/2022/08/GRE_web-min-scaled.jpg)
![Thumbnail [90x90]](https://www.dbi-services.com/blog/wp-content/uploads/2022/08/ADE_WEB-min-scaled.jpg)
![Thumbnail [90x90]](https://www.dbi-services.com/blog/wp-content/uploads/2024/03/AHI_web.jpg)
![Thumbnail [90x90]](https://www.dbi-services.com/blog/wp-content/uploads/2025/07/ALK_MIN.jpeg)