I’ve been playing around with 2 applications recently: OpenShift from Red Hat and NeuVector from SUSE. At some point I’ve wondered if I couldn’t play with both at the same time. Read on as I’ll share some tips & tricks I didn’t see anywhere else!
The Basics
I’m using OpenShift Local which is free to use and I’ve installed it in an Azure VM. I’ve detailed this installation in 2 blogs if you are interested: Test OpenShift 4 at low cost in Azure and Interacting with OpenShift Local in an Azure VM.
Usually I’m using NeuVector in a SUSE Rancher RKE2 cluster on which you install it in almost one click. NeuVector has been bought by SUSE and they made it open-source. NeuVector is a powerful security tool that scan your cluster (nodes and containers) for vulnerabilities, scan images in your registry, display on a graph the network connections between pods and can detect in real time attacks like log4j or credit card exfiltration. Wouaw! That was a mouthful! It is the only cloud-native application (means it runs into containers) I know that groups all those features in one place. NeuVector documentation can be found here.
On the homepage of this documentation you can see there is an OpenShift Operator so of course I wanted to test it!
The installation of NeuVector in OpenShift is quite easy and you can follow all the steps in this blog from SUSE here. All right, then this is the end of my blog, see you next time!
The OpenShift Local Infrastructure
Not so quick, I’ve promised you some tips & tricks in my introduction and it would not be nice from me to not keep it!
But let start from the beginning. You may wonder what is an OpenShift Operator. I’m glad you asked! An Operator is simply put an application you can install in your OpenShift cluster with a few clicks. From the OpenShift Web Console you have the Operator Hub which is a repository with all the application you can install. You do a search, as NeuVector, and you can install it. The Operators are a great addition of OpenShift in comparison to vanilla Kubernetes.
Once the Operator of your application is installed (here NeuVector), you can then deploy one or several instances of it in your OpenShift cluster.
By using OpenShift local, you will need to tweak a bit this Neuvector Operator instance before its deployment.
First, you can see from the NeuVector requirements that it needs some vCPU and memory and so you need to use an Azure VM with adequate capacity. I’ve then used a VM size D8s_v3 instead of D4s_v3 I used in my previous blogs.
Then, you have learned from my previous blogs that we are using the tool crc to build our OpenShift Local cluster. That cluster is using just one node. The size of this cluster by default is not enough to work comfortably with NeuVector. The settings that worked for me are:
$ cat .crc/crc.json
{
  "consent-telemetry": "no",
  "cpus": 8,
  "disk-size": 100,
  "memory": 20480
}
You can set those parameters as follows before starting the cluster:
$ crc config set cpus 8
$ crc config set memory 20480
$ crc config set disk-size 100

$ crc start
At this stage you have a proper OpenShift environment to work with and you can install NeuVector as described by SUSE. But…
The OpenShift Operator Customization
After installing the NeuVector Operator and before creating an instance of it that will deploy the application in the cluster, we have to tweak a little bit its YAML file as shown below:
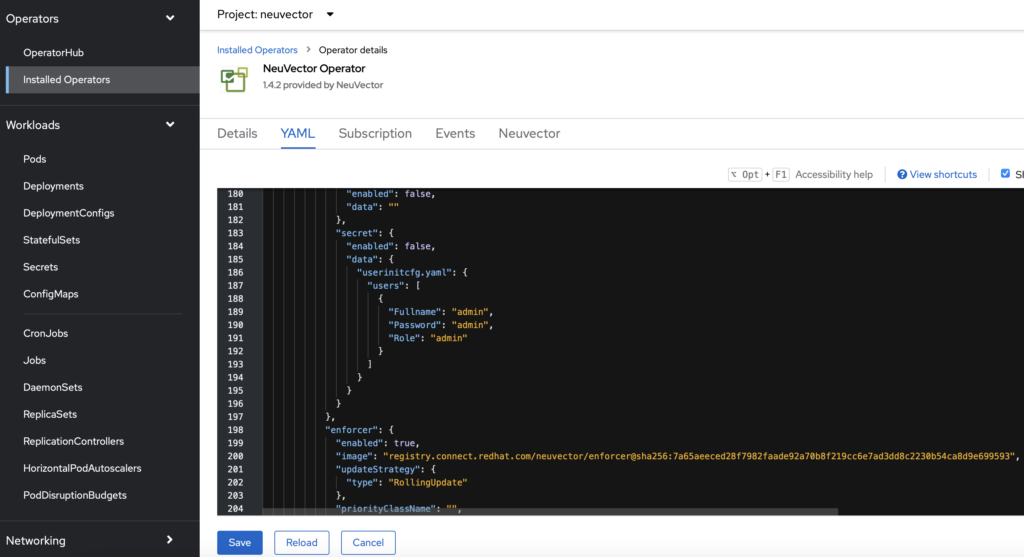
By default the admin password for the Web interface of NeuVector is empty (“”) but if you deploy the application like this, NeuVector will not allow you to authenticate with that empty password. So set a password here by modifiying this YAML parameters.
I’ve also noticed that you must change one parameter at a time then click on “Save” and click on “Reload”. If you change several parameters at once, they will not be taken into account for some reasons.
Other parameters you can change here are the number of replicas of the controller and scanner components of NeuVector. You can reduce them from 3 to 1. Do it in the configuration parts of the YAML file but not below the “Status” section that will be changed dynamically. And as said just above do it one at a time.
The controller component is deployed with High Availability in mind but as we are using only one node we can save resources by scaling it down. The scanner component scans for images, containers and nodes in the cluster but in our lab environment with one node and a few applications, one will be enough.
At this stage you have the NeuVector Operator installed and customized. This operator is itself deployed as a deployment in the OpenShift cluster and if you are curious you can check that the YAML changes you did took effect immediately with the following command:
$ oc get deploy neuvector-operator -oyaml
Now you can create the instance and the route as explained in the SUSE blog and you’ll be good to go!
Wrap up
I hope that helps, let me know if you are using NeuVector with OpenShift and what is your experience with it.
![Thumbnail [90x90]](https://www.dbi-services.com/blog/wp-content/uploads/2022/08/GRE_web-min-scaled.jpg)
![Thumbnail [90x90]](https://www.dbi-services.com/blog/wp-content/uploads/2022/08/ADE_WEB-min-scaled.jpg)
![Thumbnail [90x90]](https://www.dbi-services.com/blog/wp-content/uploads/2022/08/NME_web-min-scaled.jpg)