In my last article, I presented the first part of setting up a new action for Alfresco Share, which is an archive action. I advise you to read the first part if you have not read it yet since it is a prerequisite for the proper functioning of the action: Developping an archive action for Alfresco Share (1 of 2). The purpose of this part is to extend the user interface with the creation of an AMP for Alfresco Share. I remind you that ALF_AMP_HOME and SHARE_AMP_HOME references the location of the projects (e.g. C:/AlfrescoEclipseProjects/AlfrescoShareAMP).
1. Extension of Alfresco Share
So let’s create a properties file that contains the display name of the action and messages that will be sent to the user at the end of the action:
SHARE_AMP_HOME/config/alfresco/messages/custom.properties

In cases where Alfresco is used with multiple languages, you can manage this file with i18n. So you can add several files for different languages: custom_en.properties, custom_fr.properties, aso…
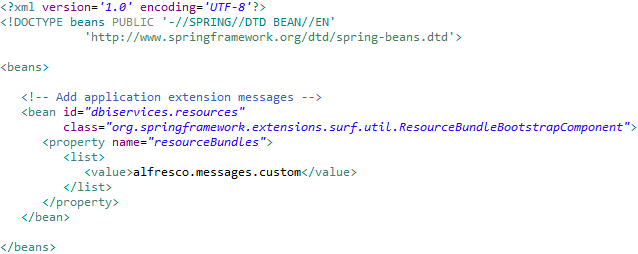
As we did for the Java code, we have to tell to Alfresco Share that a new property file was added. For that purpose, create the following file:
SHARE_AMP_HOME/config/alfresco/web-extension/custom-slingshot-application-context.xml
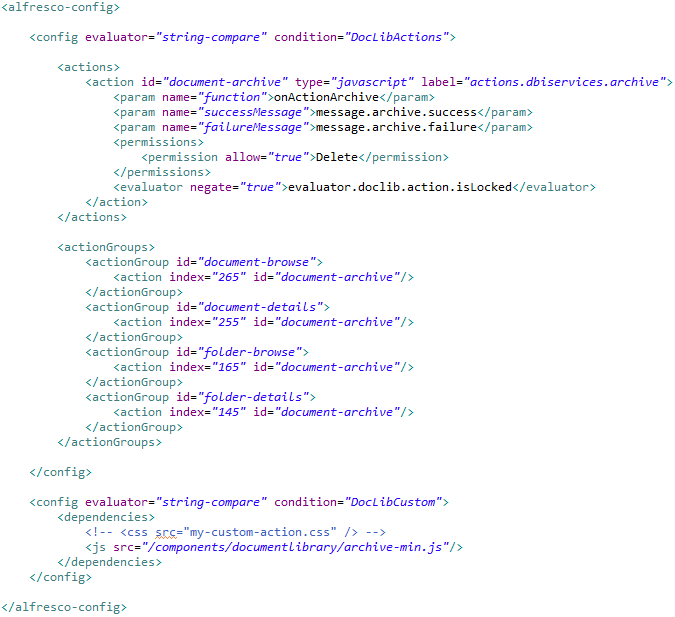
The next step is to add a line in the list of actions on Alfresco Share interface. To do this, you will need to extend the file you certainly know:
SHARE_AMP_HOME/config/alfresco/web-extension/share-config-custom.xml
Each action on Alfresco has a small image (16×16) that can be seen next to the name. Alfresco Share can automatically handles the dependency between the image and the action. For that purpose, you must add the following image:
SHARE_AMP_HOME/source/web/components/documentlibrary/actions/document-archive-16.png
The name of this image must be the id of the action that you define in the file share-config-custom.xml followed by the size of the image (16px): document-archive-16.png
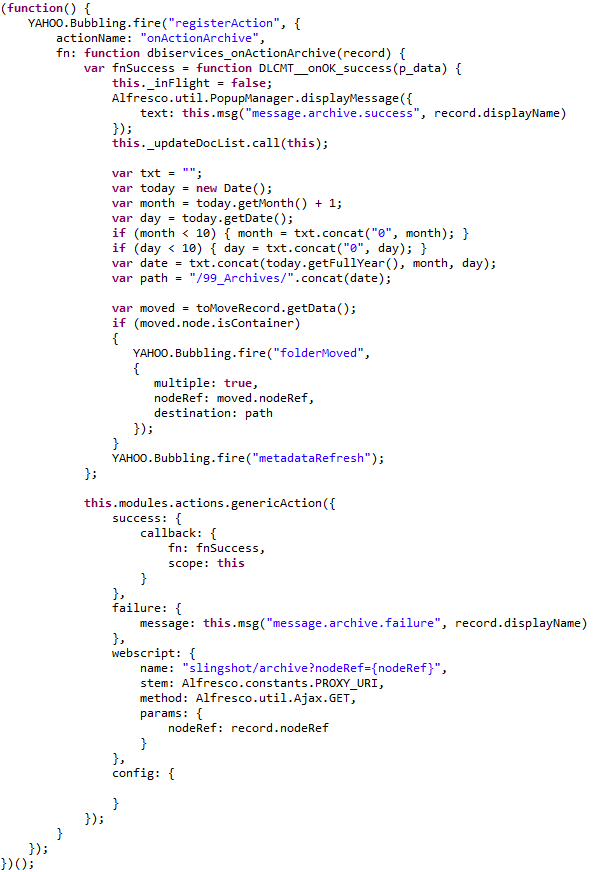
The last thing to do is to create the JavaScript file that will be executed with a click on the action. This JavaScript file must be minified because Alfresco use by default the minify version of a JavaScript file when DEBUG mode is turned off. The build.xml file can do it for you if you have put the two jar files ‘yui-compressor-ant-task-0.5.jar’ and ‘yuicompressor-2.4.2.jar’ in /lib. This JavaScript file manage interaction with the user by offering messages of failure and success. It also allows you to pass parameters to the Web Script which is very useful:
SHARE_AMP_HOME/source/web/components/documentlibrary/archive.js
2. Deploying AMPs
You now have all that is necessary to add an action in Alfresco Share v4.2. You can easily add other actions by taking the code and customizing it.
Once you have build your two projects, you should normally have two AMP files. Before deploying them the first time, I strongly advise you to make a backup of the original WAR files. You could create a script to deploy AMP files automatically with some of the following command lines:
# cd  ALFRESCO_HOME/tomcat/webapps
# rm  -rf  alfresco
# rm  -rf  share
# cd  ALFRESCO_HOME
# java  -jar  ALFRESCO_HOME/bin/alfresco-mmt.jar  install  ALF_AMP_HOME/dist/ALF_AMP_NAME.amp  ALFRESCO_HOME/tomcat/webapps/alfresco.war  -force
# java  -jar  ALFRESCO_HOME/bin/alfresco-mmt.jar  install SHARE_AMP_HOME/dist/SHARE_AMP_NAME.amp  ALFRESCO_HOME/tomcat/webapps/share.war  -force
# ALFRESCO_HOME/bin/clean_tomcat.sh
ALFRESCO_HOME obviously represents the Alfresco installation folder, something that should look like C:/Alfresco or /opt/Alfresco-4.2.c. ALF_AMP_NAME and SHARE_AMP_NAME represents the name of the two AMPs that was created in your Eclipse Project.
Please also note that I join to this blog the zip file containing the archive action AND the file permissionDefinitions.xml which is used to create all groups. Feel free to modify all files:
Good luck!


![Thumbnail [60x60]](https://www.dbi-services.com/blog/wp-content/uploads/2022/08/MOP_web-min-scaled.jpg)
![Thumbnail [90x90]](https://www.dbi-services.com/blog/wp-content/uploads/2022/08/ATR_web-min-scaled.jpg)