When working with an Ansible dynamic inventory, you may want to update it from your playbook on the fly. For instance, you may want to create a server and then install an application on it without calling a second playbook or developing specific code to create a runtime group (e.g. “add_host” module). Or you may want to update the inventory on the fly without having to wait for an asynchronous mechanism to be triggered. This all this project is about: providing you a simple, fully encrypted, interactive dynamic inventory made to measure for your environment.
Back-end setup
1) Install the database software:
This will serve as a data storage for your Ansible inventory data (More details here)
wget https://siodb.io/packages/InstallSiodb.sh
chmod u+x ./InstallSiodb.sh
sudo ./InstallSiodb.sh
2) Get the last version of the dynamic inventory:
git clone https://github.com/siodb/ansible-dynamic-inventory.git
cd ansible-dynamic-inventory
3) Create the inventory data model and the database user:
sudo -i -u siodb siocli --user root < sio_inv_data_model.sql
sudo -i -u siodb siocli --user root < sio_inv_user.sql
4) Create your groups, groupvars, hosts and hostvars:
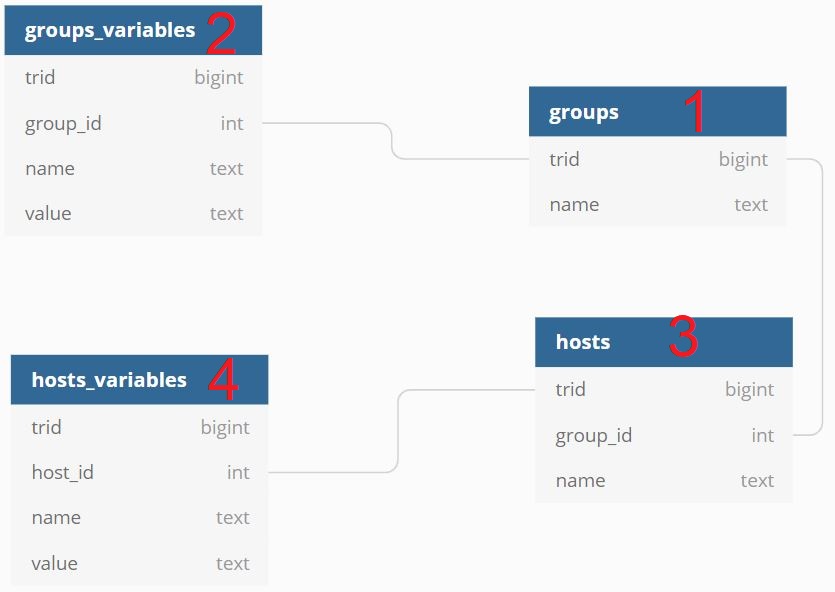
On this step, you can add your groups, groupvars, hosts and hostvars by inserting them into the correct table. Also, you can link them together using the columns:
- groups_variables.group_id: to link variables to a group from the group table.
- hosts.group_id: to link a group from the group table.
- hosts_variables.host_id: to link variables to a host from the hosts table.
Here is a overview of the data model used for this inventory (red number indicating the order in which to insert data):
So, first connect to the database freshly installed from step 1):
sudo -i -u siodb siocli --user root
Then insert your data. For instance:
use database sioinv ;
insert into groups
values
    ( 'production' ),
    ( 'test' ),
    ( 'development' )
;
insert into groups_variables
values
    ( 1, 'domain_name', 'company.com' ),
    ( 2, 'environment_name', 'production' ),
    ( 2, 'subnet', '10.10.0.0/16' ),
    ( 3, 'environment_name', 'test' ),
    ( 3, 'subnet', '10.20.0.0/16' ),
    ( 4, 'environment_name', 'development' ),
    ( 4, 'subnet', '10.30.0.0/16' )
;

insert into hosts
values
    ( 2, 'server-01', CURRENT_TIMESTAMP ),
    ( 3, 'server-02', CURRENT_TIMESTAMP ),
    ( 4, 'server-03', CURRENT_TIMESTAMP )
;

insert into hosts_variables
values
    ( 1, 'public_ip', '0.1.2.3' ),
    ( 1, 'application', 'app01' ),
    ( 2, 'public_ip', '0.1.2.4' ),
    ( 2, 'application', 'app02' ),
    ( 3, 'public_ip', '0.1.2.4' ),
    ( 3, 'application', 'app02' )
;
Configure the inventory
You must tell the inventory script where to lookup for its data. That is done configuring the file sio_inv.ini:
[sio_inv]
siodb_rest_ip = localhost
siodb_rest_port = 50443
siodb_rest_user = sioinv
siodb_rest_token = [token-generated-from-script-sio_inv_user.sql]
siodb_rest_tls_verify_certificate = no
Validate the inventory
Use the command ansible-inventory to validate your inventory. For instance:
$ ansible-inventory -i ./sio_inv.py  --graph --vars
@all:
  |--@development:
  |  |--server-03
  |  |  |--{domain_name = company.com}
  |  |  |--{environment_name = development}
  |  |  |--{subnet = 10.30.0.0/16}
  |  |--{environment_name = development}
  |  |--{subnet = 10.30.0.0/16}
  |--@production:
  |  |--hypervisor-01
  |  |  |--{domain_name = company.com}
  |  |  |--{environment_name = production}
  |  |  |--{subnet = 10.10.0.0/16}
  |  |--hypervisor-02
  |  |  |--{domain_name = company.com}
  |  |  |--{environment_name = production}
  |  |  |--{subnet = 10.10.0.0/16}
  |  |--server-01
  |  |  |--{application = app01}
  |  |  |--{domain_name = company.com}
  |  |  |--{environment_name = production}
  |  |  |--{public_ip = 0.1.2.3}
  |  |  |--{subnet = 10.10.0.0/16}
  |  |--server-04
  |  |  |--{domain_name = company.com}
  |  |  |--{environment_name = production}
  |  |  |--{subnet = 10.10.0.0/16}
  |  |--{environment_name = production}
  |  |--{subnet = 10.10.0.0/16}
  |--@test:
  |  |--server-02
  |  |  |--{application = app02}
  |  |  |--{domain_name = company.com}
  |  |  |--{environment_name = test}
  |  |  |--{public_ip = 0.1.2.4}
  |  |  |--{subnet = 10.20.0.0/16}
  |  |--server-05
  |  |  |--{domain_name = company.com}
  |  |  |--{environment_name = test}
  |  |  |--{subnet = 10.20.0.0/16}
  |  |--{environment_name = test}
  |  |--{subnet = 10.20.0.0/16}
  |--@ungrouped:
  |--{domain_name = company.com}
Example of playbook
Here is an example of how to interactively deal with the dynamic inventory while the playbook is running
(Set the variable {{ sioinv_user_token }} where it makes sense for you and store the token in Ansible Vault):
---
- name: Full Stack Service creation
  hosts: hypervisor-01
  tasks:

    - name: Create machine
      shell: >
        echo "Module or command to create a new Virtual Machine {{ vm_name }}"

    - name: Update the custom dynamic inventory on the fly with the just-created vm
      uri:
        url: https://localhost:50443/databases/sioinv/tables/hosts/rows
        validate_certs: false
        user: sioinv
        password: "{{ sioinv_user_token }}"
        method: POST
        body: >
          [{
            "name": "{{ vm_name }}"
          }]
        force_basic_auth: yes
        status_code: 201
        body_format: json
      register: r_vm_post

    - name: Add hostvars on the fly to the just-created vm
      uri:
        url: https://localhost:50443/databases/sioinv/tables/hosts_variables/rows
        validate_certs: false
        user: sioinv
        password: "{{ sioinv_user_token }}"
        method: POST
        body: >
          [{
            "host_id": {{ r_vm_post.json.trids[0] }},
            "name": "ip_address",
            "value": "10.10.0.0"
          }]
        force_basic_auth: yes
        status_code: 201
        body_format: json

    - name: Refresh the inventory in current run to include the new VM and its variables before moving to the next play
      meta: refresh_inventory

- name: Full Stack Service creation
  hosts: "{{ vm_name }}"
  tasks:

    - name: Create the new database on the new VM
      shell: >
        echo "Module or command to create a new database on {{ vm_name }}"
Last words before you go
The inventory is the foundation of your Ansible strategy. It must be dynamic as possible and avoiding complexity to ensure smooth maintenance in the future. Modifying the inventory may lead you to change all your roles and playbooks and is something you may want to avoid. With this simple inventory describe here, you’ll have a strong foundation for your Ansible automation.
I hope this helps you, and please do contact us or comment below if you need more details.
![Thumbnail [60x60]](https://www.dbi-services.com/blog/wp-content/uploads/2022/12/oracle-square.png)
![Thumbnail [90x90]](https://www.dbi-services.com/blog/wp-content/uploads/2022/08/GME_web-min-scaled.jpg)
![Thumbnail [90x90]](https://www.dbi-services.com/blog/wp-content/uploads/2025/11/LTO_WEB.jpg)