Introduction
Before Visual Studio 2019, you were able to install the SSDT with the offline installer.
You were able to install it as a standalone Visual Studio for SSDT or for an already installed Visual Studio 2017. It was almost straightforward.
With Visual Studio 2019, there is no SSDT standalone installer, so you have to install the extensions.
Of course, it can be easy if you have an internet connection, but how to install it in offline mode.
This blog explains how to install offline Visual Studio 2019, its mandatory component to install afterward the SSAS and SSIS extensions.
Note: refer to the Microsoft web documentation, to see if the SSDT extensions have been released for higher version of Visual Studio
https://docs.microsoft.com/en-us/sql/ssdt/download-sql-server-data-tools-ssdt?view=sql-server-ver15
Installation of Visual Studio 2019
To prepare an offline installation of Visual Studio 2019 and the SSDT extensions, you need first to do some work on a computer having an internet connection.
Follow the steps below:
– First you have to download the Visual Studio Bootstrapper
https://aka.ms/vs/16/release/vs_enterprise.exe
– Download the Visual Studio offline installation executing this command
vs_enterprise.exe --layout c:TempVS2019_Layout --add Microsoft.VisualStudio.Workload.ManagedDesktop --add Microsoft.VisualStudio.Workload.Data --includeOptional --lang en-US
You can of course adjust the component you want to install depending on your development needs. My goal was to install the SSAS and SSIS SSDT extensions only, so I install the minimum required.
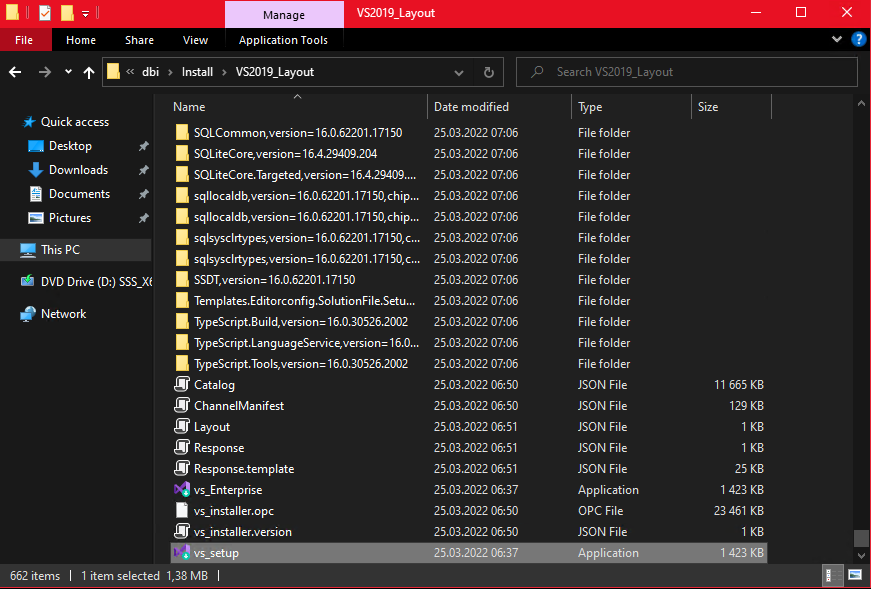
– Copy the entire c:TempVS2019_Layout folder to a location accessible by the computer where you want install Visual Studio
– Then start the installation by starting the vs_setup.exe application located in the VS2019_Layout folder you copied
Useful links:
– Create an offline installation package of Visual Studio for local installation
https://docs.microsoft.com/en-us/visualstudio/install/create-an-offline-installation-of-visual-studio?view=vs-2019
Installation of the SSAS and SSIS Visual Studio extension
– Download the SSAS and SSIS extensions from the Visual Studio Market place
○ SSAS: https://marketplace.visualstudio.com/items?itemName=ProBITools.MicrosoftAnalysisServicesModelingProjects
○ SSIS: https://marketplace.visualstudio.com/items?itemName=SSIS.SqlServerIntegrationServicesProjects
– Copy the SSAS extension VSIX file to the computer where you installed Visual Studio
– Close the Visual Studio application if it is open
– Execute the Microsoft.DataTools.AnalysisServices.vsix application and click on Install button
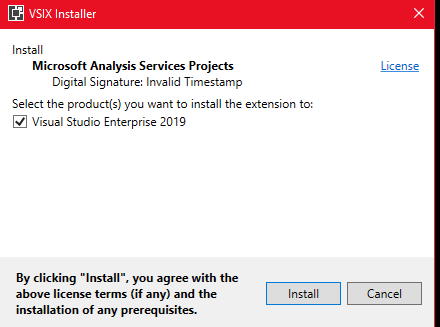
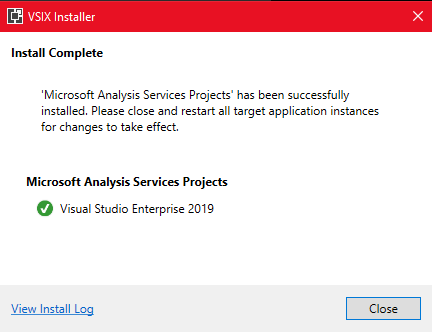
- Close the installation window
- Copy the SSIS extension EXE file to the computer where you installed Visual Studio
- Close the Visual Studio application if it is open
- Execute the Microsoft.DataTools.IntegrationServices.exe application.
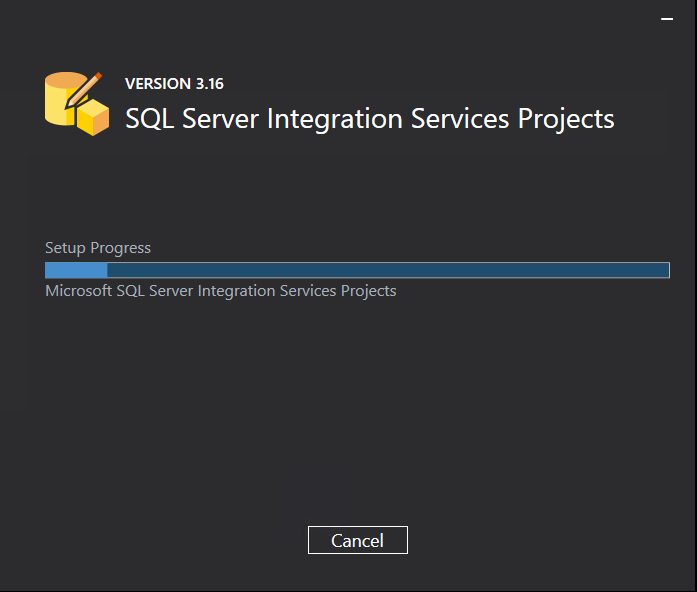
- Close the installation window
Useful links:
Microsoft Visual Studio Market place
https://marketplace.visualstudio.com/search?term=services&target=VS&category=All%20categories&vsVersion=&sortBy=Relevance
Check the SSAS and SSIS extension installation
- Open Visual Studio App

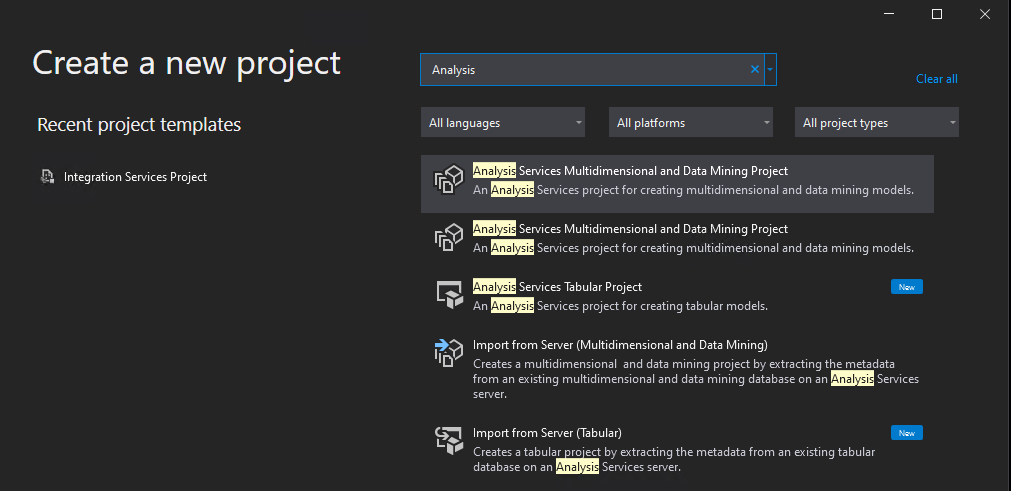
- Select “Create a new project”
- In the Create a new project window, search for the word “Analysis”. You should be able to see the 5 Analysis services project templates
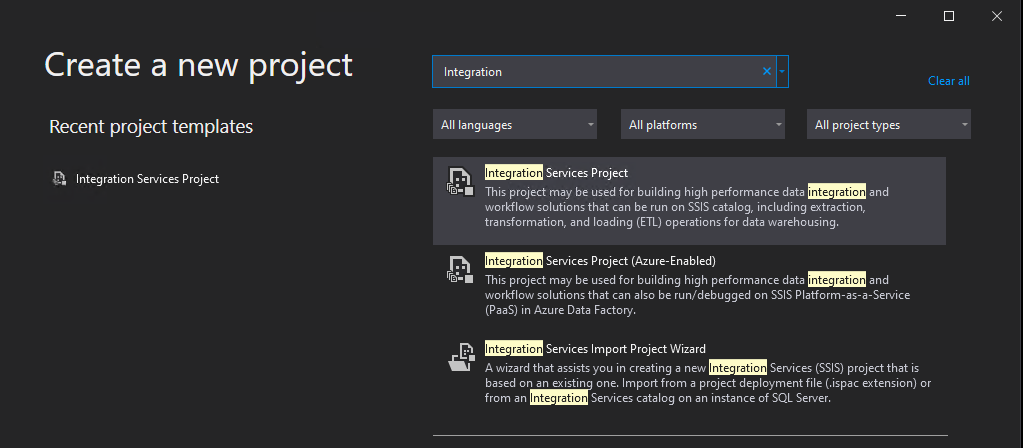
- Now search for the word “Integration”. You should see the3 Integration Services project templates
Conclusion
Finally, the process is not so complex. You can easily install the Visual Studio and the extension in an offline mode.
If you need more Visual Studio extensions, just update your layout extractions and run again the Visual Studio setup application to add the new components. Alternatively, if you need to install more extensions, download them from the Visual Studio marketplace and run the installation on the Visual Studio computer.
Have fun developing SSAS and SSIS projects.
![Thumbnail [60x60]](https://www.dbi-services.com/blog/wp-content/uploads/2022/09/CHC_web-min-min-scaled.jpg)
![Thumbnail [90x90]](https://www.dbi-services.com/blog/wp-content/uploads/2025/11/LTO_WEB.jpg)
![Thumbnail [90x90]](https://www.dbi-services.com/blog/wp-content/uploads/2023/01/APY_web-scaled.jpg)