Why is this feature interesting?
The Azure Synapse Link for SQL Server 2022 will enable you to replicate your operational data into Azure Synapse Analytics dedicated SQL pool.
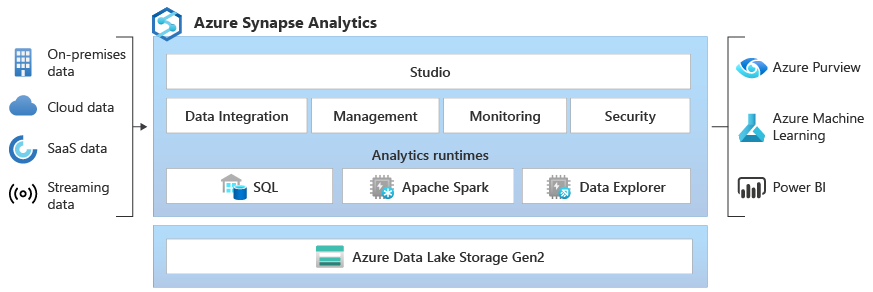
Azure Synapse is an enterprise analytics service that accelerates time to insight across data warehouses and big data systems. Azure Synapse brings together the best of SQL technologies used in enterprise data warehousing, Spark technologies used for big data, Data Explorer for log and time series analytics, Pipelines for data integration and ETL/ELT, and deep integration with other Azure services such as Power BI, CosmosDB, and AzureML.
Diagram of Azure Synapse Analytics architecture.
The advantage of creating a Synapse Link to your SQL server 2022 is that you can replicate your operational data in SQL Server to the Synapse dedicated SQL pool in an automatic way.
The data is first loaded in a landing zone and than copied to the Synapse dedicated SQL pool. The Azure Data Lake Storage Gen2 account is used for the landing zone. This data lake storage must be dedicated only for this Synapse Link for SQL landing zone.
You will be able to use the full power of Synapse to analyze your data without impacting the operational applications. You are also able to federate the data of several SQL Server 2022 databases without having to build complicated load processes.
Prerequisite
- On Azure side, you need first to have a Synapse workspace created
- On your data center side you need to have SQL Server 2022 Instance installed
- Make sure to have an master encryption key created on the database you want to link with your Synapse Analytics
- CREATE MASTER KEY ENCRYPTION BY PASSWORD = ‘************’
- Be also sure not to have clustered columnstore indexes on the tables you want to link in Synapse. This is not supported
- Make sure to have an master encryption key created on the database you want to link with your Synapse Analytics
- Create an Azure Data Lake Storage Gen2 account (different from the account created with the Azure Synapse Analytics workspace) used as the landing zone to stage the data submitted by SQL Server 2022.
- If you don’t have a container available, create one that will be used for the landing zone of the data coming from your SQL Server 2022 instance on-premises
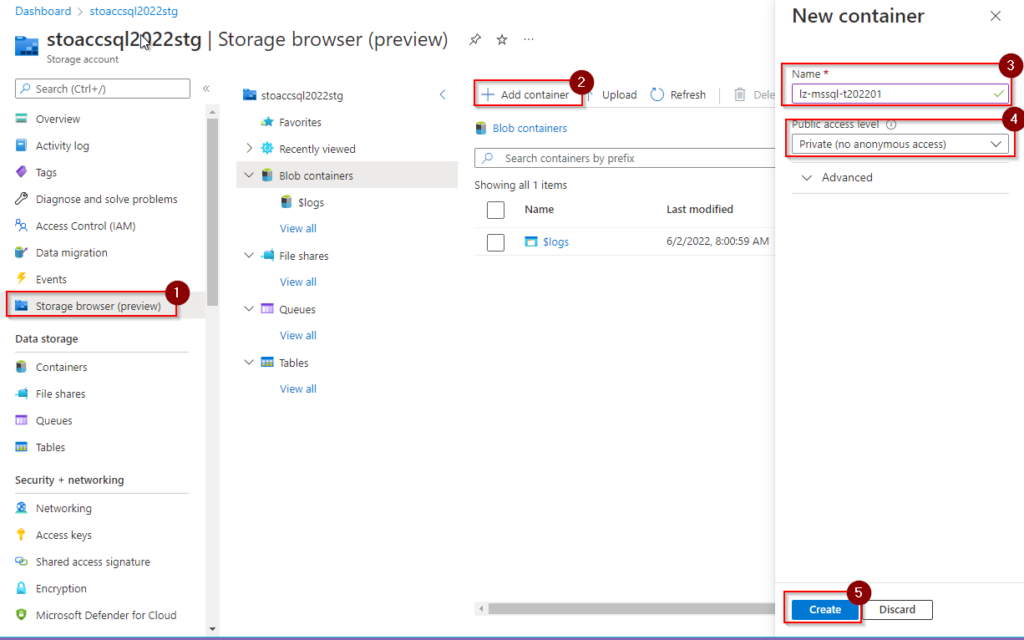
- You will also need a Share Access Signature (SAS) on your container later on to allow to access it
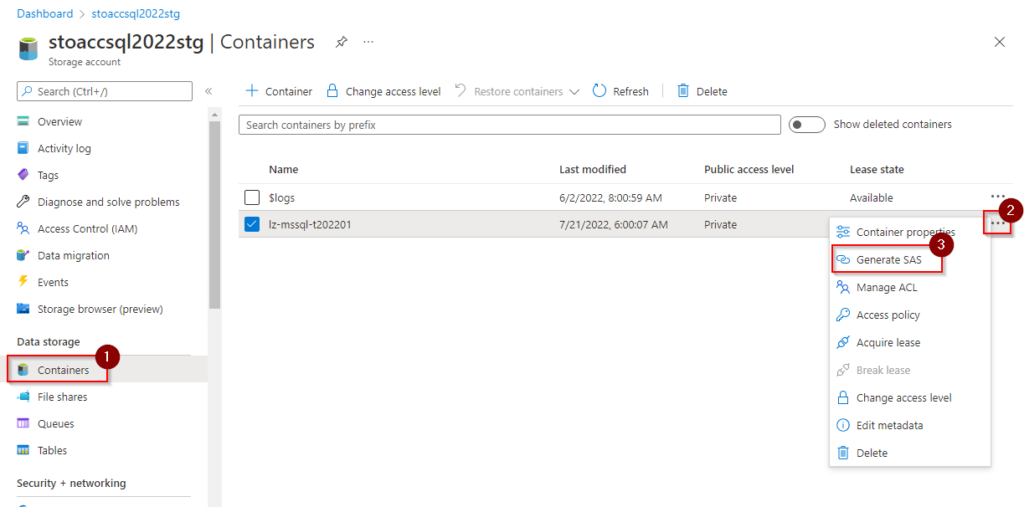
- In the Azure portal navigate to your storage account you will use for the landing zone
- Select the containers
- Click the ellipse button of the container you created previously
- Select generate SAS
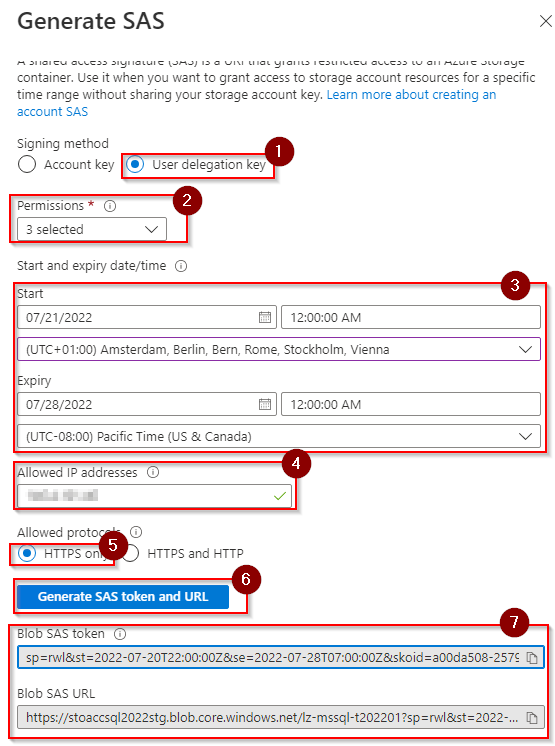
- Use User delegation key as the signing method
- Select Read/Write/List in the permissions
- Set the validity period of your signature (max duration is 7 days, after that you have to renew the signature)
- Defined the IP address of the computer which will access the landing zone container
- Select the protocol communication protocol
- Generate the SAS token
- Copy and save the token generated, you will need it later
- Make sure that the computer you are working on is allow to access your synapse workspace. Check the firewall rules.
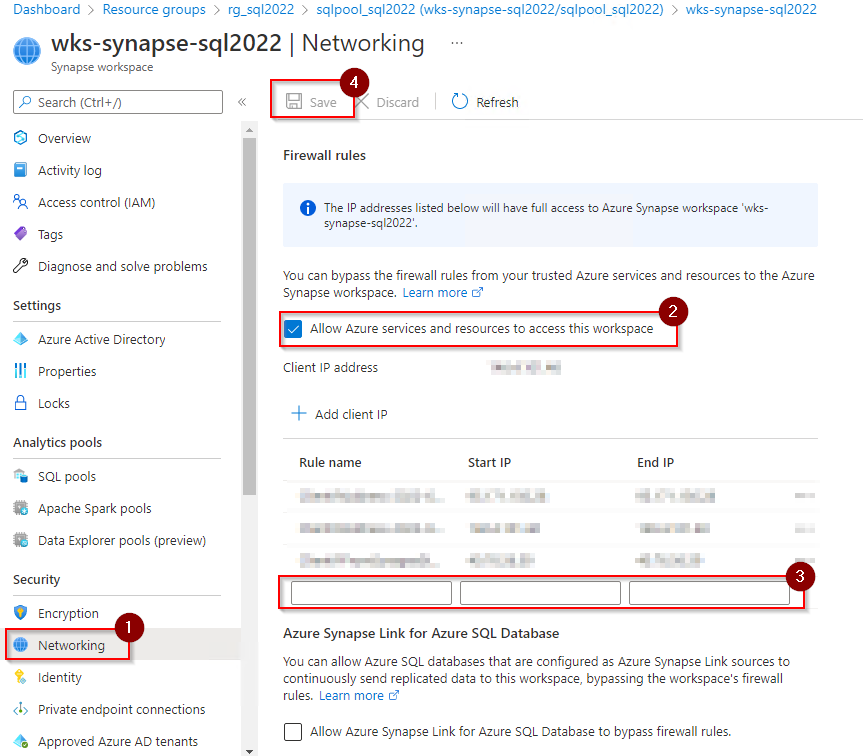
In the Azure portal navigate to your synapse workspace
- select the networking option
- Enable the checkbox to allow Azure services to access the workspace
- add the IP address of your client. Check that it appears in the list of rules
- save your settings.
Now that the prerequisites are fulfilled we can start with the real setup of the SQL Server 2022 link with Synapse.
Create your target Synapse dedicated SQL pool
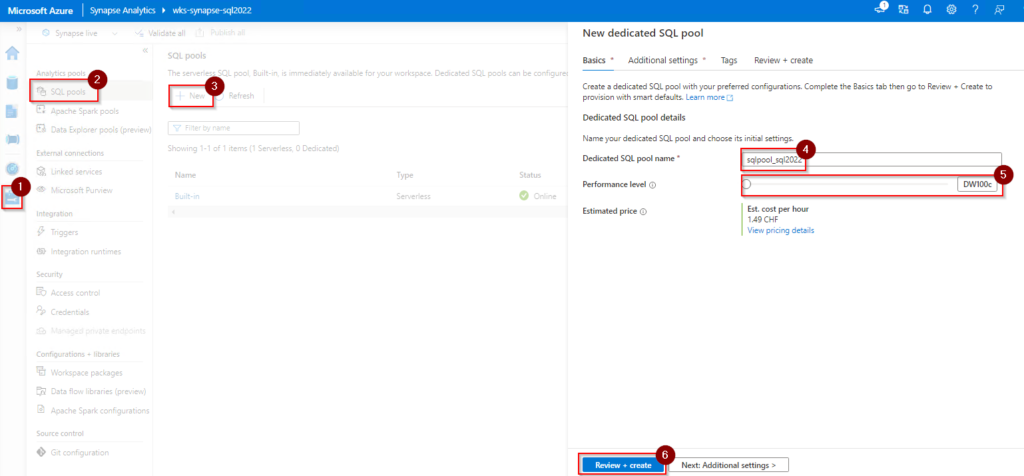
In Azure portal go to the synapse workspace you created and open the synapse studio.
- Select the manage hub
- Select SQL pool
- Click the +New to add a new SQL pool
- Key in a name
- choose the performance level depending of your needs
- create your SQL pool.
It takes some times until the SQL pool is deployed. Check the online indicator

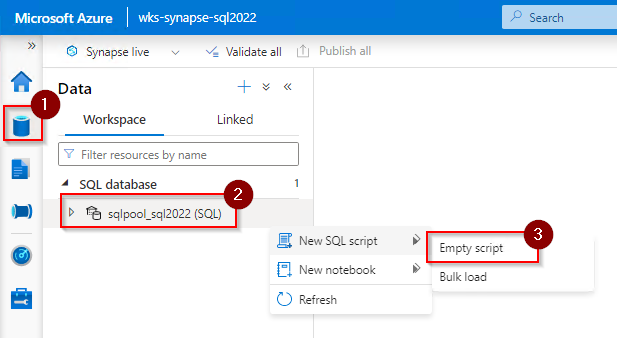
Create a master key for your synapse SQL Pool.
- go to data hub
- select your SQL pool
- create a new SQL script with the empty script option
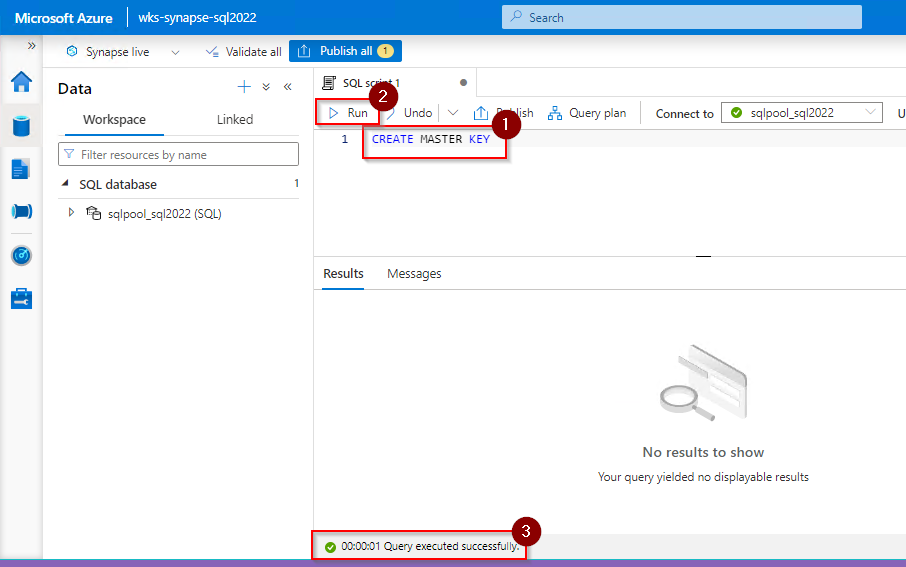
If you just created your dedicated SQL pool refresh your synapse studio, it might be that the SQL database does not appear in the workspace list.
Paste the command CREATE MASTER KEY in the script pane and run it. Be sure the script is successfully executed.
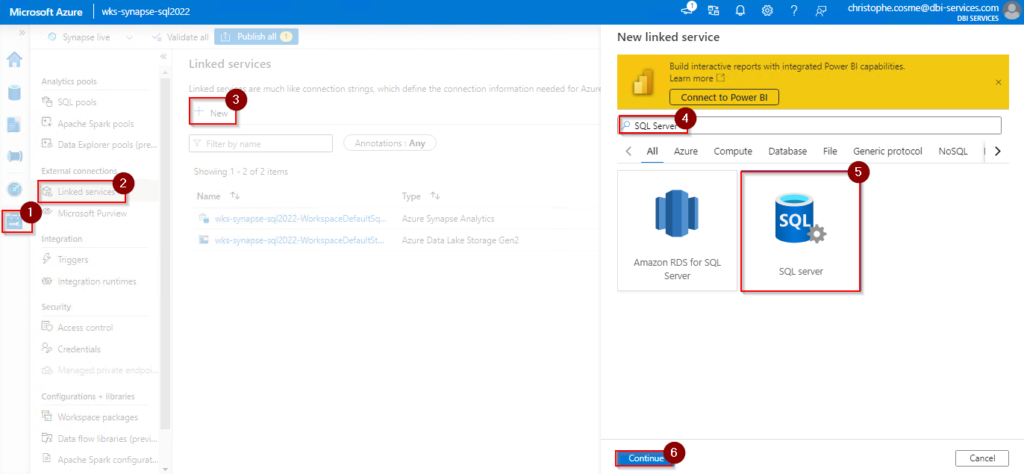
Create linked service for your source SQL Server 2022
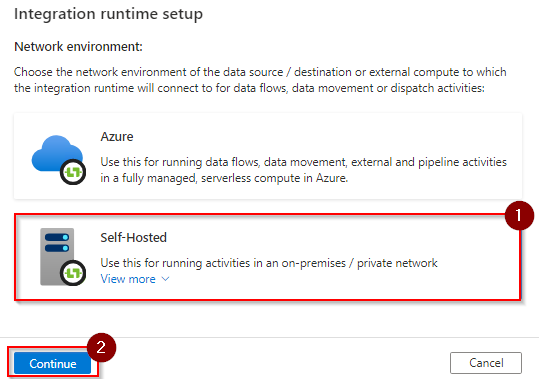
Create a Self-hosted integration Runtime : is a software agent that you can download and install on your on-premises machine or a virtual machine. It is a required component for synapse to get access to the data on SQL Server 2022
The Self-hosted Integration Runtime is only supported on Windows Operating System
- Select the [Manage Hub] option
- Select the option linked services
- select +New
- search for “SQL Server ”
- select the SQL Server Icon
- validate clicking continue.
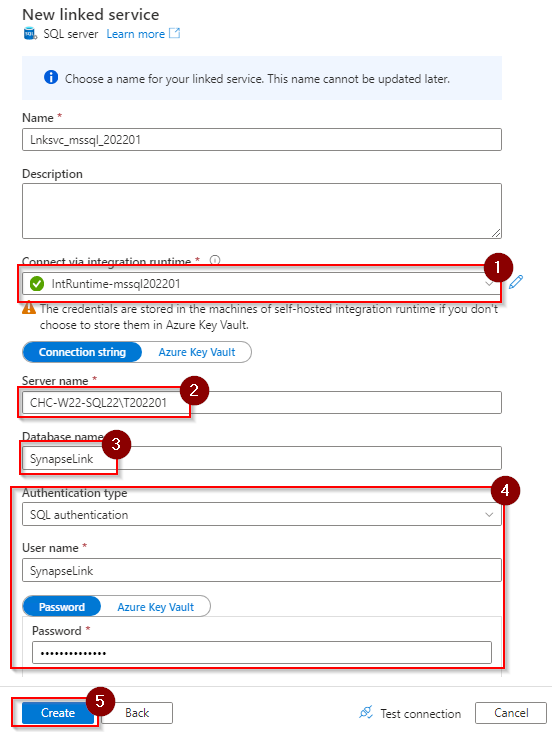
- Define a name for your linked service
- Define your owned integration runtime, by opening the dropdown
- select +New
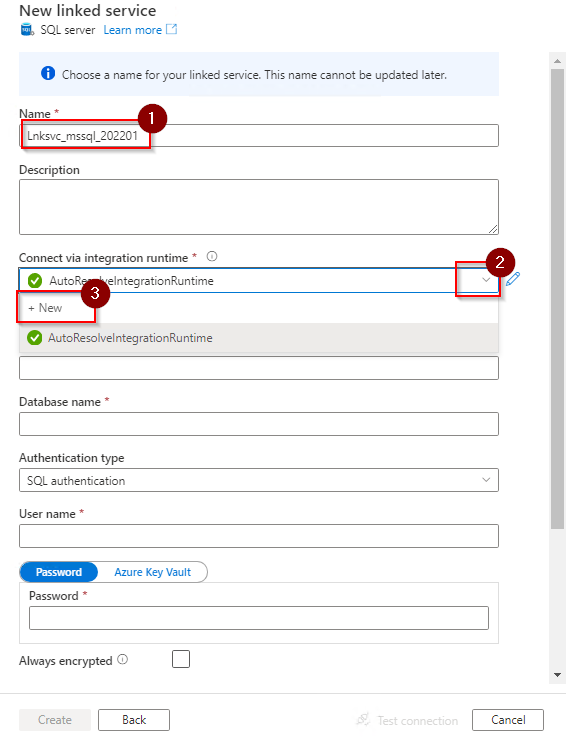
- Select the Self-Hosted option
- validate with continue
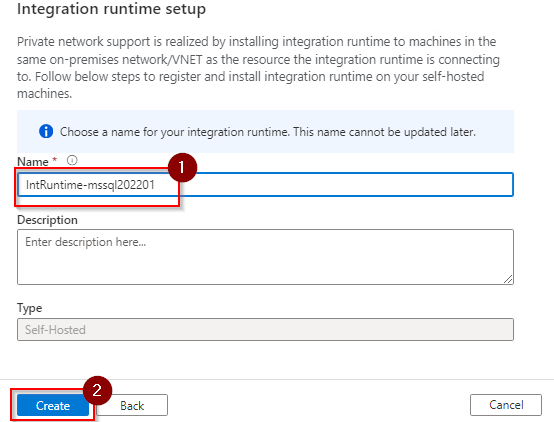
- Define a name unique in the workspace matching the naming convention
- and click create.
I opted for the manual setup. So I downloaded and installed the integration runtime manually. Copy the key in when installing it when required.
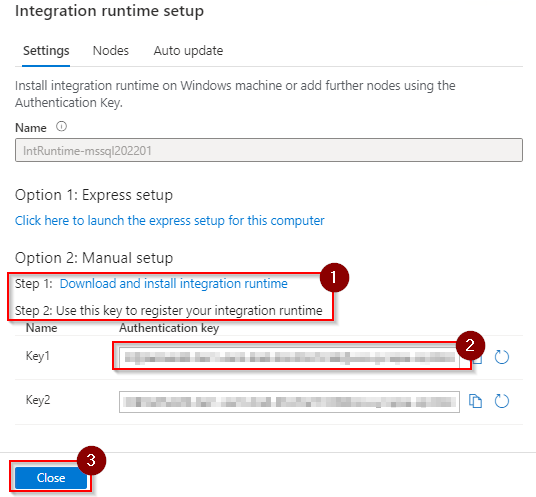
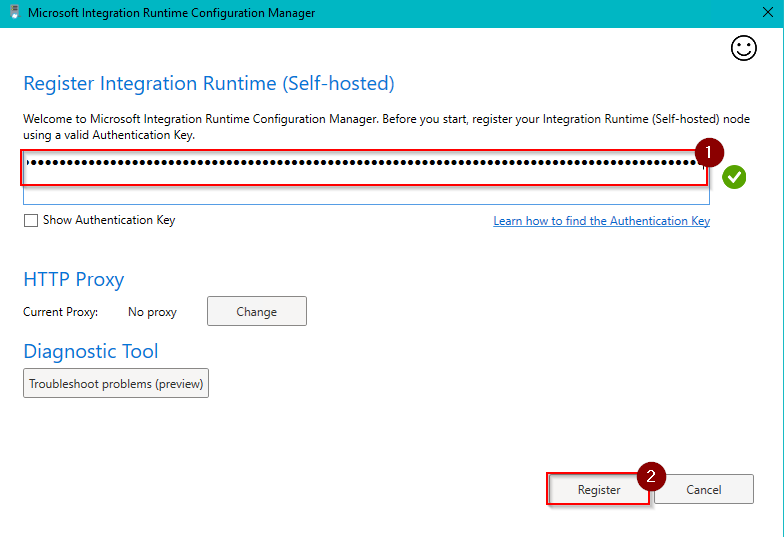
When the installation is finished the configuration manager will open. Copy the key provided by the setup in the synapse workspace and click register
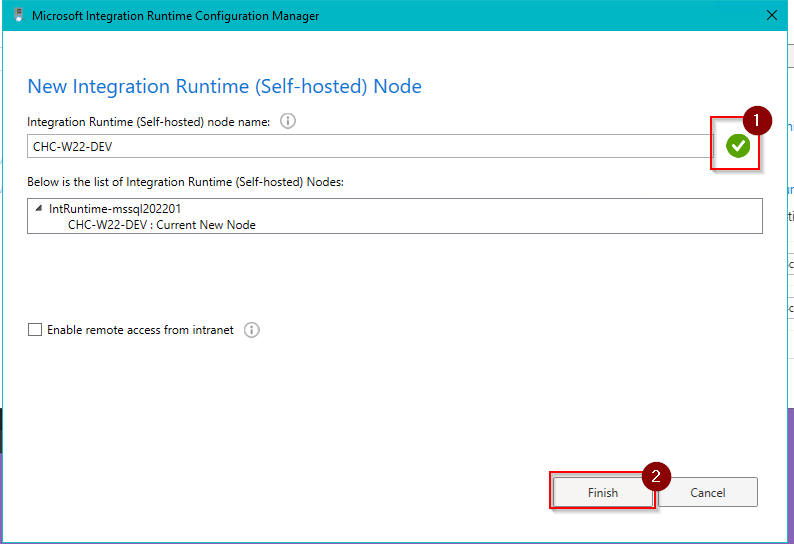
Check that the validation is ok and click finish to finalize the registration
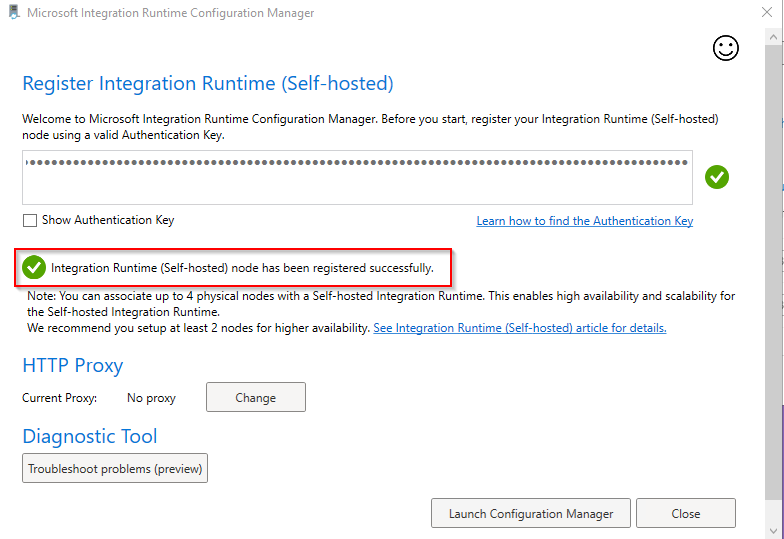
Check if the registration is successful
You can now finalize the creation of the linked service on your synapse workspace.
- Check that your integration runtime is valid
- Capture the name of you on-premises SQL Sever instance
- Specify the database name
- Define the authentication to your on-premises SQL Server instance.
- Test your connection
- Click create
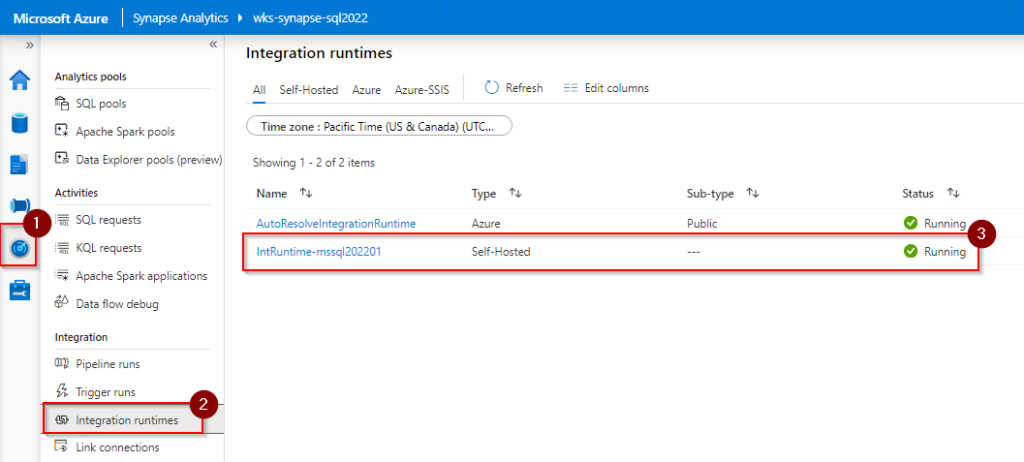
The last think you can do for this step is verify that your integration runtime is up and running
- Go to the monitor hub
- Select integration runtimes
- Check the status of your self-hosted integration runtime
Create a linked service to connect to your data lake staging area
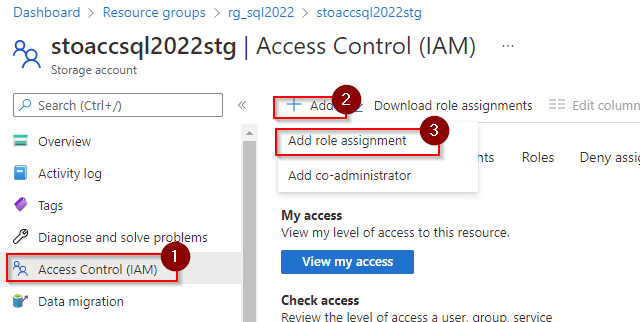
First you have to grant permissions to your Azure data lake gen2 for your synapse workspace to access it. On the Azure portal, go to the Azure Data Lake Storage Gen2 account you created.
- Select the Access Control (IAM) menu.
- Click +Add, and select Add role assignment.
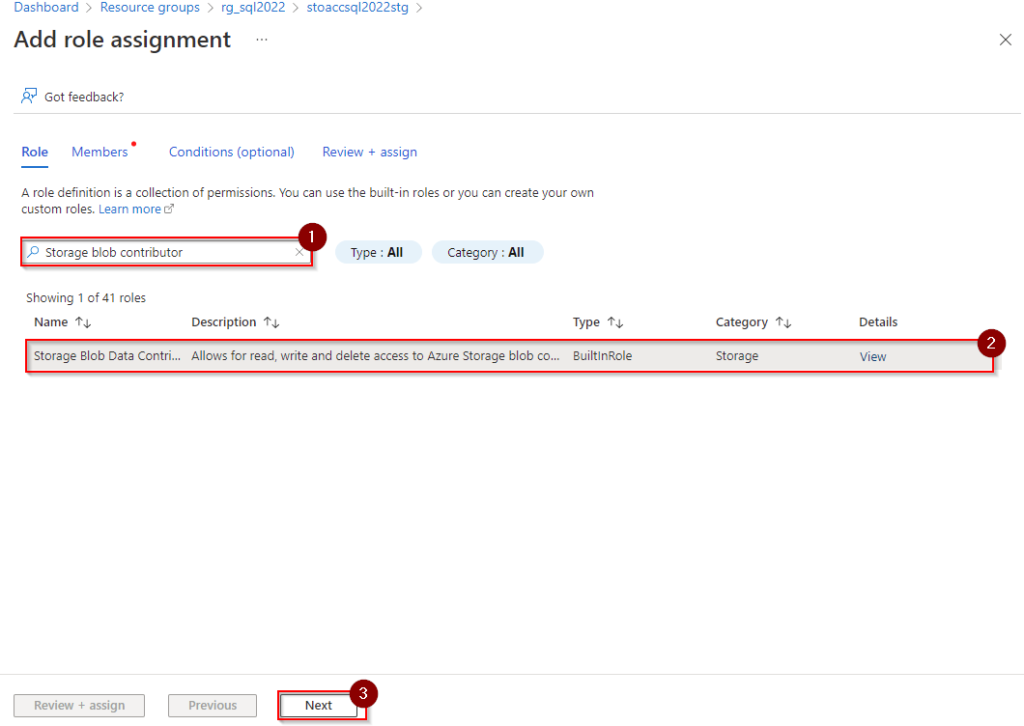
- Search for Storage Blob Data Contributor for the selected role
- Select the line in the list
- Click next
- Choose Managed identity in the assign access to section
- Click select members
In the right pane
- Select the subscription to use
- Select Synapse workspaces in the managed identity dowpdown
- Select the synapse workspace you want to grant the role to.
- Click select
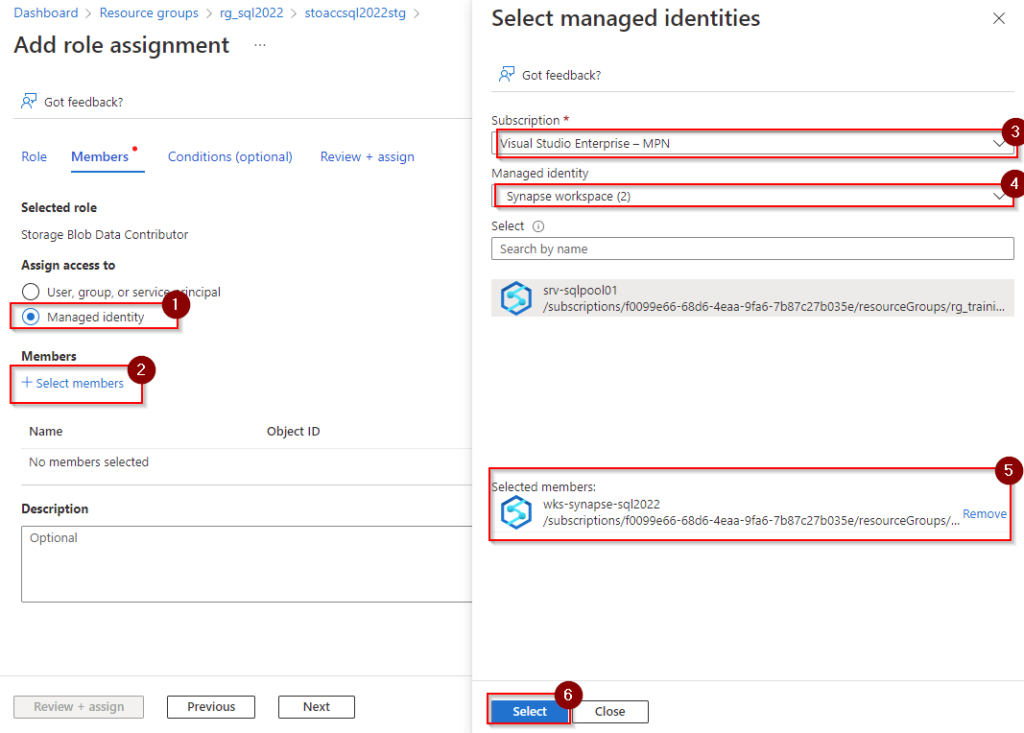
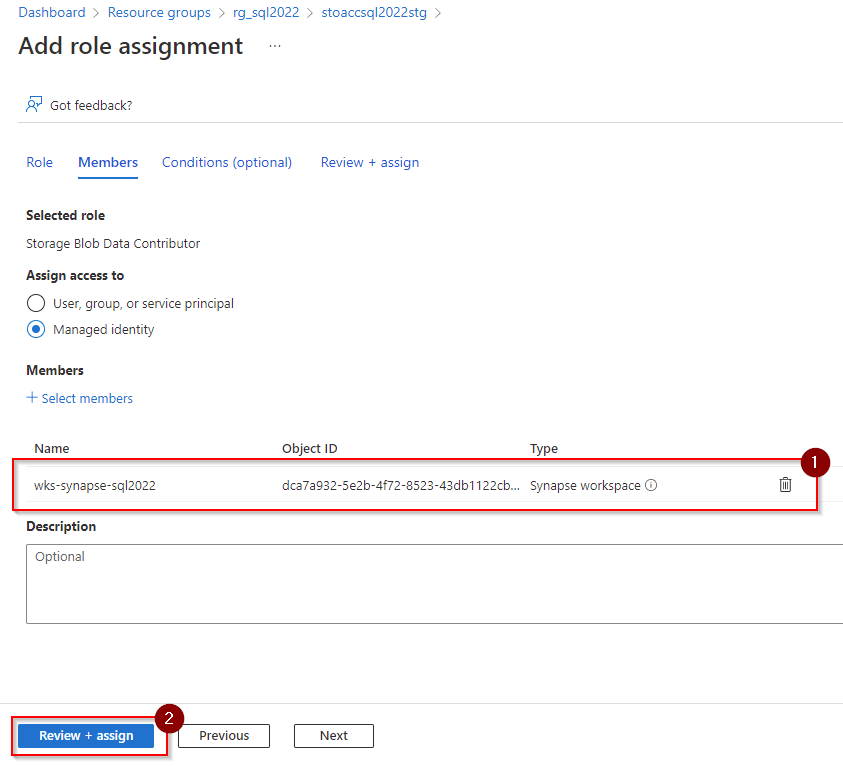
- Check if you selected the right member
- Validate with Review + assign
This may take a few minutes to take effect to add role assignment.
Now you can create the linked services in your synapse workspace to bind the data lake gen2.
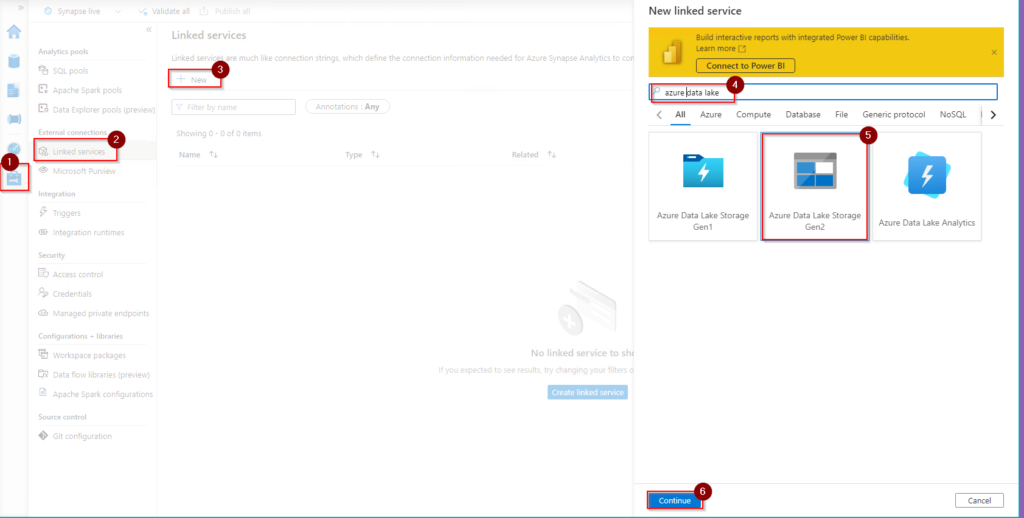
Go back to the synapse studio
- Select the manage hub section,
- Select linked services
- Click +New
- In the right pane
- Search for Azure Data Lake Storage Gen2
- Click continue
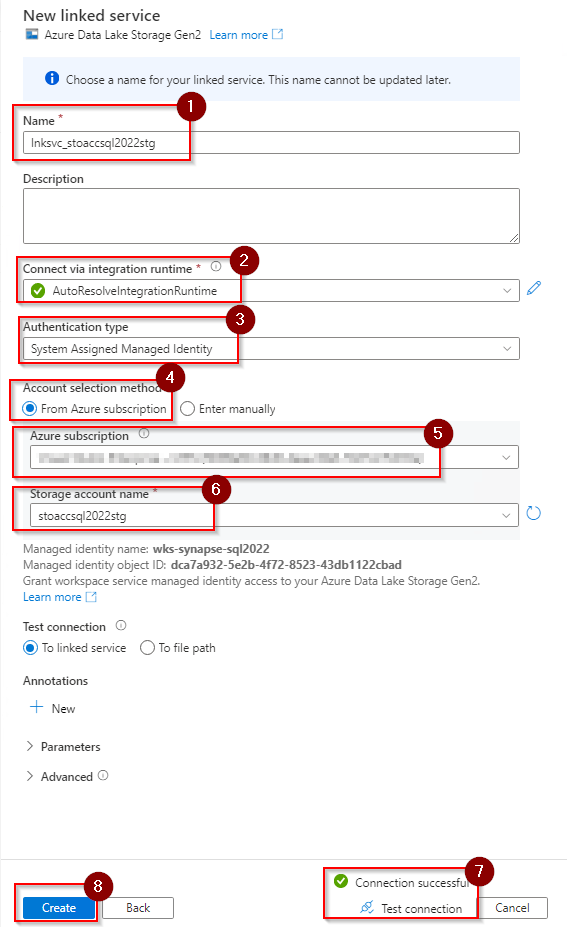
- Defined a name for your linked service
- Select the AutoResolveIntegrationRuntime connection method
- Select Accountkey in the authentication type
- Select the option Fron Azure subscription
- Select the subscription
- Select your storage account name to be the destination of your landing zone
- Test your connection and check if everything is fine
- Finalize the creation by clicking create
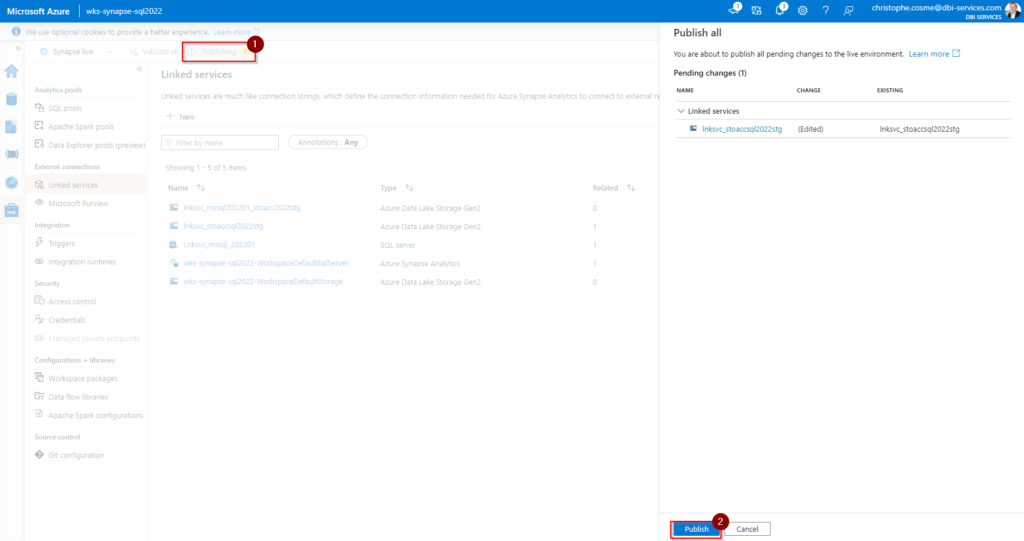
Do not to forget to publish the changes when needed
- Click the Publishing command
- Click the publish button after having reviewed the list of changes to apply
Create the Azure synapse link connection
First be sure that all the tables you need to replicate in your Synapse have a primary key on the on-premises SQL Server instance side. This is mandatory for the data replication
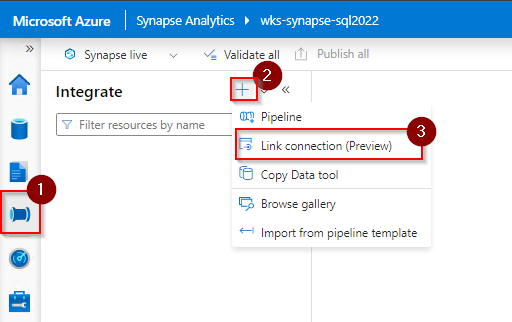
Stay in your Synapse Studio to set this configuration
- Go to the integrate hub
- Click on the +
- Select the Link connection option
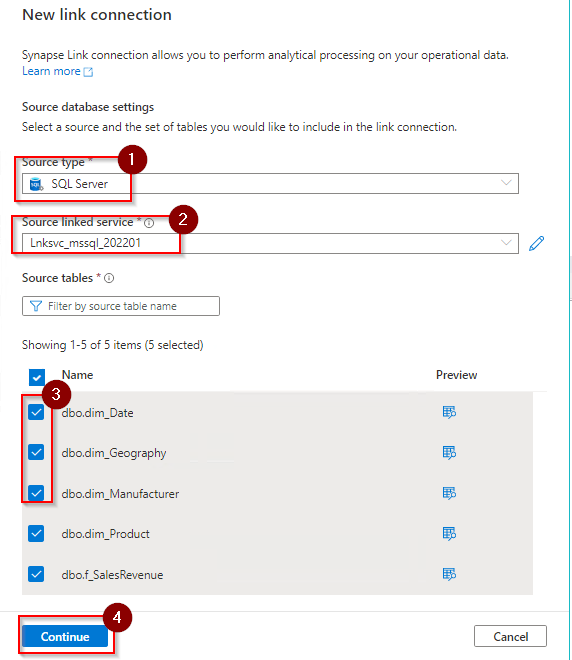
Define your new connection to the SQL Server 2022 instance you have on-premises
In the New link connection window
- Define the source type, in our case SQL Server
- Select the Source linked server you created previously to bind your SQL Server instance on-premises
- Select the tables to be replicated on Synapse side
- Click continue
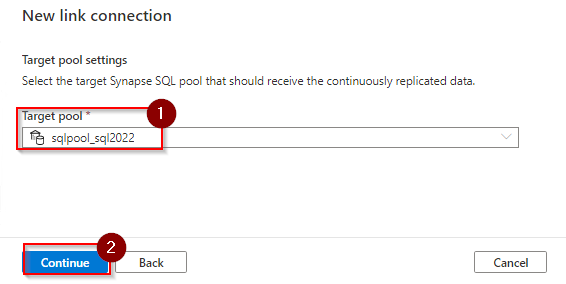
In the next step
- Select the SQL pool you have created previously
- Click continue
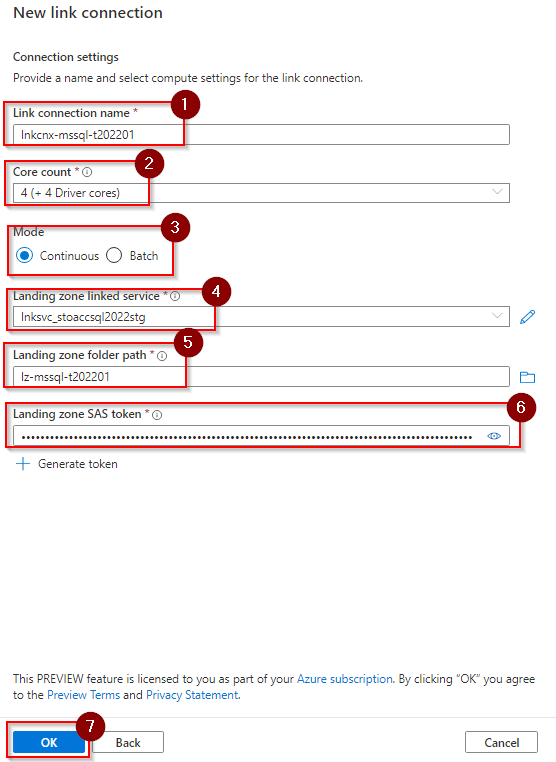
- Give a name to your link connection
- Set the number of core dedicated to the connection
- Select the mode of the connection
- Sekect the linked service to the landing zone your created previously
- Select the storage account container you created (see the prerequisite chapter)
- Copy the storage container SSAS token you generated (see the prerequisite chapter)
- Click the OK button to create the link connection
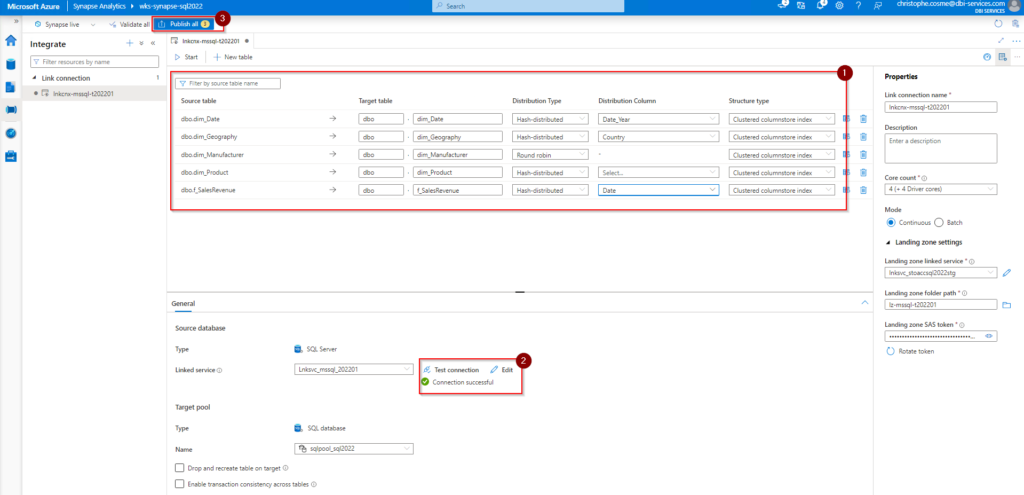
On the next screen, you will get a summary of the whole link connection your just defined
- Change the target table names, distribution type/Column and structure type to fit best the data you are dealing with
- Test again the connection with your SQL Server instance on-premises
- Publish the link connection your created on your synapse workspace
Start and control the data replication
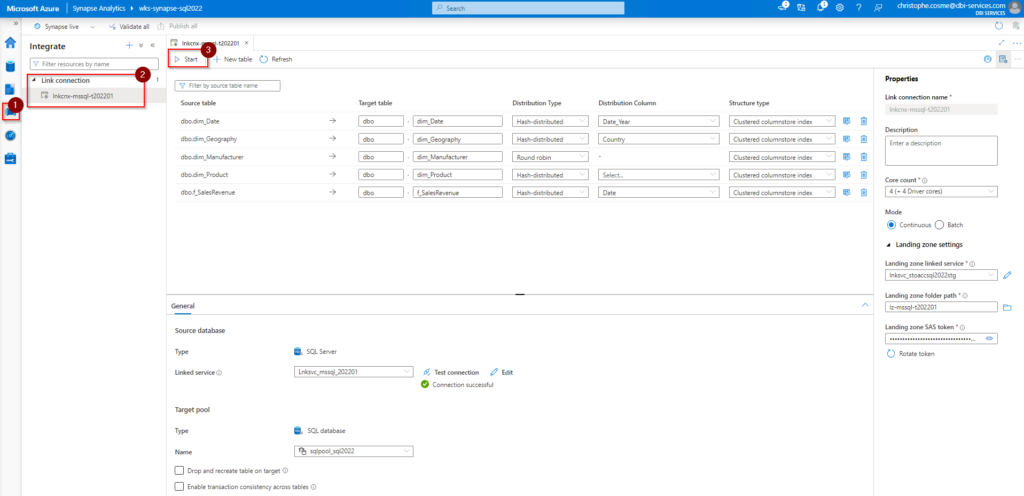
Now we are finally ready to start the data replication from your SQL Server 2022 on-premises to your Synapse workspace.
It can take several minutes for the link to take effect and data starting to be replicating.
It will first create the table structure on the SQL pool, than snapshot the data to make an initial data load and start the replication.
In the Synapse Analytics Studio
- go to the Integrate hub
- Select the link connections you create previously
- Click on the Start button
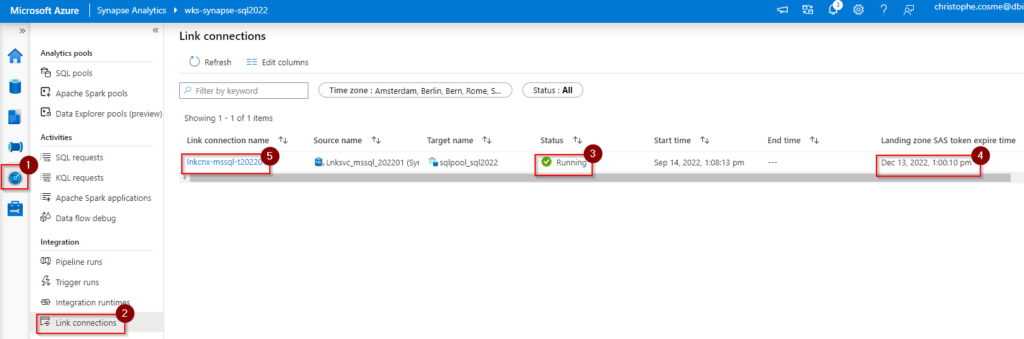
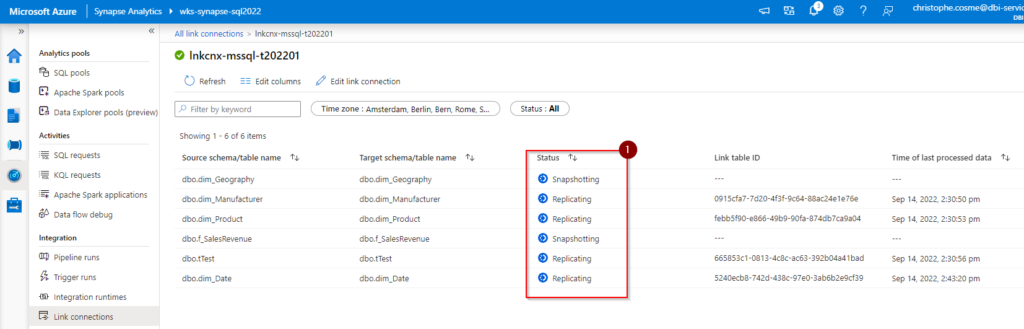
You can follow the status of the data replication from the Synapse Studio
- Go to the monitoring hub
- Select the Link connection option
- Be sure that the status is running
- Notice as well that a warning is displayed indicating the landing zone token has an expiring date. I will have to rotate the key to ensure for the replication to continue working
- Click on the link connection name to see the detailed information of the replication
- Check the status of the replication per table you selected. When error occur you will see it here too. In this case you can click on the error to see the error message.
Control in the SQL pool that the tables have been created correctly and that they contain data
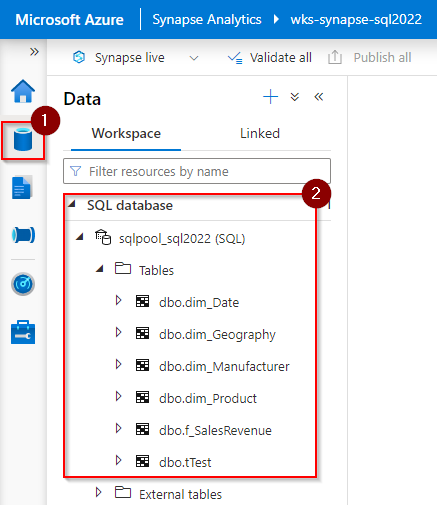
From Synapse Analytics Studio
- Select the Data hub
- From the Workspace tab, expand the table folder of your SQL pool and check the table created. The specific icon in front of the table indicate that it is a linked table
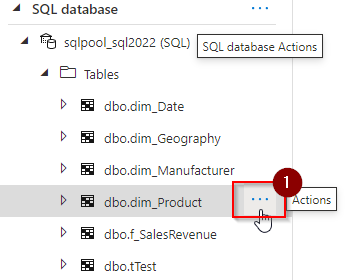
- Hover on the table name
- Click the […] button to create action on the table
- Select New SQL Script
- Click on Select TOP 100 rows to generate the query and see the result set
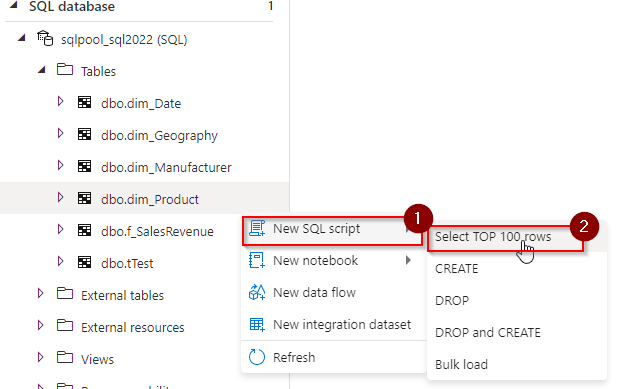
- The query will be written in the SQL script frame
- The dataset will be display below
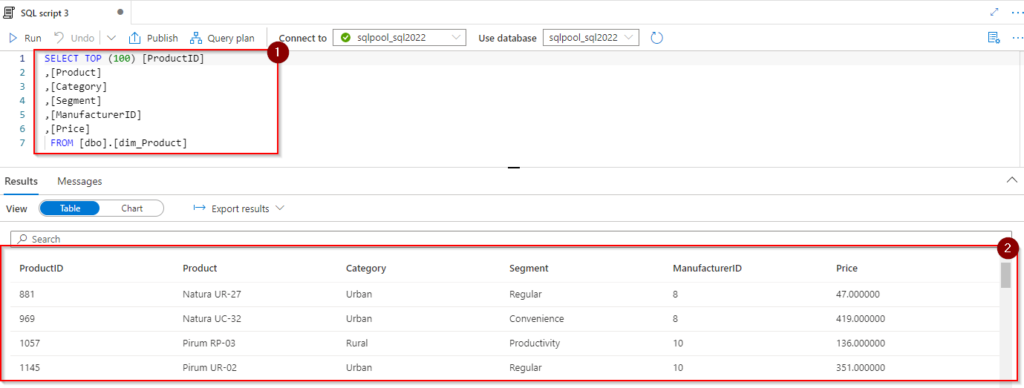
You can query your data and check the replication consistency by changing the query.
You can publish your queries and thus create control script to control if the replication is running as expected.
Check to be done on SQL Server side
There are some checks you can do on your SQL Server side.
Within the database use to link the tables in Synapse, you will find 3 new system tables in which you can query information about the linked tables using the change feed feature
[changefeed].[change_feed_settings]
[changefeed].[change_feed_table_groups]
[changefeed].[change_feed_tables]
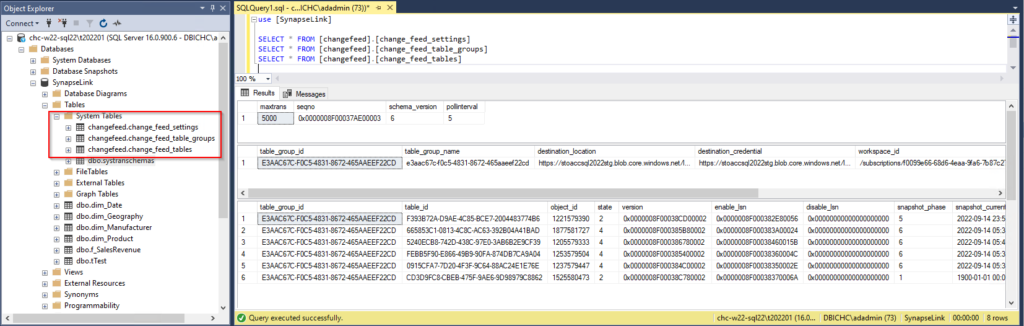
You will find connection info used by Synapse to replicate the table through the link service running the following query on your database level:
use [<YourDatabaseName>]
select * from sys.database_scoped_credentials
And check the result you obtain:
- The name of the scoped credential must match your Azure Storage Account container folder your defined
- The principal id must match the database user id you used to connect to the database through the Microsoft integration Runtime service

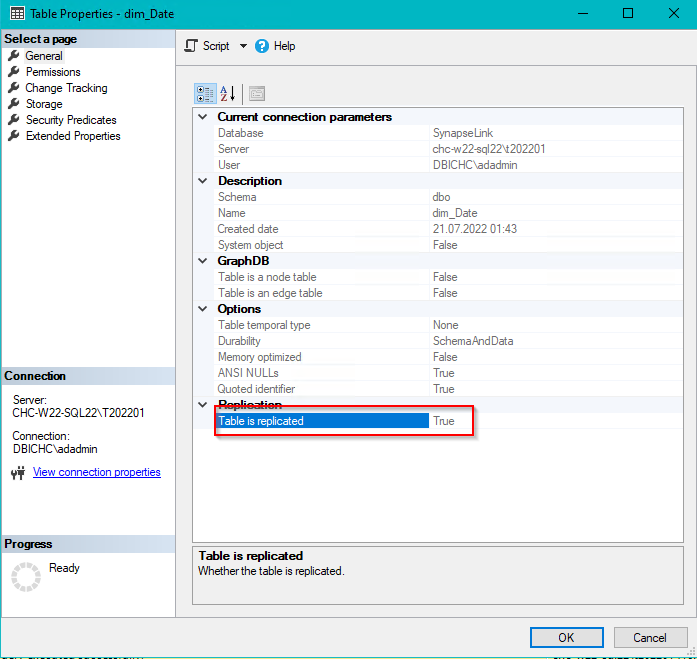
On table level check the propoties. You notice that the Table is replicated is set to True.
Limitation
In the documentation you can find information on the limitations you have at the moment. You will also find the know issues:
Conclusion
Even if this feature is only in preview mode, and if it seems a bit cumbersome to configure, I like the idea to be able to replicate your operational data to Synapse for real-time data analysis.
It can be a good setup for such scenario.
My next step will be to test how it behaves in a more changing environment, like having lot of transactions on the source system or changing the table structure and so on.
Another aspect I want to experiment, is to plug Power BI reports on this Synapse Analytics linked tables.
It is really a feature I will follow and I’m looking forward to see the further development.
![Thumbnail [60x60]](https://www.dbi-services.com/blog/wp-content/uploads/2022/09/CHC_web-min-min-scaled.jpg)
![Thumbnail [90x90]](https://www.dbi-services.com/blog/wp-content/uploads/2022/08/STH_web-min-scaled.jpg)
![Thumbnail [90x90]](https://www.dbi-services.com/blog/wp-content/uploads/2022/11/TBR-web-min-scaled.jpg)
![Thumbnail [90x90]](https://www.dbi-services.com/blog/wp-content/uploads/2025/11/LTO_WEB.jpg)
![Thumbnail [90x90]](https://www.dbi-services.com/blog/wp-content/uploads/2023/01/APY_web-scaled.jpg)