In the case you have the following configuration and requirements
Your Power BI, paginated mobile KPI reports are published on your on premise Power BI Report Server (Named i.e. SRV-PBIRS), their data sources is an Analysis Services located on another server (Named i.e. SRV-SSASTAB\INST01, INST01 being the named instance) and you want to track/monitor who is accessing the data on Analysis Services or you have row level security constraints.
In such case, if you have configure your Analysis connection using Windows integrated authentication, and therefore you have to setup the Kerberos delegation from the Power BI Report Server to the Analysis Services Server. If you don’t do that, your users will be faced to the famous “double-hop” issue and they won’t be able to access the Analysis Services data or you won’t be able to identify who is consuming your data on Analysis Services side.
In order to setup the Kerberos delegation you can follow steps below:
1- Be sure to be Domain Admin or to have sufficient permission to create SPN and change the Service Account and /or computer settings in the Active Directory.
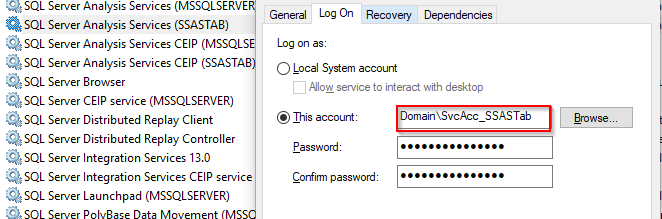
2- On your Power BI Report Server server, get the Service account starting your Power BI Report Server service.
(i.e. SvcAcc_PBIRS)

Note: If you do not have used domain service account you will have to use the server name instead in the following steps.
While you are on the server, make first a backup and then change the rsreportserver.config configuration file (for a default installation it is located here: C:\Program Files\Microsoft Power BI Report Server\PBIRS\ReportServer). Add the parameter <RSWindowsNegotiate/>> in the <AuthenticationType> xml node
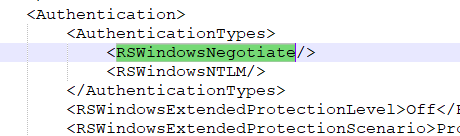
Save an close the file.
3. On your Analysis Services server, get the server account starting your Analysis Services service
(i.e. SvcAcc_SSASTab)
Note: If you do not have used domain service account you will have to use the server name instead in the following steps.
4- Open a PowerShell console on a any domain computer with your domain admin user.
Execute the following command to get SPN associated with your Power BI Report Service account:
Setspn -l PBIRSServiceAccount
If you do not see the following entry
HTTP/SRV-PBIRS.DomainHTTP/SRV-PBIRS
Execute the following commands to register HTTP SPN for your server FQDN and NETBIOS names
SetSpn -a http/SRV-PBIRS.Domain PBIRSServiceAccount
SetSpn -a http/SRV-PBIRS PBIRSServiceAccount
Note that you have to replace the SRV-PBIRS.Domain with the URL (without the virtual directory) of your Power BI Report Server site in the case you defined an URL or you defined an HTTPS URL with a certificate.
Check again if you the SPN’s are correctly registered after.
5- In your PowerShell session, execute the following command to get SPN registered for your Analysis Services Service account:
SetSpn -l SvcAcc_SSASTab
You should see the following entries, meaning your Analysis Services SPN’s have been registered:
MSOLAPSVC.3/ SRV-SSASTAB:INST01MSOLAPSVC.3/ SRV-SSASTAB.domain:INST01
If not run the following commands:
    SetSpn -a MSOLAPSVC.3/ SRV-SSASTAB:INST01 SvcAcc_SSASTab
    SetSpn -a MSOLAPSVC.3/ SRV-SSASTAB.domain:INST01 SvcAcc_SSASTab
Furthermore, in the case you installed your Analysis Services with a named instance (in my example INST01), check if SPN’s have been registered for the Analysis Services SQL Browser Service (the server name is used in that case for the SQL Server Browser is started with a local service account):
SetSpn -l SRV-SSASTAB
You should see the following entries:
MSOLAPDisco.3/SRV-SSASTABMSOLAPDisco.3/SRV-SSASTAB.domain
If not, run the following command:
SetSpn -a MSOLAPDisco.3/SRV-SSASTAB SRV-SSASTAB
SetSpn -a MSOLAPDisco.3/SRV-SSASTAB.domain SRV-SSASTAB
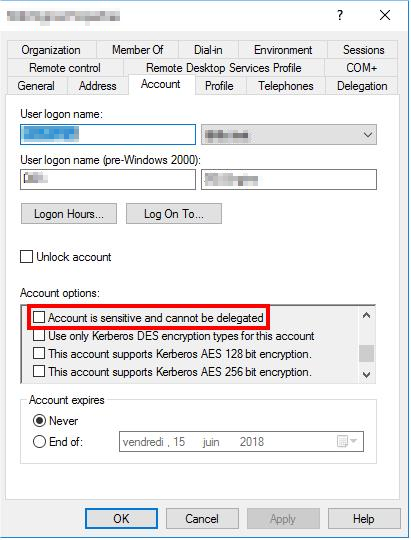
6- For the next step you have to open Active Directory administration.
Open the properties of your Power BI Report Server service account.In the Account tab, uncheck the “Account is sensitive and cannot be delegated”
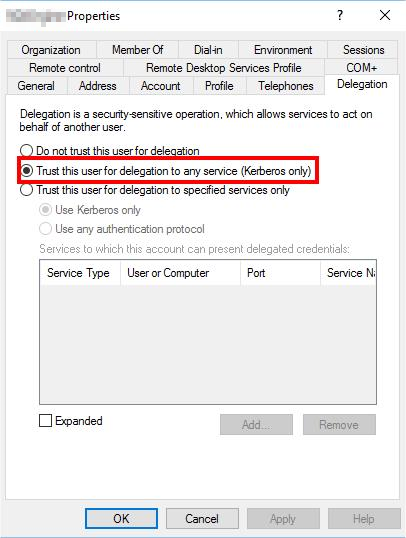
Then in the Delegation tab, select the “Trust this user for delegation to any service”. If you have security constraint with the delegation, it is recommended to use the third option and to select the only services you defined in step 5.
![Thumbnail [60x60]](https://www.dbi-services.com/blog/wp-content/uploads/2022/09/CHC_web-min-min-scaled.jpg)
![Thumbnail [90x90]](https://www.dbi-services.com/blog/wp-content/uploads/2022/08/STH_web-min-scaled.jpg)
![Thumbnail [90x90]](https://www.dbi-services.com/blog/wp-content/uploads/2022/11/TBR-web-min-scaled.jpg)
![Thumbnail [90x90]](https://www.dbi-services.com/blog/wp-content/uploads/2025/11/LTO_WEB.jpg)
![Thumbnail [90x90]](https://www.dbi-services.com/blog/wp-content/uploads/2023/01/APY_web-scaled.jpg)