
Grid infrastructure 12c has recently been released. In this posting, I will show that the installation prerequisites are quite similar between Grid Infrastructure 11g and 12c. We will see parts of them during a review for the deployment of Grid Infrastructure on a two nodes RAC database cluster.
Server hardware requirements
Let’s see the hardware part.
| Grid infrastructure 12.1 | Grid infrastructure 11.2 | |
| Minimal size for /tmp | 1 GB | 1 GB |
| Minimal size for Grid infrastructure install | 8 GB | 6,5 GB |
| Minimal size for clusterware and asm logfiles | 3,5 GB | |
| Minimal memory | 4 GB | 2,5 GB |
| Minimal Swap | Equal to memory, up to 16 GB |
Equal to memory, up to 16 GB (32 bits) Equal to memory, up to 32 GB (64 bits) |
| Operating system architecture | 64 bits | 32 bits 64 bits |
This table shows three principal things. Grid Infrastructure 12c needs more disk space. Not really a surprise, new features need space. Swap space rule has changed too, 16 GB is the maximum amount of swap space required.
And a last important change we can observe: 32 bit operating systems are no longer supported with Grid Infrastructure 12c. This fact is to take in account for people who want to migrate from 11g to 12c, because some applications still need 32 bit libraries to work fine.
Server software requirements
Grid Infrastructure is not compatible with two old releases of Linux:
| Linux release | |
| Oracle Grid Infrastructure 12.1 | Oracle Linux / RHEL 5 Update 6 or later, Oracle Linux / RHEL 6 or later |
| Oracle Grid Infrastructure 11.2 | Oracle Linux / RHEL 4 Update 7 or later, Oracle Linux / RHEL 5 Update 2 or later, Oracle Linux / RHEL 6 or later |
This table shows only requirements for Oracle Linux because this blog is about Oracle. As you can see, Grid Infrastructure 12c supports only OEL / RHEL release 5 Update 6 or later.
What you will need
You choosed an operating system, and your hardware is able to support Grid Infrastructure. But if you want to create a two nodes cluster, you also need following pre requisites.
For Network:
- One public IP for each node
- One virtual IP for each node
- One private IP for each node for cluster interconnect, on a separate subnet
- Up to three public IPs for the SCAN – Single Client Access Name (3 IPs is recommanded)
For ASM:
- One shared disk of 2 GB minimum for CRS with external redundancy (use three disks for normal redundancy and five disks for high redundancy)
- At least one shared disk for datas
Shared disk means that the disk can be accessed in read / write by multiple hosts at a same time.
In this example, we are going to create 3 disks of 2 GB for CRS with high redundancy, 1 disk of 10 GB for database files (DATA) and 1 disk of 10 GB for the fast recovery area (FRA). We have a total of 5 disks.
Of course, do not forget to download the Oracle binaries for Grid infrastructure and for rdbms. We assume that you already downloaded and unzipped files on node01 in the path “/software”.
Configuring the system
Once we validated that the system can be used to install Oracle Grid Infrastructure, there are some configuration to do or some parameters to adapt. Unless it is precised, all following steps concern both nodes.
1) General configuration
- cvuqdisk package
This package is required by cluvfy tool, to see shared disks. It is available in Grid Infrastructure binaries, in /software/grid/rpm directory. You can copy the rpm on the second node using scp.
# CVUQDISK_GRP=oinstall; export CVUQDISK_GRP
# rpm -iv cvuqdisk-1.0.9-1.rpm
Preparing packages for installation...
cvuqdisk-1.0.9-1
You can check that the package is installed with the rpm command:
# rpm -qa | grep cvuqdisk
cvuqdisk-1.0.9-1.x86_64
This package is required for both 11g and 12c Grid Infrastructure. Note that thepackage version may change according to the Oracle release used.
- NTP services
NTP (Network Time Protocol) is used to synchronize time of members of the cluster. According to Oracle note 1056693.1, it was necessary due to an unresolved bug to add the slew option for the ntp deamon with Grid Infrastructure 11g. It consists to run ntpd with the “-x” option, by editing the /etc/sysconfig/ntpd file. It gives something like this:
OPTIONS="-x -u ntp:ntp -p /var/run/ntpd.pid"
It seems that this problem does not affect Oracle Grid Infrastructure 12c. I did not edit the ntpd configuration before installing Grid Infrastructure 12c, and I got no error about it.
- IPtables (firewall)
To make sure that members of the cluster can communicate, iptables service must be stopped. To do that, just stop the service and disable the autostart of this service:
# service iptables stop
# chkconfig iptables off
# chkconfig --list iptables
iptables        0:off   1:off   2:off   3:off   4:off   5:off   6:off
IPTables has to be disabled for both 11g and 12c installations.
- SELinux
SELinux can prevent to establish a correct SSH communication between two hosts, or prevent the creation of ASM disks with the oracleasm tool. To disable SELinux, edit the file /etc/selinux/config as follow:
# This file controls the state of SELinux on the system.
# SELINUX= can take one of these three values:
#       enforcing - SELinux security policy is enforced.
#       permissive - SELinux prints warnings instead of enforcing.
#       disabled - No SELinux policy is loaded.
SELINUX=disabled
# SELINUXTYPE= can take one of these two values:
#       targeted - Targeted processes are protected,
#       mls - Multi Level Security protection.
SELINUXTYPE=targeted
Reboot the server and check if SELinux is down by using the following command:
# /usr/sbin/getenforce
Disabled
SELinux has to be disabled for both 11g and 12c installations.
2) Network configuration
Address plan
You need multiple IP addresses for your cluster.
Each node needs:
- An IP on the public network. This address corresponds to a network interface, and is used to allow the node to communicate on the network.
- An IP on a private network, different subnet from the public one. It is also called Cluster Interconnect. This address corresponds to a second network interface. The Interconnect is a Network dedicated to communication between nodes and is not supposed to be accessible by other hosts not member of the cluster.
- A virtual IP on the public network. The virtual IP is not really connected to the server, it does not appear in its network configuration. It is used for connection redundancy: if the node fails, its virtual IP is transferred on the leaving node and clients still can communicate with the cluster.
You also need to configure up to three addresses on the public network for SCAN. The SCAN is a single name to access the cluster.
Each SCAN IP corresponds to a listener SCAN which redirects requests to nodes local listeners. Using this name, clients are not aware of the node on which database is running, and adding or removing a node in the cluster does not affect client connect configuration.
SCAN also provides failover and load balancing.
As a summary, you need 9 IPs to create a two nodes cluster. IPs are described at next step.
Name resolution
Once IP addresses are defined, they must be resolvable by all nodes. Three options:
- Use of a local hosts file
You may have something like this:
127.0.0.1   localhost localhost.localdomain localhost4 localhost4.localdomain4
::1         localhost localhost.localdomain localhost6 localhost6.localdomain6
192.168.100.1        node01          node01.it.dbi-services.com
192.168.100.2        node02          node02.it.dbi-services.com
192.168.100.11       node01-vip      node01-vip.it.dbi-services.com
192.168.100.12       node01-vip      node02-vip.it.dbi-services.com
192.168.100.100      cluster-scan    cluster-scan.it.dbi-services.com
192.168.200.1        node01-priv     node01-priv.it.dbi-services.com
192.168.200.2        node02-priv     node02-priv.it.dbi-services.com
Important point: with local hosts file, you cannot use more than one IP for the SCAN because round robin is not available.
- Use of a Domain Name Server
In this case you have to create all addresses and hostnames on the DNS, and to enable round robin for SCAN addresses if you are using more that one address for the SCAN.
You may have following entries in your DNS zone file:
node01.it.dbi-services.com           IN A 192.168.100.1
node02.it.dbi-services.com           IN A 192.168.100.2
node01-vip.it.dbi-services.com       IN A 192.168.100.11
node02-vip.it.dbi-services.com       IN A 192.168.100.12
cluster-scan.it.dbi-services.com     IN A 192.168.100.100
                                     IN A 192.168.100.101
                                     IN A 192.168.100.102
node01-priv.it.dbi-services.com      IN A 192.168.200.1
node02-priv.it.dbi-services.com      IN A 192.168.200.2
- Use of Oracle GNS – Grid Naming Service
GNS was introduced with Grid Infrastructure 11.2 and provides dynamics DHCP addresses for SCAN and Virtual IPs. I will not detail this service in this blog, just know that it exists. For more information, you can consult Oracle documentation.
We are going to use a DNS Server to resolve names and IPs.
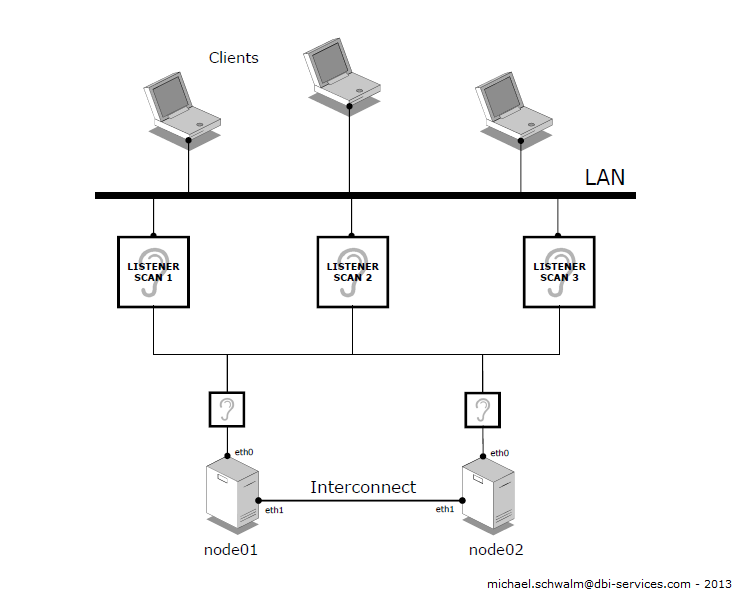
A word about SCAN
The following schema gives an overview of the interconnection of a two nodes cluster:
3) Users and groups
- rdbms package
Download the rdbms preinstall package from the public repository or ULN. The package is in the latest yum repository (el6_latest or ol5_latest). You must enable it. For Oracle Linux 6, use the following command:
# yum install oracle-rdbms-server-12cR1-preinstall
This package will automatically download required packages or libraries, create users and groups… It avoids fastidious configuration steps.
However, it does not everything. Some facultative oracle groups are not created by the package. This is the case for oper, and for the three new Oracle 12c groups backupdba, dgdba and kmdba.
More, this package makes the system ready for rdbms installation only, meaning that all pre requisites for Grid Infrastructure are not automatically set.
Note that since Oracle 12c, the package does not edit the file /etc/security/limits.conf anymore. Ulimits must be specified by hand.
- Groups creation
Database groups
The following groups are not created by the rdbms package, and must be created manually:
# /usr/sbin/groupadd -g 54323 oper
# /usr/sbin/groupadd -g 54327 backupdba
# /usr/sbin/groupadd -g 54328 dgdba
# /usr/sbin/groupadd -g 54329 kmdba
Asm groups
Since the rdbms preinstall package is dedicated to Oracle RDBMS install, all pre requisites for Grid Infrastructure and ASM must be set manually. This includes the three following groups:
# /usr/sbin/groupadd -g 54324 asmadmin
# /usr/sbin/groupadd -g 54325 asmdba
# /usr/sbin/groupadd -g 54326 asmoper
- Users creation and modification
The user oracle was already created by the rdbms preinstall package with oinstall and dba groups. But it is not member of all newly created groups.
More, it has no rights for ASM, and is not able to see ASM disks to create a database. For that, the oracle user needs the asmdba group. You can drop and recreate the user, or just alter its parameters with this command:
# /usr/sbin/usermod -g oinstall -G dba,backupdba,dgdba,kmdba,oper,asmdba oracle
Grid Infrastructure needs a software owner, member of oinstall, which is not created by the rdbms preinstall package. It is advised to create a dedicated user:
# /usr/sbin/useradd -u 54322 -g oinstall -G asmadmin,asmdba,asmoper grid
Do not forget to specify password for both oracle and grid users:
# passwd oracle
# passwd grid
- SSH
The OUI (Oracle Universal Installer) is run on one node, and uses SSH and scp commands to run command and copy files on remote nodes during the install. SSH must be configured on all members of the cluster to avoid each command to prompt for a password. This configuration can be done during install process, with the OUI, or with a script provided by Oracle and available in /software/grid/sshsetup.
To make it with the script, connect as root on node01 and run the script as follow for both oracle and grid accounts:
# ./sshUserSetup.sh -user grid -hosts "node01 node02" -advanced -exverify –noPromptPassphrase
# ./sshUserSetup.sh -user oracle -hosts "node01 node02" -advanced -exverify –noPromptPassphrase
The script will check connectivity between all node listed, and will ask for password twice for each node. Once configuration done, no password will be asked to establish a ssh connection in the future.
SSH connectivity is checked for both 11g and 12c installations.
4) Directory structure
Once users and groups are created, Oracle directories can be created, using the OFA standard:
# mkdir -p /u00/app/12.1.0/grid
# mkdir -p /u00/app/grid
# mkdir -p /u00/app/oracle
# chown -R grid:oinstall /u00/app
# chown -R oracle:oinstall /u00/app/oracle
# chmod -R 775 /u00/app
5) Ulimits settings
In Oracle 11g, the file /etc/security/limits.conf was automatically configured by the rdbms preinstall package for the oracle user. We only had to copy / paste values from oracle to grid user.
In Oracle 12c, the rdbms preinstall package does not configure ulimits. We must edit /etc/security/limits.conf and set ulimits for oracle and grid users according to the Oracle documentation.
# Setting for nofile soft limit is 1024
oracle   soft   nofile   1024
grid     soft   nofile   1024
# Setting for nofile hard limit is 65536
oracle   hard   nofile   65536
grid     hard   nofile   65536
# Setting for nproc soft limit is 2047
oracle   soft   nproc   2047
grid     soft   nproc   2047
# Setting for nproc hard limit is 16384
oracle   hard   nproc   16384
grid     hard   nproc   16384
# Setting for stack soft limit is 10240
oracle   soft   stack   10240
grid     soft   stack   10240
# Setting for stack hard limit is 32768
oracle   hard   stack   32768
grid     hard   stack   32768
Values for ulimit are the same for both Oracle 11g and Oracle 12c releases.
6) ASM disks and diskgroups
- ASM packages
To use Oracle ASM, two or three packages are required, depending on the situation. Here, we consider using ASMLib instead of Raw devices. So three packages will be required:
- oracleasm-support
- oracleasmlib
- the driver oracle asm
Download oracleasm-support from the repository:
# yum install oracleasm-support
Then, download oracleasmlib from the Oracle website and install it manually.
# wget http://download.oracle.com/otn_software/asmlib/oracleasmlib-2.0.4-1.el6.x86_64.rpm
# rpm -iv oracleasmlib-2.0.4-1.el6.x86_64.rpm
Note that this oracleasmlib package is for 64 bits system. It also exists for 32 bits systems.
For the last package, it depends of your kernel. If your server is configured with the default Unbreakable Enterprise Kernel (UEK), the driver is already compiled in the kernel. If you are using the Red Hat compatible kernel, you must install the following package (for Oracle Linux 6):
# yum install kmod-oracleasm
For Oracle Linux 5, install the package corresponding to your kernel version:
# yum install oracleasm-`uname -r`
- ASM disks
Database and cluster files will be stored in ASM disks. In order to create ASM disks, we must prepare available disks.
We choosed to create 3 disks for CRS and 2 for data and FRA.
Available disks are:
/dev/sdb
/dev/sdc
/dev/sdd
/dev/sde
/dev/sdf
Use the command fdisk to prepare disks from one node. Example for sdb:
# fdisk /dev/sdb
Command (m for help): n
Command action
   e   extended
   p   primary partition (1-4)
p
Partition number (1-4): 1
First cylinder (1-1305, default 1):
Using default value 1
Last cylinder or +size or +sizeM or +sizeK (1-1305, default 1305):
Using default value 1305Command (m for help): w
The partition table has been altered!
Calling ioctl() to re-read partition table.
- Configure ASM
Once all disks are ready, you can create ASM disks. First, configure ASM on both nodes:
# /usr/sbin/oracleasm configure -i
Configuring the Oracle ASM library driver.
This will configure the on-boot properties of the Oracle ASM library
driver.  The following questions will determine whether the driver is
loaded on boot and what permissions it will have.  The current values
will be shown in brackets ('[]').  Hitting without typing an
answer will keep that current value.  Ctrl-C will abort.
Default user to own the driver interface []: grid
Default group to own the driver interface []: asmadmin
Start Oracle ASM library driver on boot (y/n) [n]: y
Scan for Oracle ASM disks on boot (y/n) [y]: y
Writing Oracle ASM library driver configuration: done
Then, initialize ASM module on both nodes:
# /usr/sbin/oracleasm init
Creating /dev/oracleasm mount point: /dev/oracleasm
Loading module "oracleasm": oracleasm
Mounting ASMlib driver filesystem: /dev/oracleasm
- Create ASM disks
Create ASM disks from one node:
# oracleasm createdisk CRSFG1D1 /dev/sdb1
# oracleasm createdisk CRSFG2D1 /dev/sdc1
# oracleasm createdisk CRSFG3D1 /dev/sdd1
# oracleasm createdisk U01FG1D1 /dev/sde1
# oracleasm createdisk U90FG1D1 /dev/sdf1
I choosed to name the failer groups U01* for database files, and U90* for the Flash Recovery Area, according to the OFA modele and our best practices.
From the second node, scan ASM disks:
# oracleasm scandisks
Reloading disk partitions: done
Cleaning any stale ASM disks...
Scanning system for ASM disks...
Instantiating disk "CRSFG1D1"
Instantiating disk "CRSFG2D1"
Instantiating disk "CRSFG3D1"
Instantiating disk "U01FG1D1"
Instantiating disk "U90FG1D1"
Then use the oracleasm listdisks command to see if ASM disks are all present on both nodes:
# oracleasm listdisks
CRSFG1D1
CRSFG2D1
CRSFG3D1
U01FG1D1
U90FG1D1
- Create ASM diskgroups
We need diskgroups for the cluster itself (voting disks), and for the database.
- ASM diskgroups for CRS will be created during Grid Infrastructure deployment, in the step 11 of the OUI.
- ASM diskgroups for DATA and FRA cannot be created if ASM is not already installed, because we must connect to the ASM instance. Those diskgroups will be created later, after having installed Grid Infrastructure. This step will be detailed in my future blog about the Grid Infrastructure binaries installation.
7) Validation: cluvfy tool
Cluvfy is a tool provided by Oracle. It checks all software and hardware pre requisites on each node to make sure the install can be done. This tool is called before installing grid infrastructure, before adding a node, or before adding a database.
Here, we want to be sure that our two nodes are ready to deploy Grid Infrastructure for a cluster environment. Locate the script in /software/grid and run it as grid user with following options from node01:
$ /software/grid/runcluvfy.sh stage -pre crsinst -osdba asmdba -orainv oinstall -n node01,node02 -r 12.1 -fixup -verbose > /tmp/cluvfy_output.log
- -osdba is for the SYSDBA role for asm
- -orainv is for the OINSTALL role for asm (the owner of the software)
- -n is for the nodes list
- -r is for the release
- -verbose is to display details for each check
- -fixup is to fix automatically failed pre requisites, if possible. For example:
Fix: OS Kernel Parameter: swappiness
  Node Name                             Status
  ------------------------------------  ------------------------
  vmtestrac12c2                         successful
  vmtestrac12c1                         successful
Result: "OS Kernel Parameter: swappiness" was successfully fixed on all the applicable nodes
Fix up operations were successfully completed on all the applicable nodes.
After cluvfy has stopped running, look for a “failed” keyword in the logfile. If all parameters have “passed” status on all nodes, you should get the following sentence in the cluvfy logfile:
Pre-check for cluster services setup was successful on all the nodes.
It means that you are ready to start your installation. You can run the OUI and deploy Grid Infrastructure on the two nodes. Enjoy!
In one of my next blog posting, I will go onto the details of the installation procedure and show you some new features in the OUI of Grid Infrastructure 12c.
![Thumbnail [60x60]](https://www.dbi-services.com/blog/wp-content/uploads/2022/12/oracle-square.png)
![Thumbnail [90x90]](https://www.dbi-services.com/blog/wp-content/uploads/2022/11/TBR-web-min-scaled.jpg)
![Thumbnail [90x90]](https://www.dbi-services.com/blog/wp-content/uploads/2022/08/FRJ_web-min-scaled.jpg)
![Thumbnail [90x90]](https://www.dbi-services.com/blog/wp-content/uploads/2024/03/AHI_web.jpg)