Data and applications integration is always a technical challenge for most of the companies. All data integration tool ensures that information is timely, accurate, and consistent across complex systems.
Oracle Data Integrator (ODI) is different than traditional data integration tools in the sense it integrates data in a different orders.
ODI is known as en E-LT because it Extracts data from the source system and Loads and Transforms data into the target system while traditional tools transform the data in an intermediate layer (Staging) between the Source (where the data is Extract) and the Target (where the data is Loaded).
Oracle Data Integrator Cloud removes the complexity in creating real-time operation reporting schema enabling a novice user to perform the creation, initial load, and real time synchronization in just a few clicks. Usually, these types of data integration required assistance from ELT developers and Database administrators.
The goal of this blog is to show you how install ODI in the Cloud.
Sign up for a free credit promotion or purchase an Oracle Cloud subscription and your sign-in credentials.

There are two types of ODI components:
- Oracle Data Integrator Studio used by Administrators, Developers and Operators for administering the infrastructure (security and topology), reverse-engineering the metadata, developing projects, scheduling, operating and monitoring executions.
- Oracle Data Integrator Console used (in read only) to access the repositories, peform topology configuration and production operations.
The first step is to create an Oracle Database Cloud Service Instance (Database As A Service)
In the top right menu, go to service user console:

Click on Service User Console

Click On Oracle Database Cloud Service

Click on Go to Console

Click on Create Instance

Choose Instance Name and Database Version and Click Next

Choose Database Name, Administration Password (leave all others default value) and Click Next
Create an SSH key, public and private key
ssh-keygen -t rsa -N "" -b "2048" -C "key comment" -f /drives/c/Users/lfe/Documents/dbi/technique/blog/ODI_cloud/id_rsa

WARNING:

You should not store anything in MobaXterm HOME directoy (/home/mobaxterm): with your current settings, this folder is not "persistent", so it will be cleared at each MobaXterm restart.

If you want to set a "persistent" HOME directory which will not be cleared at each MobaXterm startup, go to MobaXterm settings window and choose a folder in which to store MobaXterm home files.

Generating public/private rsa key pair.
Your identification has been saved in /drives/c/Users/lfe/Documents/dbi/technique/blog/ODI_cloud/id_rsa.
Your public key has been saved in /drives/c/Users/lfe/Documents/dbi/technique/blog/ODI_cloud/id_rsa.pub.
The key fingerprint is:
SHA256:S0Z6qE+BSdANABj3RDOdvEq1hxF5ts3jA4MbG8lGGv4 key comment
The key's randomart image is:
+---[RSA 2048]----+
|+o++*=.+ |
|.. +ooX o |
| .o* X.+ |
| .+o@+= + |
| .o++*S+ . |
| ..E= .o |
| . . . . |
| o |
| . |
+----[SHA256]-----+
Two keys are created :
- public key : id_rsa.pub
- private key : id_rsa
Click on “SSHPublic Key Files” and Upload the Public key files just created.
Click Next

Click on Create
The Instance Creation fails:

Let’s go back to the previous screen to replace Oracle Database 19c by Oracle Database 12c Release 2

Now the instance can be created:

The instance is being created…

Wait some minutes till the instance is created (Status Ready)
 Let’s try to connect with a SSH client (MobaXterm in our case) to the database machine
Get the Public IP address and let’s add the private key created previously into Mobaxterm

Click OK

Now we can connect to the database :
[opc@ODI ~]$ sudo su - oracle
[oracle@ODI ~]$ sudo su - oracle
Last login: Fri Mar 26 10:58:13 UTC 2021
[oracle@ODI ~]$
[oracle@ODI ~]$ ps -ef | grep pmon
oracle   16565     1  0 10:53 ?        00:00:00 ora_pmon_ODI
oracle   23105 23056  0 10:58 pts/0    00:00:00 grep --color=auto pmon
[oracle@ODI ~]$ sqlplus / as sysdba

SQL*Plus: Release 12.2.1.0.0 - Production on Fri Mar 26 10:59:00 2021
Version 12.2.1.0.0

Copyright (c) 1982, 2020, Oracle.  All rights reserved.


Connected to:
Oracle Database 12c EE High Perf Release 12.2.1.0.0 - Production
Version 12.2.1.0.0

SQL> show pdbs

    CON_ID CON_NAME                       OPEN MODE  RESTRICTED
---------- ------------------------------ ---------- ----------
         2 PDB$SEED                       READ ONLY  NO
         3 ODI                    		  READ WRITE NO
SQL> alter session set container=ODI;

Session altered.
The second step is to provisioning an Oracle Java Cloud Instance
The goal is to configure the Oracle Java Cloud Instance on which we want to install and run Oracle Data Integrator Cloud.

Click On Java Services

Click on Create Instance

Enter the service details:
- Service Level — From the dropdown, select Oracle Java Cloud Service for Fusion Middleware – Oracle Data Integrator
- Software Release — Select Oracle Weblogic Server 12c (12.2.1.2)
Click Next

Choose the Compute Shape (VM.Standard – 2.0 OCPU, 30 GB of Ram).
Choose the public key created previously
Choose the Instance ODI created previously
Enter SYS credentials
For our case do no configure backup. Of course in a production environment, you have always to set Backup Destination.
Click Next
 Click on Create

Wait a moment for the Instance creation…

The Oracle Java Cloud Service Instance (JAAS) is now created and associated with the Oracle Database Cloud Service Instance (DBAAS).
Configure the SSH connection from MobaXterm with the same private key created previously for the database instance machine

The next step is to install Oracle Data Integrator
The good news with the Cloud is that Oracle WebLogic Server is already installed in your Java Cloud Service instance, there is no need to install the Fusion Middleware Infrastructure. It is already there!!!
To interact with the graphical interface into the Java Cloud Server Instance, we have to configure VCN viewer.
Turn Off the lock screen and start the VNC Server
[oracle@oditest-wls-1 upperstack]$ gconftool-2 -s -t bool /apps/gnome-screensaver/lock_enabled false
[oracle@oditest-wls-1 upperstack]$ vncserver -nolisten local -geometry 1680x1050

You will require a password to access your desktops.

Password:
Verify:
Would you like to enter a view-only password (y/n)? y
Password:
Verify:
xauth:  file /u01/app/oracle/tools/home/oracle/.Xauthority does not exist

New 'oditest-wls-1:1 (oracle)' desktop is oditest-wls-1:1

Creating default startup script /u01/app/oracle/tools/home/oracle/.vnc/xstartup
Creating default config /u01/app/oracle/tools/home/oracle/.vnc/config
Starting applications specified in /u01/app/oracle/tools/home/oracle/.vnc/xstartup
Log file is /u01/app/oracle/tools/home/oracle/.vnc/oditest-wls-1:1.log
Open a new local terminal to create an SSH tunnel on the VNC server port on the Administration Server VM
ssh -i C:/Users/lfe/Documents/dbi/technique/blog/ODI_cloud/id_rsa -L 5901:127.0.0.1:5901 [email protected] -N
To have the graphical access for the Oracle Java Cloud Server instance,use the VNC Viewer on the local machine to connect to localhost:5901. You will be prompted for the password you entered in the previous step.
Start VNC Viewer locally

From vncviewer, navigate to the /u01/zips/upperstack directory and install ODI
[oracle@oditest-wls-1 upperstack]$ cd /u01/zips/upperstack/
[oracle@oditest-wls-1 upperstack]$ ls -ltr
total 4323160
-r-xr-xr-x. 1 oracle oracle 2027199017 Aug 22  2017 fmw_12.2.1.3.0_odi_generic.jar
-r-xr-xr-x. 1 oracle oracle  186404495 Aug 22  2017 fmw_12.2.1.3.0_odi_generic2.jar
-rwxr-xr-x. 1 oracle oracle 2213306744 Dec 17  2019 ODI.zip
[oracle@oditest-wls-1 upperstack]$ unzip ODI.zip
Archive: ODI.zip
inflating: fmw_12.2.1.3.0_odi_generic.jar
inflating: fmw_12.2.1.3.0_odi_generic2.jar
[oracle@oditest-wls-1 upperstack]$ java -jar fmw_12.2.1.3.0_odi_generic.jar
Launcher log file is /tmp/OraInstall2021-03-19_09-14-31PM/launcher2021-03-19_09-14-31PM.log.
Extracting the installer . . . . . . . . . Done
Checking if CPU speed is above 300 MHz.   Actual 1995.309 MHz    Passed
Checking monitor: must be configured to display at least 256 colors.   Actual 16777216    Passed
Checking swap space: must be greater than 512 MB.   Actual 8191 MB    Passed
Checking if this platform requires a 64-bit JVM.   Actual 64    Passed (64-bit not required)
Checking temp space: must be greater than 300 MB.   Actual 26195 MB    Passed
Preparing to launch the Oracle Universal Installer from /tmp/OraInstall2021-03-19_09-14-31PM
The installation starts

Click OK

Click Next

Skip Auto Updates and click Next

Choose Enterprise Edition and Click Next

Click Next

Click Install

Now, let’s create the Oracle Data Integrator Repository
[oracle@oditest-wls-1 bin]$ cd /u01/app/oracle/middleware/oracle_common/bin/
[oracle@oditest-wls-1 bin]$ ./rcu

Click Next

Click Next

Choose your PDB database and SYS credentials (DBaaS) created previously and click Next

Click Ok

Check Oracle Data Integrator, leave by default all option checked and click Next
Enter password for main and auxiliary schemas and click Next
Click Create Tablespaces and Schemas DEV1_*

Click Close
Update the Java Cloud Instance Domain
est-wls-1 bin]$ cd /u01/app/oracle/tools/home/oracle/Oracle/Middleware/Oracle_Home/oracle_common/common/
[oracle@oditest-wls-1 bin]$ ./config.sh

Click Next

Select Oracle Data Integrator Components and click Next
Leave all default value checked and click Next for all screens

Click Next

Click Finish
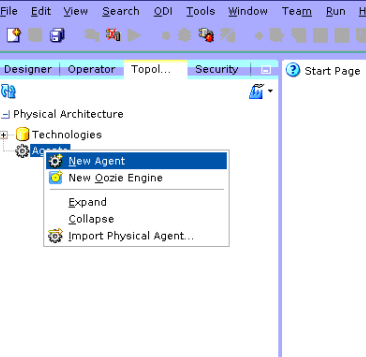
The last task is to start ODI Studio and create ODI Agents
[oracle@oditest-wls-1 studio]$ cd /u01/app/oracle/tools/home/oracle/Oracle/Middleware/Oracle_Home/odi/studio/
[oracle@oditest-wls-1 studio]$ ./odi.sh
. . .
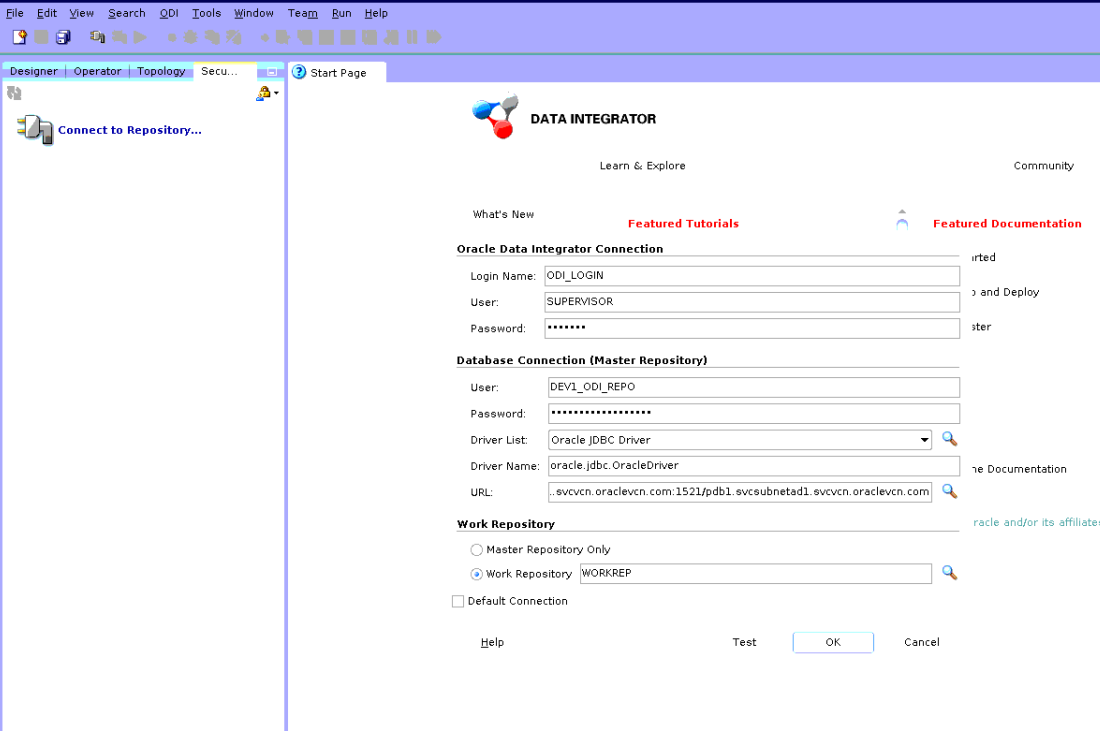
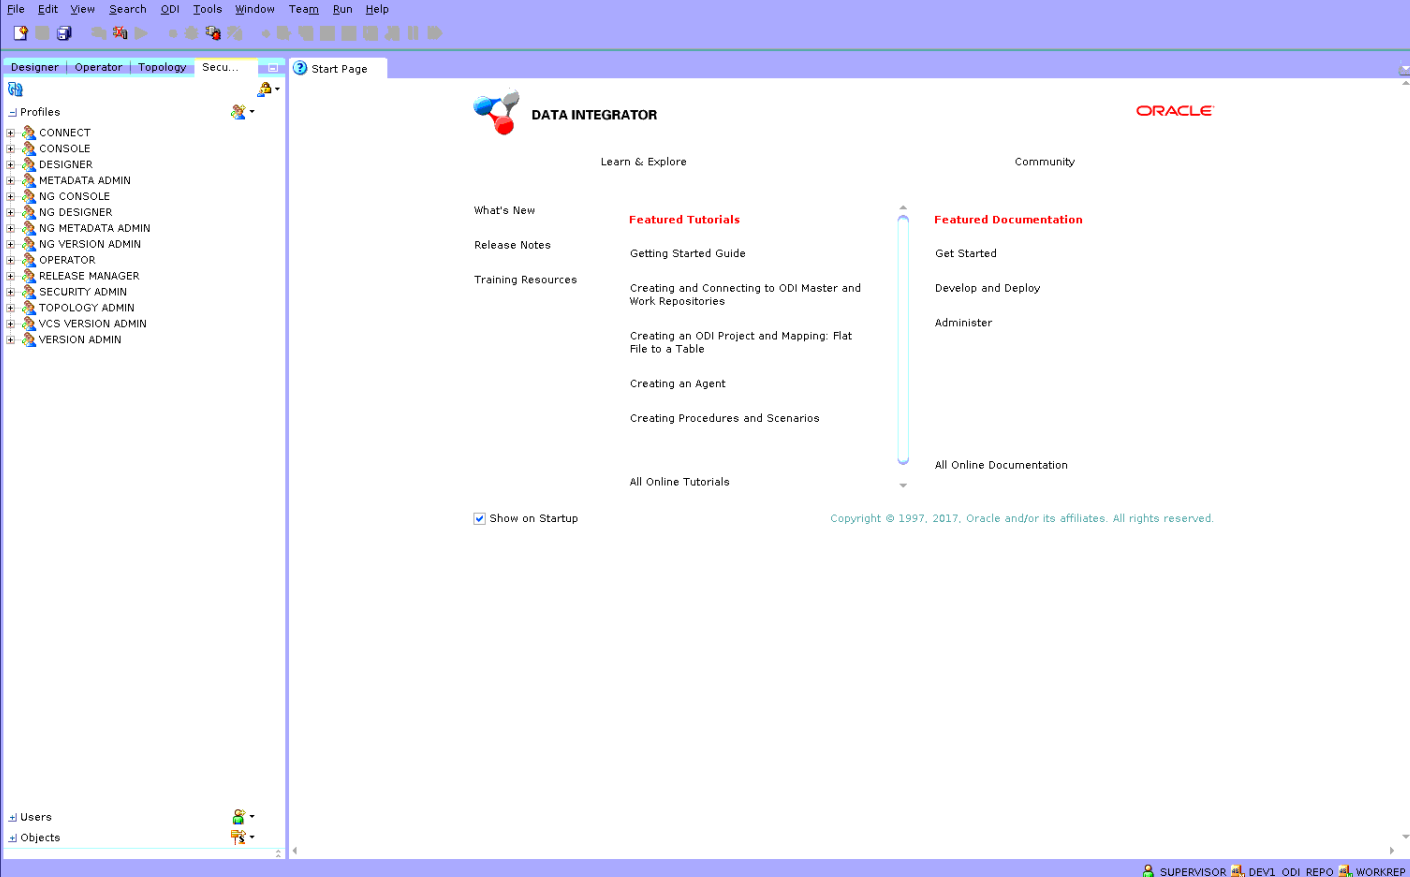
Create your connection, connect to the Work Repository

Click OK
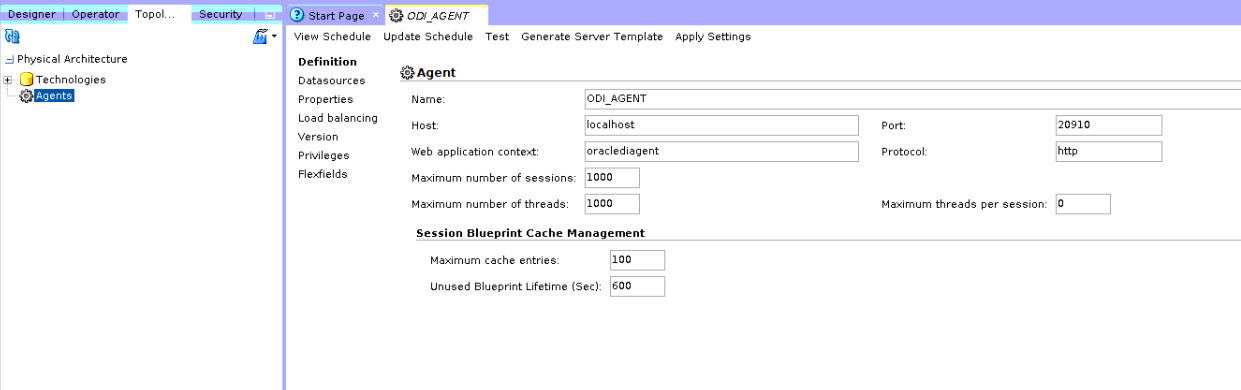
Go to Topology/Physical Architecture/Agent (right click)/New Agent and create the Physical Agent
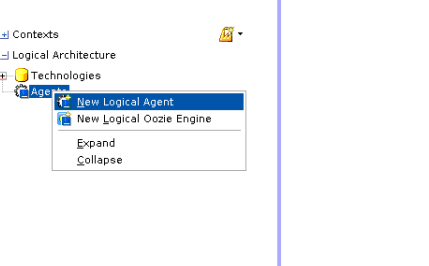
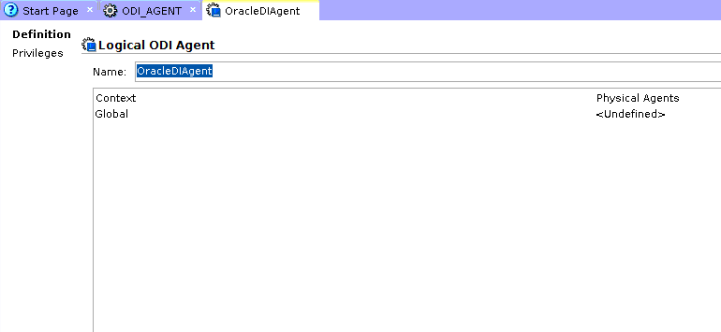
Go to Topology/Logical Architecture/Agent (right click)/New Agent and create the Logical Agent
Now you are ready to create your first mapping from source database to target database.
Conclusion:
To install Oracle Data Integrator into Oracle Cloud Infrastructure, we need to :
- To access to OCI Generation 1 – OCI Classic (Menu Profile/Service User Console), the OCI generation 2 is reachable from the top left menu
- Create a database instance (DBaaS) provisioning a machine with Oracle Database already installed used to store the ODI repository.
- Create a Java instance (JaaS) provisioning a machine with Oracle Fusion Middleware Infrastructure already installed,
- Install ODI into the JaaS machine.
![Thumbnail [60x60]](https://www.dbi-services.com/blog/wp-content/uploads/2022/12/oracle-square.png)
![Thumbnail [90x90]](https://www.dbi-services.com/blog/wp-content/uploads/2025/05/JDE_Web-1-scaled.jpg)
![Thumbnail [90x90]](https://www.dbi-services.com/blog/wp-content/uploads/2022/08/MAW_web-min-scaled.jpg)