Introduction
This blog is the third chapter related to deploying a MySQL infrastructure on the Azure cloud. In addition to performance, we should indeed also consider backup and restore capabilities. The objective of this blog is to present the main backup and restore possibilities offered by Azure through a simple example and show a second backup/restore possibility using MySQL Shell dump utilities.
Backup window and mechanism
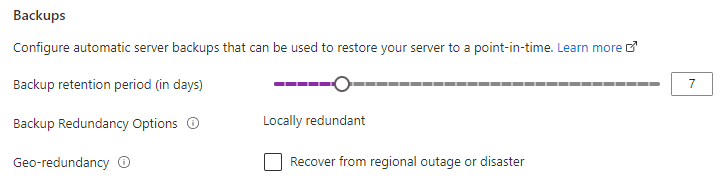
Flexible Azure for MySQL generates by default a 7 days server backup retention period. This retention period can be extended up to 35 days or shorten to 1 day. In addition we can decide if you want to have a Geo Redundant backup storage. By default the backups are locally redundant.
It’s important to understand that Azure makes backup of the whole server, not only the MySQL Server through mysqldump, MySQL Enterprise Backup or any other solution. These backups can only be used to restore MySQL Server in another Azure Database for MySQL Server. It means that these backups cannot be exported to generate a new database on our on-premise server for instance. If we want to extract part of our database in order to export data, we can use mysqldump, MySQL Shell’s instance dump utility or the set of tools provided by MySQL Shell.
The backups provided by Azure can be used to make Point In Time Recovery of the Server with a granularity of 5 minutes since the system snapshots are done automatically every 5 minutes. As specified in the documentation, the backups are encrypted using AES 256-bit.
Backup and restore costs
As explained on Microsoft website
“Backup storage is the storage associated with automated backups of your server. Increasing your backup retention period increases the backup storage that is consumed by your server. There is no additional charge for backup storage for up to 100% of your total provisioned server storage. Additional consumption of backup storage will be charged in GB/month.” – https://azure.microsoft.com/en-us/pricing/details/mysql/flexible-server/
Increasing the retention of the backup, may have an impact on the pricing. We can have an idea of the global costs related to Azure Database for MySQL on the following URL: https://azure.microsoft.com/en-us/pricing/details/mysql/flexible-server/
Recover a database from Azure Backup Restore interface
In this first test, we will simply use the recovery functionalities provided by Azure Database for MySQL flexible server. We will simulate a user error by deleting a table and we will restore the entire server (as it’s not possible to simply recover a database or a table using Azure features).
- Dropping a table by mistake
 MySQL  albatroz.mysql.database.azure.com:3306 ssl  SQL > SELECT CURRENT_TIMESTAMP ;
+---------------------+
| CURRENT_TIMESTAMP   |
+---------------------+
| 2022-08-18 20:48:44 |
+---------------------+
1 row in set (0.1002 sec)
 MySQL  albatroz.mysql.database.azure.com:3306 ssl  SQL > drop table sysbench.sbtest1;
Query OK, 0 rows affected (0.1884 sec)- Restoring the MySQL Server to a time before the mistake
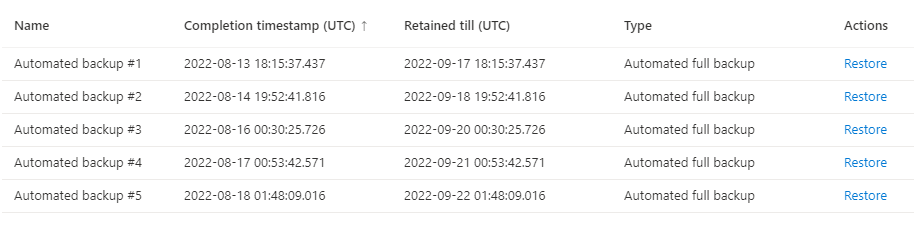
We first have to go in the “backup/restore” menu of our Azure Database for MySQL flexible server and select the backupset that we want to restore. As we can see a backupset is done everyday. In our current context, we want to use the most recent backupset (Automated backup #5)
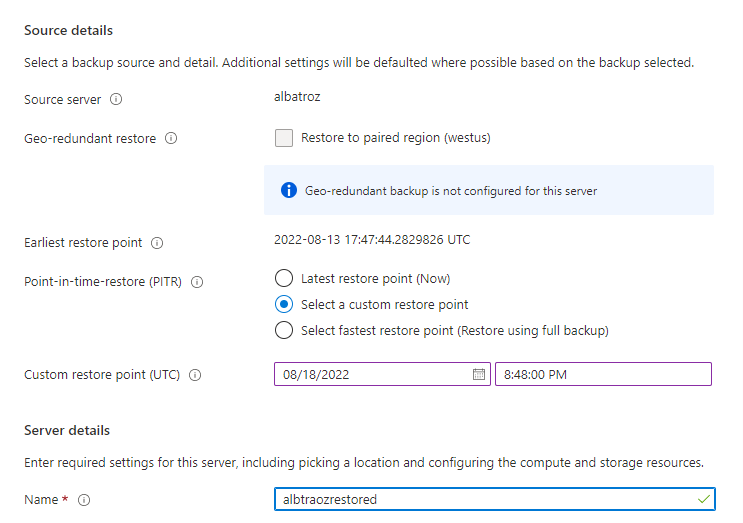
Once the backupset selected a screen appears showing the restore server options. It provides us with the possibility to make a Point In Time Restore (PITR) of our server by choosing between 3 options:
- Latest restore point (Now)
- Select a custom restore point
- Select fastest restore point (Restore using full backup)
In our case we will use the “Select a Custom Restore point” option as shown in the screenshot below. We will define the custom restore time just before the mistake and specify a name for the restored Server.
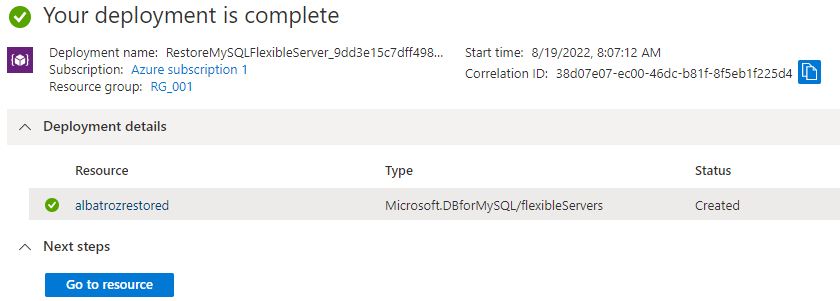
Once the restore requested, it took approximately 5 minutes to deploy the new server.
- Let’s check if my table is back on the new deployed server
Finally we simply have to connect to the new restored server and check if the dropped table is back. Of course we can also export this table from this restored server and import this same table on the original server using mysqldump.
 MySQL  albatrozrestored.mysql.database.azure.com:3306 ssl  sysbench  SQL > show tables from sysbench like '%1';
+-------------------------+
| Tables_in_sysbench (%1) |
+-------------------------+
| sbtest1                 |
+-------------------------+
1 row in set (0.1048 sec)
4. Export/Import table from the restored Server
Now that the server is restored, we can export the table that was deleted by mistake using util.dumpTables() and import it to the albatroz server using util.loadDump(). The process is rather simple as you can see below:
Export from the recovered server (albatrozrestored)
MySQL  albatrozrestored.mysql.database.azure.com:3306 ssl  sysbench  JS > util.dumpTables("sysbench", [ "sbtest1"], "C:/Users/grs/Albatroz-Sysbench-sbtest1");
NOTE: Backup lock is not available to the account 'grs'@'%' and DDL changes will not be blocked. The dump may fail with an error if schema changes are made while dumping.
Acquiring global read lock
Global read lock acquired
Initializing - done
...
...
109% (15.29K rows / ~13.98K rows), 0.00 rows/s, 0.00 B/s uncompressed, 0.00 B/s compressed
Dump duration: 00:00:01s
Total duration: 00:00:06s
Schemas dumped: 1
Tables dumped: 1
Uncompressed data size: 2.93 MB
Compressed data size: 1.33 MB
Compression ratio: 2.2
Rows written: 15294
Bytes written: 1.33 MB
Average uncompressed throughput: 2.35 MB/s
Average compressed throughput: 1.07 MB/s
Import on Albatroz server
MySQL  albatroz.mysql.database.azure.com:3306 ssl  JS > util.loadDump("C:/Users/grs/Albatroz-Sysbench-sbtest1", {schema: "sysbench"});
Loading DDL and Data from 'C:/Users/grs/Albatroz-Sysbench-sbtest1' using 4 threads.
Opening dump...
Target is MySQL 8.0.28. Dump was produced from MySQL 8.0.28
Scanning metadata - done
Checking for pre-existing objects...
Executing common preamble SQL
Executing DDL - done
Executing view DDL - done
Starting data load
1 thds loading | 100% (2.93 MB / 2.93 MB), 1.94 MB/s, 0 / 1 tables done
Executing common postamble SQL
Recreating indexes - done
1 chunks (15.29K rows, 2.93 MB) for 1 tables in 1 schemas were loaded in 6 sec (avg throughput 1.94 MB/s)
0 warnings were reported during the load.
Recover a database from your own backups
As stated in the introduction, I will present in this chapter a complementary solution of backup/restore. Of course Azure does not prevent us from doing our own backups by connecting to the Azure Database for MySQL flexible server and using either mysqdump, MySQL Enterprise Backup or any other MySQL backup solution. I decided to use the opportunity of this blog to use the backup tools provided by MySQL Shell. Indeed MySQL Shell’s instance dump utility, such as util.dumpInstance(), util.dumpSchemas() or even util.dumpTables(), introduced in MySQL Shell 8.0.22, provide interesting functionalities. This export tools alone would deserve several blogs dedicated to them.
Before starting let’s illustrate what will be demonstrated in the next few lines:
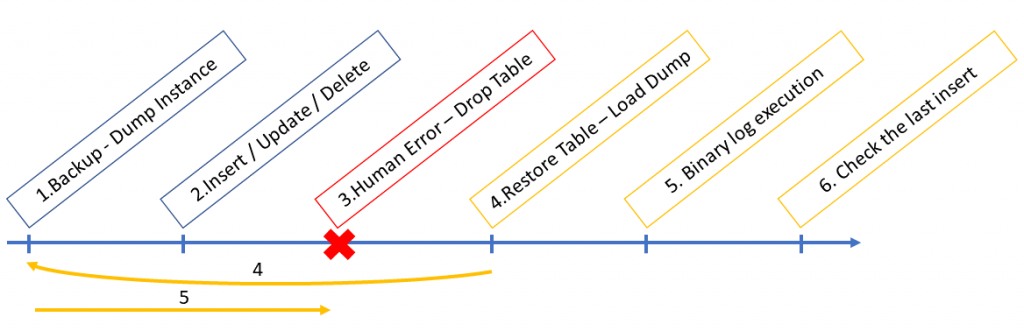
- The very first step consist in doing a dump of the MySQL Instance
- Secondly, we will insert a row in a table named sbtest1
- Thirdly, we will simulate a human error and drop a table
- Then we will restore the database to the state after the backup
- After having restored the backup, we will execute the binary to the state just before the human error
- Finally we will check that the last insert I did is stored into the sbtest2
- Dump of MySQL Instance using util.dumpInstance()
As explained above, the very first step consist in doing a dump of the entire instance. Without this backup we won’t be able to restore the database. We will use util.dumpInstance() as presented below:
MySQL  albatroz.mysql.database.azure.com:3306 ssl  JS > util.dumpInstance("C:/Users/grs/AlbatrozDump", {dryRun: false, showProgress: true, threads: 2})
NOTE: Backup lock is not available to the account 'grs'@'%' and DDL changes will not be blocked. The dump may fail with an error if schema changes are made while dumping.
Acquiring global read lock
Global read lock acquired
Initializing - done
2 out of 6 schemas will be dumped and within them 9 tables, 0 views.
4 out of 7 users will be dumped.
...
...
107% (137.28K rows / ~128.10K rows), 14.42K rows/s, 2.61 MB/s uncompressed, 1.20 MB/s compressed
Dump duration: 00:00:15s
Total duration: 00:00:21s
Schemas dumped: 2
Tables dumped: 9
Uncompressed data size: 26.26 MB
Compressed data size: 11.97 MB
Compression ratio: 2.2
Rows written: 137284
Bytes written: 11.97 MB
Average uncompressed throughput: 1.72 MB/s
Average compressed throughput: 784.25 KB/s- Inserting row in our table
Now we simulate some activity in the database by inserting a row into the table sbtest1.
MySQL  albatroz.mysql.database.azure.com:3306 ssl  sysbench  SQL > insert into sbtest1 values(999999999,1,1,"my row before drop table");
Query OK, 1 row affected (0.1134 sec)
MySQL  albatroz.mysql.database.azure.com:3306 ssl  sysbench  SQL > SELECT CURRENT_TIMESTAMP ;
+---------------------+
| CURRENT_TIMESTAMP   |
+---------------------+
| 2022-08-19 16:42:12 |
+---------------------+- Dropping a table by mistake
Thirdly, we simulate the human error by dropping the table sbtest1.
 MySQL  albatroz.mysql.database.azure.com:3306 ssl  sysbench  SQL > SELECT CURRENT_TIMESTAMP ;
+---------------------+
| CURRENT_TIMESTAMP   |
+---------------------+
| 2022-08-19 16:46:47 |
+---------------------+
1 row in set (0.1095 sec)
 MySQL  albatroz.mysql.database.azure.com:3306 ssl  sysbench  SQL > drop table sysbench.sbtest1;
Query OK, 0 rows affected (0.1823 sec)- Restoring the MySQL Server using the backup
Now, we have to restore the database using the last backup we have. We will use util.loadDump() in order to restore our table. To only recover the table we can simply use the option “includeTables“.
 MySQL  albatroz.mysql.database.azure.com:3306 ssl  sysbench  JS > util.loadDump("C:/Users/grs/AlbatrozDump", { includeTables: ["sysbench.sbtest1"],loadDdl:true, LoadData:true, threads: 2})
Loading DDL and Data from 'C:/Users/grs/AlbatrozDump' using 2 threads.
Opening dump...
Target is MySQL 8.0.28. Dump was produced from MySQL 8.0.28
Scanning metadata - done
Checking for pre-existing objects...
Executing common preamble SQL
Executing DDL - done
Executing view DDL - done
Starting data load
1 thds loading \ 100% (2.93 MB / 2.93 MB), 1.16 MB/s, 0 / 1 tables done
Executing common postamble SQL
Recreating indexes - done
1 chunks (15.29K rows, 2.93 MB) for 1 tables in 1 schemas were loaded in 9 sec (avg throughput 1.16 MB/s)
0 warnings were reported during the load.
If the restore worked properly, the table sbtest1 should be restored. We now have recovered the table sbtest1 without the queries that have been executed afterwards (before the drop table).
 MySQL  albatroz.mysql.database.azure.com:3306 ssl  sysbench  SQL > show tables;
+--------------------+
| Tables_in_sysbench |
+--------------------+
| sbtest1            |
| sbtest10           |
| sbtest2            |
| sbtest3            |
| sbtest4            |
| sbtest5            |
| sbtest6            |
| sbtest7            |
| sbtest8            |
| sbtest9            |
+--------------------+
10 rows in set (0.1169 sec)

MySQL  albatroz.mysql.database.azure.com:3306 ssl  sysbench  SQL > select * from sbtest1 where pad like 'my%';
Empty set (0.1284 sec)- Execution of the binary logs
Before executing the binary logs, we need to define what we call the “start-position” and the “end-position“. In order to find these two numbers, we have to find the log position after the backup and to find the log position of the “drop table”. The first (start-position) can be found into the metadata of the dump ( .json file). For the second we have to find the exact position using mysqlbinlog as demonstrated below (drop position at 14329648)
mysqlbinlog --verify-binlog-checksum --host=albatroz.mysql.database.azure.com --port=3306 --user=grs -p -                                                   -read-from-remote-server --verbose --start-datetime="2022-08-19 18:40:40" --stop-datetime="2022-08-19 18:50:47" mysql-bin.00                                                   0006 | grep -C 15 "DROP TABLE"

# at 14329648
#220819 18:47:12 server id 3691359094  end_log_pos 14329725 CRC32 0xa81066cf    Anonymous_GTID  last_committed=6652     sequence_number=6653r                                  br_only=no      original_committed_timestamp=1660927632152016   immediate_commit_timestamp=1660927632152016     transaction_length=217
# original_commit_timestamp=1660927632152016 (2022-08-19 18:47:12.152016 CEST)
# immediate_commit_timestamp=1660927632152016 (2022-08-19 18:47:12.152016 CEST)
/*!80001 SET @@session.original_commit_timestamp=1660927632152016*//*!*/;
/*!80014 SET @@session.original_server_version=80028*//*!*/;
/*!80014 SET @@session.immediate_server_version=80028*//*!*/;
SET @@SESSION.GTID_NEXT= 'ANONYMOUS'/*!*/;
# at 14329725
#220819 18:47:12 server id 3691359094  end_log_pos 14329865 CRC32 0x9f7865b0    Query   thread_id=480   exec_time=0     error_code=0    Xid =                                   412469
use `sysbench`/*!*/;
SET TIMESTAMP=1660927632/*!*/;
DROP TABLE `sbtest1` /* generated by server */
/*!*/;
Now that we have the start and end position of the binary log, we can apply the events in binary log file to the server. For my part, I prefer to go through an intermediate step consisting in creating a file containing all the events. This way I can look at what is inside and then just run my file. This allows me, for example, to see if I have made an error. As shown below I’m for instance able to show my “insert” statement:
osboxes@osboxes:~$  mysqlbinlog --verify-binlog-checksum --host=albatroz.mysql.database.azure.com --port=3306 --user=grs -p --read-from-remote-server --start-datetime="2022-08-19 16:40:40" --stop-datetime="2022-08-19 16:46:47" mysql-bin.000006 >/tmp/restore.sql
Enter password:
osboxes@osboxes:~$ vi /tmp/restore.sql
...
# at 14329545
#220819 18:41:18 server id 3691359094  end_log_pos 14329617 CRC32 0xd124e6a0    Write_rows: table id 913 flags: STMT_END_F

BINLOG '
Lr3/YhN2qwXcRQAAAMmm2gAAAJEDAAAAAAEACHN5c2JlbmNoAAdzYnRlc3QxAAQDA/7+BO7g/vAA
AQEAAgP8/wDqexN/
Lr3/Yh52qwXcSAAAABGn2gAAAJEDAAAAAAEAAgAE/wD/yZo7AQAAAAEAMRhteSByb3cgYmVmb3Jl
IGRyb3AgdGFibGWg5iTR
'/*!*/;
### INSERT INTO `sysbench`.`sbtest1`
### SET
###   @1=999999999
###   @2=1
###   @3='1'
###   @4='my row before drop table'
# at 14329617
...
Finally we can execute our restore script on the database.
osboxes@osboxes:~$ mysql --host=albatroz.mysql.database.azure.com --port=3306 --user=grs -p </tmp/restore.sql
Enter password:- Let’s check that our last insert has been executed
As we can see, the last record we inserted in the table is now present.
 MySQL  albatroz.mysql.database.azure.com:3306 ssl  sysbench  SQL > select * from sbtest1 where pad like 'my%';
+-----------+---+---+--------------------------+
| id        | k | c | pad                      |
+-----------+---+---+--------------------------+
| 999999999 | 1 | 1 | my row before drop table |
+-----------+---+---+--------------------------+
Conclusion
Azure Backup Restore interface provides an easy and interesting solution to backup and restore a MySQL Server going through the replication of the server. In addition in the tests I did, the deployment of the new server was rather fast. However, my server did not contain gigabytes of information. The 35 days of backup window could be seen as too small depending on your needs.
Beside of this solution I strongly encourage Database Administrators to keep on backing up their MySQL Database using other tools such as the ones provided by MySQL Shell or any other backup solution in order to ensure that no transactions are lost when restoring data. Such solutions could offer more flexibility in the backup and restore process and longer retention.
![Thumbnail [60x60]](https://www.dbi-services.com/blog/wp-content/uploads/2022/08/GRS_web-min-scaled.jpg)
![Thumbnail [90x90]](https://www.dbi-services.com/blog/wp-content/uploads/2022/08/ADE_WEB-min-scaled.jpg)
![Thumbnail [90x90]](https://www.dbi-services.com/blog/wp-content/uploads/2024/03/AHI_web.jpg)
![Thumbnail [90x90]](https://www.dbi-services.com/blog/wp-content/uploads/2025/07/ALK_MIN.jpeg)
![Thumbnail [90x90]](https://www.dbi-services.com/blog/wp-content/uploads/2025/05/JDE_Web-1-scaled.jpg)