In the 1st post of this serie, I demonstrate how easy it is to install AWX on a local Minikube Kubernetes cluster.
Now that the installation is done and the access to the web console is working, let’s find out what kind of objects should be created to best manage Ansible playbooks deployments using AWX.
AWX Command Line Interface
Obviously all objects can be managed from the web console. But did you know that AWX also provides a CLI ?
Generally speaking, I’m quite a fan of Command Line Interfaces. So as first step here, let’s see how we can install this one.
On RHEL OS Family, you can use yum or dnf to install it. On all other platforms, it can be installed via pip :
joc@jocbox:~$ pip3 install --user https://releases.ansible.com/ansible-tower/cli/ansible-tower-cli-latest.tar.gz

Collecting https://releases.ansible.com/ansible-tower/cli/ansible-tower-cli-latest.tar.gz
Using cached https://releases.ansible.com/ansible-tower/cli/ansible-tower-cli-latest.tar.gz (92 kB)
Requirement already satisfied: PyYAML in /usr/lib/python3/dist-packages (from awxkit==3.8.5) (5.3.1)
Requirement already satisfied: requests in /usr/lib/python3/dist-packages (from awxkit==3.8.5) (2.22.0)
Building wheels for collected packages: awxkit
Building wheel for awxkit (setup.py) ... done
Created wheel for awxkit: filename=awxkit-3.8.5-py3-none-any.whl size=110710 sha256=a93595b0d1511a1d14e9f3d4f37861aab0c6cb6d61c65944efd85b25ba0c2bb6
Stored in directory: /home/joc/.cache/pip/wheels/5b/2d/3a/b7e56c0c48d65ee4c9708c7d6f5ac36ddbd10477e28c1b0b4b
Successfully built awxkit
Installing collected packages: awxkit
Successfully installed awxkit-3.8.5
joc@jocbox:~$

joc@jocbox:~$ awx --version
3.8.5
joc@jocbox:~$
Once AWX CLI is installed, the first thing to do is to login to the AWX instance. For that, ask kubectl to tell you the port number on which the service is exposed :
joc@jocbox:~$ kubectl get svc -l "app.kubernetes.io/managed-by=awx-operator"
NAME              TYPE       CLUSTER-IP      EXTERNAL-IP  PORT(S)       AGE
awx-joc-postgres  ClusterIP  None            <none>       5432/TCP      23d
awx-joc-service   NodePort   10.108.183.108  <none>       80:32283/TCP  23d
joc@jocbox:~$
The awx login command generates a personal access token. Run it by specifying the IP of the AWX server, the port returned by kubectl, the username and the password :
joc@jocbox:~$ TOWER_HOST=http://192.168.49.2:32283 \
              TOWER_USERNAME=admin \
              TOWER_PASSWORD=LbcA6yarpcRcnDMeBTJvZnJ8hf7wXXxa \
              awx login
{
"token": "gQbq6qFBoAIxKPp1BMILiN8l3amCR1"
}
joc@jocbox:~$
You can use the token to avoid having to specify the username and password for each awx command :
joc@jocbox:~$ export TOWER_TOKEN=gQbq6qFBoAIxKPp1BMILiN8l3amCR1
joc@jocbox:~$ awx config
{
  "base_url": "http://192.168.49.2:32283",
  "token": "gQbq6qFBoAIxKPp1BMILiN8l3amCR1",
  "use_sessions": false,
  "credentials": {
      "default": {
          "username": "admin",
          "password": "LbcA6yarpcRcnDMeBTJvZnJ8hf7wXXxa"
      }
  }
}
joc@jocbox:~$
By default, the output is displayed in JSON format. You can change it using the -f option. For instance :
joc@jocbox:~$ awx config -f human
key          value
============ ==========================================================
base_url     http://192.168.49.2:32283
token        gQbq6qFBoAIxKPp1BMILiN8l3amCR1
use_sessions 0
credentials  {"default": {"username": "admin", "password": "LbcA6yarpcRcnDMeBTJvZnJ8hf7wXXxa"}}
joc@jocbox:~$
We are now ready to manage AWX with both the GUI or the CLI.
Objects hierarchy
The following diagram describes the AWX objects hierarchy :
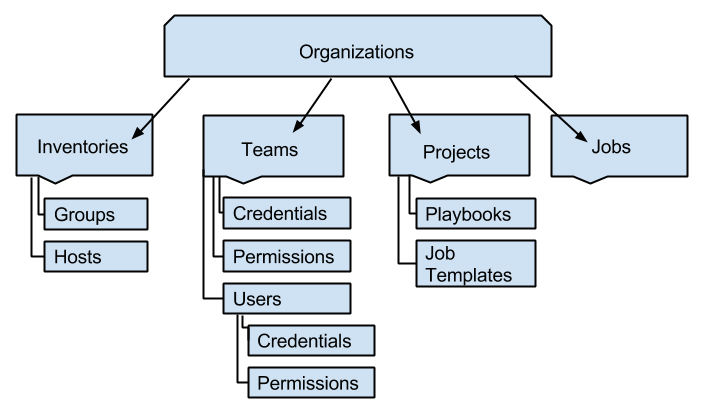
As the title of this post indicates, we will first focus on organizations, teams and users only.
Organization
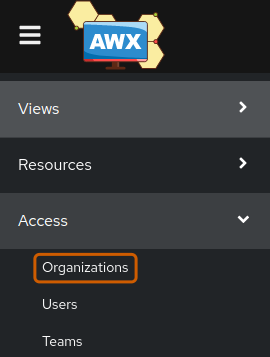
An organization is the highest level in the AWX object hierarchy. Nothing surprising. To create an organization, click on the Organizations icon from the left navigation bar :
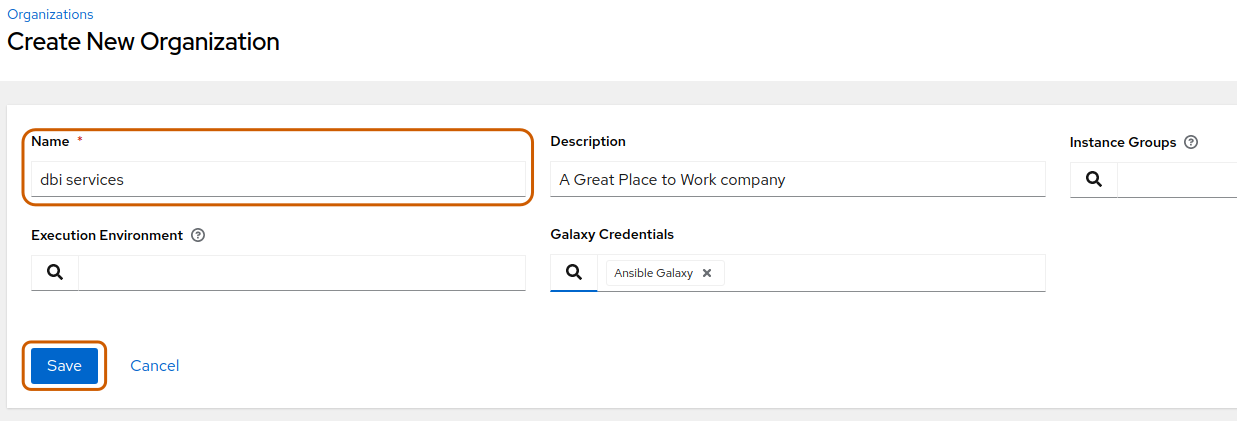
A default organization already exists. Click on the Add button to create a new one :

The only mandatory property is the name. Choose an elegant one, add a description if you want and click on Save. Other fields can stay empty for now :
From the CLI :
joc@jocbox:~$ awx organizations create --name "dbi services3" --description "A Great Place to Work company" -f human
id name
== =============
3  dbi services3
joc@jocbox:~$

joc@jocbox:~$ awx organizations list -f human
id name
== ============
3  dbi services
1  Default
joc@jocbox:~$
User
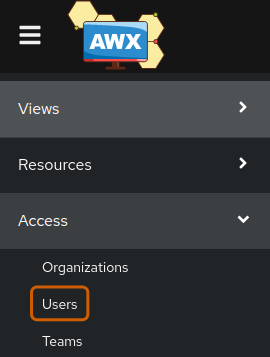
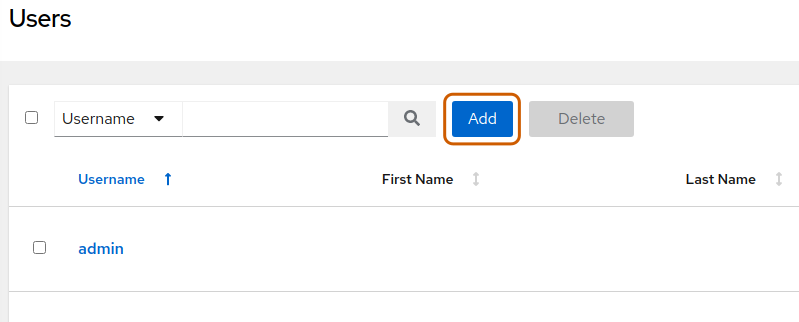
Now that we have an organization, we need some users. To create them, click on the Users icon from the left navigation bar :
The only user that exists at the moment is the admin. Click on the Add button to add a new one :
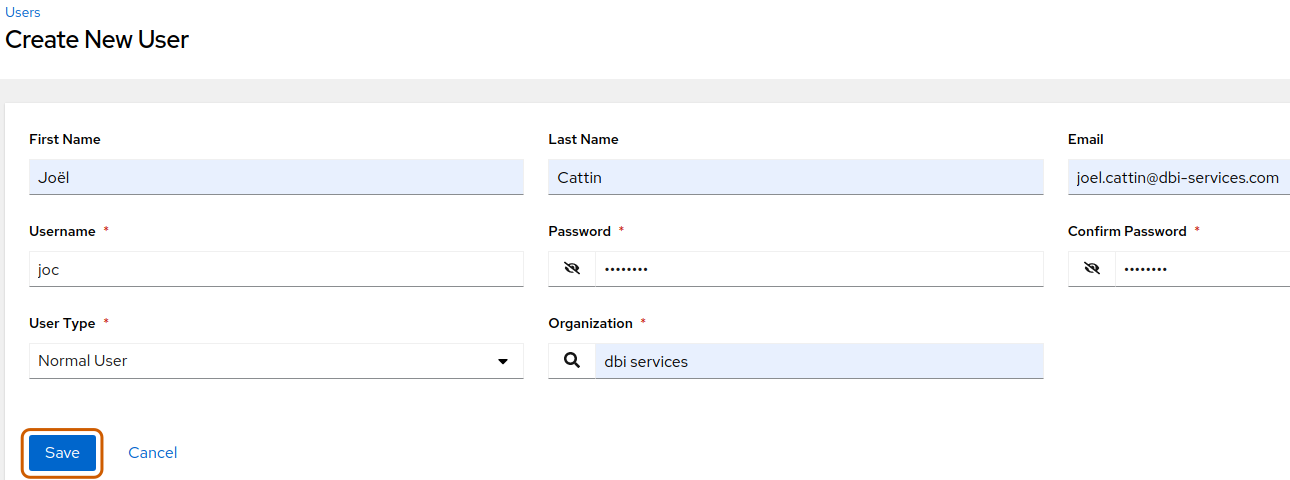
Fill out the usual fields, select your organization and click on Save :
From the CLI :
joc@jocbox:~$ awx users create --username "joc" --first_name "Joël" --last_name "Cattin" --email "[email protected]" --password "mypassword" --organization "dbi services"
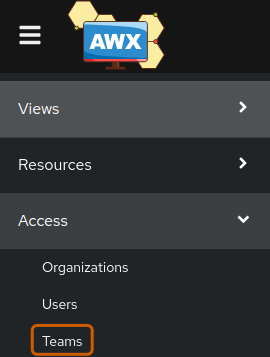
Team
Obviously, a team is a group of users. By using teams, you will be able to manage and delegate responsibilities across the organization.
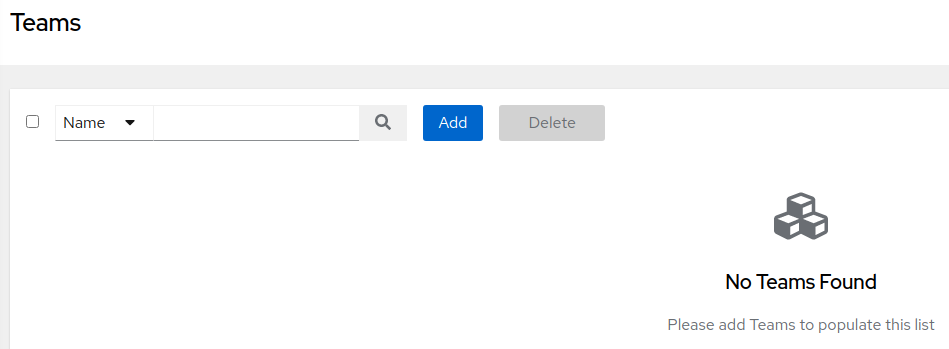
To create them, click on the Teams icon from the left navigation bar :
And then on Add :
Fill out the fields, select your organization and click on Save :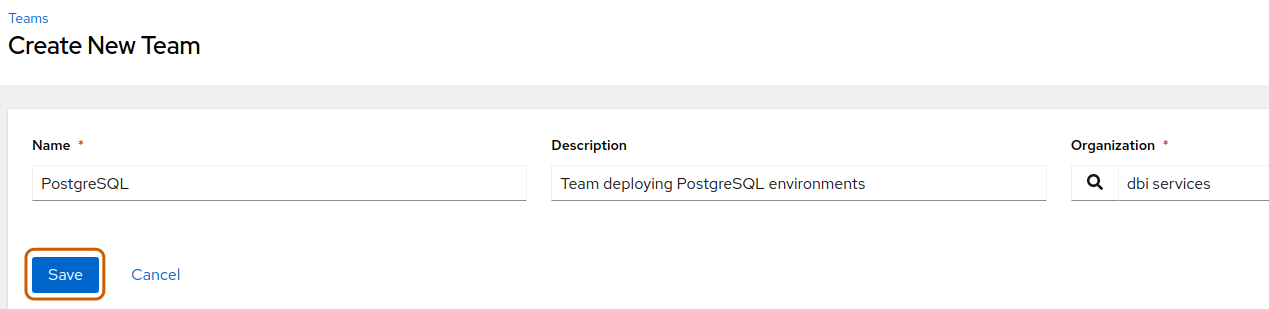
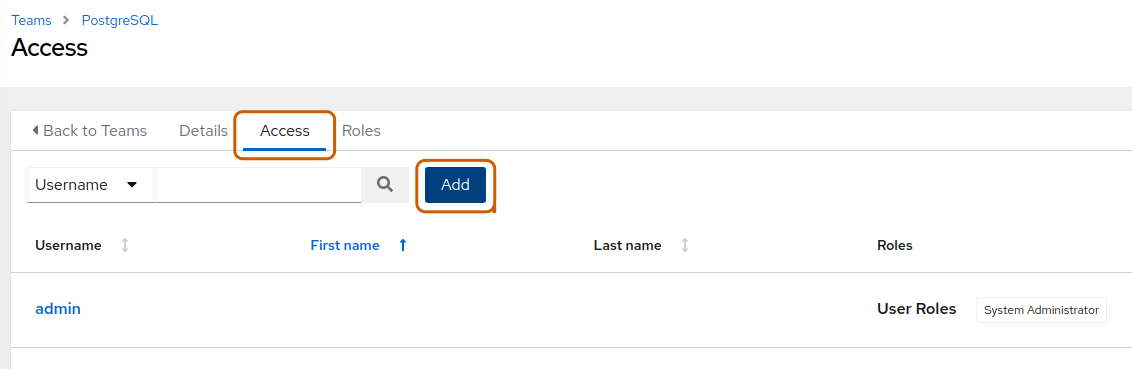
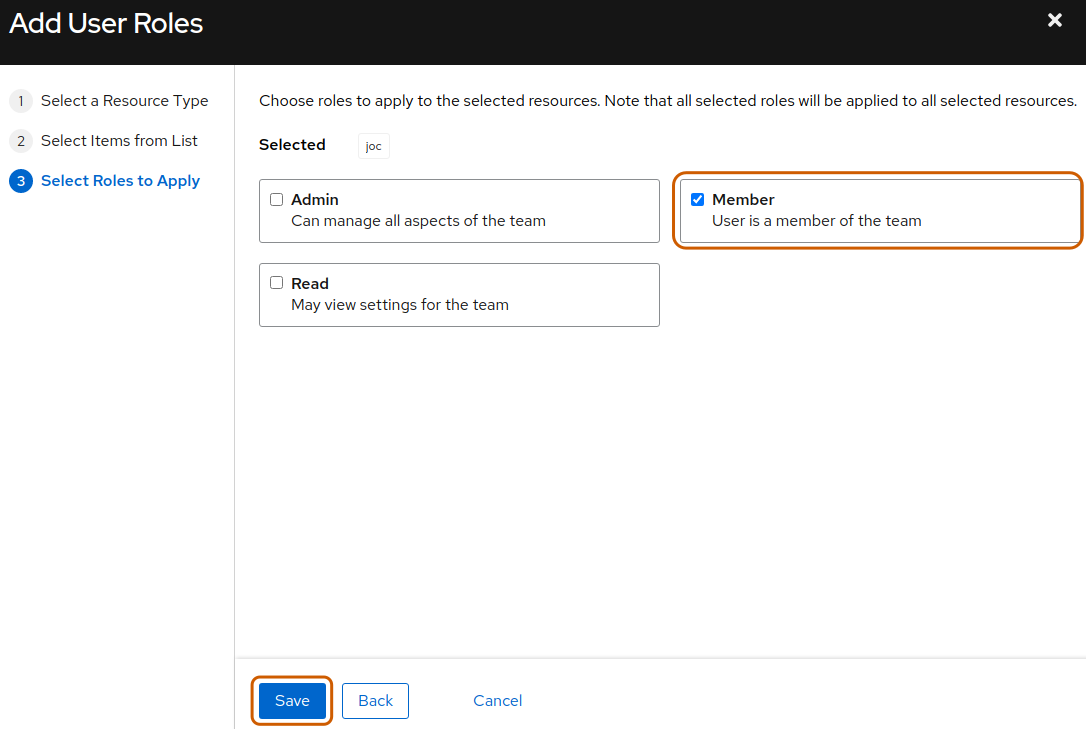
To add a user to the team, click on the Access tab and then on Add :
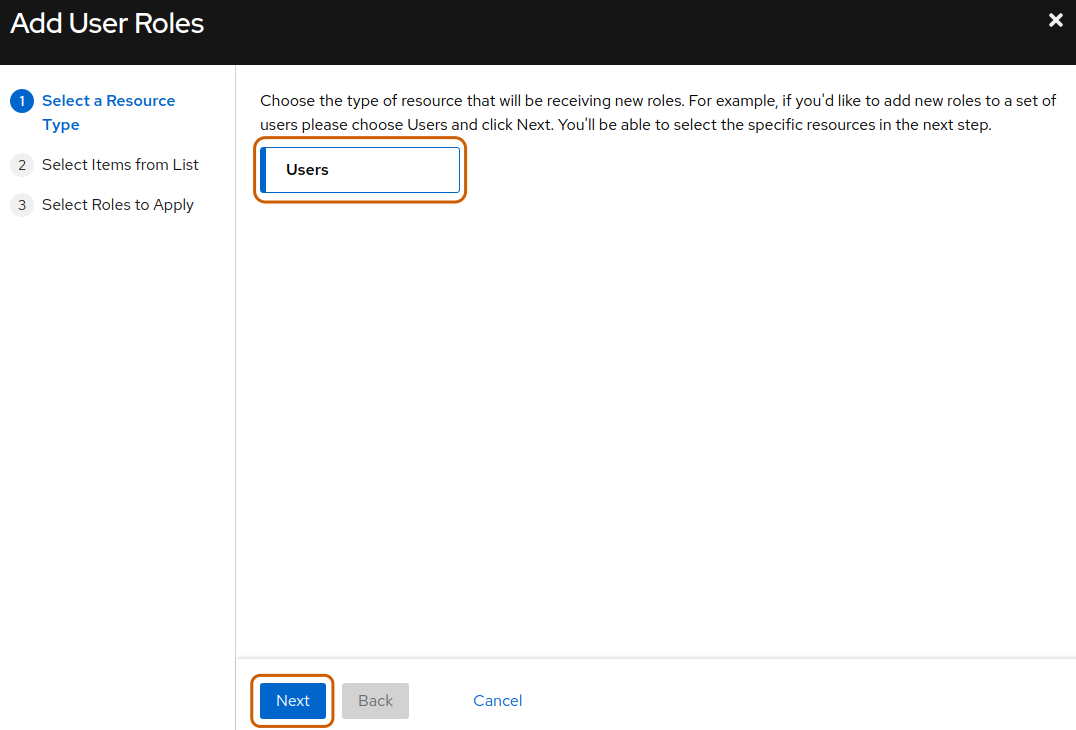
Select Users as resource type and click on Next :
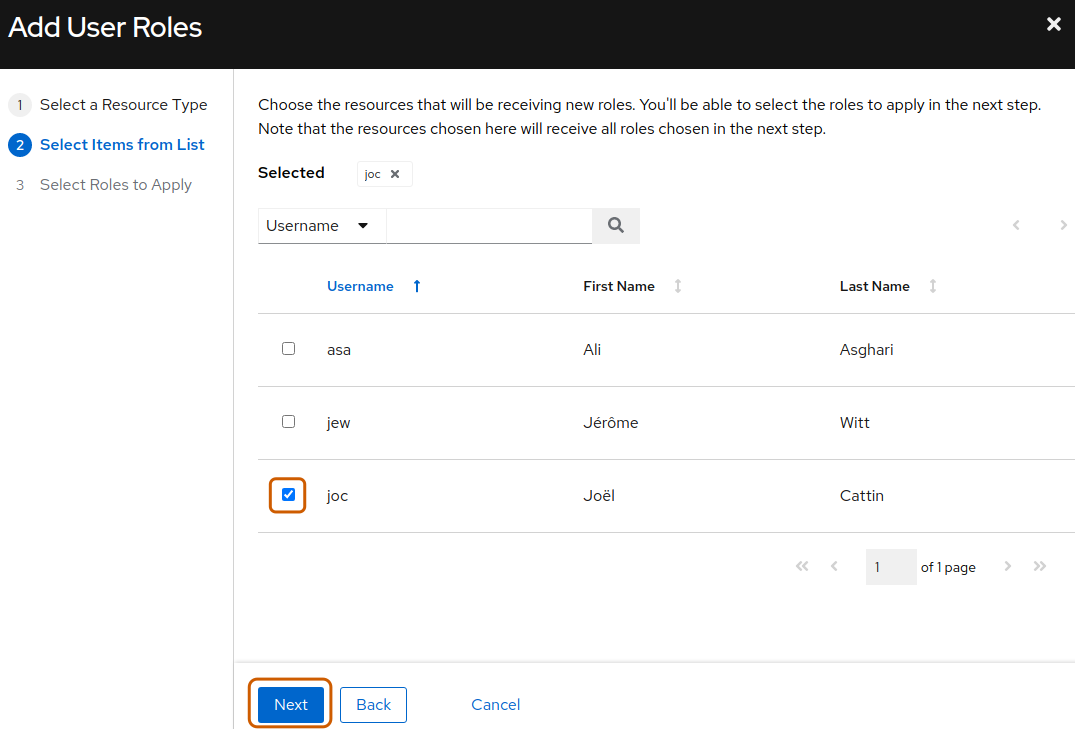
Choose the users you want to add to the team and click on Next :
Select the role you want to grant to the user and click on Save :
From the CLI :
joc@jocbox:~$ awx teams create --name "PostgreSQL" --description "Team deploying PostgreSQL environments" --organization "dbi services"

joc@jocbox:~$ awx users grant --team "PostgreSQL" --role "member" joc --organization "dbi services"
That’s all for this post. We have now an organization, some teams and some users. Everything can be managed from the AWX GUI or the CLI.
Stay tuned for the 3rd part of this serie !
![Thumbnail [60x60]](https://www.dbi-services.com/blog/wp-content/uploads/2022/08/JOC_web-scaled.jpg)
![Thumbnail [90x90]](https://www.dbi-services.com/blog/wp-content/uploads/2022/08/GRE_web-min-scaled.jpg)
![Thumbnail [90x90]](https://www.dbi-services.com/blog/wp-content/uploads/2024/03/AHI_web.jpg)
![Thumbnail [90x90]](https://www.dbi-services.com/blog/wp-content/uploads/2022/08/NAC_web-min-scaled.jpg)
![Thumbnail [90x90]](https://www.dbi-services.com/blog/wp-content/uploads/2022/08/ADE_WEB-min-scaled.jpg)