In this blog post, I will outline the steps required to enable and configure the M-Files Outlook Pro add-in. This includes configuring Microsoft Outlook rules to automate email handling. It took me some time to configure the rules, as they were not working as I expected. I hope this blog helps others save time.
Installation
The installation is very straight forward and well documented, it can take some time for the creation of the necessary self signed certificated for the Microsoft Azure Application. In addition, you must ensure that you have management access to the Microsoft Azure Admin Centre or an admin aside to perform the required steps
I will. not go through each step in detail, but I will highlight important steps from my point of view. The step by step documentation can be found on the M-Files web page for Integrations.
Important steps:
- Allow third-party cookies for Outlook Web.
https://[*.]office365.com
https://[*.]office.com - Ensure that the lins below not blocked by the firewall.
https://mfnewoutlookaddinprod.m-files.com
https://login.microsoftonline.com/common
https://login.m-files.com/ - Create a self signed certificate and convert them to be able to configure the M-Files Vault Application.
- Create and configure the Application in Azure, according the M-Files documentation.
- Installation and configure the M-Files Vault Application, just follow the M-Files documnetation.
- Install or deploy the M-Files for Outlook add-in. It is a certified Microsoft application. It can be installed individually or deployed to a specific group of users. This is the standard Microsoft process.
Create a self signed certificate for use in a cloud setup
Open PowerShell with administrative access and use the command below.
$certname = "{certificateName}"    ## Replace {certificateName}
$cert = New-SelfSignedCertificate -Subject "CN=$certname" -CertStoreLocation "Cert:\CurrentUser\My" -KeyExportPolicy Exportable -KeySpec Signature -KeyLength 2048 -KeyAlgorithm RSA -HashAlgorithm SHA256

Export-Certificate -Cert $cert -FilePath "C:\Users\admin\Desktop\$certname.cer"   ## Specify your preferred location

$mypwd = ConvertTo-SecureString -String "{myPassword}" -Force -AsPlainText  ## Replace {myPassword}

Export-PfxCertificate -Cert $cert -FilePath "C:\Users\admin\Desktop\$certname.pfx" -Password $mypwd   ## Specify your preferred location
In case you get an execution error from PowerShell, you can use the command below to allow the execution
Set-ExecutionPolicy -ExecutionPolicy RemoteSigned -ForceIf everything worked as expected you have files as in the example below.
Mode                 LastWriteTime         Length Name
----                 -------------         ------ ----
-a----        29/06/2026     08:18            772 testcert.cer
-a----        29/06/2026     08:20           2644 testcert.pfx
To convert the certificates, you will need to use OpenSSH and Cygwin. M-Files strongly recommends using Cygwin. I encountered issues when I did not use Cygwin and it did not work.
Conversion is required in order to configure the certificate within the M-Files Vault application.
After the installation of Cygwin the command below must be executed in a Cygwin command window.
openssl pkcs12 -in MyCert.pfx -out MyCert.pem -nokeys

openssl pkcs12 -in MyCert.pfx -out MyCert.key -nocerts

openssl rsa -in MyCert.key -out MyCert_encrypted.key -aes256
Configure the Outlook and M-Files rules
You can use the Outlook and M-Files rules to automatically save received emails to the M-Files system. It is important to understand how each rule works within the M-Files Outlook add-in. This differs from creating an object in M-Files, where the workflow and required state must be explicitly defined.
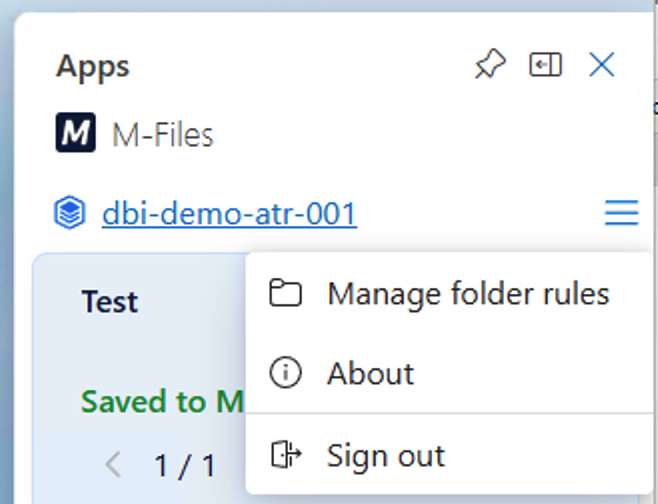
Open the M-Files Outlook Add-In in Outlook and navigate to “Manage folder rules.
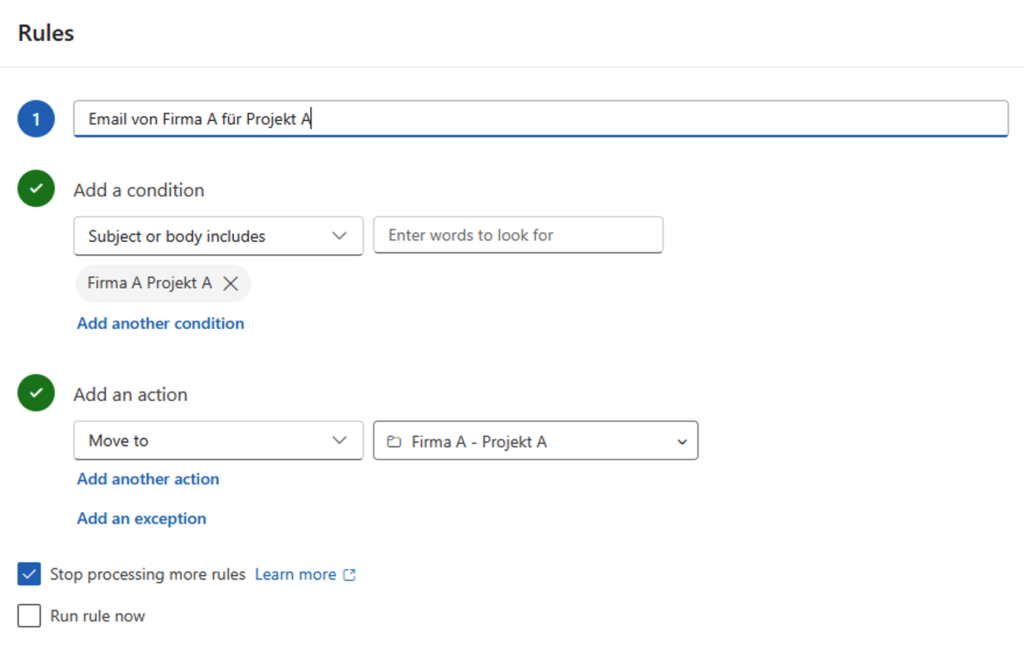
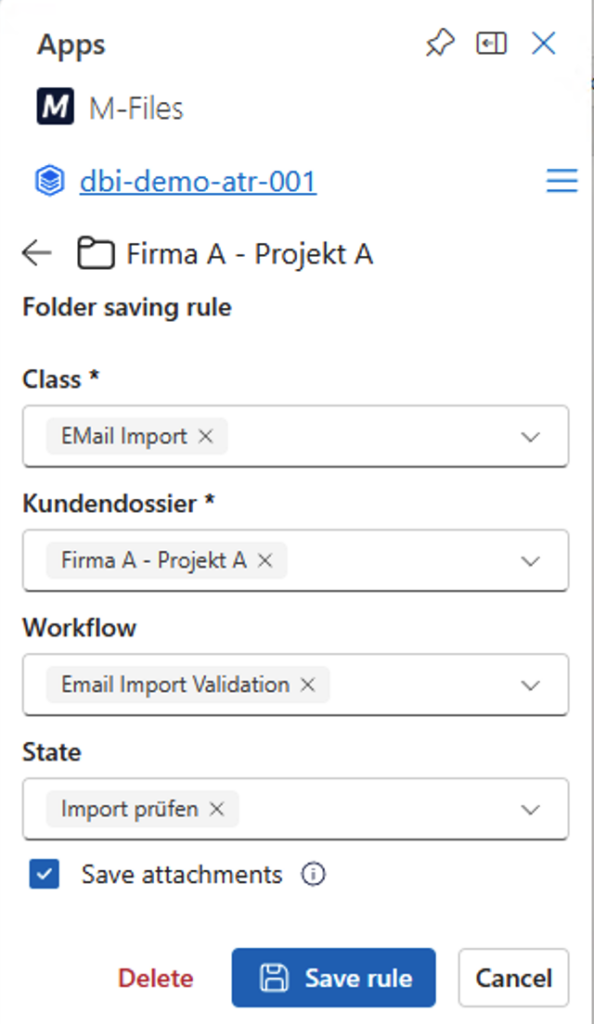
The screenshot below shows the configuration of the Outlook folder “Firma A – Projekt A”, which will be imported automatically and assigned to the M-Files class ‘Email Import’. Additionally, the “Email Import Validation” workflow with the state “Import prüfen” is assigned.
If the workflow is not defined in the rule, it will not be assigned as expected. As we know, when a new object is created in M-Files, the workflow of the class is used automatically.
Conclusion
In order to automate the process of moving incoming emails into M-Files, two steps are required. First, define the usual Outlook rule, then create a rule in the M-Files Outlook add-in, as explained above.
Don’t hesitate to get in touch with us or directly with me if you have any more questions or need support with implementation.
![Thumbnail [60x60]](https://www.dbi-services.com/blog/wp-content/uploads/2022/08/ATR_web-min-scaled.jpg)
![Thumbnail [90x90]](https://www.dbi-services.com/blog/wp-content/uploads/2022/11/TBR-web-min-scaled.jpg)
![Thumbnail [90x90]](https://www.dbi-services.com/blog/wp-content/uploads/2022/08/GME_web-min-scaled.jpg)
![Thumbnail [90x90]](https://www.dbi-services.com/blog/wp-content/uploads/2022/08/MOP_web-min-scaled.jpg)