Now that we have a system with a proper network setup we can take a look at how backup and restore works in Exasol. Without being able to restore and recover your database, you for sure cannot put a system into production, so backup and restore always is a major topic to understand (with any system that holds data you do not want to lose). When it comes to backup and restore, this is what I expect at a minimum in that area:
- Backups should be non-blocking
- Given that Exasol is targeting massive data volumes, there should be a way to parallelize backups and restores
- There should be a way to check the integrity of backups
- Point in time recovery of course is a must
- Compression of backups becomes important with huge data, also this is not a blocker
Let’s go and check what is available, and how it works.
Backups in Exasol are either stored into “Local Archive Volumes”, or into “Remote Archive Volumes”. If you remember the last post, you can have “data” and “archive” volumes. The “archive” volumes are for backups. As the names imply, “Local Archive Volumes” are local inside the cluster, while backups to “Remote Archive Volumes” go out of the cluster. For the remote archives, there are the following options:
- FTP
- SMB
- AWS S3
- WebHDFS
- Azure Blob Storage
- Google Cloud Storage
From my personal experience, backups should always be stored in a location that is not local to the database system or, in the case of Exasol, local to the cluster. Everything can fail and if you loose the whole cluster (for whatever reason) you really want to have a backup you can restore from somewhere else. There is one exception to that: If you can load your data into Exasol from external sources in a reasonable time, it might be sufficient to with local backups only.
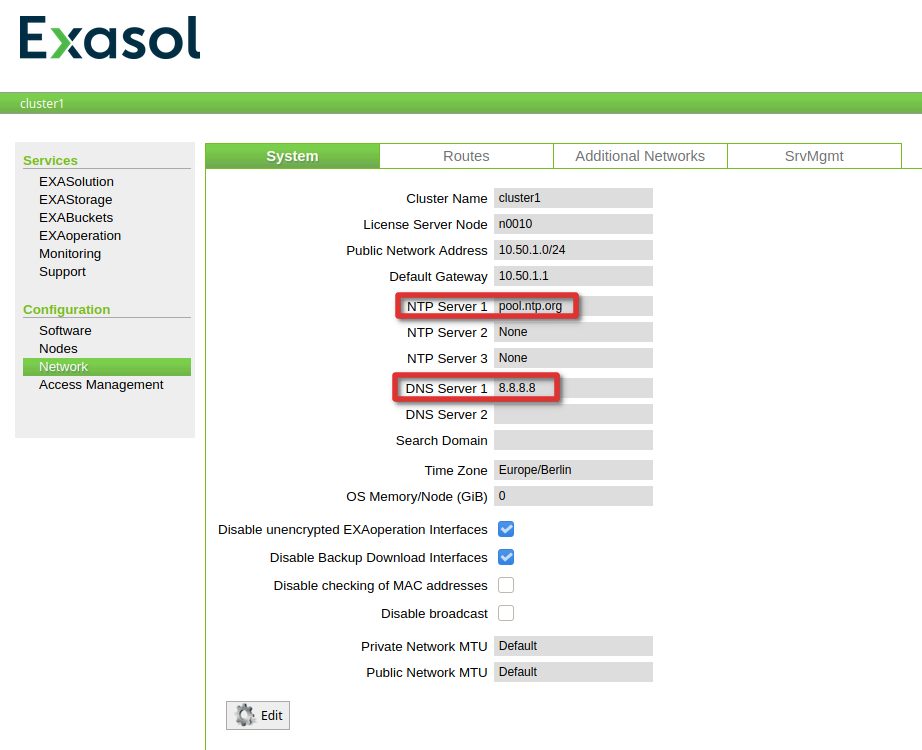
For the scope of this post we’ll go with an AWS S3 bucket. Before we can attach an S3 bucket we need to do some more configurations in the Network configuration section of the web console which currently looks like this:

What we need to provide are the DNS servers Exasol will use for DNS resolution, and the ntp servers to use (not really required here but required when you have multiple nodes):
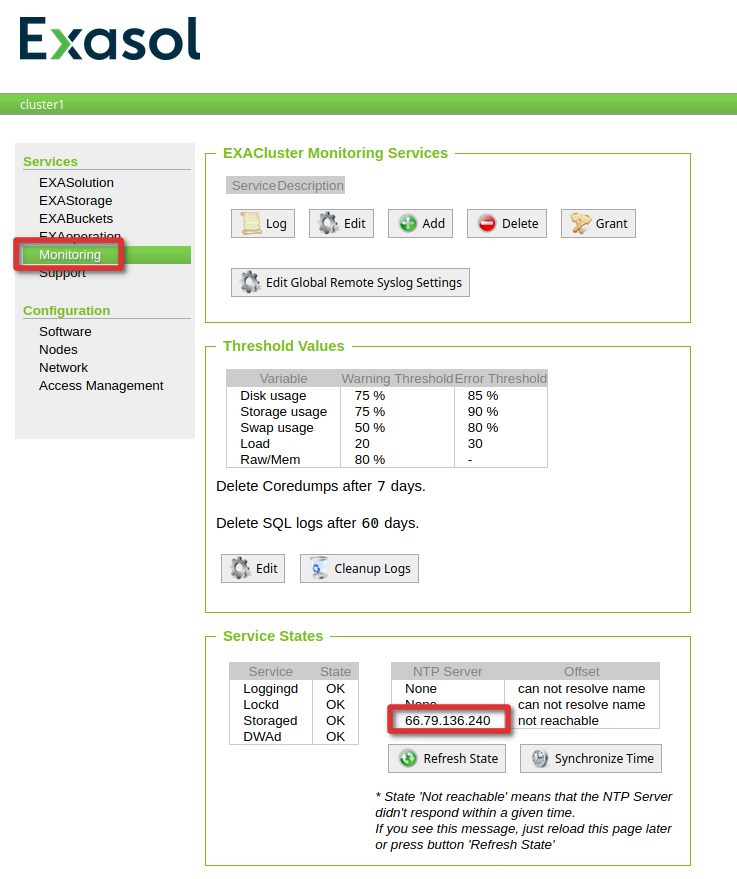
A simple way of checking if the network setup is fine, is to go to the “Monitoring” section, and check if there is an IP address for one of the NTP servers (in case you used pool.ntp.org in the previous step):
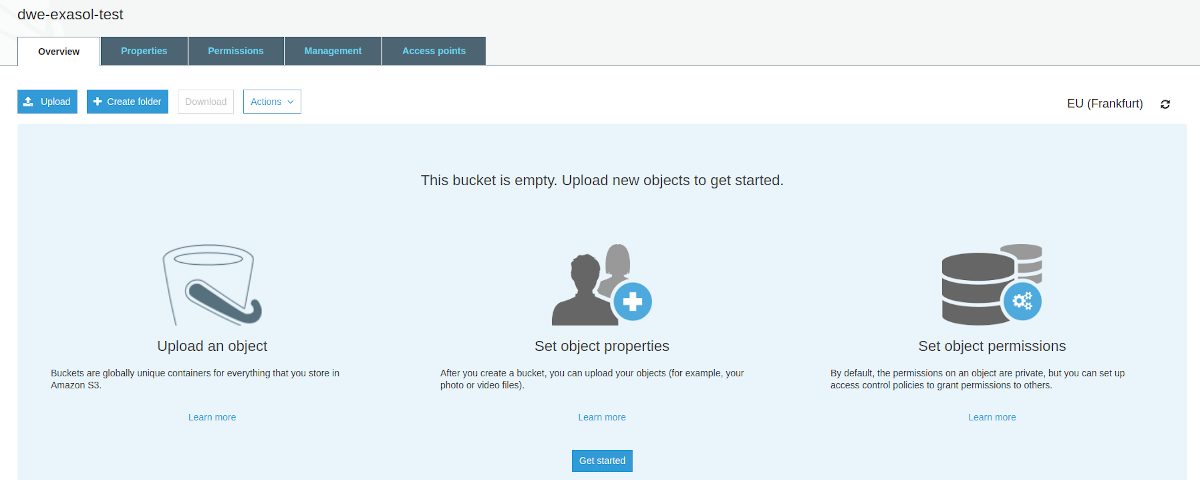
Now, that connectivity is fine we can go ahead and attach a S3 bucket. I’ve created a standard bucket with no special permissions:
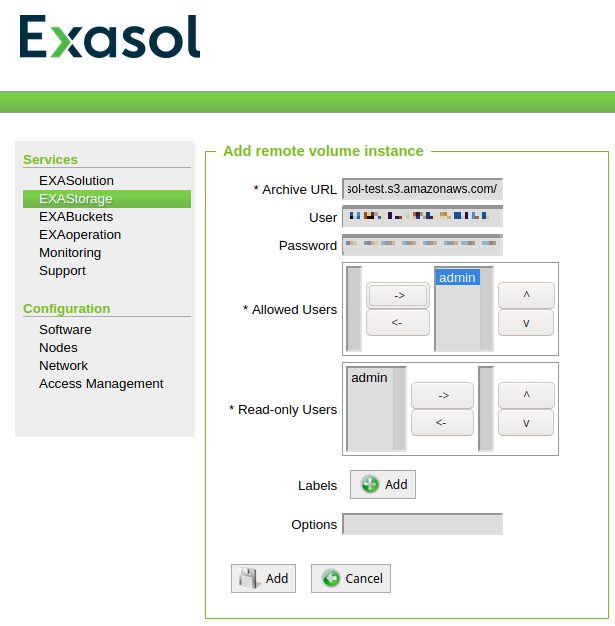
Remote archives in Exasol are configured in the “Storage” section:
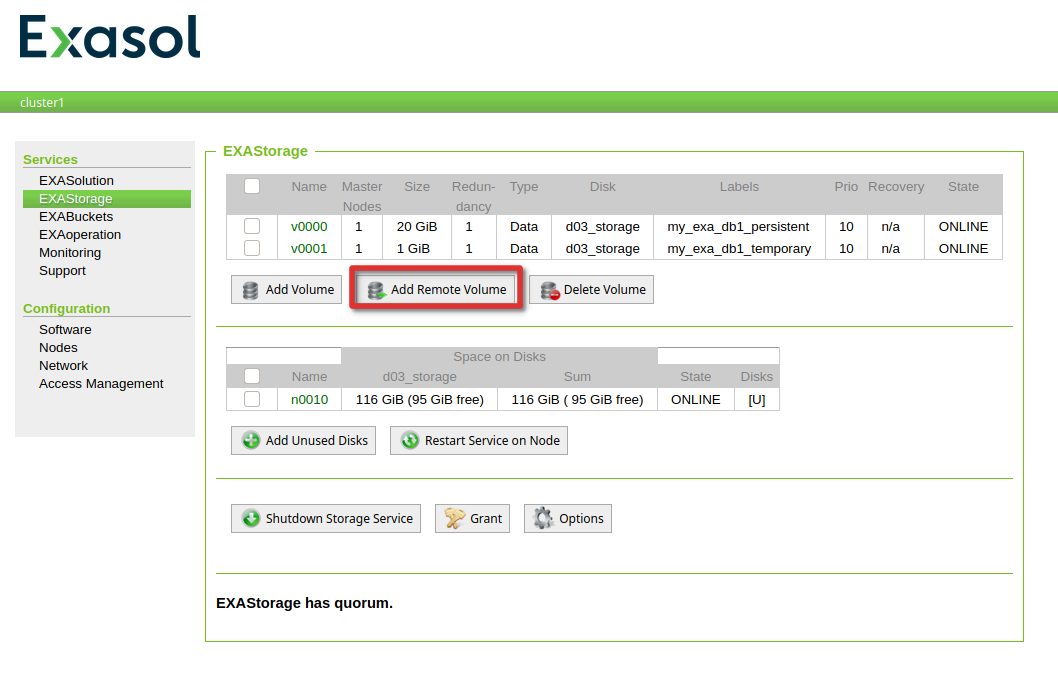
All you need to provide is the URL to the bucket, your AWS access key and the secret for that key.
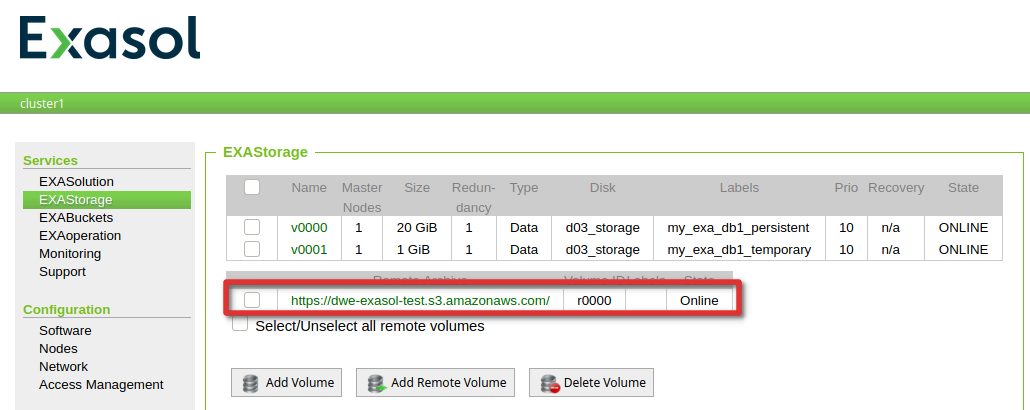
If all is fine, the remote archive should show a status of “online”:
Before scheduling the actual backup let’s generate some data we can use for the backup (one simple table containing three rows):
dwe@dwe:~/EXAplus-7.0.0$ /home/dwe/EXAplus-7.0.0/exaplus -c 192.168.178.111:8563 -u sys -p exasol
EXAplus 7.0.0 (c) EXASOL AG

Thursday, October 8, 2020 at 3:04:16 PM Central European Summer Time
Connected to database my_exa_db1 as user sys.
EXASolution 7.0.2 (c) EXASOL AG

SQL_EXA> create schema demo;
EXA: create schema demo;

Rows affected: 0

SQL_EXA> create table t1 ( a int );
EXA: create table t1 ( a int );

Rows affected: 0

SQL_EXA> open schema demo;
EXA: open schema demo;

SQL_EXA> insert into t1 values (1);
EXA: insert into t1 values (1);

Rows affected: 1

SQL_EXA> insert into t1 values (2);
EXA: insert into t1 values (2);

Rows affected: 1

SQL_EXA> insert into t1 values (3);
EXA: insert into t1 values (3);

Rows affected: 1
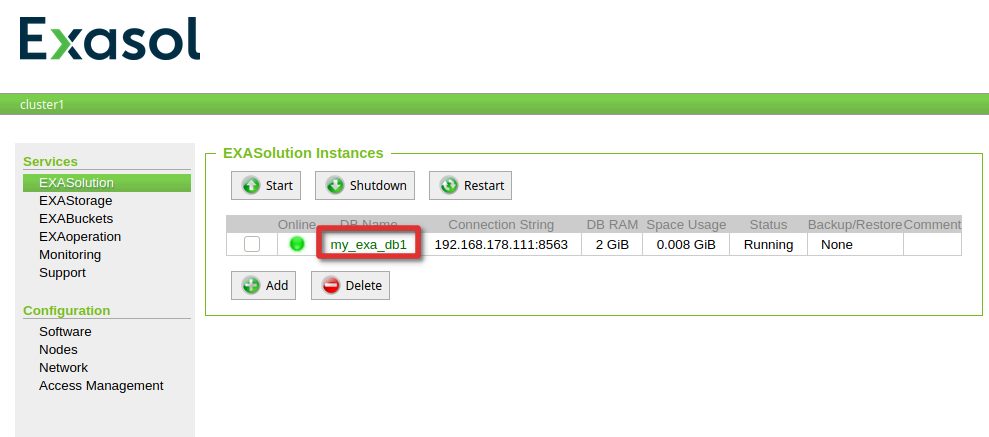
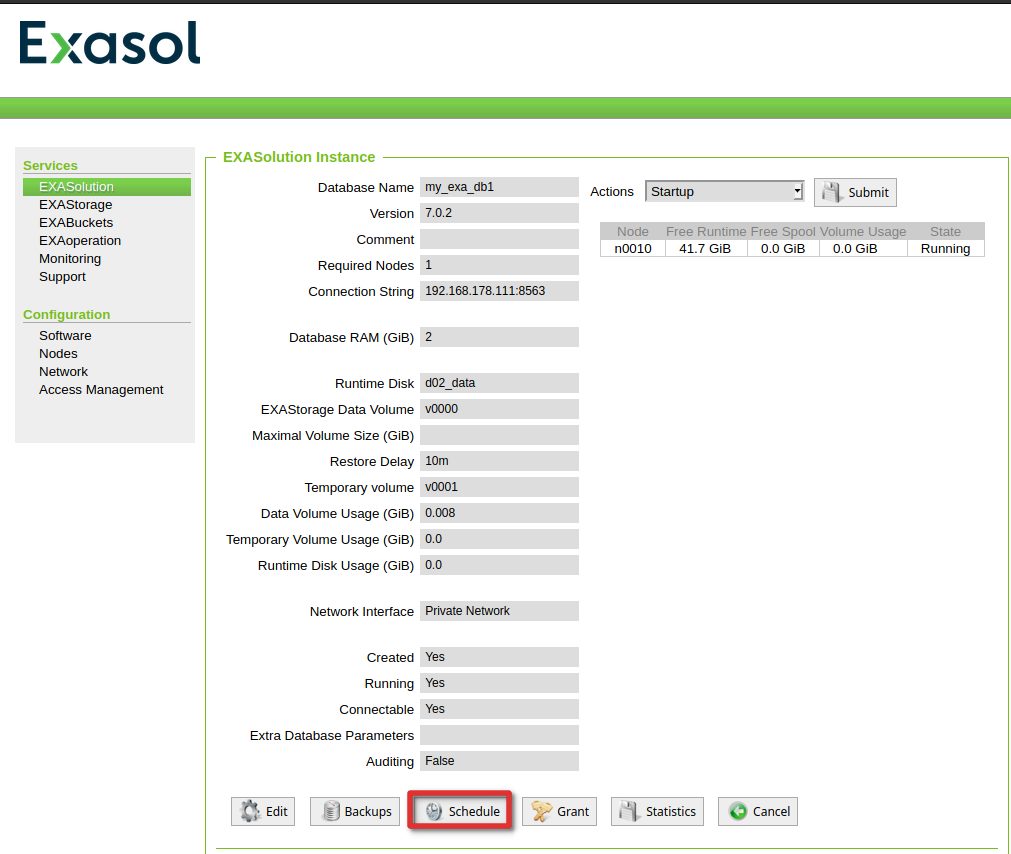
In Exasol everything related to backup starts with a backup schedule. As usual that is done in the web console:
The schedule uses a cron like syntax:
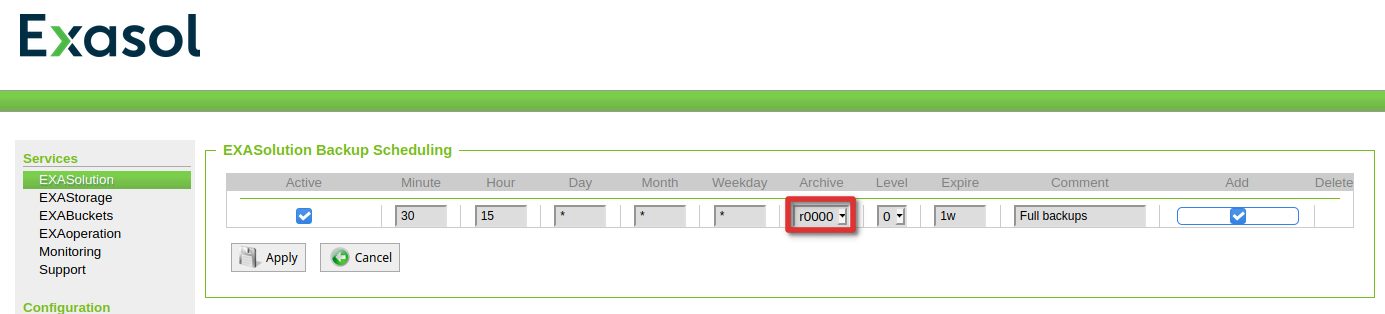
In this case that means:
- Do a full backup every day at 15:30
- Store the backup in the remote archive (S3) we just created
- Expire the backups after one week
There will be a nice timeline once the first schedule is created:
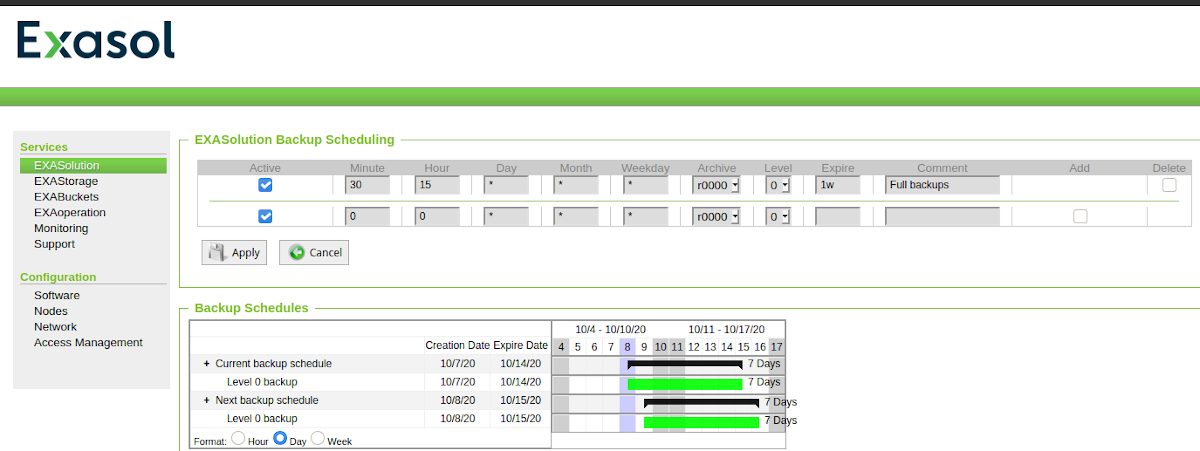
Let’s go a step a further and create an incremental backup 10 minutes after the full, and an incremental 2 backup 10 minutes after the first incremental. The level of the incremental backups always refer to the level before: 2 means incremental to level 1, 3 mean incremental level 2 and so on.
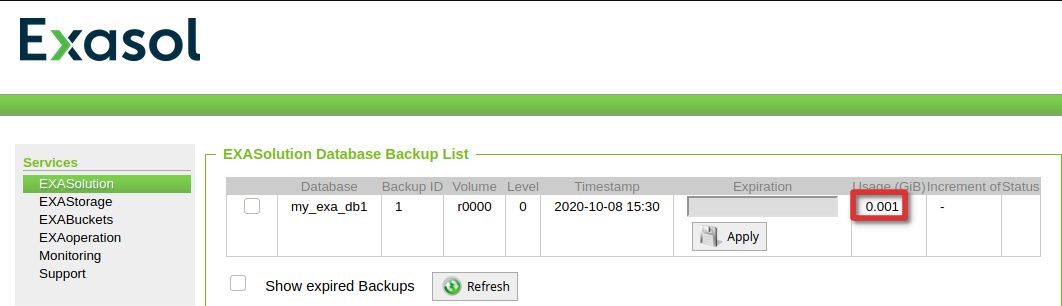
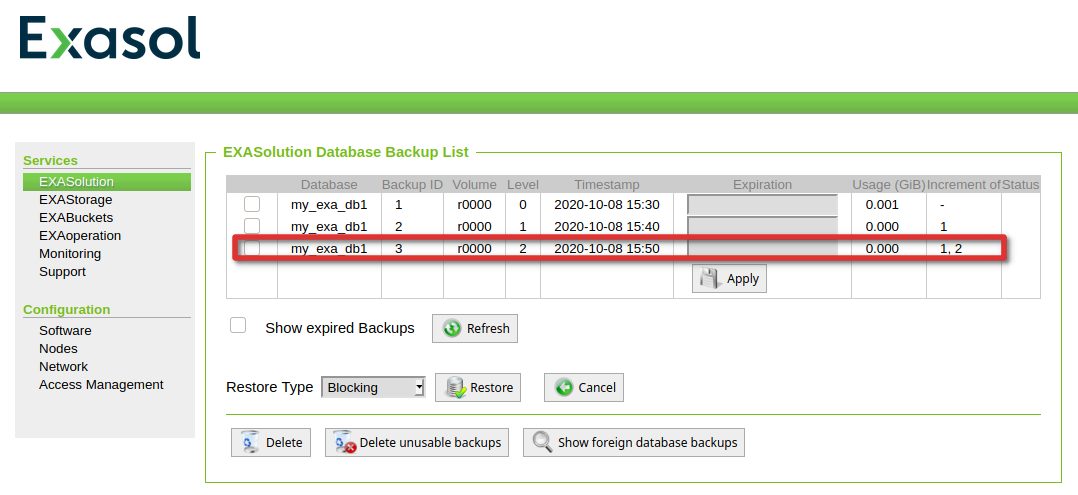
A few minutes after the full backup schedule let’s check if it is there:
Now we add some data so we have changes between the first full and the first incremental backup:
SQL_EXA> select current_timestamp from dual;
EXA: select current_timestamp from dual;

CURRENT_TIMESTAMP
--------------------------
2020-10-08 15:34:03.199000

1 row in resultset.

SQL_EXA> insert into t1 values (-1);
EXA: insert into t1 values (-1);

Rows affected: 1

SQL_EXA> insert into t1 values (-2);
EXA: insert into t1 values (-2);

Rows affected: 1

SQL_EXA> insert into t1 values (-3);
EXA: insert into t1 values (-3);

Rows affected: 1
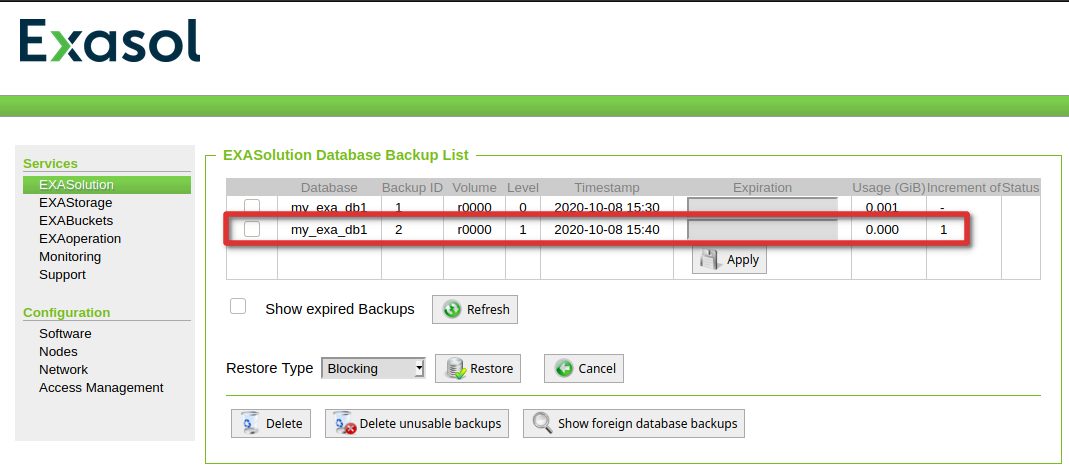
One the first incremental is there:
… again lets add some data and wait for the second incremental to complete:
SQL_EXA> select current_timestamp from dual;
EXA: select current_timestamp from dual;

CURRENT_TIMESTAMP
--------------------------
2020-10-08 15:43:45.369000

1 row in resultset.

SQL_EXA> insert into t1 values (-300);
EXA: insert into t1 values (-300);

Rows affected: 1

SQL_EXA> insert into t1 values (-301);
EXA: insert into t1 values (-301);

Rows affected: 1

SQL_EXA> insert into t1 values (-302);
EXA: insert into t1 values (-302);

Rows affected: 1

SQL_EXA>
Once it is there, we have something to test:
Finally lets add some data again, which is not in any backup:
SQL_EXA> select current_timestamp from dual;
EXA: select current_timestamp from dual;

CURRENT_TIMESTAMP
--------------------------
2020-10-08 15:55:47.749000

1 row in resultset.

SQL_EXA> insert into t1 values (-4001);
EXA: insert into t1 values (-4001);

Rows affected: 1

SQL_EXA> insert into t1 values (-4002);
EXA: insert into t1 values (-4002);

Rows affected: 1

SQL_EXA> insert into t1 values (-4003);
EXA: insert into t1 values (-4003);

Rows affected: 1

SQL_EXA>
Let’s start with the easy case: Restore the full backup. If that work fine we should see this data after the restore:
SQL_EXA> select * from t1;
EXA: select * from t1;

A
---------------------
                    1
                    2
                    3
Before we start the restore, there is another point to mention: Restores can be:
- Non blocking: While the restore is running, users can normally work with the database. If blocks are required for users while the restore is running, these blocks are restored with priority
- Blocking: Users can not work with the database while the restore is running. This is true for all restores that get the data from a remote archive. This is the fastest way to restore.
- Virtual access: Only blocks will be restored that are required by users. Changes will be allowed, but these changes will not be persistent and this method is only available for local archives.
Btw: What was stored in our S3 bucket? Lets have a look. The folder structure that got created is: [DATABASE_NAME]/[BACKUP_ID]/[BACKUP_LEVEL]/[NODE_ID]:
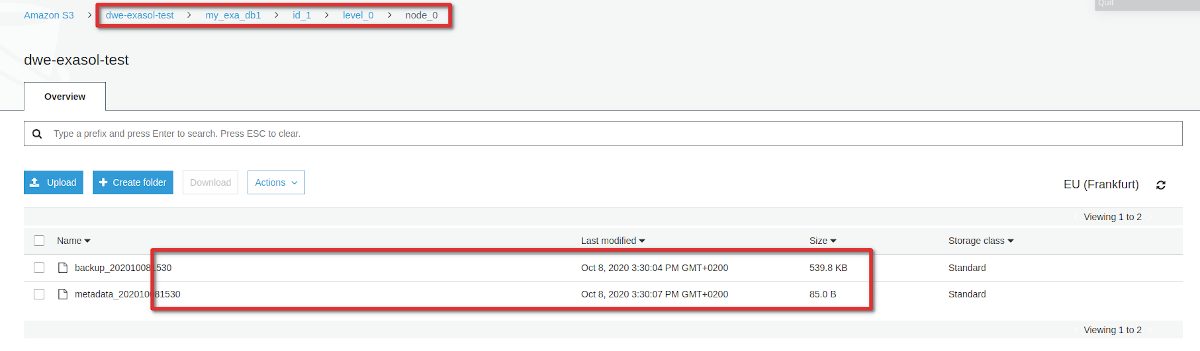
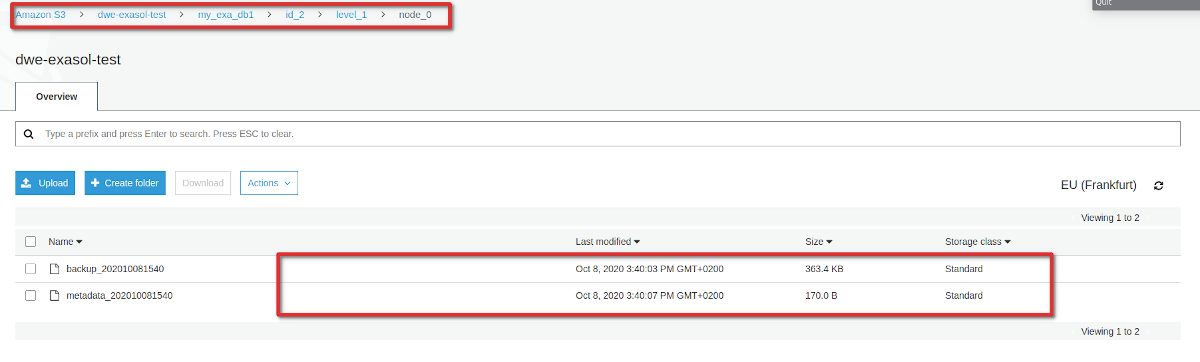
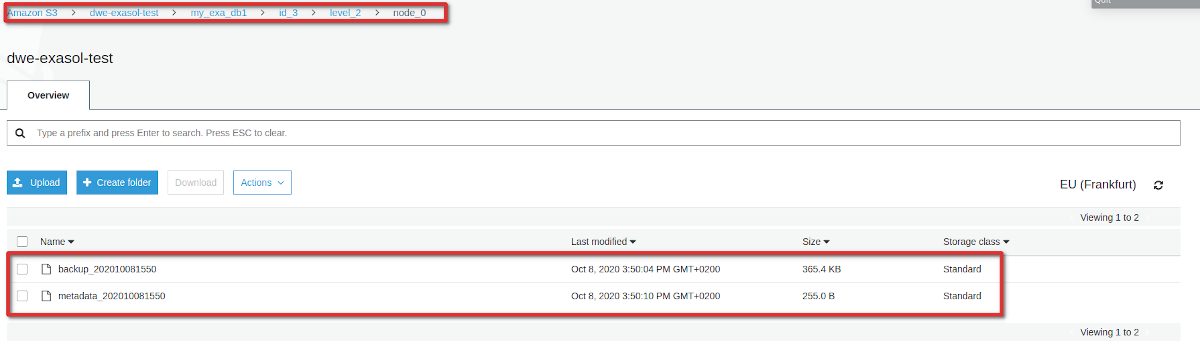
Each of those contains a meta data file and the actual data. In our case they are quite small because we do not have much data. But that also gives us another hint: Even for the full backup this can not be a full backup of the entire database (it is only around 540 kB). It seems only user data and a bit of other stuff really makes it into the backup. Once we do a restore, a new, empty database is created and the user data gets restored.
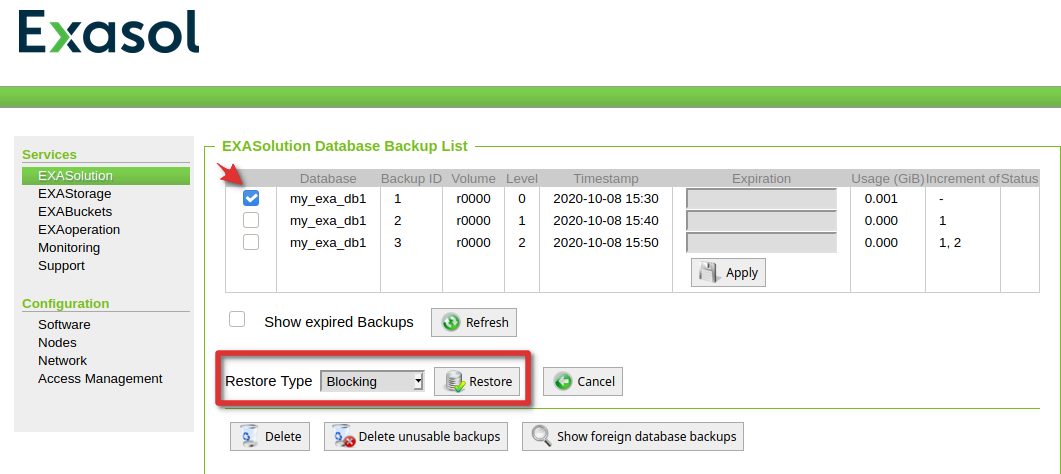
Coming to the real restore. Kicking of a restore is done in the same section as the backup overview. As we are restoring from S3 we can only do a “blocking restore”:
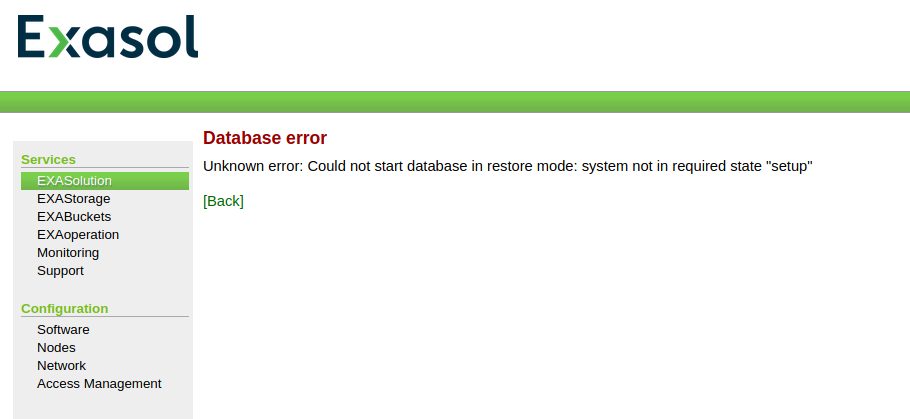
If you try to do that while the database is running you’ll run into this error message:
So we need to shut it down before we attempt to restore:

Kicking of the restore again will automatically start the database:

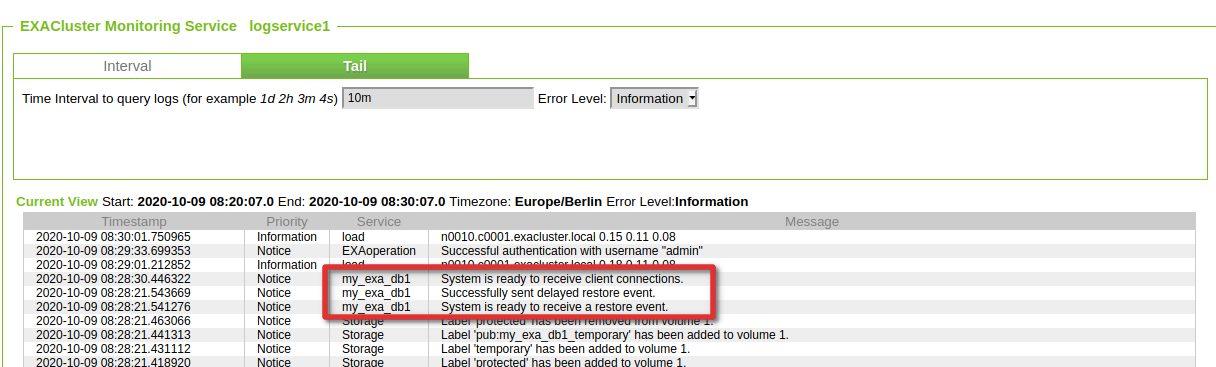
In the monitoring section we can see that the restore was initiated:
Finally checking the result:
dwe@dwe:~/EXAplus-7.0.0$ /home/dwe/EXAplus-7.0.0/exaplus -c 192.168.178.111:8563 -u sys -p exasol
EXAplus 7.0.0 (c) EXASOL AG

Friday, October 9, 2020 at 8:31:22 AM Central European Summer Time
Connected to database my_exa_db1 as user sys.
EXASolution 7.0.2 (c) EXASOL AG

COLUMN   user_name ON
FORMAT   a30
COLUMN   sql_text ON
FORMAT   a30
COLUMN   effective_user ON
FORMAT   a30
COLUMN   limit_value ON
FORMAT   a30
COLUMN   status ON
FORMAT   a15
COLUMN   index_schema ON
FORMAT   a30
COLUMN   index_table ON
FORMAT   a30
COLUMN   index_type ON
FORMAT   a15
COLUMN   column_name ON
FORMAT   a30
COLUMN   column_comment ON
FORMAT   a50
COLUMN   CONSUMER_GROUP_COMMENT ON
FORMAT   a30
COLUMN   SYS_CONSUMER_GROUP ON
FORMAT   a30
COLUMN   CONSUMER_GROUP_NAME ON
FORMAT   a30
SQL_EXA> open schema demo;
EXA: open schema demo;

Rows affected: 0

SQL_EXA> select * from t1;
EXA: select * from t1;

A
---------------------
                    1
                    2
                    3

3 rows in resultset.

SQL_EXA>
That works well and is pretty fast. As this post is alreay quite long we’ll look into the remaining topics in the next post.
![Thumbnail [60x60]](https://www.dbi-services.com/blog/wp-content/uploads/2022/08/DWE_web-min-scaled.jpg)
![Thumbnail [90x90]](https://www.dbi-services.com/blog/wp-content/uploads/2023/01/APY_web-scaled.jpg)
![Thumbnail [90x90]](https://www.dbi-services.com/blog/wp-content/uploads/2022/08/FRJ_web-min-scaled.jpg)