As you want to migrate your database workload to the Azure Cloud, you must test different aspects of the migration. An important factor for an offline migration is to estimate the duration of the migration process, so the service owner can plan for downtime. I want to show some points, you should consider when estimating the downtime. For concrete offline migration process, please check my previous blog
The idea of this blog came up during the testing phase of databases migration at a customer. The DBA told me, he was testing the migration of 2 databases to an Azure SQL Database: a small (2GB) and a large (200 GB) database. I was curious and started asking him about it. I asked him to give me access to the database, so I could take a look at it and maybe give him some information.
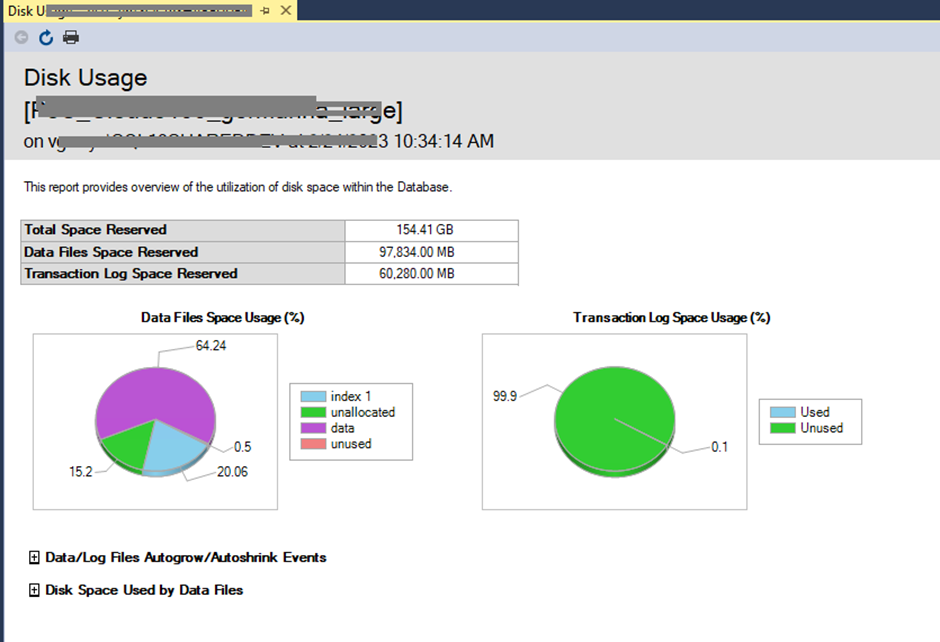
Effective Database Size
He gives me access to the On-Premise MS SQL Instance. First, I check the size of the database. See Screenshot 1. From the screenshot 1 you can notice that the log file is empty. The assumption (migrating 200 GB) about the size of the database is not correct. The Total Space reserved is 155 GB. The Data Files Space reserved less than 100GB, and 15% are unallocated. So, in this case 82 GB of data will be migrated to the Azure SQL Database.
Extracting the file with SqlPackage
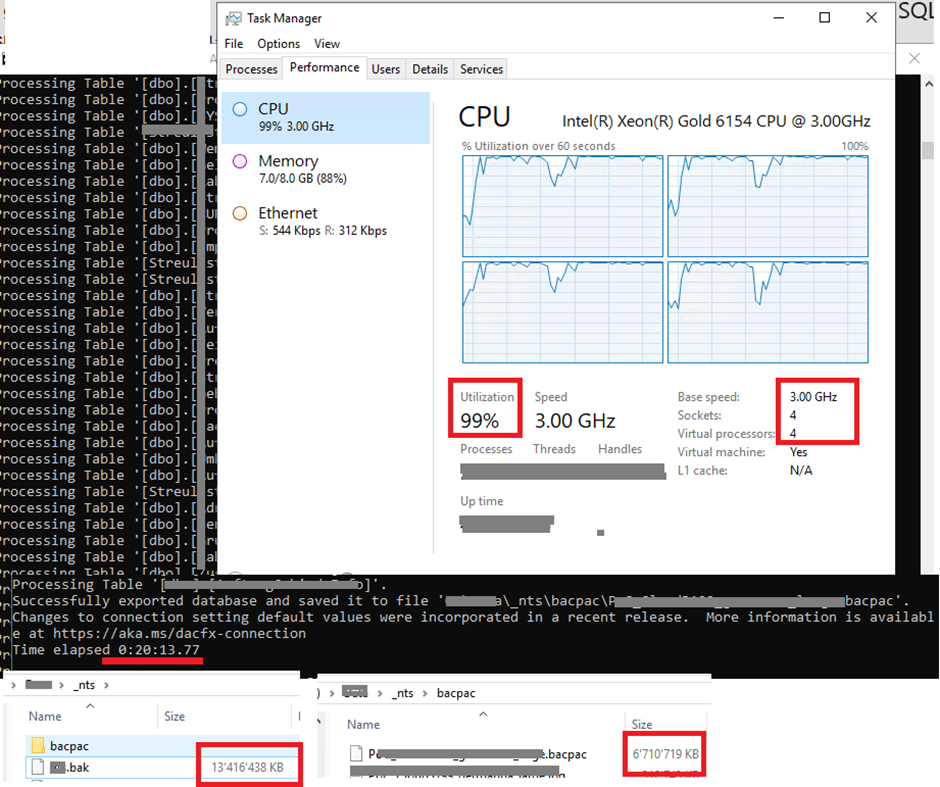
After clarifying the effective among of data, that will be move to the cloud, we decide to estimate the extraction time (T2). As the migration will be done by BACPAC, please check my previous blog. The best way for this estimation, is just to test it on your server. We extract the BACPAC it took 20 minutes on the server. The configuration of the server can be found in the screenshot 2. The result of the BACPAC extraction is only 6.5 GB. For comparison, the Compress-BACKUP file of the same database is about 12.7 GB.
Upload the file to Azure Storage Account
As mentioned before the BACPAC File is only 6.5 GB. This mean, when applying an offline migration, you should not tell your network administrator that a 80 GB (200 GB) Database will be transfer to the network, but only a 6.5 GB BACPAC. So only consider the time you need to transfer the BACPAC file to the Azure Cloud (T3).
The Import to Azure SQL Database
Of course, the import duration (T4) depends to the service tier you choose. Tip: choose a high service tier to make the import fast.
Finally: additional tasks
You should also plan time for additional tasks
- Pre-Migrations task (T1) like e.g., extraction permissions, etc.…
- Post-Migration task (T5) like e.g., restoring permissions, power-on test, etc.…
Conclusion
In this blog I try to show some important aspects to consider, when planning an offline On-Premise MS SQL Database migration to Azure SQL Database using BACPAC.
- Be careful when estimating the size of your data to be migrated.
- Network load: Not the full database will be transfer over the network, but only the compress BACPAC.
- When estimating the Offline Time (migration time), don’t forget extra time e.g., restoring permissions and other small task you must do after the import. Don’t put yourself under pressure. 😉
- The Offline Time is: T1+T2+T3+T4+T5. In my case I estimate the offline time to 2 hours.
- Preparation: Some of the Tasks describe in my previous blog can be done as preparation for the migration. So it is essential to execute them early enough before the migration to optimize the overall offline time
I am not pretending to consider all aspect here. But I hope this will give you an idea of what you need for a successful offline migration.
#besharing, #bemigrating, #beprepare
![Thumbnail [60x60]](https://www.dbi-services.com/blog/wp-content/uploads/2022/12/microsoft-square.png)
![Thumbnail [90x90]](https://www.dbi-services.com/blog/wp-content/uploads/2022/08/STH_web-min-scaled.jpg)
![Thumbnail [90x90]](https://www.dbi-services.com/blog/wp-content/uploads/2022/11/TBR-web-min-scaled.jpg)
![Thumbnail [90x90]](https://www.dbi-services.com/blog/wp-content/uploads/2025/11/LTO_WEB.jpg)
![Thumbnail [90x90]](https://www.dbi-services.com/blog/wp-content/uploads/2023/01/APY_web-scaled.jpg)