Executive Summary
As preparation for migrating his MS SQL workload to the cloud, a customer ask for a disaster recovery solution from an On-Premise MS SQL Instance to an Azure Cloud. The starting point for the disaster recovery will be the existing backup on a shared-disk in the On-Premise environment of the customer. I will export the database as BACPAC and restore to the cloud. Then, the application will be connected to the resulting Azure SQL Database for a full test of the disaster recovery scenario. Testing the application goes beyond the scope of this article. Therefore, will not be part of the article.
Existing Infrastructure
The MS SQL environment for which the disaster recovery solution has to be implemented is a MS SQL 2019 Always On installation. The databases are in compatibility level SQL 2019. The configuration of the VM is not that relevant as we will not migrating from the production machine. At this stage it is important to mention that, it is not a good idea to run the following steps on your production server as the process can be CPU und Memory consuming. Running the process in the PROD will have a direct negative impact on your workload.
Prerequisite
- A non productive VM for exporting the BACPAC
- The SqlPackage utility
- An instance of MS SQL
- dbatools
- Azure Cli
- aZCopy
- An Azure subscription
- An Azure SQL Database
- A storage account
Step 1: Database Restore
As the starting point of the disaster recovery process, we use the MS SQL Backup-File of our production database. The first step is to restore the database to the preinstall MS SQL instance. Use management studio to generate a script similar to listing 1.
-- Listing 1
-- NTS_DR\INST01: MS SQL Instance for Disaster Recovery
-- replace “NTS_xxx” with the value appropriate to your environment
--
USE [master]
RESTORE DATABASE [NTS_TESTDB] FROM DISK = N'NTS_BACKUP_DIR\NTS_TESTDB.BAK' WITH  FILE = 1, MOVE N'NTS_TESTDB' TO N'NTS_DATA_DIR\NTS_TESTDB.mdf',  MOVE N'NTS_TESTDB_log' TO N'NTS_LOG_DIR\NTS_TESTDB_log.ldf',  NOUNLOAD,  STATS = 5
GO
Step 2: Export the database
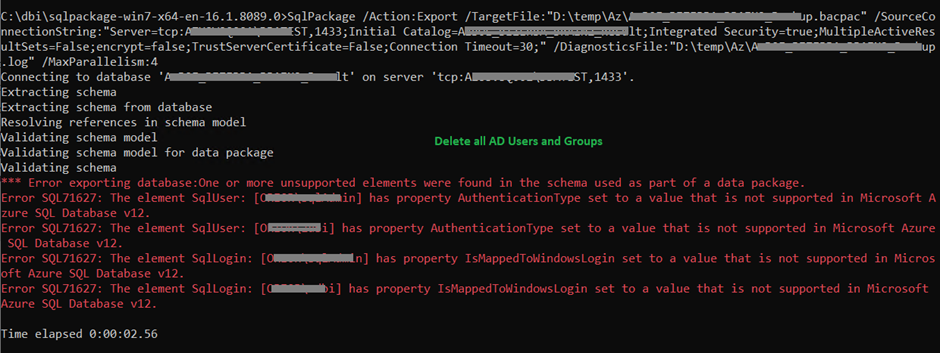
2a. Before you export the database, you should first extract all user permissions from the database. I use dbatools for this export (see listing 2). The resulting T-SQL script can be used later to correct and double check the permissions, in the case something is missing. Basically you should export the user directly from your production workload. Do not forget to remove orphan users. Removing orphan users is a typical and regular dba task.
2b. Then drop all Windows User from the database. (see listing 2).
# Listing 2
# NTS_PROD\INST01: PRODUCTION MS SQL Server Instance
# NTS_DR\INST01: MS SQL Server Instance for Disaster Recovery.
# Powershell
#clean up orphaned user. Should be run as regular task on your database.
Get-DbaDbOrphanUser -SqlInstance NTS_PROD\INST01
Remove-DbaDbOrphanUser -SqlInstance NTS_PROD\INST01

#export user login with permissions
Export-DbaUser -SqlInstance NTS_PROD\INST01 -FilePath C:\temp\NTS_PROD_users.sql

#If your demo DR environment is clean, normally after the restore step, all the user should be orphaned, as the user are not present in the DR MS SQL Instance.
# so clean up all orphaned user from your DR Instance
Remove-DbaDbOrphanUser -SqlInstance NTS_DR\INST01
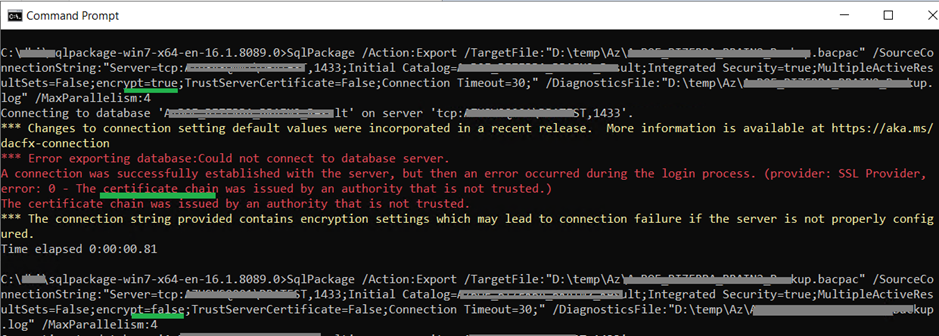
2c. When the database is cleaned from Windows User, the export process can start. (see listing 3). Notice that you can use the parameter /MaxParalelism to start multiple thread and make the export faster. During the export, you will notice high CPU usage. That is the reason why you should not run the process on your production server.
#listing 3
# Create the BACPAC-File
# I share some error message with you in the screenshot.
SqlPackage /Action:Export /TargetFile:"N:\TS\Az\NTS_TESTDB.bacpac" /SourceConnectionString:"Server=tcp:NTS_DR\INST01,1433;Initial Catalog=NTS_TESTDB;Integrated Security=true;MultipleActiveResultSets=False;encrypt=false;TrustServerCertificate=False;Connection Timeout=30;" /DiagnosticsFile:"N:\TS\Az\NTS_TESTDB.log" /MaxParallelism:4
The result of the export will be a BACPAC-File. This file can be uploaded to a storage account to be restored in an Azure SQL Database.
Before moving to the next steps let me share with you some common errors, you can get during the export process.

Step 3: upload to the storage account
You can upload the BACPAC-File in an Azure storage account (see Listing 4). In listing 4, you connect to your azure account and create the necessary infrastructure.
### listing 4
### I test using PowerShell
###

### the following parameter will be needed

$ntsSubscriptionId=""
$ntsLocation = ""
$ntsResourceGroup="nts-bacpac-rg-x1234"
$ntsStorageAC="ntsbacpacx1234"
$ntsStorageContainer="containerx1234"
$ntsStorageACKey=""

### the URI to the BACPAC in the storage account container
$ntsBacpacStorageURI = ""

### login to azure
az login

### Search for your subscription. Just enter a part of the subscriptions name
### just if you need to choose another subscription

$ntsSubscriptionId = az account list --query "[?contains(name,'REPLACE_YOUR_STRING_TO_SEARCH')].{Company:name, TenantId:tenantId,   ID:id}  | [].ID" --output tsv

### check that the subscription is correct
$ntsSubscriptionId

### Search for the location you want to use

$ntsLocation = az account list-locations --query "[?contains(displayName,'Switzerland N')].{DisplayName:displayName, Name:name} | [].Name " --output tsv

### check that the location is correct
$ntsLocation


###
echo "Creating $ntsResourceGroup in $ntsLocation..."
az group create --name $ntsResourceGroup --location $ntsLocation

### maybe you want to check if your name is already in use....
# az storage account check-name --name $ntsStorageAC

echo "Creating $ntsStorageAC..."
az storage account create --name $ntsStorageAC --resource-group $ntsResourceGroup --location "$ntsLocation" --sku Standard_LRS

### get the storage account key
$ntsStorageACKey = az storage account keys list --account-name $ntsStorageAC --resource-group $ntsResourceGroup  --query [0].value -o tsv

### check the key
$ntsStorageACKey

### create the storage container
az storage container create --name $ntsStorageContainer --account-key $ntsStorageACKey --account-name $ntsStorageAC
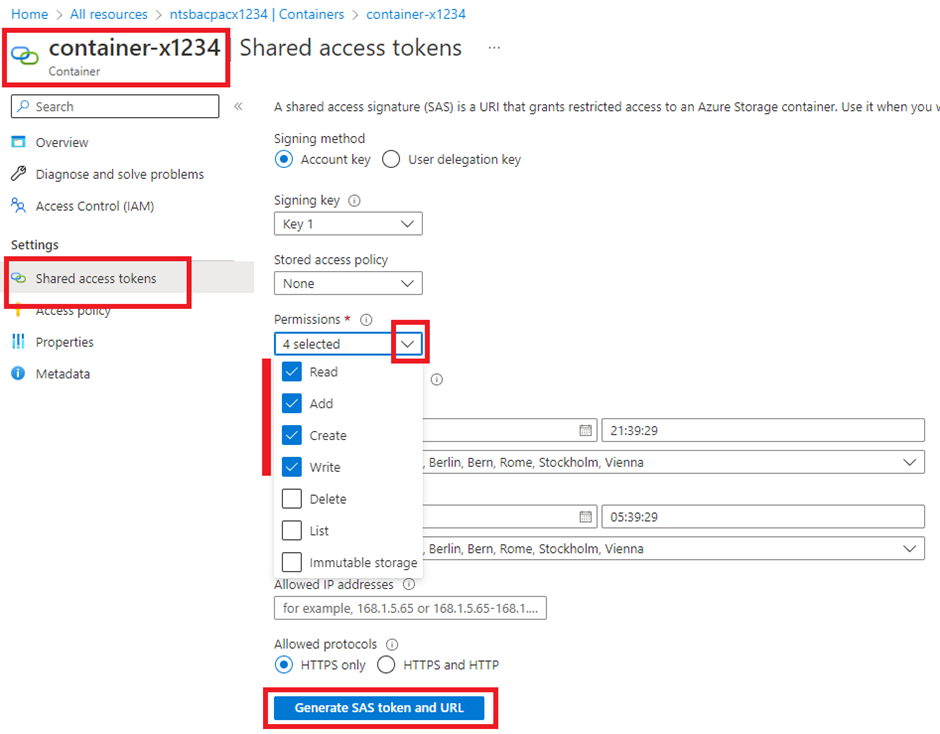
After creating the storage container, you can upload the BACPAC-file to Azure. You can do it manually in the portal or how you like. I use aZCopy (see listing 5 ). For that, I create a shared access signature (SAS) in the azure portal. See screenshot 4.

# listing 5
# azcopy run in Powershell
# include all the information/credential to acces the container
# This Connection String can be get from see screenshot
$ntsBacpacDestination = "FULL_SAS_URI_GET_THE_VALUE_FROM_THE_PORTAL"

$ntsBacpacSource = " N:\TS\Az\NTS_TESTDB.bacpac"
# go to azcopy.exe dir
#cd C:\dbi\azcopy
.\azcopy.exe copy $ntsBacpacSource $ntsBacpacDestination  --recursive=false
Step 4: Import the BACPAC to Azure SQL Database
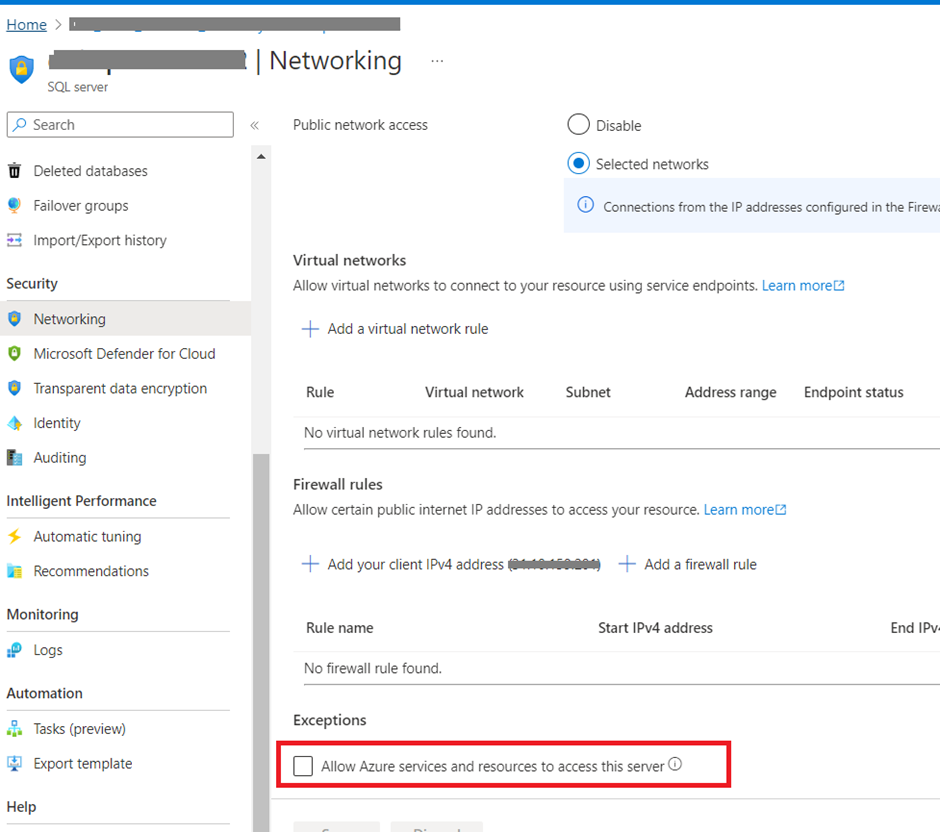
In this step, the BACPAC will be imported in an Azure SQL Database. It is recommended to choose a High Service Tier during the import process. This can speed up the import process. When the migration/import is finished, it is recommended to resize your Azure SQL Database. Resize it to the appropriate service tier for your workload. The full import process is described in listing 6. In listing 6, the necessary infrastructure will be provisioned and configured. You must activate the checkbox in screenshot 5. This allows azure services to access your newly created Azure SQL Database.
### Listing 6

###
### I can start some preparation for the azure sql database
### Check which service-objective are available in the selected region
az sql db list-editions -a -o table -l $ntsLocation

$ntsServer = "ntssqlserverx1234"
$ntsAdminuser = "ntsadminsql"
$ntsAdminuserpassword = "NTSp@ssw0rd"

az sql server create -l $ntsLocation -g $ntsResourceGroup  -n $ntsServer -u $ntsAdminuser -p $ntsAdminuserpassword

### please change the name to what you prefere
$ntsEmptyDB = "NTSDBTOIMPORT"
### Very Important: You should use for the import a high service-objective to make the import performant.
### After the import you can scale down the service-objective to the one you need
az sql db create -g $ntsResourceGroup -s $ntsServer -n $ntsEmptyDB --service-objective S9

### you can also get this information from the azure portal.
$ntsBacpacStorageURI = "https://ntsbacpacx1234.blob.core.windows.net/container-x1234/NTS_TESTDB.bacpac"
### create the database skeleton if not already exist
#az sql db create -g $ntsResourceGroup -s $ntsServer -n $ntsEmptyDB --service-objective S9

### !!! IMPORTANT!!! DO NOT FORGET TO ENABLE "azure service access"  >>> screenshot 5
az sql db import -s $ntsServer -n $ntsEmptyDB -g $ntsResourceGroup -p $ntsAdminuserpassword -u $ntsAdminUser  --storage-key-type StorageAccessKey --storage-uri $ntsBacpacStorageURI 	--storage-key $ntsStorageACKey
Final considerations
When the import process is finished, it is important to resize the Azure SQL Database to the appropriate service tier for your workload. It is also recommended to move the BACPAC-File in the storage account to a different access tier to safe money. The steps are showed in listing 7.
### Listing 7
###
### Final step
### you should scale the service-objective to the appropriate one
az sql db update -g $ntsResourceGroup -s $ntsServer -n $ntsEmptyDB --service-objective S1

# move to Cool access tier
$ntsBlobname =  '/NTS_TESTDB.bacpac'
az storage blob set-tier --account-name $ntsStorageAC --container-name  $ntsStorageContainer  --name  $ntsBlobname  --tier Cool  --account-key $ntsStorageACKey
Your database is now available as Azure SQL database. You should apply the extracted users permissions and additional steps if necessary.
Conclusion
In this blog I show you how to offline migrate an On-Premise MS SQL Database to an Azure SQL Database as part of a disaster recovery solution. Give you some important tips to make your migration quick and smooth.
#besharing, #bemigrating
![Thumbnail [60x60]](https://www.dbi-services.com/blog/wp-content/uploads/2022/12/microsoft-square.png)
![Thumbnail [90x90]](https://www.dbi-services.com/blog/wp-content/uploads/2023/01/APY_web-scaled.jpg)
![Thumbnail [90x90]](https://www.dbi-services.com/blog/wp-content/uploads/2022/08/FRJ_web-min-scaled.jpg)