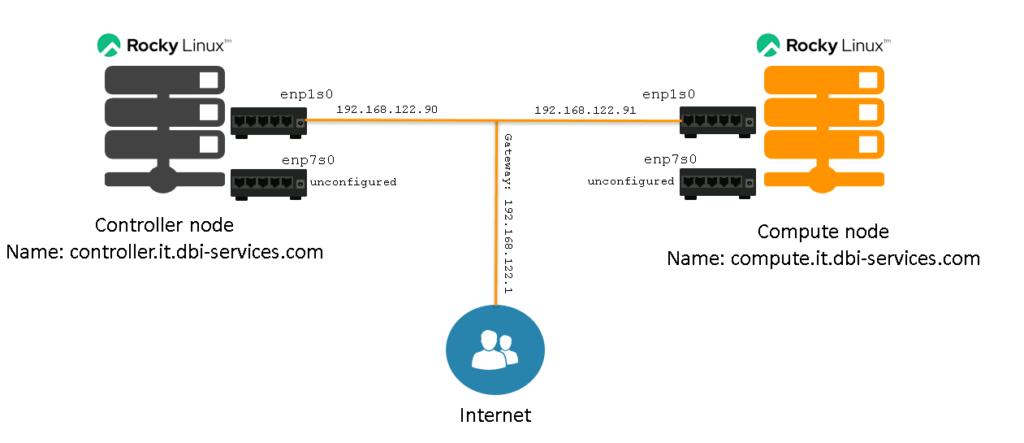
In the introduction post we’ve briefly looked at some options you have available when you want to build your own private cloud. In this post we’re going to start our journey into OpenStack by preparing the two nodes we’re going to use for this setup: The controller node, and one compute node. Maybe you remember from the last post, this is our starting point:

A minimal installation of Rocky Linux 9 is straight forward, so we’re not going to look into this. Once both machines are installed it should look more or less like this (I am using KVM and virt-manager in my setup which auto assigns IP addresses by default):
###### CONTROLLER NODE
[root@controller ~]$ ip a
1: lo: <LOOPBACK,UP,LOWER_UP> mtu 65536 qdisc noqueue state UNKNOWN group default qlen 1000
    link/loopback 00:00:00:00:00:00 brd 00:00:00:00:00:00
    inet 127.0.0.1/8 scope host lo
       valid_lft forever preferred_lft forever
    inet6 ::1/128 scope host
       valid_lft forever preferred_lft forever
2: enp1s0: <BROADCAST,MULTICAST,UP,LOWER_UP> mtu 1500 qdisc fq_codel state UP group default qlen 1000
    link/ether 52:54:00:38:00:73 brd ff:ff:ff:ff:ff:ff
    inet 192.168.122.19/24 brd 192.168.122.255 scope global dynamic noprefixroute enp1s0
       valid_lft 3565sec preferred_lft 3565sec
    inet6 fe80::5054:ff:fe38:73/64 scope link noprefixroute
       valid_lft forever preferred_lft forever
3: enp7s0: <BROADCAST,MULTICAST,UP,LOWER_UP> mtu 1500 qdisc fq_codel state UP group default qlen 1000
    link/ether 52:54:00:81:1d:26 brd ff:ff:ff:ff:ff:ff
    inet 10.0.0.233/24 brd 10.0.0.255 scope global dynamic noprefixroute enp7s0
       valid_lft 3565sec preferred_lft 3565sec
    inet6 fe80::9f14:4737:4cf7:d88f/64 scope link noprefixroute
       valid_lft forever preferred_lft forever

###### COMPUTE NODE
[root@compute ~]$ ip a
1: lo: <LOOPBACK,UP,LOWER_UP> mtu 65536 qdisc noqueue state UNKNOWN group default qlen 1000
    link/loopback 00:00:00:00:00:00 brd 00:00:00:00:00:00
    inet 127.0.0.1/8 scope host lo
       valid_lft forever preferred_lft forever
    inet6 ::1/128 scope host
       valid_lft forever preferred_lft forever
2: enp1s0: <BROADCAST,MULTICAST,UP,LOWER_UP> mtu 1500 qdisc fq_codel state UP group default qlen 1000
    link/ether 52:54:00:b8:8e:c0 brd ff:ff:ff:ff:ff:ff
    inet 192.168.122.138/24 brd 192.168.122.255 scope global dynamic noprefixroute enp1s0
       valid_lft 3376sec preferred_lft 3376sec
    inet6 fe80::5054:ff:feb8:8ec0/64 scope link noprefixroute
       valid_lft forever preferred_lft forever
3: enp7s0: <BROADCAST,MULTICAST,UP,LOWER_UP> mtu 1500 qdisc fq_codel state UP group default qlen 1000
    link/ether 52:54:00:7c:27:a4 brd ff:ff:ff:ff:ff:ff
    inet 10.0.0.254/24 brd 10.0.0.255 scope global dynamic noprefixroute enp7s0
       valid_lft 3378sec preferred_lft 3378sec
    inet6 fe80::7981:d103:c103:2804/64 scope link noprefixroute
       valid_lft forever preferred_lft forever
As you can see, there are two networks. The configuration for both is:
This is the reason, both interfaces already got IP addresses. In an OpenStack setup, you don’t want to have this and should go for a static configuration of the nodes. While the first interface on the nodes must be configured and must be able to reach the internet, the second interface should not connect to any network be default. To achieve this, a manual configuration of the interfaces is required. Here are the steps to do that on the controller node:
[root@controller ~]$ nmcli con show
NAME                UUID                                  TYPE      DEVICE
enp1s0              5ef7a54f-8219-3287-8030-572251acfb7e  ethernet  enp1s0
Wired connection 1  733abc24-3c2d-3e17-a37e-8ae1e19d58a5  ethernet  enp7s0
lo                  bf801f94-99ea-40d9-b7c4-dc89930a42f5  loopback  lo
[root@controller ~]$ nmcli con mod "enp1s0" \
  ipv4.addresses "192.168.122.90/24" \
  ipv4.gateway "192.168.122.1" \
  ipv4.dns "192.168.122.1,8.8.8.8" \
  ipv4.dns-search "it.dbi-services.com" \
  ipv4.method "manual"
[root@controller ~]$ nmcli con down enp1s0
[root@controller ~]$ nmcli up down enp1s0
[root@controller ~]$ ip a
1: lo: <LOOPBACK,UP,LOWER_UP> mtu 65536 qdisc noqueue state UNKNOWN group default qlen 1000
    link/loopback 00:00:00:00:00:00 brd 00:00:00:00:00:00
    inet 127.0.0.1/8 scope host lo
       valid_lft forever preferred_lft forever
    inet6 ::1/128 scope host
       valid_lft forever preferred_lft forever
2: enp1s0: <BROADCAST,MULTICAST,UP,LOWER_UP> mtu 1500 qdisc fq_codel state UP group default qlen 1000
    link/ether 52:54:00:38:00:73 brd ff:ff:ff:ff:ff:ff
    inet 192.168.122.90/24 brd 192.168.122.255 scope global noprefixroute enp1s0
       valid_lft forever preferred_lft forever
    inet6 fe80::5054:ff:fe38:73/64 scope link noprefixroute
       valid_lft forever preferred_lft forever
3: enp7s0: <BROADCAST,MULTICAST,UP,LOWER_UP> mtu 1500 qdisc fq_codel state UP group default qlen 1000
    link/ether 52:54:00:81:1d:26 brd ff:ff:ff:ff:ff:ff
    inet 10.0.0.233/24 brd 10.0.0.255 scope global dynamic noprefixroute enp7s0
       valid_lft 2753sec preferred_lft 2753sec
    inet6 fe80::9f14:4737:4cf7:d88f/64 scope link noprefixroute
       valid_lft forever preferred_lft forever

[root@controller ~]$ nmcli conn modify "Wired connection 1" con-name "enp7s0"
[root@controller ~]$ nmcli conn show
NAME    UUID                                  TYPE      DEVICE
enp7s0  733abc24-3c2d-3e17-a37e-8ae1e19d58a5  ethernet  enp7s0
enp1s0  5ef7a54f-8219-3287-8030-572251acfb7e  ethernet  enp1s0
lo      bf801f94-99ea-40d9-b7c4-dc89930a42f5  loopback  lo

[root@controller ~]$ nmcli con modify enp7s0 +ipv4.routes "10.0.0.0/24 10.0.10.1" ipv4.method "manual"
[root@controller ~]$ nmcli con down enp7s0
[root@controller ~]$ nmcli con up enp7s0
[root@controller ~]$ ip a
1: lo: <LOOPBACK,UP,LOWER_UP> mtu 65536 qdisc noqueue state UNKNOWN group default qlen 1000
    link/loopback 00:00:00:00:00:00 brd 00:00:00:00:00:00
    inet 127.0.0.1/8 scope host lo
       valid_lft forever preferred_lft forever
    inet6 ::1/128 scope host
       valid_lft forever preferred_lft forever
2: enp1s0: <BROADCAST,MULTICAST,UP,LOWER_UP> mtu 1500 qdisc fq_codel state UP group default qlen 1000
    link/ether 52:54:00:38:00:73 brd ff:ff:ff:ff:ff:ff
    inet 192.168.122.90/24 brd 192.168.122.255 scope global noprefixroute enp1s0
       valid_lft forever preferred_lft forever
    inet6 fe80::5054:ff:fe38:73/64 scope link noprefixroute
       valid_lft forever preferred_lft forever
3: enp7s0: <BROADCAST,MULTICAST,UP,LOWER_UP> mtu 1500 qdisc fq_codel state UP group default qlen 1000
    link/ether 52:54:00:81:1d:26 brd ff:ff:ff:ff:ff:ff
    inet6 fe80::9f14:4737:4cf7:d88f/64 scope link noprefixroute
       valid_lft forever preferred_lft forever
The explanation of what happened: We’ve configured the first interface (enp1s0) to use a static configuration, providing the IP address, the gateway and the DNS servers we want to use. To activate the settings, we took that connection down and up again (depending on how you are connected at this step, you might lose your connection, so be careful). We’ve then renamed the second connection from “Wired connection 1” to use the name of the second interface to be consistent with the first connection. Finally we switched the “enp7s0” connection from an automatically assigned to statically assigned configuration, but we did not specify an IP address.
Once you followed the same steps for the compute node (using another IP address for the enp1s0 interface, of course), you should have something like this:
[root@compute ~]$ ip a
1: lo: <LOOPBACK,UP,LOWER_UP> mtu 65536 qdisc noqueue state UNKNOWN group default qlen 1000
    link/loopback 00:00:00:00:00:00 brd 00:00:00:00:00:00
    inet 127.0.0.1/8 scope host lo
       valid_lft forever preferred_lft forever
    inet6 ::1/128 scope host
       valid_lft forever preferred_lft forever
2: enp1s0: <BROADCAST,MULTICAST,UP,LOWER_UP> mtu 1500 qdisc fq_codel state UP group default qlen 1000
    link/ether 52:54:00:b8:8e:c0 brd ff:ff:ff:ff:ff:ff
    inet 192.168.122.91/24 brd 192.168.122.255 scope global noprefixroute enp1s0
       valid_lft forever preferred_lft forever
    inet6 fe80::5054:ff:feb8:8ec0/64 scope link noprefixroute
       valid_lft forever preferred_lft forever
3: enp7s0: <BROADCAST,MULTICAST,UP,LOWER_UP> mtu 1500 qdisc fq_codel state UP group default qlen 1000
    link/ether 52:54:00:7c:27:a4 brd ff:ff:ff:ff:ff:ff
    inet6 fe80::7981:d103:c103:2804/64 scope link noprefixroute
       valid_lft forever preferred_lft forever
So, now we are exactly here:
Btw: If you are still used to find your network interface configuration under “/etc/sysconfig/network-scripts/” on Red Hat based distributions you’ll be surprised, there isn’t anything anymore:
[root@controller ~]$ ls /etc/sysconfig/network-scripts/
readme-ifcfg-rh.txt
Configurations for NetworkManager are here:
[root@controller ~]$ ls -la /etc/NetworkManager/system-connections/
total 8
drwxr-xr-x. 2 root root  60 Jan 16 14:15 .
drwxr-xr-x. 7 root root 134 Jan 16 13:43 ..
-rw-------. 1 root root 331 Jan 16 14:02 enp1s0.nmconnection
-rw-------. 1 root root 262 Jan 16 14:15 enp7s0.nmconnection
These are still plain text files, but in INI format:
[root@controller ~]$ cat /etc/NetworkManager/system-connections/enp1s0.nmconnection
[connection]
id=enp1s0
uuid=5ef7a54f-8219-3287-8030-572251acfb7e
type=ethernet
autoconnect-priority=-999
interface-name=enp1s0
timestamp=1737031847

[ethernet]

[ipv4]
address1=192.168.122.90/24,192.168.122.1
dns=192.168.122.1;8.8.8.8;
dns-search=it.dbi-services.com;
method=manual

[ipv6]
addr-gen-mode=eui64
method=auto

[proxy]
Another requirement before we can start to deploy OpenStack services is name resolution. In this demo setup we’re just using the hosts file for this as we do not have a DNS service available. This looks the same for both nodes:
[root@controller ~]$ cat /etc/hosts
127.0.0.1   localhost localhost.localdomain localhost4 localhost4.localdomain4
::1         localhost localhost.localdomain localhost6 localhost6.localdomain6

192.168.122.90 controller controller.it.dbi-services.com
192.168.122.91 compute compute.it.dbi-services.com

[root@controller ~]$ ping -c1 controller
PING controller (192.168.122.90) 56(84) bytes of data.
64 bytes from controller (192.168.122.90): icmp_seq=1 ttl=64 time=0.061 ms

--- controller ping statistics ---
1 packets transmitted, 1 received, 0% packet loss, time 0ms
rtt min/avg/max/mdev = 0.061/0.061/0.061/0.000 ms
[root@controller ~]$ ping -c1 compute
PING compute (192.168.122.91) 56(84) bytes of data.
64 bytes from compute (192.168.122.91): icmp_seq=1 ttl=64 time=1.05 ms

--- compute ping statistics ---
1 packets transmitted, 1 received, 0% packet loss, time 0ms
rtt min/avg/max/mdev = 1.049/1.049/1.049/0.000 ms
Time synchronization is another bit to get right. What we do here is to let the controller node synchronize the time from the internet and let the compute node synchronize its time from the controller node. To configure the controller node to synchronize from the internet there is nothing to do, but we need to allow other nodes in the same subnet to synchronize from the controller node:
# keep everything as it is, but allow nodes from the same subnet to synchronize from this node
[root@controller ~]$ grep allow /etc/chrony.conf
allow 192.168.122.0/24
[root@controller ~]$ systemctl restart chronyd
Configure the compute node to synchronize from the controller node:
# keep everything as it is, but comment out the pool and specify the controller node as the server
[root@compute ~]$ grep -B 1 -w server /etc/chrony.conf
#pool 2.rocky.pool.ntp.org iburst
server controller iburst
[root@compute ~]$ systemctl restart chronyd
To verify that everything is working as expected, check the chrony sources on the compute node:
[root@compute ~]$ chronyc sources
MS Name/IP address         Stratum Poll Reach LastRx Last sample
===============================================================================
^? controller                    0   7     0     -     +0ns[   +0ns] +/-    0ns
As we will install the OpenStack services from packages later on, we need to make sure that we have the required repositories enabled on both of the nodes:
[root@controller ~]$ dnf config-manager --set-enabled baseos    # should be enabled by default
[root@controller ~]$ dnf config-manager --set-enabled appstream # should be enabled by default
[root@controller ~]$ dnf config-manager --set-enabled crb
Having that ready, we can use the repository provided by the RDO project, to install the OpenStack client:
[root@controller ~]$ dnf install http://trunk.rdoproject.org/rdo_release/rdo-release.el9s.rpm -y
[root@controller ~]$ dnf upgrade -y
[root@controller ~]$ dnf install python3-openstackclient openstack-selinux -y
The final step for preparing the nodes is to install a SQL database engine on the controller node. The reason is, that several OpenStack services require a database to store their configurations (more on that later). There are several supported engines, but we’ll go with PostgreSQL for obvious reasons (just in case you ask yourself why this is obvious, check this blog for PostgreSQL related blog posts 🙂 ). In a production setup you wouldn’t install the database on the controller node, but externalize it, make it high available and put in place proper backup and restore processes. For the scope of this blog series, we don’t care and will go with an unprotected single instance of PostgreSQL.
Red Hat Enterprise Linux 9 based distributions come with a packaged version of PostgreSQL by default:
[root@controller ~]$ dnf search postgresql-server
Last metadata expiration check: 0:05:54 ago on Thu 16 Jan 2025 03:18:44 PM CET.
========================================= Name Exactly Matched: postgresql-server ==========================================
postgresql-server.x86_64 : The programs needed to create and run a PostgreSQL server
============================================= Name Matched: postgresql-server ==============================================
postgresql-server-devel.x86_64 : PostgreSQL development header files and libraries
Please do not use this one, as this is PostgreSQL 13 which will go out of support this November:
[root@controller ~]$ dnf info postgresql-server | grep Version
Version      : 13.18
If you want to go for a packaged version from Red Hat, at least use the latest one you can find in the AppStream repository:
[root@controller ~]$ dnf module list
Last metadata expiration check: 0:08:44 ago on Thu 16 Jan 2025 03:18:44 PM CET.
Rocky Linux 9 - AppStream
Name        Stream Profiles                              Summary
mariadb     10.11  client, galera, server [d]            MariaDB Module
maven       3.8    common [d]                            Java project management and project comprehension tool
nginx       1.22   common [d]                            nginx webserver
nginx       1.24   common [d]                            nginx webserver
nodejs      18     common [d], development, minimal, s2i Javascript runtime
nodejs      20     common [d], development, minimal, s2i Javascript runtime
nodejs      22     common [d], development, minimal, s2i Javascript runtime
php         8.1    common [d], devel, minimal            PHP scripting language
php         8.2    common [d], devel, minimal            PHP scripting language
postgresql  15     client, server [d]                    PostgreSQL server and client module
postgresql  16     client, server [d]                    PostgreSQL server and client module
redis       7      common [d]                            Redis persistent key-value database
ruby        3.1    common [d]                            An interpreter of object-oriented scripting language
ruby        3.3    common [d]                            An interpreter of object-oriented scripting language

Rocky Linux 9 - CRB
Name        Stream Profiles                              Summary
swig        4.1    common [d], complete                  Connects C/C++/Objective C to some high-level programming languages

Hint: [d]efault, [e]nabled, [x]disabled, [i]nstalled
In this case, please go with version 16:
[root@controller ~]$ dnf module enable postgresql:16 -y
[root@controller ~]$ dnf install postgresql-server -y
An even better approach is to install PostgreSQL from the community provided repositories.
Before the OpenStack services can use PostgreSQL, there needs to be a running instance, so lets create this:
[root@controller ~]$ /usr/bin/postgresql-setup --initdb
 * Initializing database in '/var/lib/pgsql/data'
 * Initialized, logs are in /var/lib/pgsql/initdb_postgresql.log
[root@controller ~]$ systemctl enable postgresql
[root@controller ~]$ systemctl start postgresql
[root@controller ~]$ su - postgres -c "psql -c 'select version()'"
                                                   version
--------------------------------------------------------------------------------------------------------------
 PostgreSQL 16.6 on x86_64-redhat-linux-gnu, compiled by gcc (GCC) 11.5.0 20240719 (Red Hat 11.5.0-2), 64-bit
(1 row)
The Red Hat package configures PostgreSQL for “ident” authentication by default:
[root@controller ~]$ cat /var/lib/pgsql/data/pg_hba.conf | egrep -v "^#|^$"
local   all             all                                     peer
host    all             all             127.0.0.1/32            ident
host    all             all             ::1/128                 ident
local   replication     all                                     peer
host    replication     all             127.0.0.1/32            ident
host    replication     all             ::1/128                 ident
This is probably not what you want, so lets switch this to “scram-sha-256” and in addition we want to allow connections from the same subnet:
[root@controller ~]$ sed -i 's/ident/scram-sha-256/g' /var/lib/pgsql/data/pg_hba.conf
[root@controller ~]$ echo "host    all             all             192.168.122.0/24           scram-sha-256" >> /var/lib/pgsql/data/pg_hba.conf
[root@controller ~]$ systemctl reload postgresql
[root@controller ~]# su - postgres -c "psql -c 'select * from pg_hba_file_rules'"
 rule_number |            file_name            | line_number | type  |   database    | user_name |    address    |                 netmask                 |  auth_method  | options | error
-------------+---------------------------------+-------------+-------+---------------+-----------+---------------+-----------------------------------------+---------------+---------+-------
           1 | /var/lib/pgsql/data/pg_hba.conf |         113 | local | {all}         | {all}     |               |                                         | peer          |         |
           2 | /var/lib/pgsql/data/pg_hba.conf |         115 | host  | {all}         | {all}     | 127.0.0.1     | 255.255.255.255                         | scram-sha-256 |         |
           3 | /var/lib/pgsql/data/pg_hba.conf |         117 | host  | {all}         | {all}     | ::1           | ffff:ffff:ffff:ffff:ffff:ffff:ffff:ffff | scram-sha-256 |         |
           4 | /var/lib/pgsql/data/pg_hba.conf |         120 | local | {replication} | {all}     |               |                                         | peer          |         |
           5 | /var/lib/pgsql/data/pg_hba.conf |         121 | host  | {replication} | {all}     | 127.0.0.1     | 255.255.255.255                         | scram-sha-256 |         |
           6 | /var/lib/pgsql/data/pg_hba.conf |         122 | host  | {replication} | {all}     | ::1           | ffff:ffff:ffff:ffff:ffff:ffff:ffff:ffff | scram-sha-256 |         |
           7 | /var/lib/pgsql/data/pg_hba.conf |         123 | host  | {all}         | {all}     | 192.168.122.0 | 255.255.255.0                           | scram-sha-256 |         |
Finally, we want PostgreSQL to listen for external connections, not only on localhost:
[root@controller ~]$ su - postgres -c "psql -c '\dconfig *listen*'"
List of configuration parameters
    Parameter     |   Value
------------------+-----------
 listen_addresses | localhost
(1 row)
[root@controller ~]$ echo "listen_addresses='*'" >> /var/lib/pgsql/data/postgresql.auto.conf
[root@controller ~]$ systemctl restart postgresql
[root@controller ~]$ su - postgres -c "psql -c '\dconfig *listen*'"
List of configuration parameters
    Parameter     | Value
------------------+-------
 listen_addresses | *
(1 row)
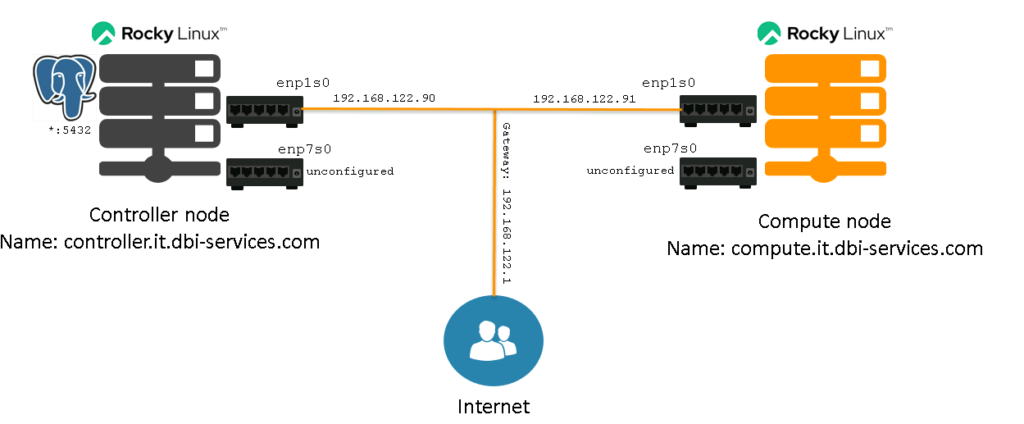
That’s it for the preparation of the hosts and leaves us with the following setup:
![Thumbnail [60x60]](https://www.dbi-services.com/blog/wp-content/uploads/2022/08/DWE_web-min-scaled.jpg)
![Thumbnail [90x90]](https://www.dbi-services.com/blog/wp-content/uploads/2022/08/FRJ_web-min-scaled.jpg)
![Thumbnail [90x90]](https://www.dbi-services.com/blog/wp-content/uploads/2022/08/GRE_web-min-scaled.jpg)
![Thumbnail [90x90]](https://www.dbi-services.com/blog/wp-content/uploads/2023/01/APY_web-scaled.jpg)
![Thumbnail [90x90]](https://www.dbi-services.com/blog/wp-content/uploads/2025/03/OBA_web-scaled.jpg)