While public clouds are a trend since several years now, some companies are also looking into self hosted solutions to build a private cloud. Some do this because of costs, others do this because they don’t want to be dependent on one ore multiple public cloud providers, others do it because they want to keep their data locally. There are several solutions to this and depending on the requirements those might or might not be an option. Some of the more popular ones are:
- VMware: Obviously, one of the long term players and well known but sold to Broadcom, which not everybody is happy with
- Proxmox: A complete open source virtualization solution based on Debian and KVM, can also deploy containerized workloads based on LXC.
- Nutanix: A hyper converged platform that comes with its own hypervisor, the Acropolis Hypervisor (AHV).
- Red Hat Virtualization: Red Hat’s solution for virtualized infrastructures, but this product is in maintenance mode and Red Hat fully goes for Red Hat OpenShift Virtualization nowadays.
- Harvester: A complete open source hyper converged infrastructure solution. SUSE comes with a commercial offering for this, which is called SUSE virtualization.
- … and many others
The other major player which is not in the list above is OpenStack, which started in 2010 already. OpenStack is not a single product, but more a set of products combined together to provide a computing platform to deploy your workloads on top of either virtual machines, or containers, or a mix of both. There are plenty of sub projects which bring in additional functionality, check here for a list. The project itself is hosted and supported by the OpenInfra Foundation, which should give sufficient trust that it will stay as a pure open source project (maybe have a look at the OpenInfra supporting organizations as well, to get an idea of how widely it is adopted and supported).
The main issue with OpenStack is, that it is kind of hard to start with. There are so many services you might want to use that you probably get overwhelmed at the beginning of your journey. To help you a bit out of this, we’ll create a minimal, quick and dirty OpenStack setup on virtual machines with just the core services:
- Keystone: Identity service
- Glance: Image service
- Placement: Placement service
- Nova: Compute service
- Neutron: Network service
- Horizon: The OpenStack dashboard
We’ll do that step by step, because we believe that you should know the components which finally make up the OpenStack platform, or any other stack you’re planning to deploy. There is also DevStack which is a set of scripts for the same purpose, but as it is scripted you’ll probably not gain the same knowledge than by doing it manually. There is OpensStack-helm in addition, which deploys OpenStack on top of Kubernetes, but this as well is out of cope for this series of blog posts. Canonical offers MicroStack, which also can be used to setup a test environment quickly.
Automation is great and necessary, but it also comes with a potential downside: The more you automate, the more people you’ll potentially have who don’t know what is happening in the background. This is usually fine as long as the people with the background knowledge stay in the company, but if they leave you might have an issue.
As there are quite some steps to follow, this will not be single blog post, but split into parts:
- Introduction (this blog post)
- Preparing the controller and the compute node
- Setting up and configuring Keystone
- Setting up and configuring Glance and the Placement service
- Setting up and configuring Nova
- Setting up and configuring Neutron
- Setting up and configuring Horizon, the Openstack dashboard
In the most easy configuration, the OpenStack platform consists of two nodes: A controller node, and at least one compute node. Both of them will require two network interfaces, one for the so-called management network (as the name implies, this is for the management of the stack and communication with the internet), and the other one for the so-called provider network (this is the internal network e.g. the virtualized machines will be using to communicate with each other).
When it comes to your choice of the Linux distribution you want to deploy OpenStack on, this is merely a matter of taste. OpenStack can be deployed on many distributions, the official documentation comes with instructions for Red Hat based distributions (which usually includes Alma Linux, Rocky Linux and Oracle Linux), SUSE based distributions (which includes openSUSE Leap), and Ubuntu (which also should work on Debian). For the scope of this blog series we’ll go with a minimal installation of Rocky Linux 9, just because I haven’t used it since some time.
OpenStack itself is released in a six month release cycle and we’ll go with 2024.2 (Dalmatian), which will be supported until the beginning of 2026. As always, you should definitely go with the latest supported release so you have the most time to test and plan for future upgrades.
To give you an idea of what we’ve going to start with, here is a graphical overview:
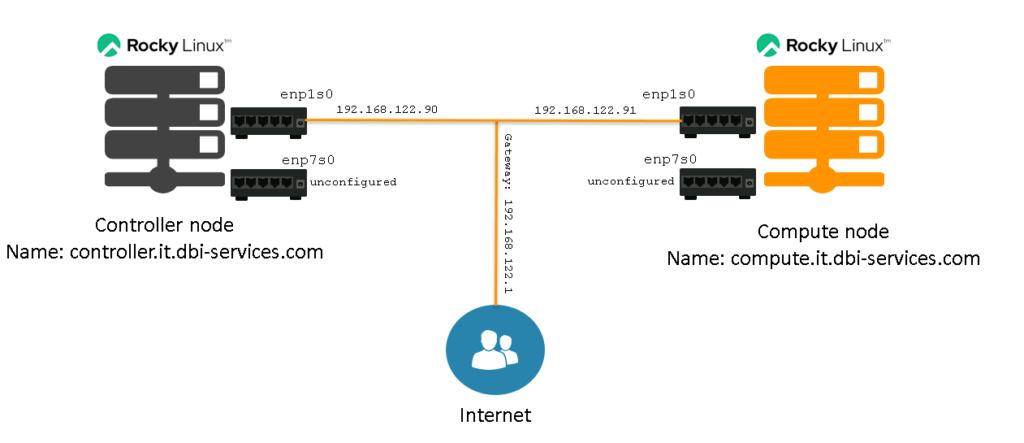
Of course this very simplified, but it is enough to know for the beginning:
- We have two nodes, one controller node and one compute node.
- Both nodes have two network interfaces. The first one is configured using a 192.168.122.0/24 subnet and connected to the internet. The second one is not configured.
- Both nodes are installed with a Rocky Linux 9 (9.5 as of today) minimal installation
We’ll add all the bits and pieces to this graphic while we’ll be installing and configuring the complete stack, don’t worry.
That’s it for the introduction. In the next post we’ll prepare the two nodes so we can continue to install and configure the OpenStack services on top of them.
![Thumbnail [60x60]](https://www.dbi-services.com/blog/wp-content/uploads/2022/08/DWE_web-min-scaled.jpg)
![Thumbnail [90x90]](https://www.dbi-services.com/blog/wp-content/uploads/2022/08/FRJ_web-min-scaled.jpg)
![Thumbnail [90x90]](https://www.dbi-services.com/blog/wp-content/uploads/2022/08/GRE_web-min-scaled.jpg)
![Thumbnail [90x90]](https://www.dbi-services.com/blog/wp-content/uploads/2023/01/APY_web-scaled.jpg)
![Thumbnail [90x90]](https://www.dbi-services.com/blog/wp-content/uploads/2025/03/OBA_web-scaled.jpg)