INTRODUCTION
Today, the benefits of automation no longer need much explanation: saving time, reducing human error, and ensuring every environment remains aligned with internal standards. What is less obvious, however, is how using an Ansible Playbook can provide advantages that more traditional scripting approaches — such as large PowerShell scripts — struggle to offer. That is exactly what I want to explore here.
When you complete an automated deployment of a SQL Server environment on Windows Server, there is a real sense of achievement. You have invested time and effort, and you expect that investment to pay off thanks to the reliability and repeatability of automation.
But everything changes when the next Windows Server upgrade or SQL Server version arrives… or when corporate standards evolve. Suddenly, you need to reopen a multi-thousand‑line PowerShell script and:
- Integrate the required changes while keeping execution stable,
- Avoid subtle but potentially critical regressions,
- Maintain clear and usable logging,
- Retest the entire automation workflow,
- Troubleshoot new issues introduced by the modifications.
This is precisely the type of situation where Ansible becomes a far better long‑term investment. Its architecture and philosophy offer several advantages:
- Native idempotence, ensuring the same result even after multiple runs,
- A declarative YAML approach, focusing on the desired end state rather than the execution steps,
- Windows Server and SQL Server modules, providing built‑in idempotence and saving significant time,
- Agentless connectivity, simplifying deployment on new machines,
- A modular structure (roles, modules, variables), making adaptation and reuse of your automation much easier.
In this article, I will give you a concrete overview by walking you through how to configure the disks required for SQL Server using Ansible.
1-Map iSCSI controllers to disk numbers
When developing an Ansible Playbook, one fundamental principle is to design for idempotence from the very start—not just rely on idempotent modules.
On Windows, disk numbering is not guaranteed: it depends on several factors – how disks are detected at startup, the firmware, and so on.
As a result, disk numbers may change from one reboot to another.
To ensure consistent and reliable execution of your deployment, this behavior must be accounted for directly in the design of your Playbook.
Otherwise, it may introduce wrong behaviors, and lead to:
- formatting the wrong disk,
- mounting volumes on incorrect devices,
- completely breaking the SQL Server provisioning workflow.
In other words, idempotence is no longer guaranteed.
To ensure stable and predictable executions, you must determine dynamically the correct disk numbering at each execution.
You can use Get-Disk PowerShell command to achieve your goal, by searching iSCSI controller number and LUN position from Location property.
$adapter = {{ disk.adapter }}
$lun = {{ disk.lun}}
(Get-Disk | Where-Object {
      $_.Location -match "Adapter $adapter\s+:.*\s+LUN $lun"
    }).number
We have done our mapping between VM specifications and Windows disk numbers.
2-Loop SQL Server disks
Since we often have several disks to configure — Data, Logs, TempDB — we need to perform the same actions repeatedly on each disk:
- dynamically determine the disk number,
- initialize it in GPT,
- create the partition and format the volume in NTFS with a 64 KB allocation unit size,
- assign an access path (drive letter or mountpoint),
- apply certain specific configuration settings, such as disabling indexing,
- verify the compliance of the disk configuration.
As these actions are identical for all disks, the best approach is to factorize the tasks.
The Ansible pattern, for such scenario, is to loop that call in a dedicated Task File.
---

- name: Manage all disk properties based on Location and Target numbers
  ansible.builtin.include_tasks: disks_properties.yml
  loop:
    - name: data
      location: "{{ disk_specs.data.location }}"
      target: "{{ disk_specs.data.target }}"
      label: "{{ disk_specs.data.label }}"
      letter: "{{ disk_specs.data.letter }}"
    - name: logs
      location: "{{ disk_specs.logs.location }}"
      target: "{{ disk_specs.logs.target }}"
      label: "{{ disk_specs.logs.label }}"
      letter: "{{ disk_specs.logs.letter }}"
    - name: tempdb
      location: "{{ disk_specs.tempdb.location }}"
      target: "{{ disk_specs.tempdb.target }}"
      label: "{{ disk_specs.tempdb.label }}"
      letter: "{{ disk_specs.tempdb.letter }}"
  loop_control:
    loop_var: disk

...
3- Implement SQL Server disk configuration
Since we performed our loop in the previous section on the disks_properties.yml file, we can now implement the configuration actions inside this file.
First, we will retrieve the disk number and then begin configuring the disk according to best practices and our internal standards.
To guarantee idempotence, we will mark this step as not changed: this is only a Get action:
---

- name: Identify the {{ disk.name }} disk number
  ansible.windows.win_shell: |
    $adapter = {{ disk.target }}
    $lun = {{ disk.location }}
    (Get-Disk | Where-Object {
      $_.Location -match "Adapter $adapter\s+:.*\s+LUN $lun"
    }).number
  register: disk_num
  changed_when: false
Then, we will register the disk number as an Ansible Fact for all this task file execution call.
- name: Set fact for {{ disk.name }} disk number
  ansible.builtin.set_fact:
    "disk_number_{{ disk.name }}": "{{ disk_num.stdout | trim | int }}"
We can now initialize the disk using community.windows module. Of course, use Ansible module if possible.
The parameter disk_bps.partition_style is a variable of my Ansible Role, to guarantee GPT will be used.
- name: Initialize disks
  community.windows.win_initialize_disk:
    disk_number: "{{ lookup('vars', 'disk_number_' + disk.name) }}"
    style: "{{ disk_bps.partition_style }}"
From there, we can create our partition:
- name: Create partition with letter {{ disk.letter }} for disk {{ disk.name }}
  community.windows.win_partition:
    drive_letter: "{{ disk.letter }}"
    partition_size: "-1"
    disk_number: "{{ lookup('vars', 'disk_number_' + disk.name) }}"
And now format our volume with allocation unit size 64KB:
- name: Create a partition letter {{ disk.letter }} on disk {{ disk.name }} with label {{ disk.label }}
  community.windows.win_format:
    drive_letter: "{{ disk.letter }}"
    allocation_unit_size: "{{ disk_bps.allocation_unit_size_bytes }}"
    new_label: "{{ disk.label }}"

...
As I mentioned earlier in previous section, we can also add tasks relative to some specific standards or a tasks to guarantee disk compliance.
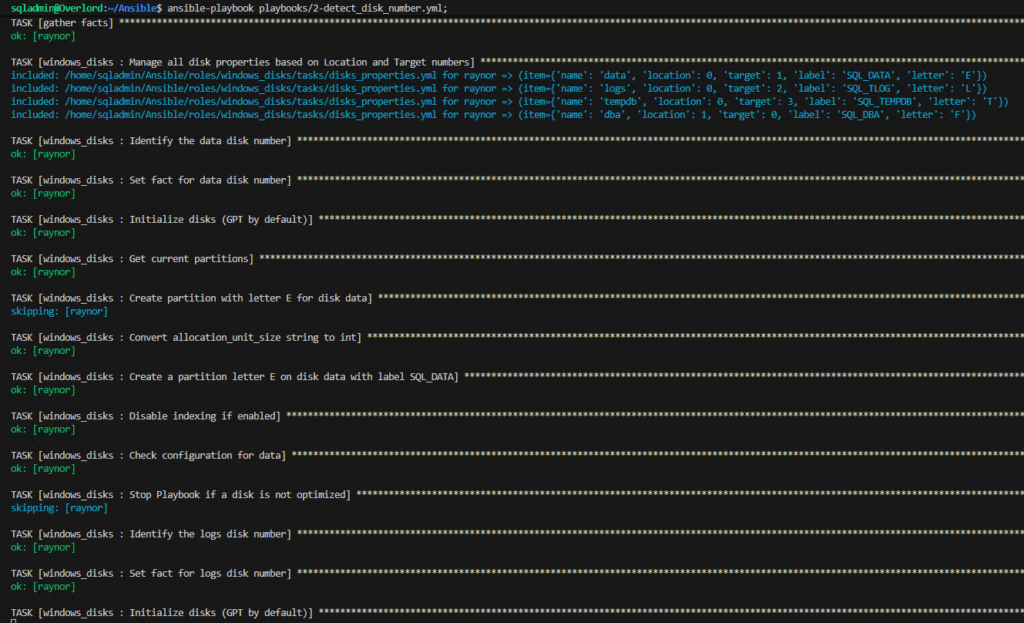
4- Execute the Playbook
Now that our Ansible Role windows_disks is ready, we can call it through a Playbook.
Of course, we must adjust the reality of the iSCSI configuration of the Virtual Machine.
---

- name: Configure Disks by detecting Disk Number
  hosts: Raynor
  gather_facts: false
  vars:
    disk_specs:
      data:
        location: 0
        target: 1
        label: SQL_DATA
        letter: E
      logs:
        location: 0
        target: 2
        label: SQL_TLOG
        letter: L
      tempdb:
        location: 0
        target: 3
        label: SQL_TEMPDB
        letter: T
  tasks:
    - name: gather facts
      ansible.builtin.setup:
      changed_when: false
      tags: [always]
    - name: Configure Disks
      ansible.builtin.import_role:
        name: windows_disks
      tags: windows_disks


...
CONCLUSION
We have had an overview of how Ansible makes automation easier to maintain and to evolve, by focusing on the logic of our deployment and not on the code to achieve it.
Now, updating your standards or upgrading versions will no longer require rewriting scripts, but mainly adapting variables.
However, it is important to be aware that idempotence must also be maintained through design.
![Thumbnail [60x60]](https://www.dbi-services.com/blog/wp-content/uploads/2022/08/NAC_web-min-scaled.jpg)
![Thumbnail [90x90]](https://www.dbi-services.com/blog/wp-content/uploads/2022/08/STH_web-min-scaled.jpg)
![Thumbnail [90x90]](https://www.dbi-services.com/blog/wp-content/uploads/2022/11/TBR-web-min-scaled.jpg)
![Thumbnail [90x90]](https://www.dbi-services.com/blog/wp-content/uploads/2025/11/LTO_WEB.jpg)
![Thumbnail [90x90]](https://www.dbi-services.com/blog/wp-content/uploads/2023/01/APY_web-scaled.jpg)