by Alexandre Nestor
Introduction
WebHooks are HTTP callbacks that are triggered by events. In case of GitlLab these can be events like pushing some code, or creating an issue, or pushing some comments, create a merge request and so on.
Somehow, is a way for an application to send data, trigger events, in real time to another application, even if the target application don’t ask for the data.
In this post I will explain how to add a WebHook to a project and how to execute some external code when en event is triggered.
I will use an Flask application, which will be triggered by GitLab WebHook.
VM configuration
The test VM is created on the OCI cloud. It is a RedHat VM but that is not very important.
First I have to open the port 8200 (used by Flask). RedHat use by default firewalld as firewall:
# add 8200 port using tcp to the public zone
[root@wb ~]# firewall-cmd --zone=public --add-port=8200/tcp
success
# list opened ports
[root@wb ~]# firewall-cmd --list-all
public (active)
target: default
icmp-block-inversion: no
interfaces: ens3
sources:
services: dhcpv6-client http ssh
ports: 8200/tcp
protocols:
forward: no
masquerade: no
forward-ports:
source-ports:
icmp-blocks:
rich rules:
The Flask application
For example I create a small Flask application which is waiting for an event on 8200 port. The easiest application is to retrieve the HTTP frame.
# app.py
from flask import Flask, request, abort
import json

app = Flask(__name__)

@app.route('/my_webhook', methods=['POST'])
def my_webhook():
    if request.method == 'POST':
        print(json.dumps(request.json, indent=2))
        return 'success', 200
    else:
        abort(400)

if __name__ == '__main__':
    app.run(host='0.0.0.0', port=8200, debug=True)
The Flask will launch a http server which is listen on all interfaces (0.0.0.0) en on port 8200
The path to be used in the HTTP POST call is my_webhook
Also I used the debug mode to get the most traces.
The Flask application is waiting a POST request (line 10). And answer success.
Otherwise, return 400 HTTP code.
Start the Flask application
(venv) [opc@wb ~]$ python app.py
 * Serving Flask app 'app' (lazy loading)
 * Environment: production
   WARNING: This is a development server. Do not use it in a production deployment.
   Use a production WSGI server instead.
 * Debug mode: on
 * Running on all addresses.
   WARNING: This is a development server. Do not use it in a production deployment.
 * Running on http://172.168.0.40:8200/ (Press CTRL+C to quit)
 * Restarting with stat
 * Debugger is active!
 * Debugger PIN: 295-390-357
GitLab configuration
You must have the role maitainer on your project, to have the rights to manage WebHooks.
Select Settings -> WebHooks from the left Menu
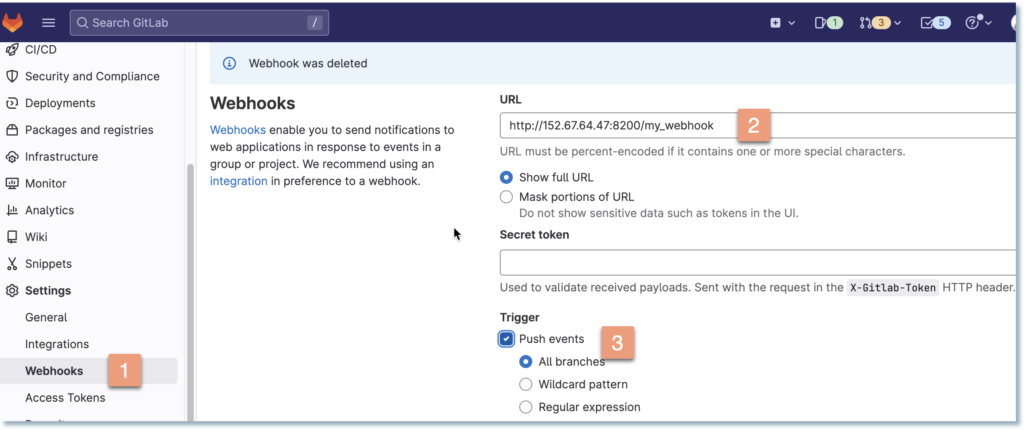
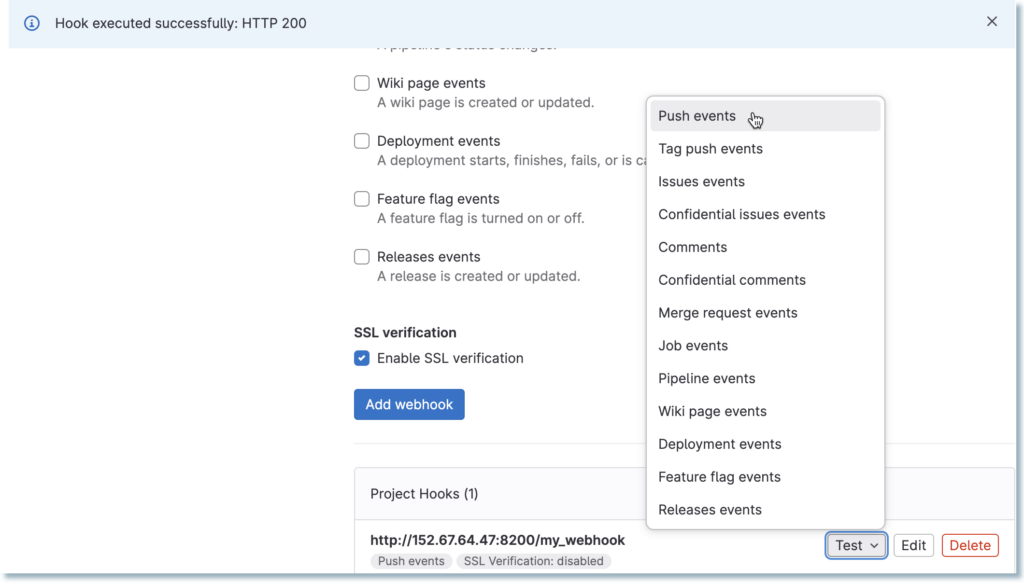
Once The WebHook was saved it can be tested. From Test button you can choose an event type to test.
Let’s try with a push event:
When the event is triggered in GitLab, the Flask application must dump the http frame on the screen:
 * Running on http://172.168.0.40:8200/ (Press CTRL+C to quit)
 * Restarting with stat
 * Debugger is active!
 * Debugger PIN: 295-390-357
.....
{
  "object_kind": "push",
  "event_name": "push",
  "before": "6aa30335b09*****53183fb28bb84aada5cf",
  "after": "a48e187ef217a******62498378e5023d355",
  "ref": "refs/heads/main",
  "checkout_sha": "a48e187ef21********9490562498378e5023d355",
  "message": null,
  "user_id": 11774125,
  "user_name": "your username ",
  "user_username": "your.usernam",
  "user_email": "",
  "user_avatar": "https://gitlab.com/uploads/-/system/user/avatar/11774125/avatar.png",
  "project_id": 38878393,
  "project": {
    "id": 38878393,
    .....
On line 7 we can see the push event from GitLab.
Conclusion
The use of WebHooks from GitLab to run external code represents another facility in DevOps tools.
Their implementation is easy and immediate.
An example of use case is the integration with Ansible Automation Controller, to run Ansible jobs.
![Thumbnail [60x60]](https://www.dbi-services.com/blog/wp-content/uploads/2022/12/oracle-square.png)
![Thumbnail [90x90]](https://www.dbi-services.com/blog/wp-content/uploads/2024/03/AHI_web.jpg)
![Thumbnail [90x90]](https://www.dbi-services.com/blog/wp-content/uploads/2022/08/NAC_web-min-scaled.jpg)
![Thumbnail [90x90]](https://www.dbi-services.com/blog/wp-content/uploads/2022/08/ADE_WEB-min-scaled.jpg)
![Thumbnail [90x90]](https://www.dbi-services.com/blog/wp-content/uploads/2022/08/NME_web-min-scaled.jpg)