In my last blog post about SQL Server 2016 Always Encrypted, here, I showed how to use this new functionality but also that you have to separate the different execution context with an Application server, a database server and a security server to avoid that certificate will be available for all users and break the segregation.
Let’s see how to build those environment.
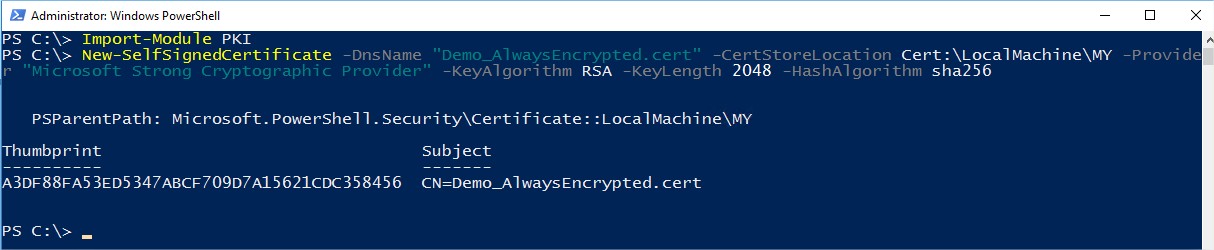
In my security server named SQL2016-2, I first create a Self-signed certificate with PowerShell after having import the PKI module. The certificate is stored in the local machine with:
- DnsName, DNS name of the certificate: Demo_AlwaysEncrypted.cert
- CertStoreLocation, specifies the certificate store in which to store the new certificate: Cert:\LocalMachine\MY
- Provider, specifies the name of the KSP or CSP that this cmdlet uses to create the certificate: Microsoft Strong Cryptographic Provider
- KeyAlgorithm, specifies the name of the algorithm that creates the asymmetric keys that are associated with the new certificate: RSA
- KeyLength, specifies the length, in bits, of the key that is associated with the new certificate: 2048
- HashAlgorithm, specifies the name of the hash algorithm to use to sign the new certificate: sha256
PowerShell script:
Import-Module PKI
New-SelfSignedCertificate -DnsName "Demo_AlwaysEncrypted.cert" -CertStoreLocation Cert:\LocalMachine\MY -Provider "Microsoft Strong Cryptographic Provider" -KeyAlgorithm RSA -KeyLength 2048 -HashAlgorithm sha256
I have now my new certificate.
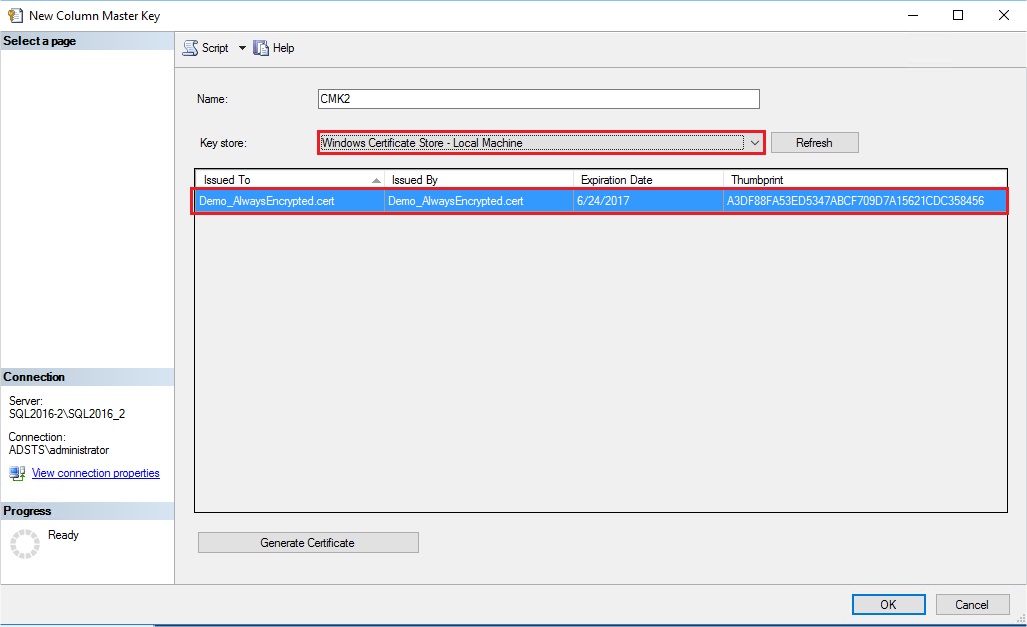
I open my SQL Server instance and navigate in my database SecurityDB to Security, Always Encrypted Keys and right click on Column Master Keys and select “New Column Master Key…”.
I create a new Column Master Key with the certificate I have just created on my local Machine and I name it CMK2:
The code to create my Master Key is the following, you can have it by clicking on the Script button in the above screen:
CREATE COLUMN MASTER KEY [CMK2]
WITH
(
       KEY_STORE_PROVIDER_NAME = N'MSSQL_CERTIFICATE_STORE',
       KEY_PATH = N'LocalMachine/My/A3DF88FA53ED5347ABCF709D7A15621CDC358456'
)
GO
I create now a Column Encryption Key named CEK2 with the Column Master Key I have create before and named CMK2:
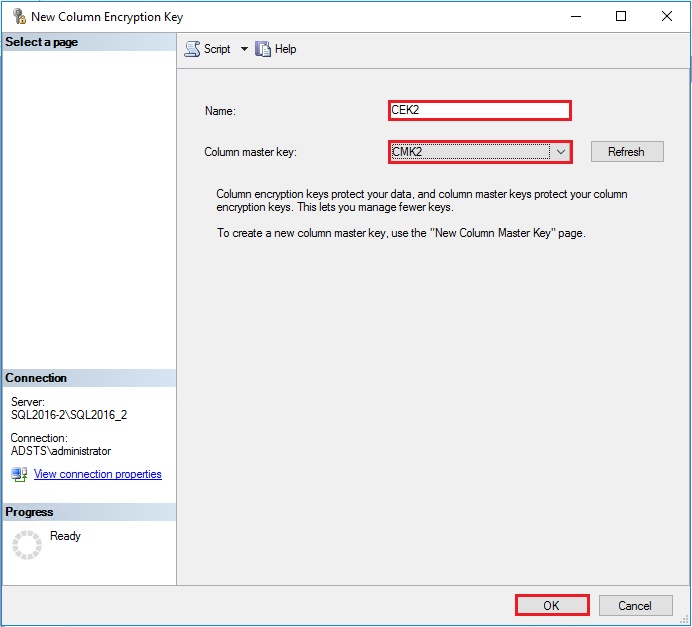
The code to create my Encryption Key is the following:
CREATE COLUMN ENCRYPTION KEY [CEK2]
WITH VALUES
(
       COLUMN_MASTER_KEY = [CMK2],
       ALGORITHM = 'RSA_OAEP',
       ENCRYPTED_VALUE = 0x01700000016C006F00630061006C006D0061006300680069006E0065002F006D0079002F00610033006400660038003800660061003500330065006400350033003400370061006200630066003700300039006400370061003100350036003200310063006400630033003500380034003500360098721948A1283B0E5375B4E7F0A5F2EED05EDB0A87814BF66EABCBE2B4E75B5A759CF48D7D87D6A2C44A6DB2B587992E412EAF20D3FE826844FE76B1BC764E769C911486150E08EB972DBF406FF51738EFAA7F831A27A540F948CBC673273B1205A2CEF33AE77A0AF01DB3589A4A746151DC8C699DAB7AD1B99910A598EA7258670F1D5C0600704A9BB440F86761F41E8C72E52FFF6A7348B65F62E60D90B60CF1FC00B1B473F40E82B140219A317760CBC8591E07215AD114FAF80F08361C607823DB44037C455514B3789661560613638D058D7965846962B9FD3D9ECF0AC62325043AB40D892683744DC994E868C5F0E3FD14277D8941977426AC59DEA7EEF1394641DB314C2DCB083D3D5A12B97A131986D9834CBF2837908D3EF54C9104D92371C8A9EDC9B22555D8D615440D21B03393303FD4A9C0047282091178F31323A6EF4313576470349F32F106D38ABC3B0A1C4F47E870EA43F7B90D85D4F6C6686368E4E5EFC416EA08241F75F2D7B4F4B700114CA545AA4310829B2691A6D2C553F8F8B7E3983FC99F4E0A28BD79C84F50B7F6ABB17419DEAE06ACA694D68B00B48DBC0D66B46847A389C8A587F138CEF7791845A999EA45849D2FAA45BDA88FE134C70E592937981A7B2A18397CC615BB435A1EDDD66CF58119D89B24190744F4326718CBCDC1182AD20C8023EECB3994569844270DC90020B20D70B5CCC5
)
GO
I will now transfer those two certificates to my SQL Server VM, named SQL2016-1, in order to encrypt my table columns with them. To do that, I will execute the scripts I have generated before in my SQL Server instance in my security VM. I have created a second database named TestDB2 where I will execute my scripts:
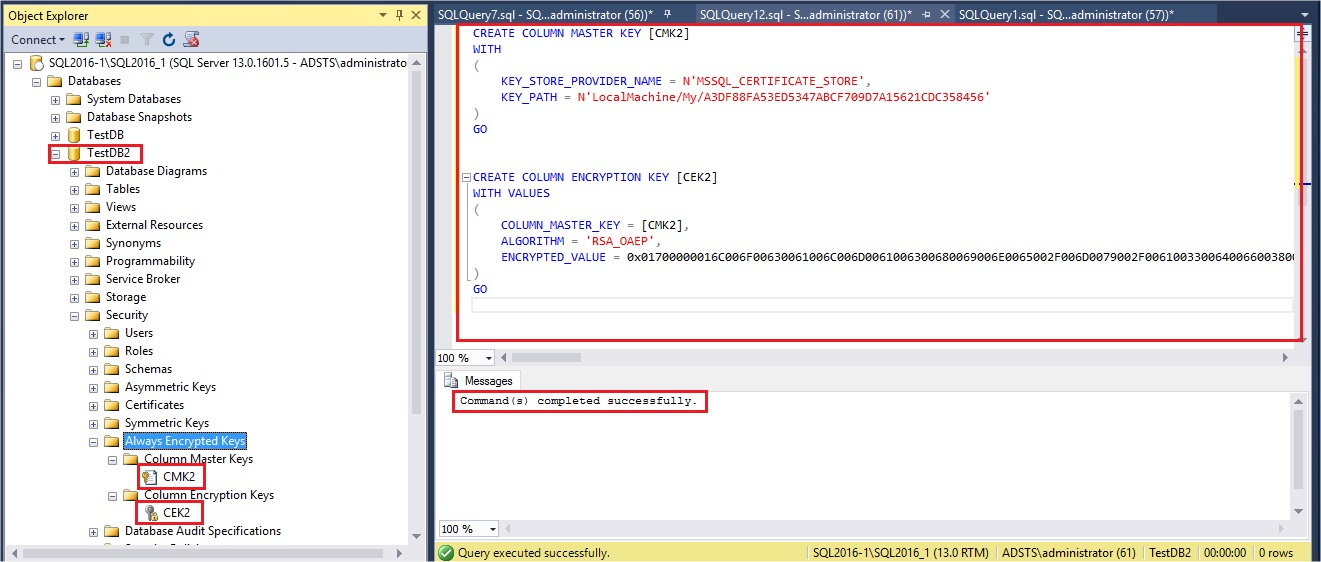
After execution of the script I have my Column Master Key and my Column Encryption Key in the Security\Always Encrypted Keys path of my TestDB2 database.
I will now create the same table that I have on my TestDB database (see my previous blog post) in my new database TestDB2. For that I will execute the following script with the same encrypted columns (CustAccountNumber, CustAccountBalance, CustCreditCardNumber) but with my new Column Encryption Key CEK2:
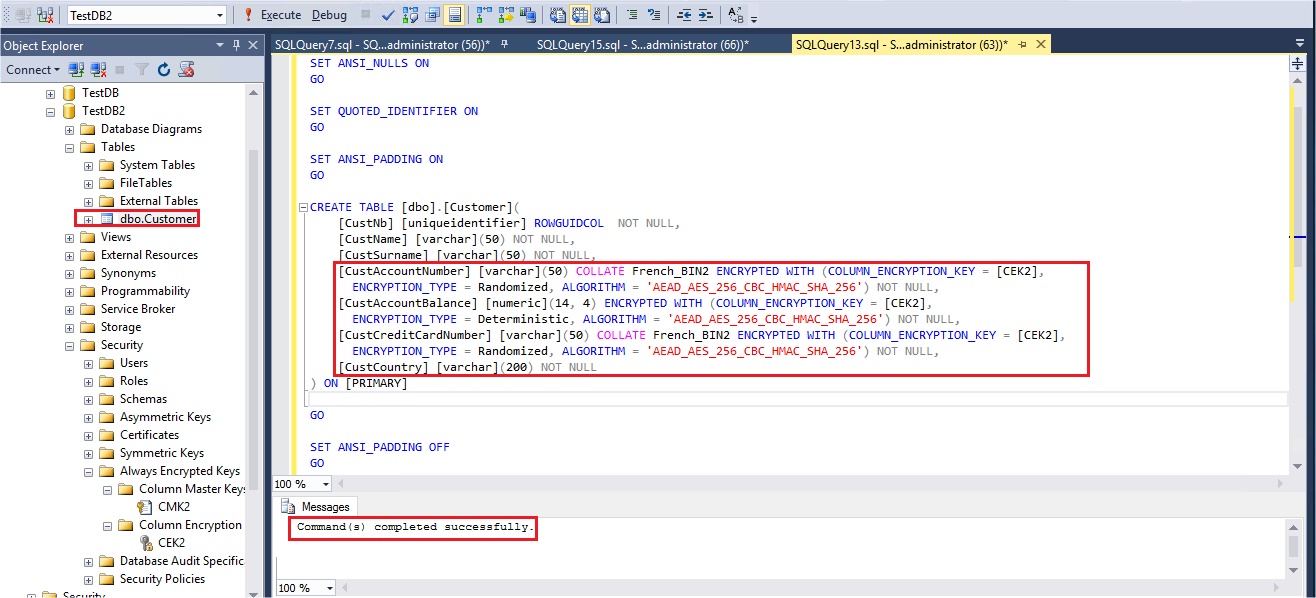
My table is created with the specified columns encrypted.
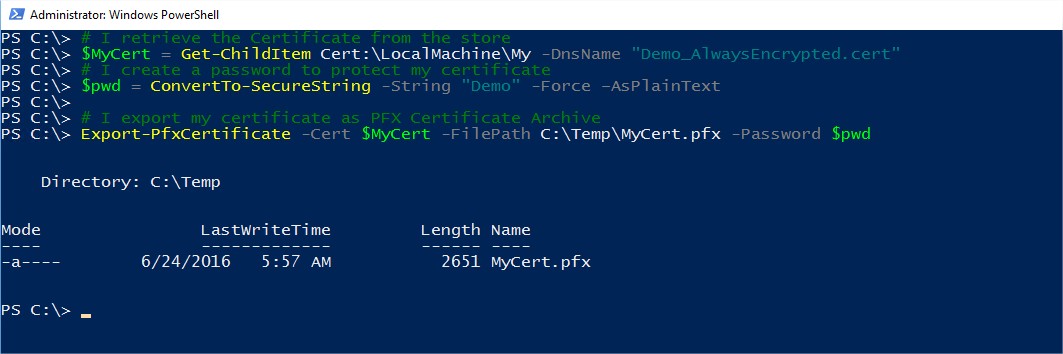
I will now export my certificate from my security server to my application server with PowerShell.
First, I retrieve my certificate from the store and export it to a file with a password:
PowerShell script:
# I retrieve the Certificate from the store
$MyCert = Get-ChildItem Cert:\LocalMachine\My -DnsName "Demo_AlwaysEncrypted.cert"
# I create a password to protect my certificate
$pwd = ConvertTo-SecureString -String "Demo" -Force –AsPlainText
# I export my certificate as PFX Certificate Archive
Export-PfxCertificate -Cert $MyCert -FilePath C:\Temp\MyCert.pfx -Password $pwd
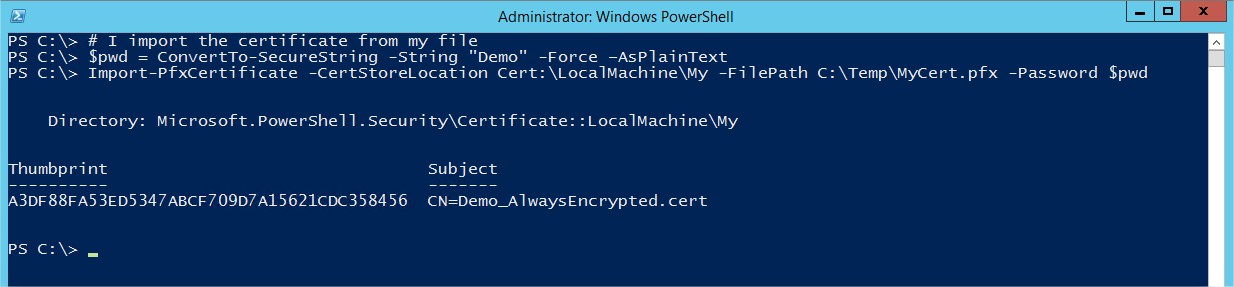
I’m able now to copy my certificate in my application server and import it:
PowerShell script:
# I import the certificate from my file
$pwd = ConvertTo-SecureString -String "Demo" -Force –AsPlainText
Import-PfxCertificate -CertStoreLocation Cert:\LocalMachine\My -FilePath C:\Temp\MyCert.pfx -Password $pwd
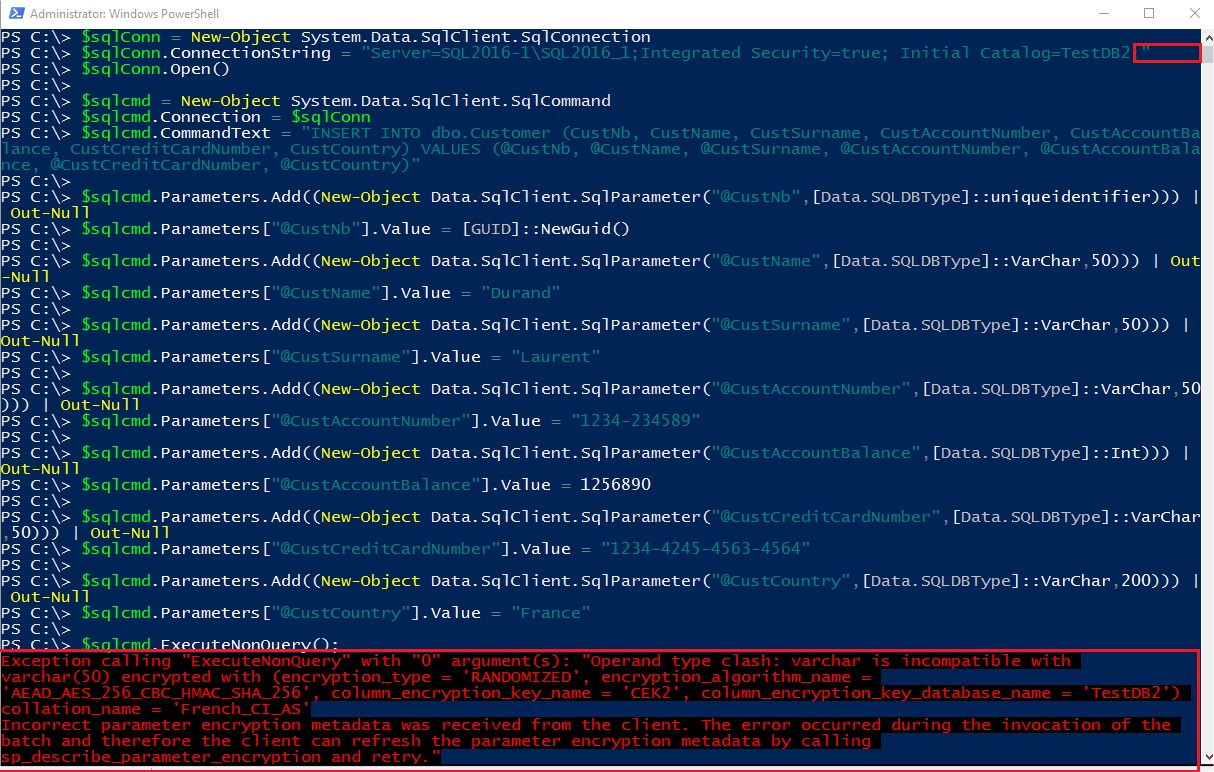
My certificate is now in the store of my application server and I will be able at this time to insert and read plain text data from my application server. I will use a PowerShell script to insert data. I will not explain all this script but it’s good to know that:
- The connection string needs to enable Always Encrypted for the client application, here PowerShell, with this parameter: Column Encryption Setting=enabled
- The application passes plain text data in SqlParameter objects to the driver. The driver will encrypt the values and send encrypted values to the SQL Server VM
PowerShell script:
$sqlConn = New-Object System.Data.SqlClient.SqlConnection
$sqlConn.ConnectionString = "Server=SQL2016-1\SQL2016_1;Integrated Security=true; Initial Catalog=TestDB2; Column Encryption Setting=enabled;"
$sqlConn.Open()
$sqlcmd = New-Object System.Data.SqlClient.SqlCommand
$sqlcmd.Connection = $sqlConn
$sqlcmd.CommandText = "INSERT INTO dbo.Customer (CustNb, CustName, CustSurname, CustAccountNumber, CustAccountBalance, CustCreditCardNumber, CustCountry) VALUES (@CustNb, @CustName, @CustSurname, @CustAccountNumber, @CustAccountBalance, @CustCreditCardNumber, @CustCountry)"
$sqlcmd.Parameters.Add((New-Object Data.SqlClient.SqlParameter("@CustNb",[Data.SQLDBType]::uniqueidentifier)))
$sqlcmd.Parameters["@CustNb"].Value = [GUID]::NewGuid()
$sqlcmd.Parameters.Add((New-Object Data.SqlClient.SqlParameter("@CustName",[Data.SQLDBType]::VarChar,50)))
$sqlcmd.Parameters["@CustName"].Value = "Durand"
$sqlcmd.Parameters.Add((New-Object Data.SqlClient.SqlParameter("@CustSurname",[Data.SQLDBType]::VarChar,50)))
$sqlcmd.Parameters["@CustSurname"].Value = "Laurent"
$sqlcmd.Parameters.Add((New-Object Data.SqlClient.SqlParameter("@CustAccountNumber",[Data.SQLDBType]::VarChar,50)))
$sqlcmd.Parameters["@CustAccountNumber"].Value = "1234-234589"
$sqlcmd.Parameters.Add((New-Object Data.SqlClient.SqlParameter("@CustAccountBalance",[Data.SQLDBType]::Int)))
$sqlcmd.Parameters["@CustAccountBalance"].Value = 1256890
$sqlcmd.Parameters.Add((New-Object Data.SqlClient.SqlParameter("@CustCreditCardNumber",[Data.SQLDBType]::VarChar,50)))
$sqlcmd.Parameters["@CustCreditCardNumber"].Value = "1234-4245-4563-4564"
$sqlcmd.Parameters.Add((New-Object Data.SqlClient.SqlParameter("@CustCountry",[Data.SQLDBType]::VarChar,200)))
$sqlcmd.Parameters["@CustCountry"].Value = "France"
$sqlcmd.ExecuteNonQuery();
$sqlConn.Close()

I have now inserted a row in my Customer table. If I try to do the same insert without the parameter Column Encryption Setting=enabled, I receive an error message:
Now, if I want to read my table from my application server I can execute a simple select * with this PowerShell script and my parameter Column Encryption Setting=enabled:
PowerShell script:
$sqlConn = New-Object System.Data.SqlClient.SqlConnection
$sqlConn.ConnectionString = “Server=SQL2016-1\SQL2016_1;Integrated Security=true; Initial Catalog=TestDB2; Column Encryption Setting=enabled;”
$sqlConn.Open()
$sqlcmd = $sqlConn.CreateCommand()
$query = "SELECT * FROM dbo.customer"
$sqlcmd.CommandText = $query
$adp = New-Object System.Data.SqlClient.SqlDataAdapter $sqlcmd
$data = New-Object System.Data.DataSet
$adp.Fill($data) | Out-Null
$data.Tables
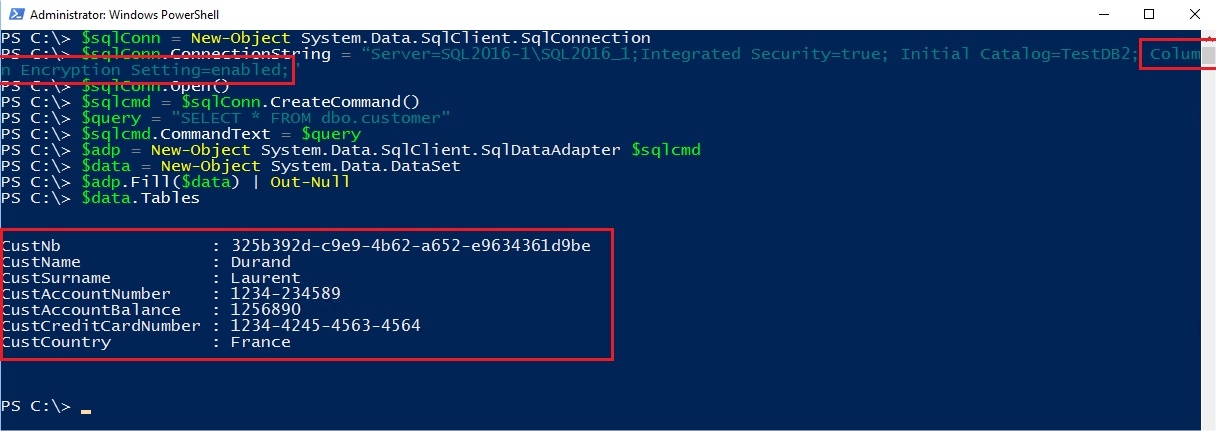
I see plan text data but without the parameter:
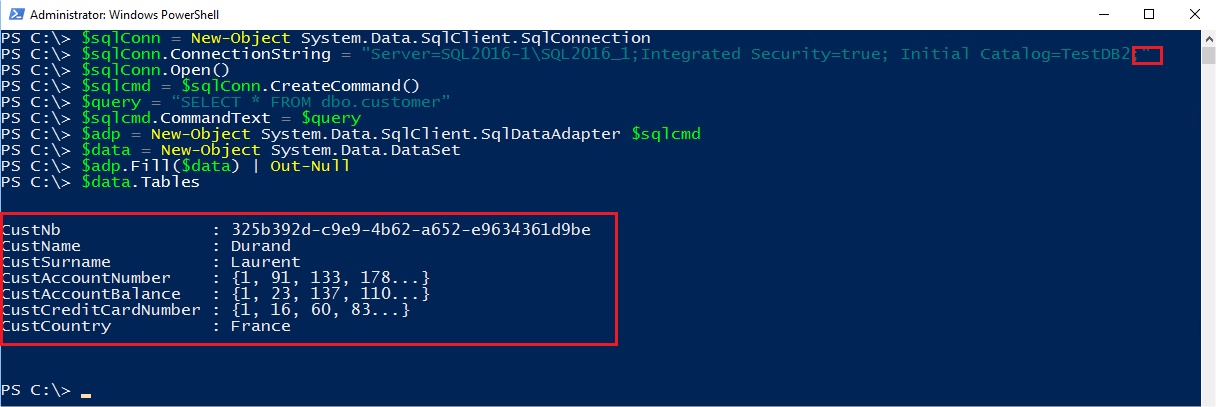
I’m able to read the table but the encrypted columns appear as blob and cannot by readable.
If I go back to my SQL Server VM, even with SYSADMIN right and with the connection string parameter Column Encryption Setting=enabled I am not allowed to query the table:
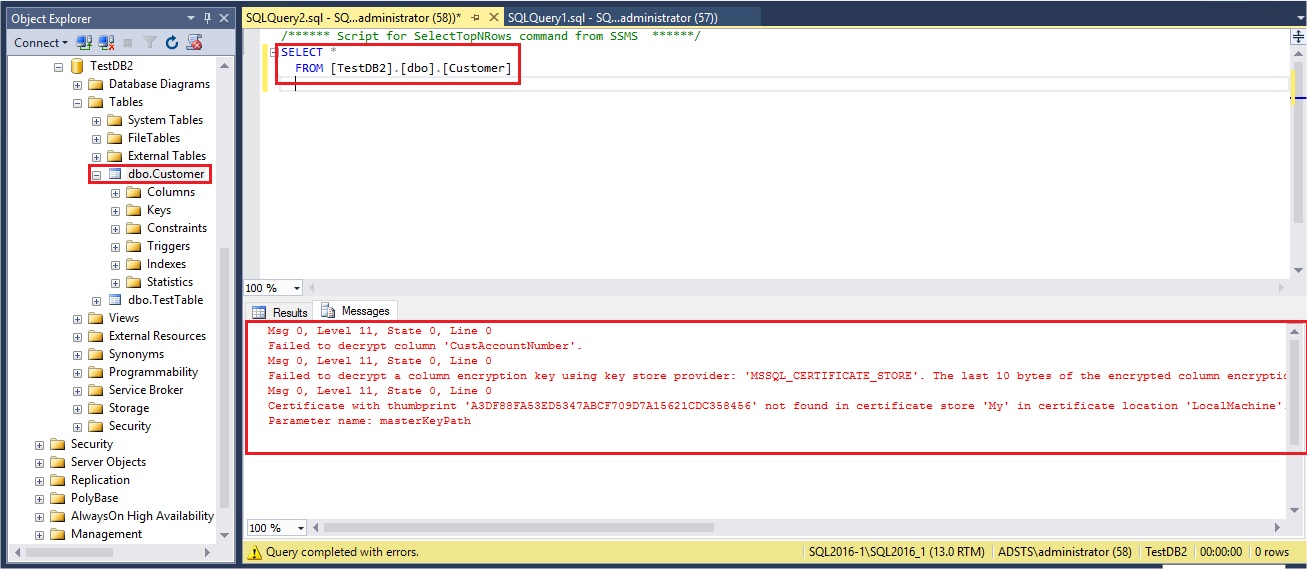
The error indicates that I don’t have access on my SQL Server VM at the certificate used to encrypt the column master key and so I’m not able to decrypt the encrypted columns.
If I don’t use the parameter Column Encryption Setting=enabled during my connection via SQL Server Management Studio and try to query my table:
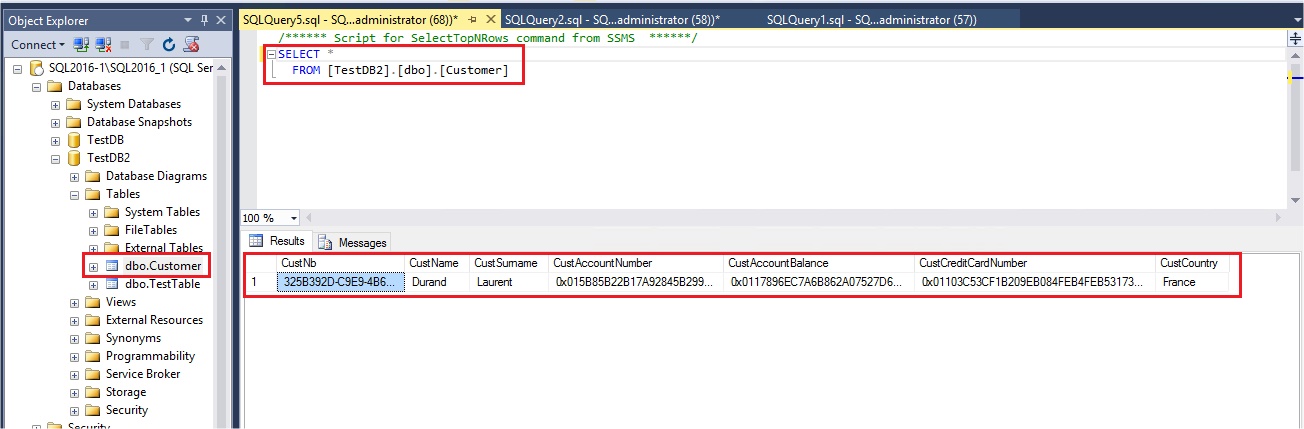
I can see my table row(s) but the encrypted columns appear as BLOB and so are protected to unexpected reader which is exactly the goal of this new feature: avoid that SQL Server DBAs or users with some rights should able to visualize critical data.
In order to validate this security, the certificate must not be saved in the certificate store of the SQL Server VM.
That’s all Folks! 😉
![Thumbnail [60x60]](https://www.dbi-services.com/blog/wp-content/uploads/2022/10/STS_web-min-scaled.jpg)
![Thumbnail [90x90]](https://www.dbi-services.com/blog/wp-content/uploads/2022/08/STH_web-min-scaled.jpg)
![Thumbnail [90x90]](https://www.dbi-services.com/blog/wp-content/uploads/2025/11/LTO_WEB.jpg)
![Thumbnail [90x90]](https://www.dbi-services.com/blog/wp-content/uploads/2023/01/APY_web-scaled.jpg)
![Thumbnail [90x90]](https://www.dbi-services.com/blog/wp-content/uploads/2022/08/FRJ_web-min-scaled.jpg)