Using Single Sign-on to manage accesses to cloud applications is really convenient. However SAML is using a certificate between the Identity Provider (IdP) and the Service Provider (SP) application and this certificate may expire. Once this certificate is expired, it’s not possible anymore to use the SSO to access the application. In this blog, we will quickly check how to renew this certificate for AWS IAM Identity Center (formerly AWS SSO) configured with Azure.
First, go in Microsoft Entra ID (formerly Microsoft Azure AD) and select the menu “Enterprise applications”. That screen is already providing an overview of the certificate statuses for all the applications. In the screenshot below, we can see that I’m already late as the certificate already expired.

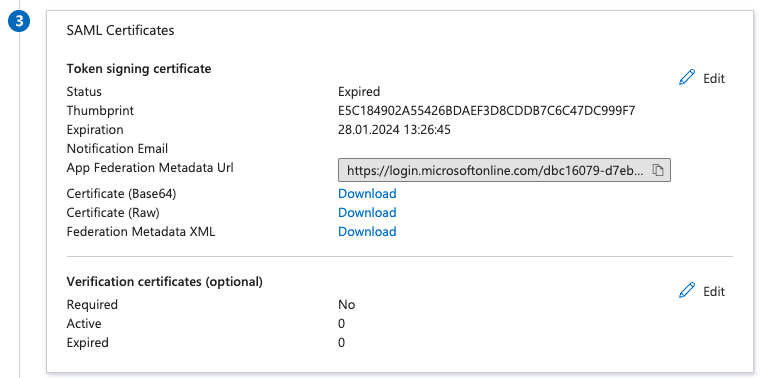
Then, you need to click on the application and select “Single sign-on” menu to get the current SAML configuration. The 3rd block about SAML Certificates shows again the status and other information like Thumbprint and Notification Email. In my Azure test environment, the email was set to the email address of the Microsoft Entra ID admin account. As I don’t have a real domain for this sandbox, I never got any reminder before the expiration. You can change the email notification and I strongly recommend to use a valid email address 🙂
Each application can have multiple signing certificates but only one is active at a certain time. It gives us some flexibility to prepare the renewal before the certificate expiration. To proceed with the renewal, just click on the Edit button in the top-right corner of the block. It will display a new menu on the right similar to the next screenshot.
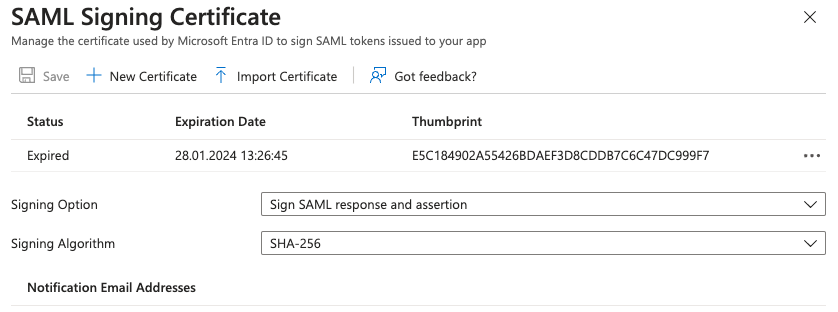
Creating a new certificate is as easy as pushing the button “New Certificate”. The new Thumbprint is not displayed until you use the button Save. Before moving to the target application, you need to download the new certificate. Just click the 3 dots on the right to display the contextual menu and download the certificate. I usually take the PEM format but it’s also available in base64 or raw formats.
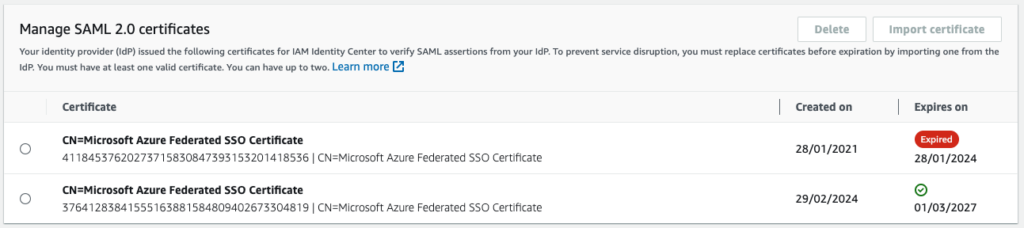
Once the new certificate on the IdP side is ready, we may need to import it in the target Service Provider. In this blog’s case, it will be in AWS IAM Identity Center. In the settings page, look for the Identity source parameters and click on the “Actions” menu to select “Manage authentication”. At the bottom of the page, the known certificates are displayed. In my case, there is only one and it’s expired.

Click on the button “Import certificate” and select the certificate you downloaded before from Azure. AWS will then display the new certificate alongside the old one. At this moment, both certificate could be used by Azure. In an ideal case, you would add this new certificate before the old one expires and there would not be any downtime.
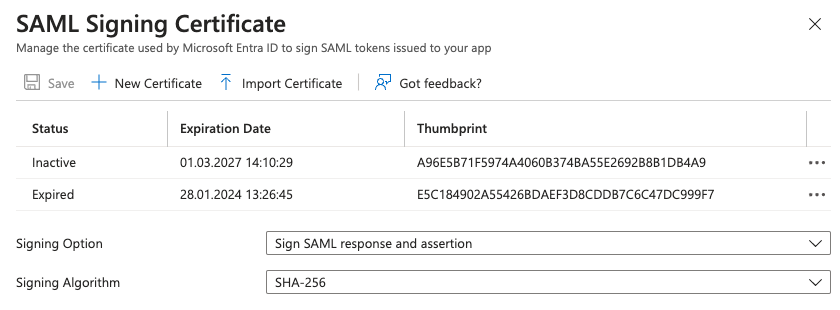
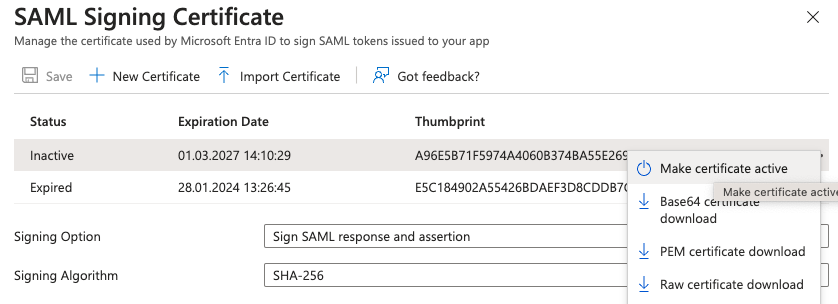
Only one certificate can be active at a time in Azure. It’s now time to go back in the Enterprise application in Azure in the management certificate page. Click on the menu and make the new certificate active.
I recommend to perform some cleanup and remove the expired certificate from both sides afterward.
In this blog, we fixed the access issue due to an expired certificate. As it’s my lab environment, it impacted only myself. But, more important, we know it’s possible to have multiple certificate in both sides. So I strongly recommend to generate the new certificate few days or 2 weeks before the expiration to avoid any interruption for your users.
![Thumbnail [60x60]](https://www.dbi-services.com/blog/wp-content/uploads/2022/11/NIJ-min-scaled.jpg)
![Thumbnail [90x90]](https://www.dbi-services.com/blog/wp-content/uploads/2022/10/MKE_web-min-scaled.jpg)
![Thumbnail [90x90]](https://www.dbi-services.com/blog/wp-content/uploads/2022/10/ELU_web-min-1-scaled.jpg)