A few years back I had the great opportunity to test Nutanix NDB, at that time called Nutanix Era, and I had written a few blogs about provisioning Oracle databases, taking snapshot, log catchup, cloning a database, restoring a database, aso… and see interaction with Oracle Database itself. But I was not able, at that time, to test the patching of Oracle databases. I recently had the chance to get a new environment and I finally had the opportunity to test the patching of Oracle databases. I would like to share with you my experience and show you how easy the patching is with Nutanix NDB. You will be able to see the advantage that Nutanix NDB offers to you in term of database’s patching.
Template VM patching
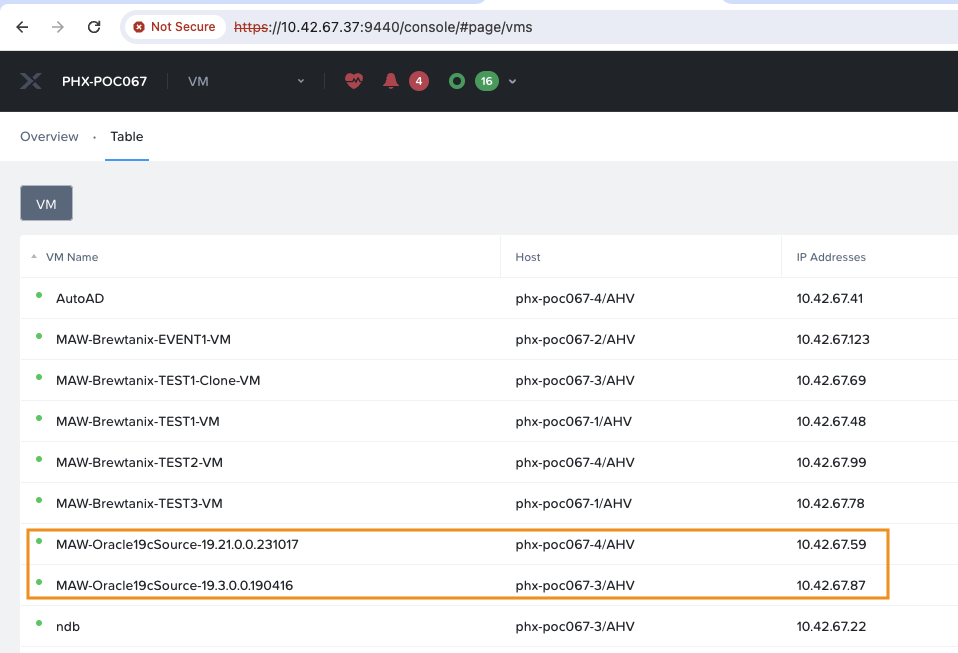
I have been initially creating a template VM with Oracle 19.3.0.0.190416 version, named MAW-Oracle19cSource-19.3.0.0.190416, used only as reference to create the software profile and provisioned several oracle databases on several VMs.
I have then cloned the same template, to create a new VM that I called MAW-Oracle19cSource-19.21.0.0.231017.
I manually patched Oracle version for Oracle RDBMS and Oracle Grid on the new template VM MAW-Oracle19cSource-19.21.0.0.231017 from version 19.3 to last version 19.21.
Version of grid before patching the template:
[grid@oel-19c ~]$ /u01/app/19.0.0/grid/OPatch/opatch lspatches
29585399;OCW RELEASE UPDATE 19.3.0.0.0 (29585399)
29517247;ACFS RELEASE UPDATE 19.3.0.0.0 (29517247)
29517242;Database Release Update : 19.3.0.0.190416 (29517242)

OPatch succeeded.
Version of oracle before patching the template:
[oracle@oel-19c ~]$ $ORACLE_HOME/OPatch/opatch lspatches
29585399;OCW RELEASE UPDATE 19.3.0.0.0 (29585399)
29517242;Database Release Update : 19.3.0.0.190416 (29517242)

OPatch succeeded.
Version of grid after patching the template:
[grid@oel-19c ~]$ $ORACLE_HOME/OPatch/opatch lspatches
35655527;OCW RELEASE UPDATE 19.21.0.0.0 (35655527)
35652062;ACFS RELEASE UPDATE 19.21.0.0.0 (35652062)
35643107;Database Release Update : 19.21.0.0.231017 (35643107)
35553096;TOMCAT RELEASE UPDATE 19.0.0.0.0 (35553096)
33575402;DBWLM RELEASE UPDATE 19.0.0.0.0 (33575402)

OPatch succeeded.
Version of oracle after patching the template:
[oracle@oel-19c ~]$ $ORACLE_HOME/OPatch/opatch lspatches
35655527;OCW RELEASE UPDATE 19.21.0.0.0 (35655527)
35643107;Database Release Update : 19.21.0.0.231017 (35643107)

OPatch succeeded.
Checking on prism we can see the 2 templates.
Register new template VM
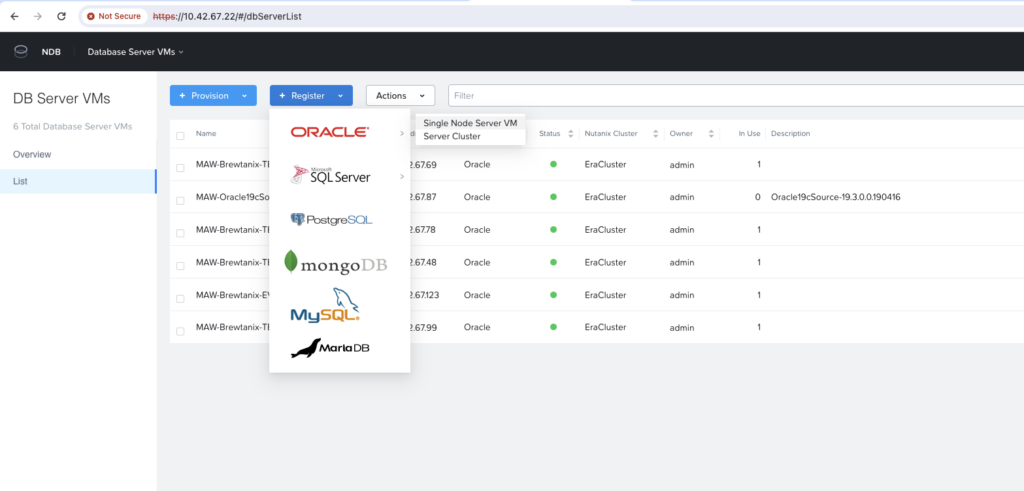
We now need to register the new MAW-Oracle19cSource-19.21.0.0.231017 VM into Nutanix NDB. For this we will go in the Database Server VMs menu and from the submenu List we will click the +Register button, and choose Oracle.
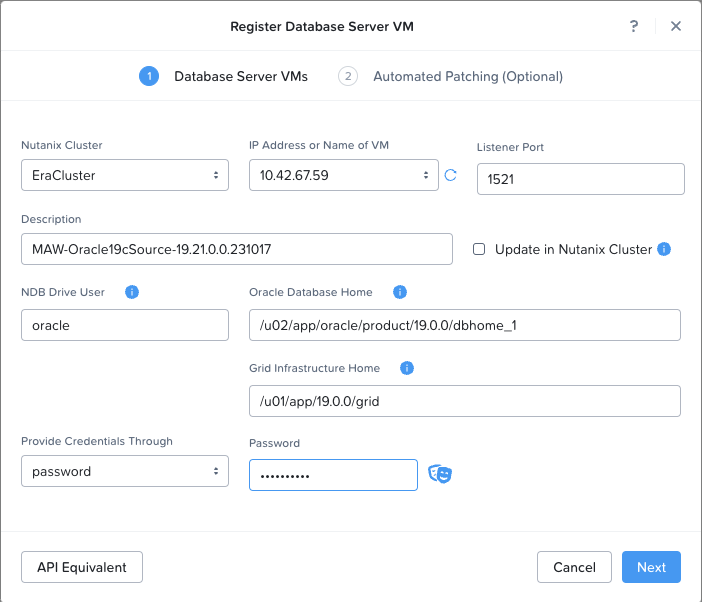
And fill all needed information.
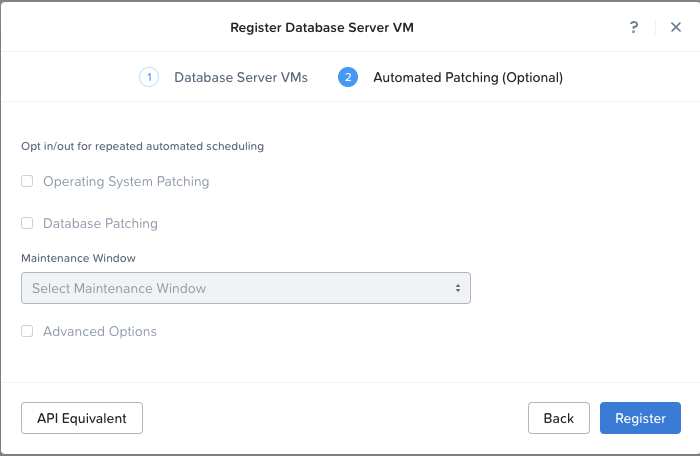
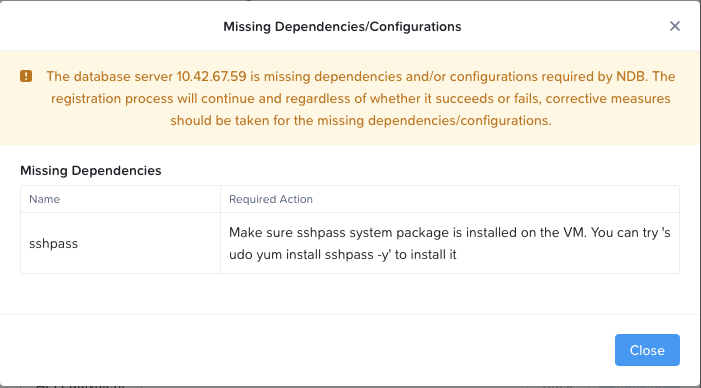
We can ignore next missing dependencies, knowing sshpass is only required for Oracle RAC patching.
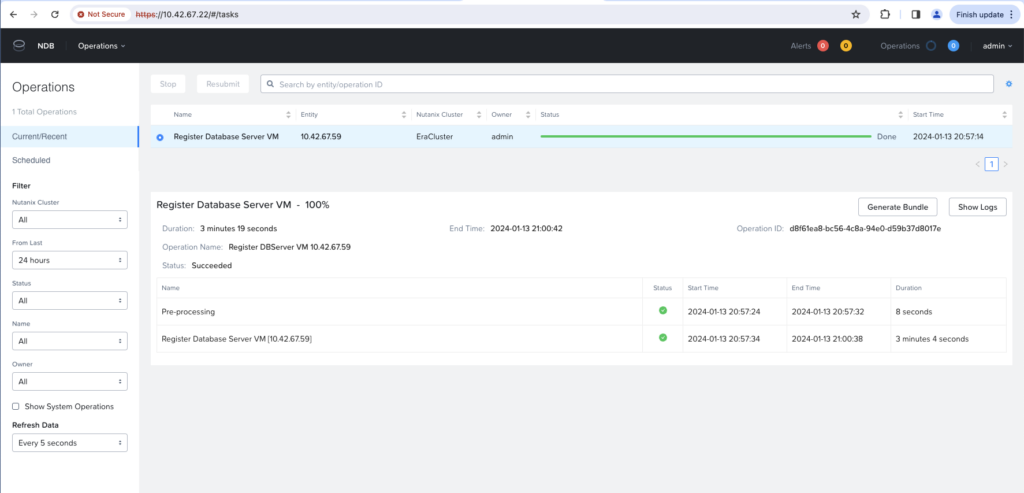
In the Operations menu, we can check the progression of the registration.
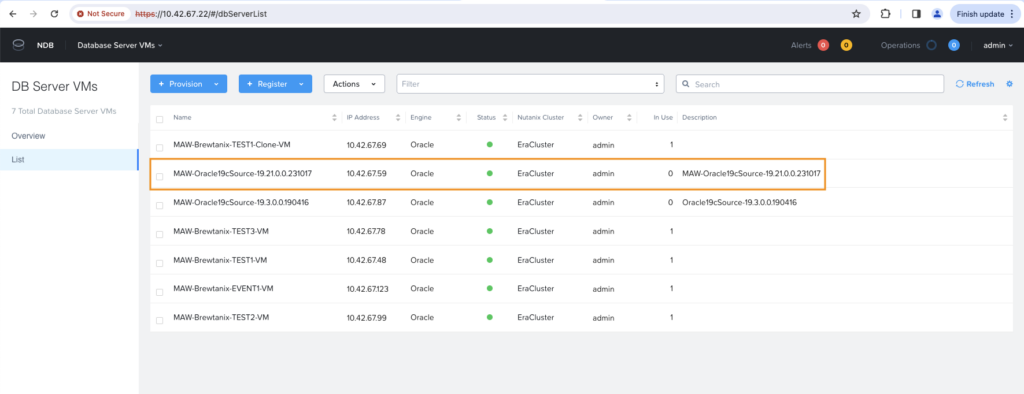
Finally, from the DB Server VMs menu, we can see our new VM template being registered.
Update existing software profile
We now need to update existing software profile with new 19.21 template. All previous databases and VMs have been provisioned with this software profile, named MAW-Oracle19c. This will give the ability to patch to 19.21 the Oracle databases been deployed with this software profile.
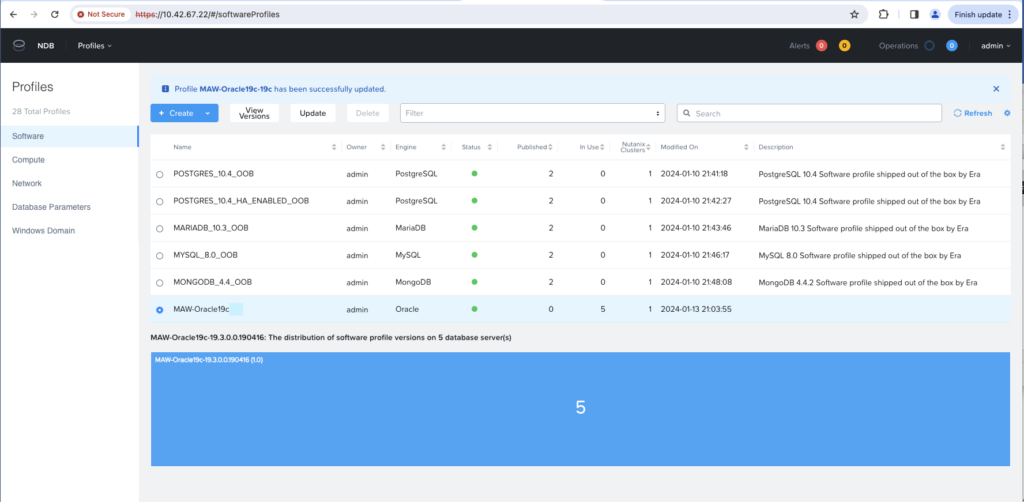
Going to the Profiles menu, Software submenu, we can see and select concerned software profile named MAW-Oracle19c.
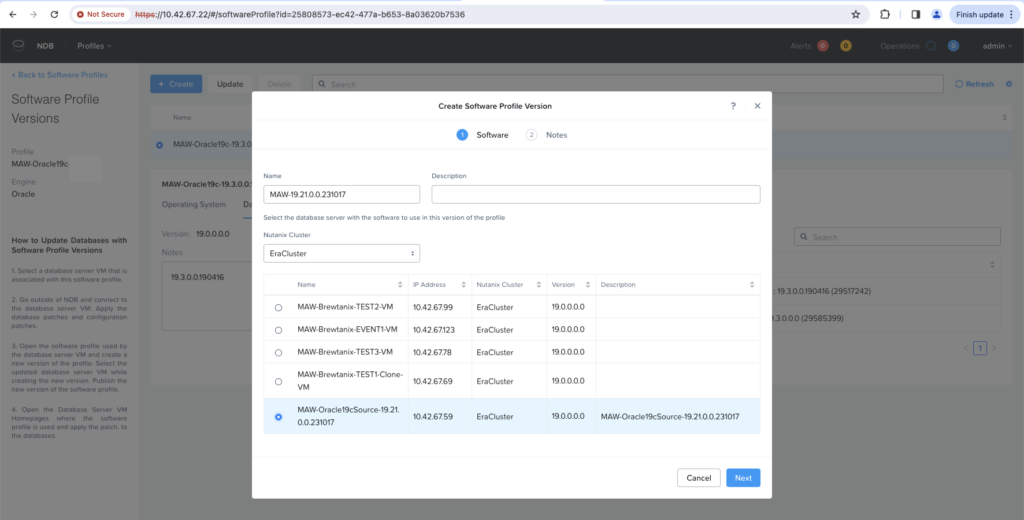
Chose the button +Create to update your software profile by creating a new version.
Provide a name for the version and select the new VM template which has been recently patched to version 19.21.
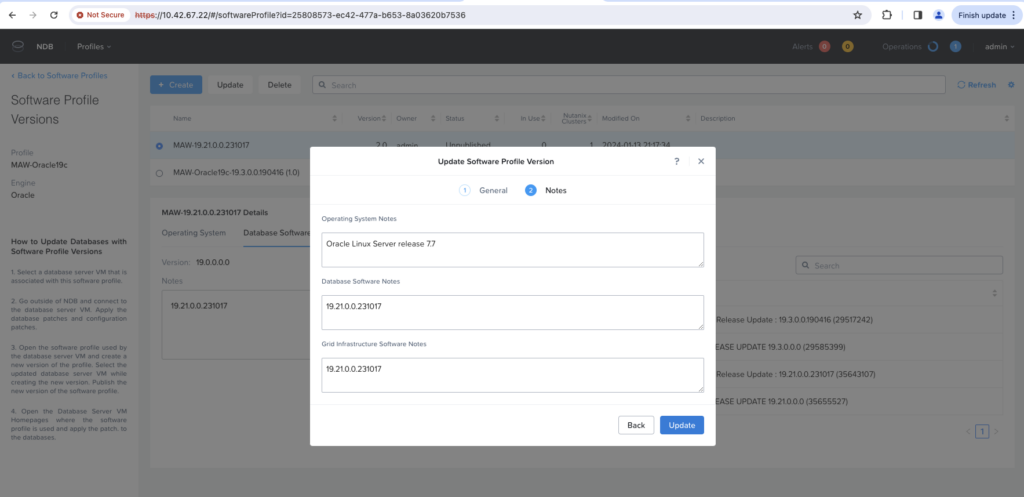
Give some notes for the new OS version, grid version and oracle home version. Operating System version? Yes, because we could also in mean time use Nutanix NDB to easily patch the OS of the VM!

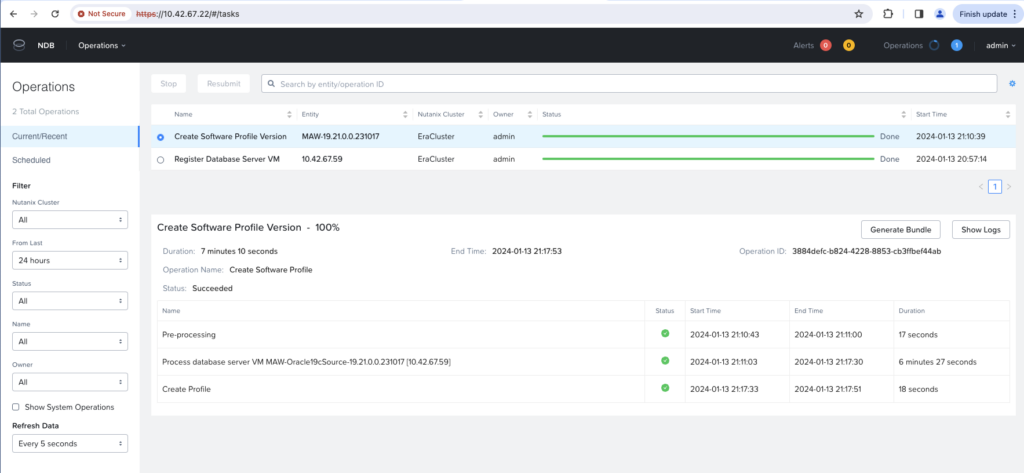
From the Operations menu, we can follow the progress of creating the Software Profile version.
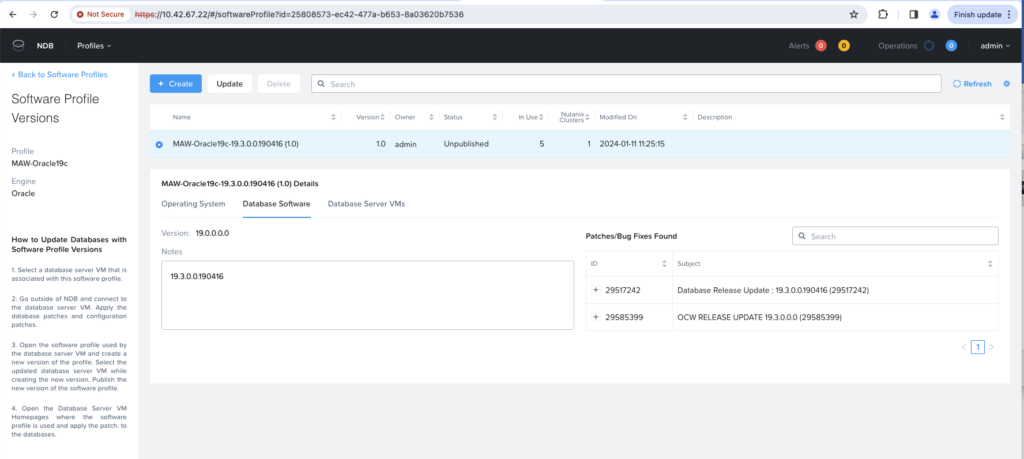
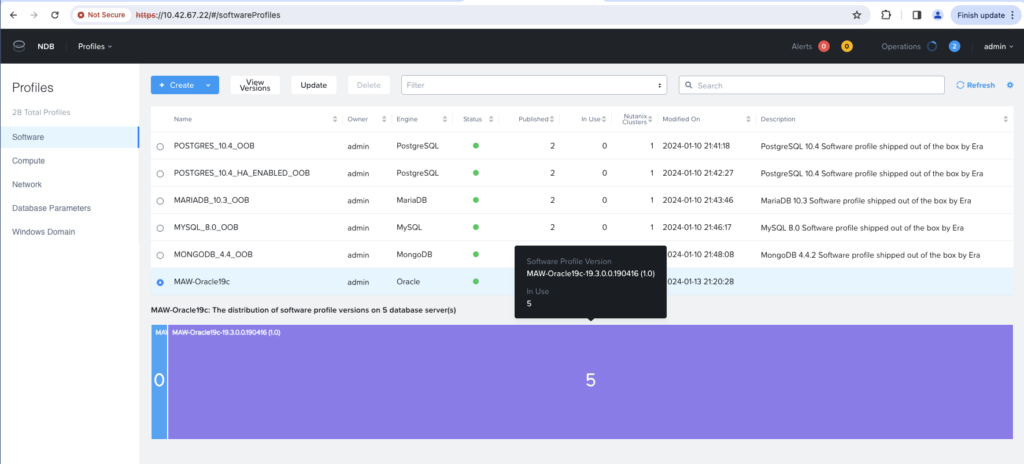
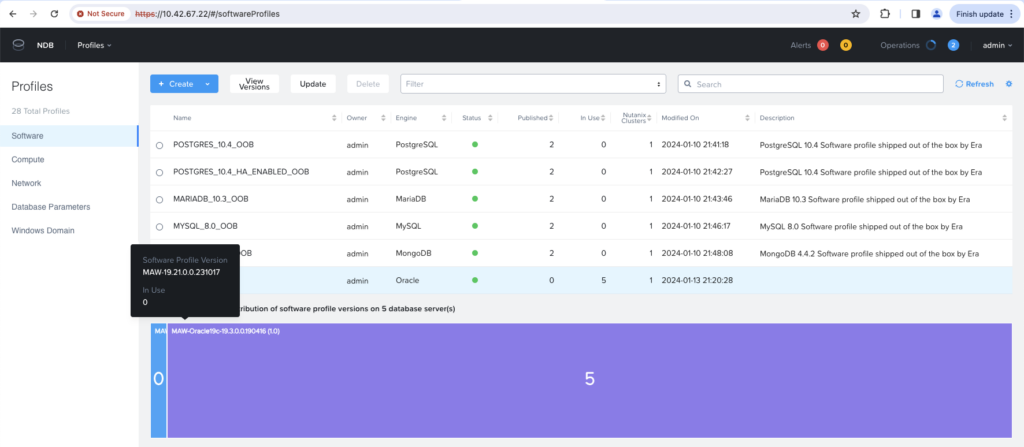
Checking Software Profile Versions in use
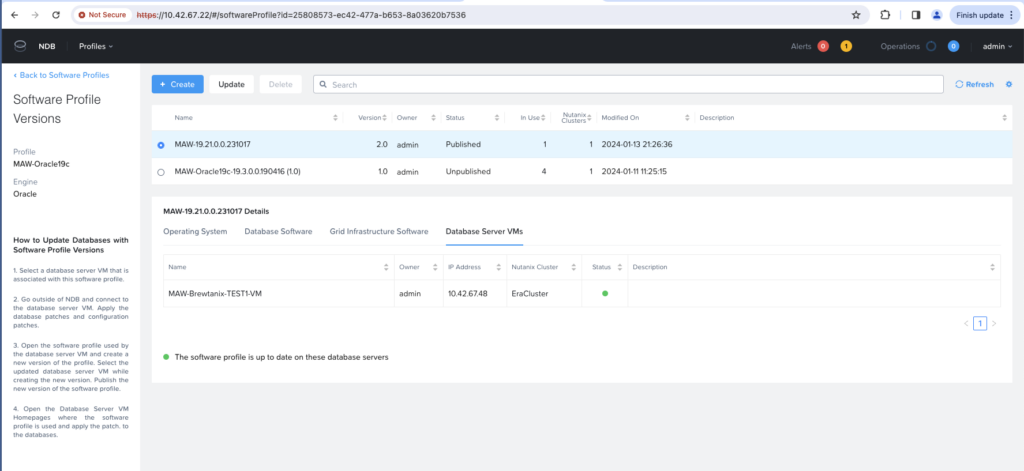
From the same Profiles menu, Software submenu, clicking on our profile we can see the number of database servers using each version. In our case, we have 5 database servers (initially deployed) using the 19.3 version and 0 so far using the new 19.21 version.
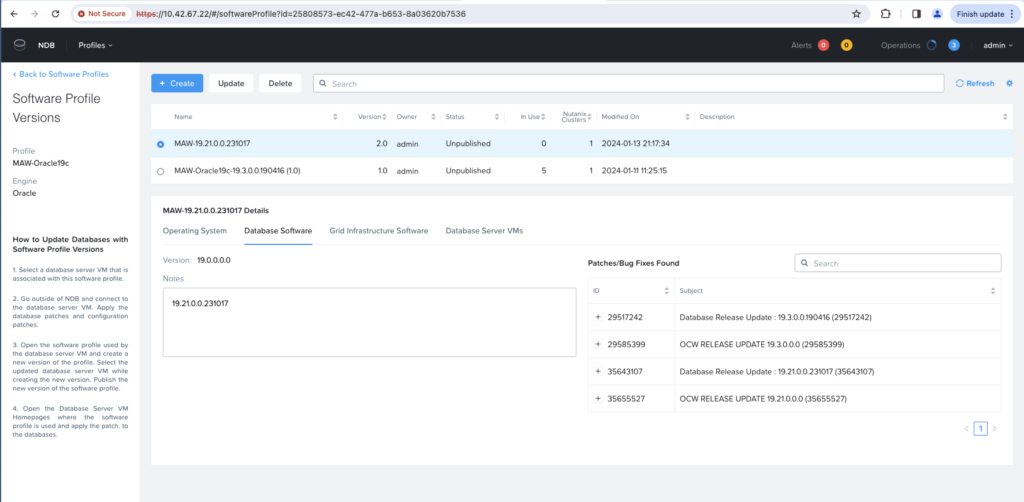
Publish the new Software Profile version
Entering the concerned Software Profile, we see the same with more details.
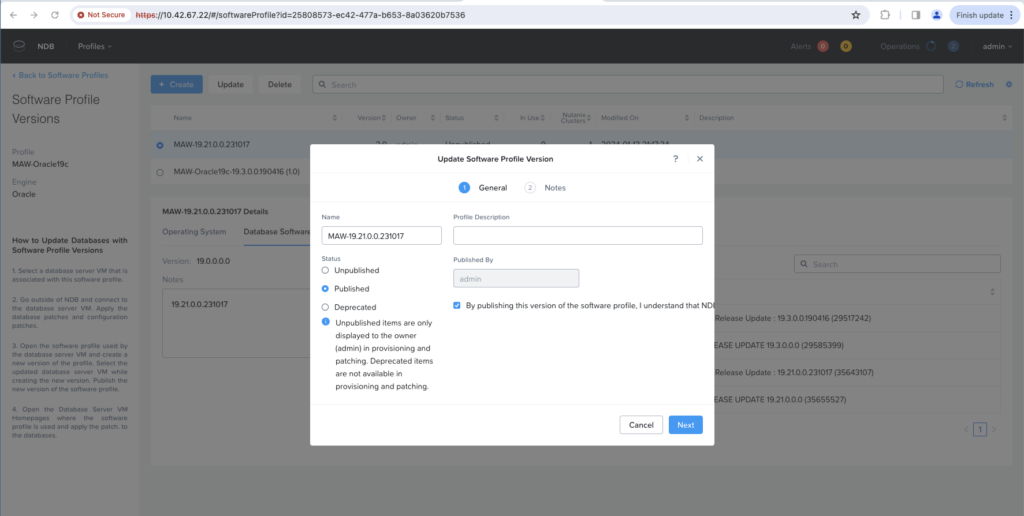
We will click on the update button on profile 2.0 version (the one we just created) to publish it and make it available for recommended patches.
Do not forget to select the check box : By publishing this version of the software profile, I understand that NDB will recommend that all databases using an earlier versions of this software profile should update to this new version. The recommendation will appear on the Database Server VM home page.
The new 2.0 version is now in Published version.
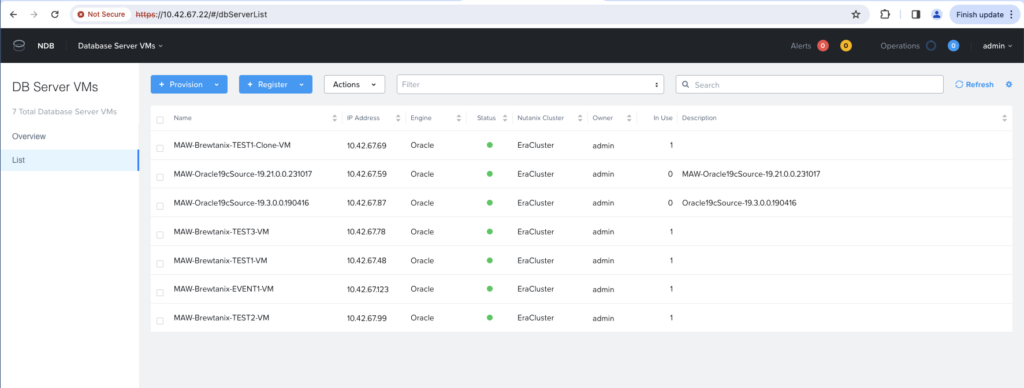
Check Database Server VMs
In Database Server VMs Menu, List submenu, we see the list of all VMs.
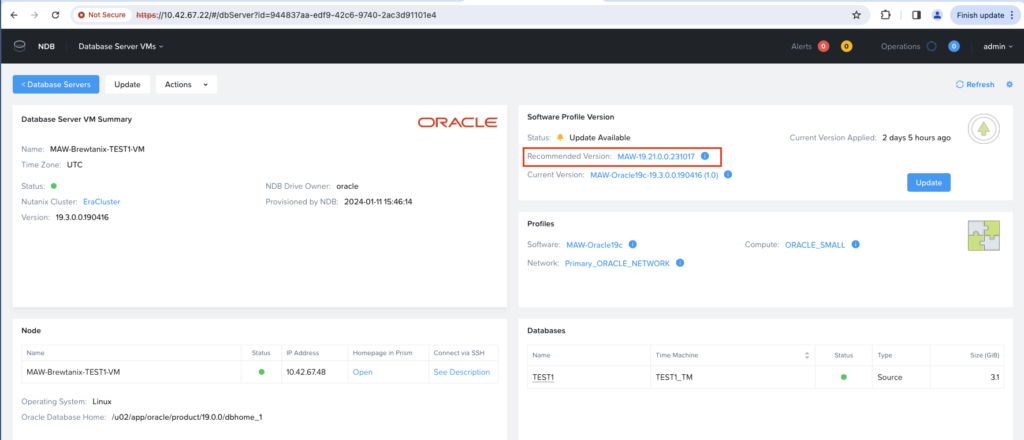
Selecting and entering one of the initial deployed VMs, we see that there is now a recommended new version that can be applied, the new 19.21 we just created.
Let’s ssh TEST1-VM, check Oracle dbhome version and connect to the TEST1 database to check current version.
maw@DBI-LT-MAW2 Nutanix % ssh -i Nutanix_oracle_private_key.pem [email protected]
Last login: Thu Jan 11 16:13:30 2024 from 10.42.202.71

-bash-4.2$ sudo su - oracle
Last login: Sat Jan 13 20:13:02 UTC 2024 from 10.42.202.71 on pts/0

-bash-4.2$ hostname
MAW-Brewtanix-TEST1-VM

-bash-4.2$ $ORACLE_HOME/OPatch/opatch lspatches
29585399;OCW RELEASE UPDATE 19.3.0.0.0 (29585399)
29517242;Database Release Update : 19.3.0.0.190416 (29517242)

OPatch succeeded.

-bash-4.2$ sqlplus / as sysdba

SQL*Plus: Release 19.0.0.0.0 - Production on Sat Jan 13 20:14:34 2024
Version 19.3.0.0.0

Copyright (c) 1982, 2019, Oracle.  All rights reserved.


Connected to:
Oracle Database 19c Enterprise Edition Release 19.0.0.0.0 - Production
Version 19.3.0.0.0

SQL> set lines 300 pages 500
SQL> select instance_name, host_name from v$instance;

INSTANCE_NAME    HOST_NAME
---------------- ----------------------------------------------------------------
TEST1            MAW-Brewtanix-TEST1-VM

SQL> select patch_id, source_version, target_version, status, description from dba_registry_sqlpatch;

  PATCH_ID SOURCE_VERSION  TARGET_VERSION  STATUS                    DESCRIPTION
---------- --------------- --------------- ------------------------- ----------------------------------------------------------------------------------------------------
  29517242 19.1.0.0.0      19.3.0.0.0      SUCCESS                   Database Release Update : 19.3.0.0.190416 (29517242)

SQL>
Patch one Database Server VM
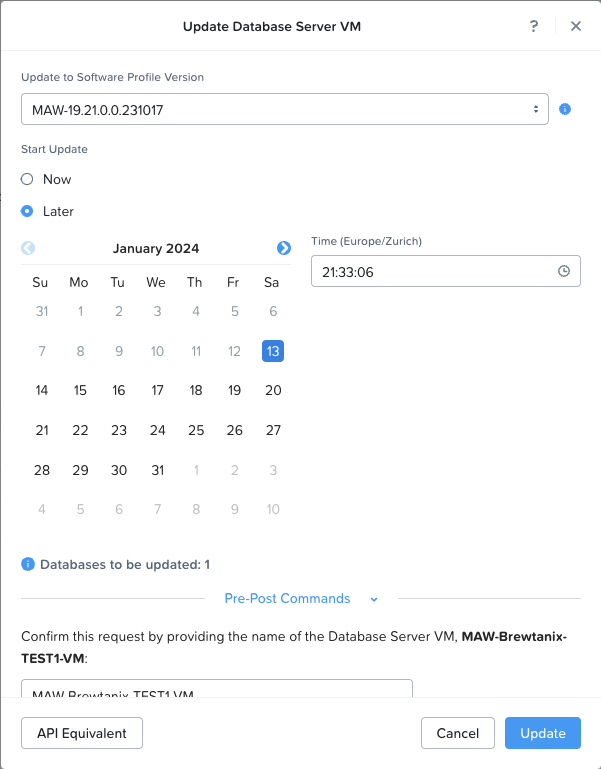
Let’s select TEST1-VM from Database Server VMs Menu and patch it by clicking the Update button.

Let’s chose our new Software Profile Version, 19.21, and select if we want to upgrade it now or later at a scheduled date and time. The patching can then easily be scheduled to be run in a maintenance windows.
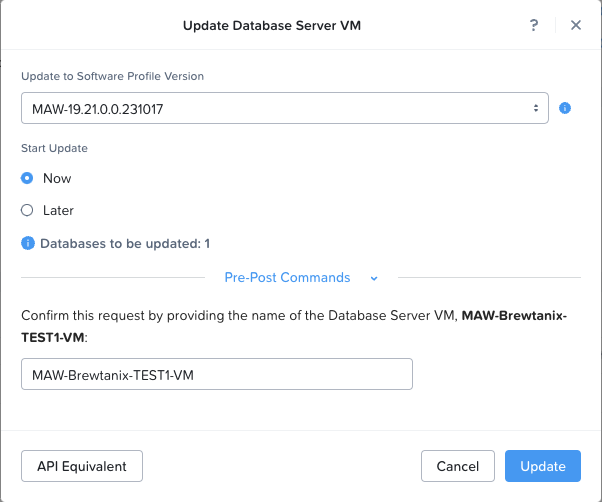
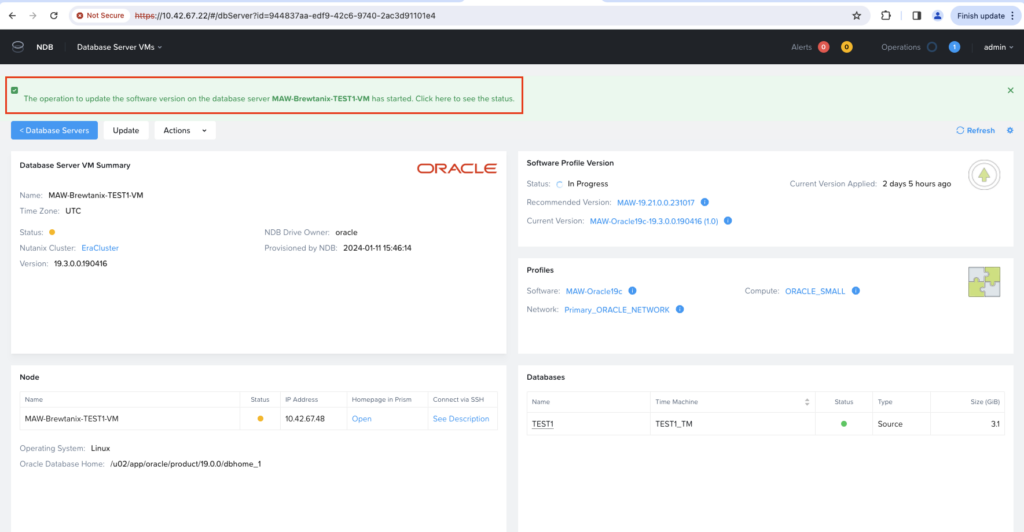
We will chose to patch it now. Confirmation needs to be given by giving the name for the Database Server VM, here MAW-Brewtanix-TEST1-VM. Click the Update button.
From the Database Server VMs menu, we can see that the operation has been started.
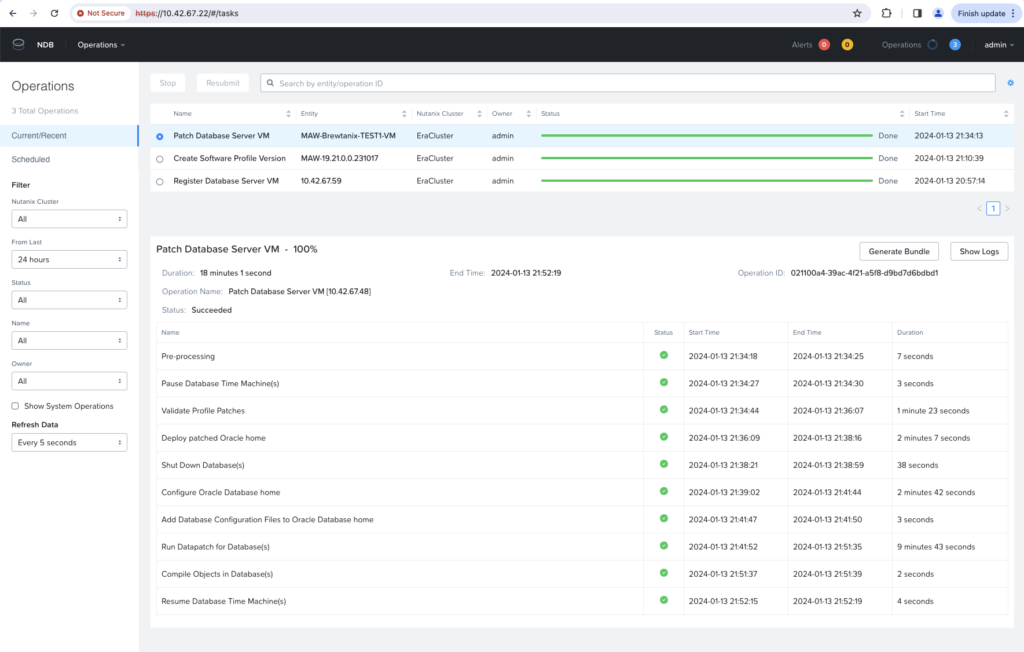
From the Operations menu we can see the process of the patching.
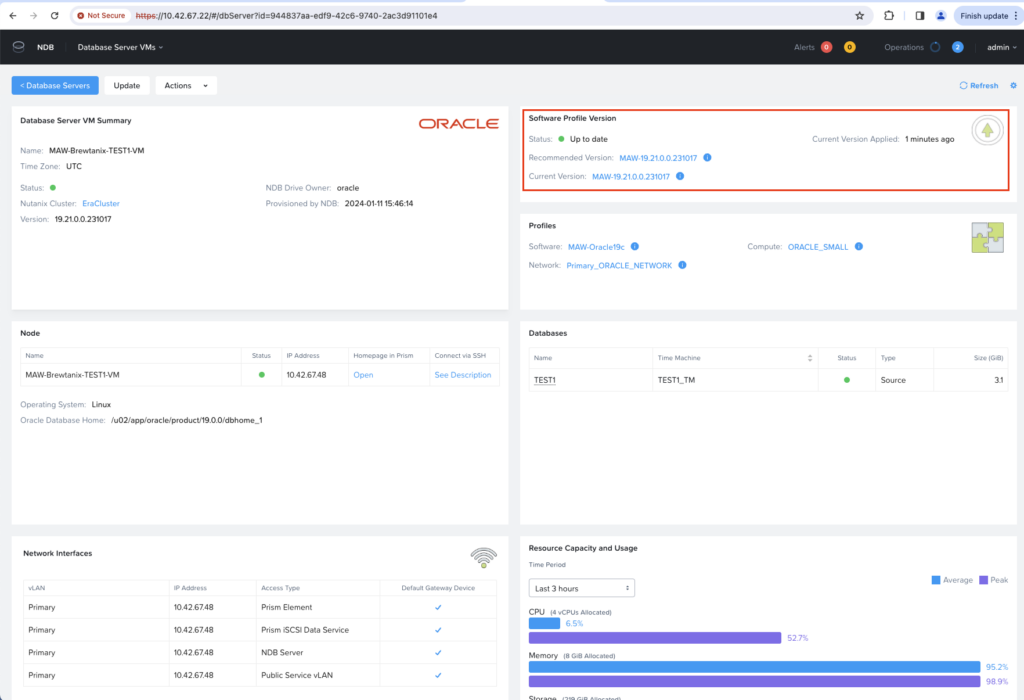
And finally, from the Database Server VMs menu, clicking of the concerned VM we can see that this one is now on the last recommended version.
Check recent patched VM and database
We can connect to the recent patched VM.
And check cfgtool logs.
-bash-4.2$ cd /u02/app/oracle/cfgtoollogs/sqlpatch/sqlpatch_120344_2024_01_13_20_42_09/

-bash-4.2$ ls -ltrh
total 33M
-rw------- 1 oracle oinstall  552 Jan 13 20:42 sqlpatch_catcon__catcon_120344.lst
-rw-r--r-- 1 oracle oinstall 1.5K Jan 13 20:42 bootstrap1.sql
-rw-r--r-- 1 oracle oinstall 1.6K Jan 13 20:42 bootstrap1_TEST1.log
-rw-r--r-- 1 oracle oinstall 7.3K Jan 13 20:42 install1.sql
-rw-r--r-- 1 oracle oinstall  326 Jan 13 20:50 sqlpatch_autorecomp_TEST1.log
-rw------- 1 oracle oinstall  23M Jan 13 20:51 sqlpatch_catcon_0.log
-rw-r--r-- 1 oracle oinstall 3.8K Jan 13 20:51 sqlpatch_summary.json
-rw-r--r-- 1 oracle oinstall 632K Jan 13 20:51 sqlpatch_invocation.log
-rw-r--r-- 1 oracle oinstall  133 Jan 13 20:51 sqlpatch_progress.json
-rw-r--r-- 1 oracle oinstall 9.1M Jan 13 20:51 sqlpatch_debug.log
The version of the dbhome, which should now run Oracle 19.21 version.
-bash-4.2$ $ORACLE_HOME/OPatch/opatch lspatches
35655527;OCW RELEASE UPDATE 19.21.0.0.0 (35655527)
35643107;Database Release Update : 19.21.0.0.231017 (35643107)

OPatch succeeded.

-bash-4.2$ hostname
MAW-Brewtanix-TEST1-VM

-bash-4.2$ echo $ORACLE_SID
TEST1
And finally database version, which is now 19.21.
-bash-4.2$ sqlplus / as sysdba

SQL*Plus: Release 19.0.0.0.0 - Production on Sat Jan 13 20:59:50 2024
Version 19.21.0.0.0

Copyright (c) 1982, 2022, Oracle.  All rights reserved.


Connected to:
Oracle Database 19c Enterprise Edition Release 19.0.0.0.0 - Production
Version 19.21.0.0.0

SQL> set lines 300 pages 500
SQL> select instance_name, host_name from v$instance;

INSTANCE_NAME    HOST_NAME
---------------- ----------------------------------------------------------------
TEST1            MAW-Brewtanix-TEST1-VM

SQL> select patch_id, source_version, target_version, status, description from dba_registry_sqlpatch;

  PATCH_ID SOURCE_VERSION  TARGET_VERSION  STATUS                    DESCRIPTION
---------- --------------- --------------- ------------------------- ----------------------------------------------------------------------------------------------------
  29517242 19.1.0.0.0      19.3.0.0.0      SUCCESS                   Database Release Update : 19.3.0.0.190416 (29517242)
  35643107 19.3.0.0.0      19.21.0.0.0     SUCCESS                   Database Release Update : 19.21.0.0.231017 (35643107)

SQL>
Patch all remaining Database Server VMs in one Maintenance Windows
We can now schedule all 4 remaining Database Server VMs patching in the same Maintenance Windows.
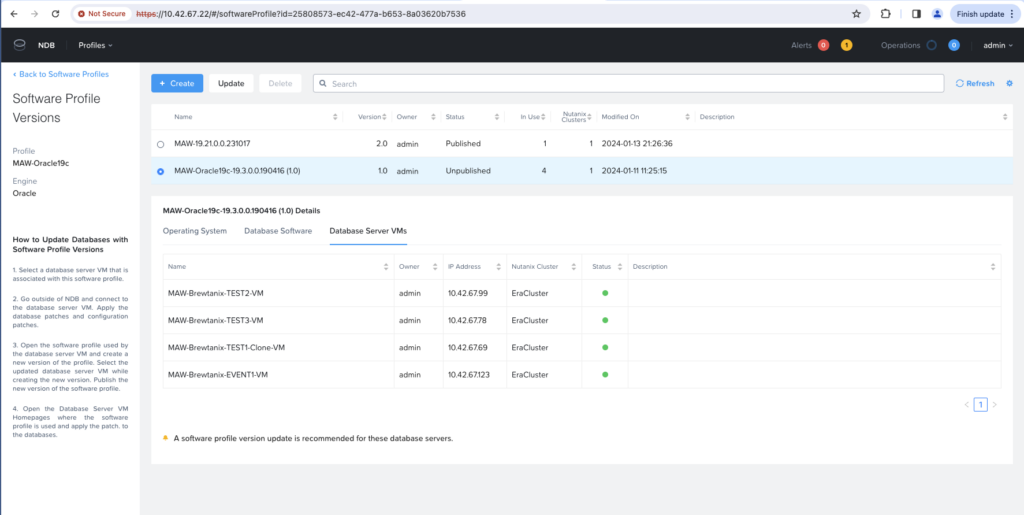
From the Profiles menu, Software submenu, clicking on our concerned Software Profile, MAW-Oracle19c, we can see that we have 4 VMs still running on 19.3 and only 1 running on last 19.21 Oracle version (TEST1 been recently patched).
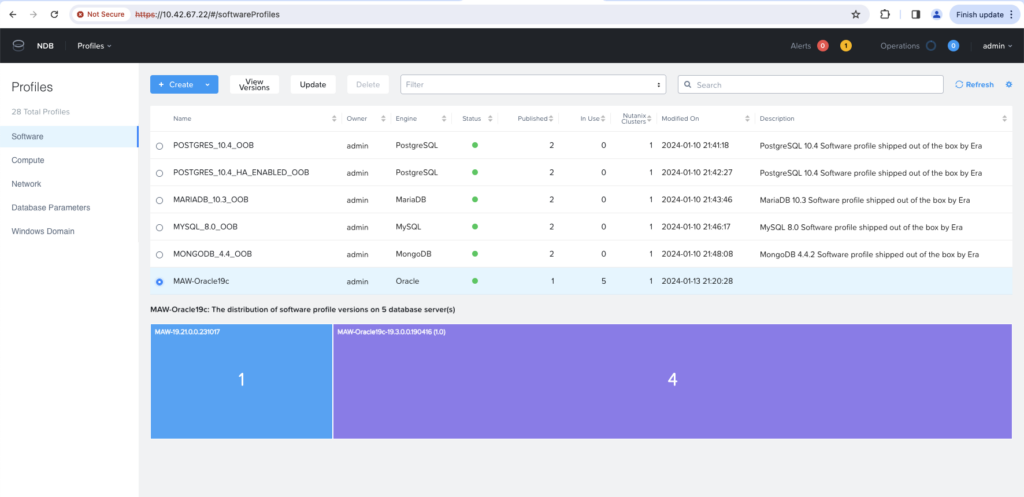
Entering our Software Profile, we can have a look on the VMs named running each software version.
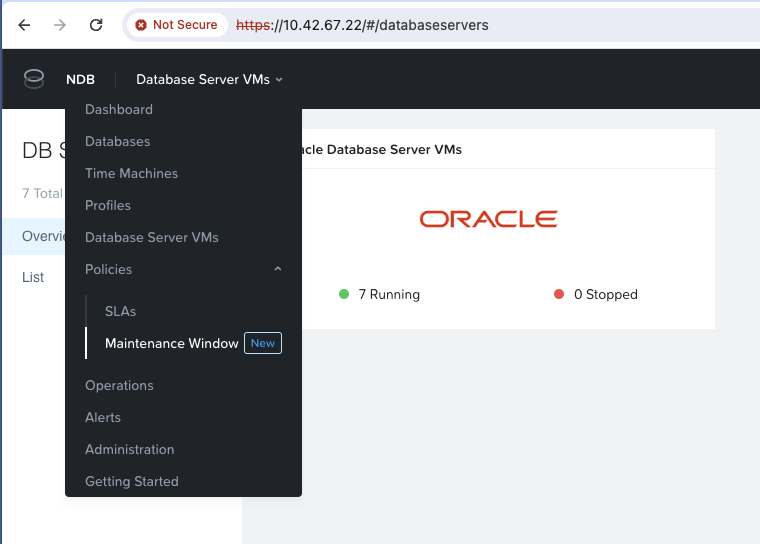
We need to create a Maintenance Windows. We can do this from the Policies menu, Maintenance Window submenu.
Click +Create button.

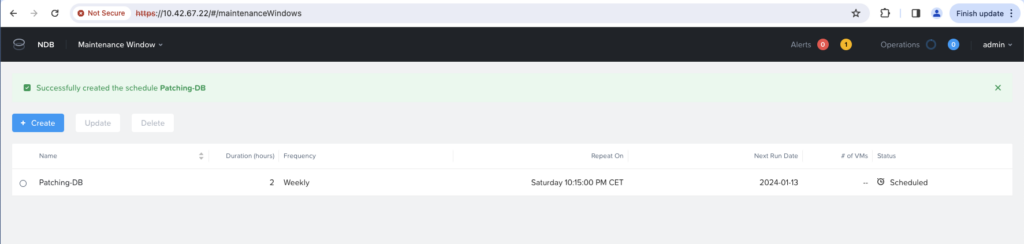
Give a name (here Patching-DB), choose scheduling, as weekly for example providing a repeated day and time. Give a time frame for the Maintenance Windows.
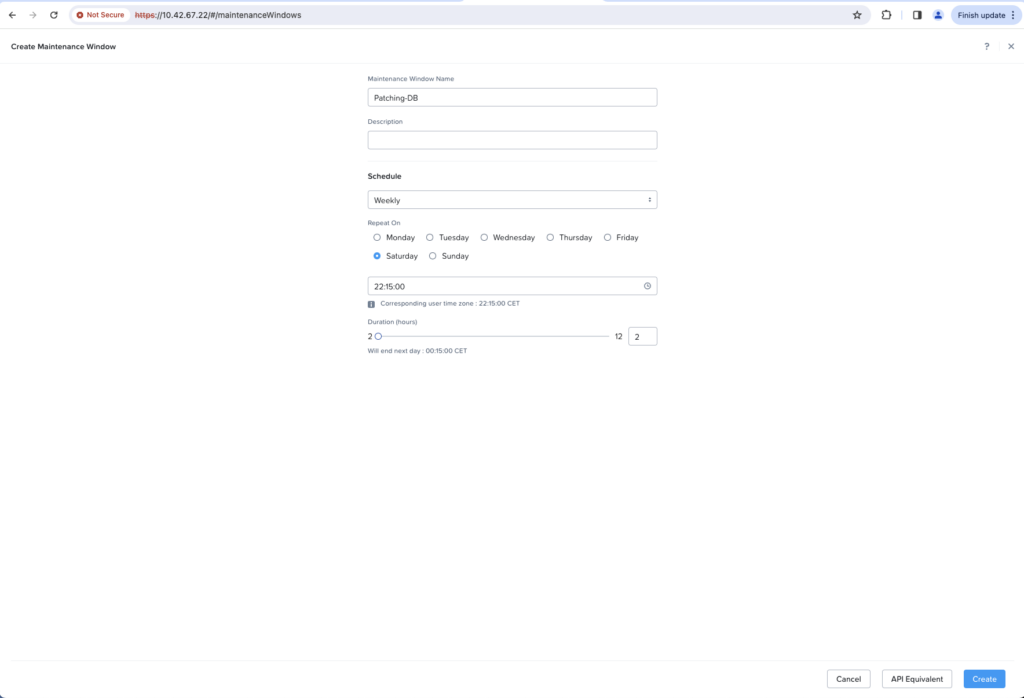
Maintenance Windows has been created.
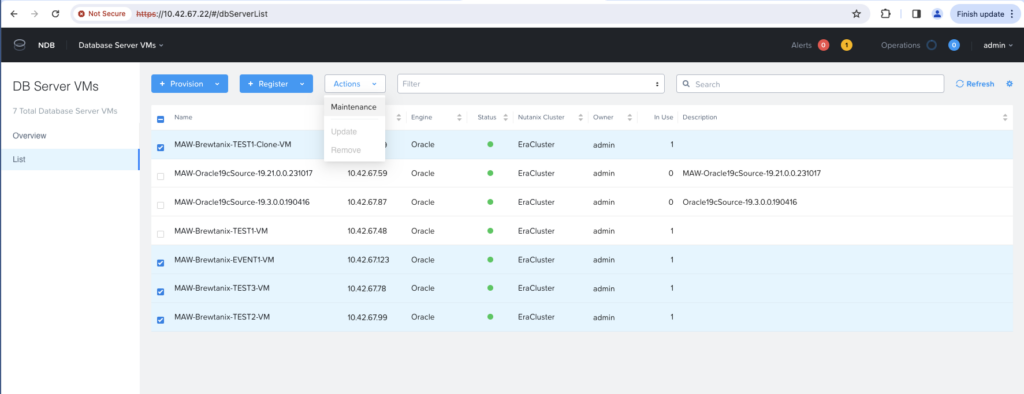
From the Database Server VMs, select I selected the 4 VMs remaining on 19.3 version, chosed Maintenance from the Actions menu.
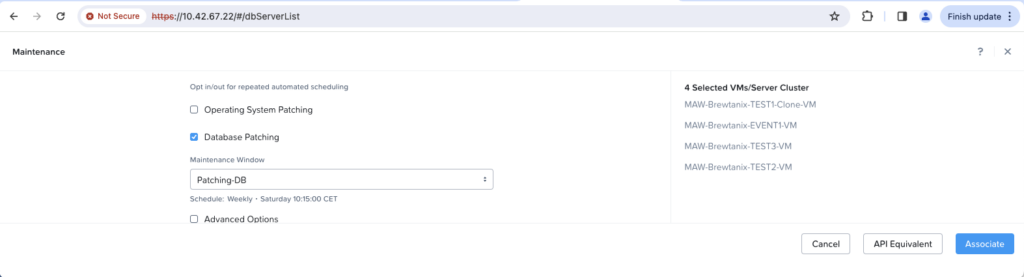
I selected Database Patching only, as I did not have any new OS version. I chose the appropriate Maintenance Windows that I have just created, and named Patching-DB. And finally associated the VMs to the maintenance windows by clicking on the Associate button.
Selecting the VMs again from the Database Server VMs menu, we can see that they are associated to the Patching-DB maintenance window.

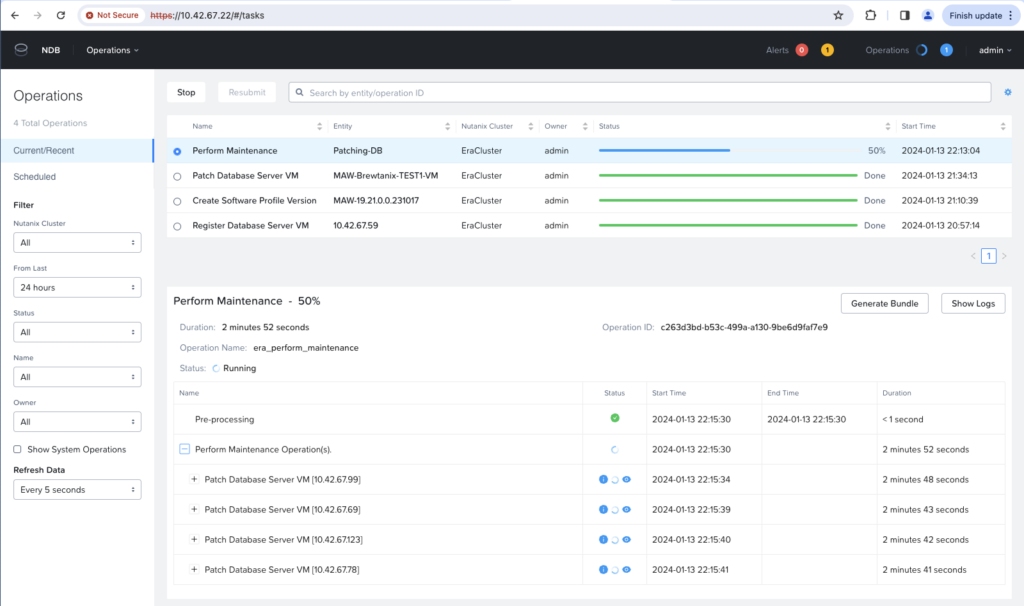
And status becomes QUEUED FOR PATCHING once the maintenance windows starts.

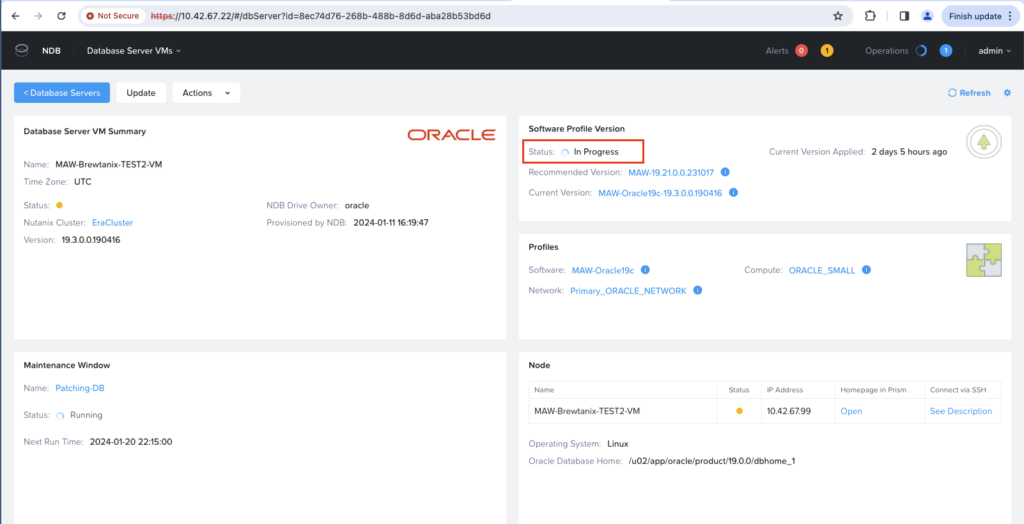
Selecting one VM, we see status of In Progress on the Software Profile Version part.
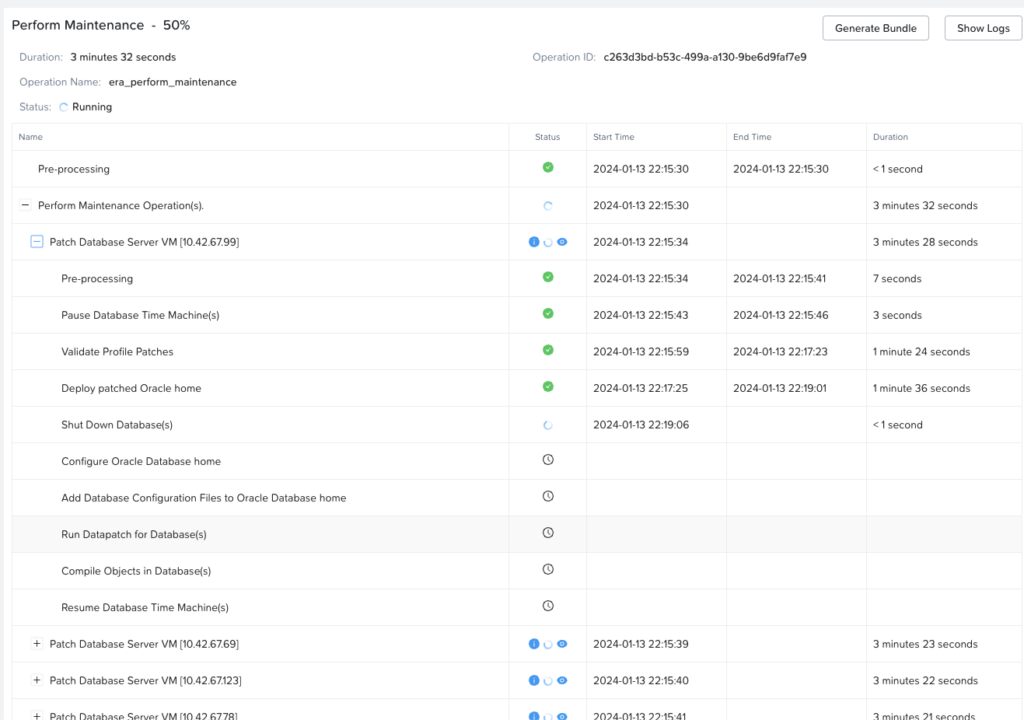
Same can be seen from the Operations menu.
To wrap up
As we could see it is more than easy and very efficient to patch several Oracle Databases with Nutanix NDB.
![Thumbnail [60x60]](https://www.dbi-services.com/blog/wp-content/uploads/2022/08/MAW_web-min-scaled.jpg)
![Thumbnail [90x90]](https://www.dbi-services.com/blog/wp-content/uploads/2025/05/JDE_Web-1-scaled.jpg)
![Thumbnail [90x90]](https://www.dbi-services.com/blog/wp-content/uploads/2022/11/CBL_web-min-min-scaled.jpg)