By Mouhamadou Diaw
Dbvisit 11 is released since a few months ans now is referenced as Dbvisit Standby MultiPlatform v11 ( Dbvisit StandbyMP 11 ) for Linux and Windows. It brings revolutionary improvements, including being able to manage both Oracle and SQL Server DR from a single GUI. In this blog I am showing how to install Dbvisit StandbyMP on a Linux both and how to setup a DR for an Oracle 21c Database
Dbvisit StandbyMP Installation
The configuration we will use is the following :
oraadserver : primary server with a database named PROD
oraadserver2 : standby server
DBvisit StandbyMP is composed by 2 main components
dbvagentmanager which is responsible for connecting to the Oracle and/or SQL Server databases, and communicating with the Dbvisit Control Center. The Dbvisit agent should be installed on each database server.
dbvcontrol which is the GUI that will be used to interact with the product. It replaces the Dbvisit console on earlier releases. It is recommended to install this component on a separate server. In this blog I will install it on the production server.
We present below the installation of the agent on server oraadserver. The same agent installation will be done on the standby server
Unpack the archive and run the command install_agent
oracle@oraadserver:/home/oracle/ [PROD (CDB$ROOT)] ./install-agent-v11.1.0
+----------------------------------------------------------------------+
|          ____  _                  _ _           __  __ ____          |
|         / ___|| |_ __ _ _ __   __| | |__  _   _|  \/  |  _ \         |
|         \___ \| __/ _' | '_ \ / _' | '_ \| | | | |\/| | |_) |        |
|          ___) | || (_| | | | | (_| | |_) | |_| | |  | |  __/         |
|         |____/ \__\__,_|_| |_|\__,_|_.__/ \__, |_|  |_|_|            |
|          Copyright 2022                   |___/   By Dbvisit         |
+----------------------------------------------------------------------+

Welcome to Dbvisit StandbyMP setup version v11.1.0.

? Please carefully read the end-user license agreement at https://dbvisit.com/eula. Do you agree to the terms of this agreement? Yes
? Which directory should the software be installed into? /u01/app/dbvisit

- - - You are now configuring the Dbvisit StandbyMP Agent - - -

The Agent will listen on the following discovered addresses:
 -  127.0.0.1
 -  192.168.56.61
 -  10.0.3.15
 -  192.168.2.21
? Agent File Transfer Port: 7890
? Fully Qualified Domain Name for this host: oraadserver
? Fully Qualified Domain Name for the Control Center: oraadserver
? Agent Communications Port: 5533
Each Dbvisit StandbyMP Agent and the Dbvisit StandbyMP Control Center must
be configured with the same passphrase. This is how we know that they are all
intended to be part of the same system. Please specify a strong passphrase - we
suggest at least 12 characters, containing at least 2 numbers and 2 symbols.
? Passphrase: ****
? Confirm Passphrase: ****

- - - Dbvisit StandbyMP Agent configuration finished - - -


- - - Ready to perform installation - - -

? Do you wish to proceed with the setup using the supplied configuration options? Proceed with setup

- - - Performing installation - - -

Copying software files to '/u01/app/dbvisit'...
Writing Agent configuration file '/u01/app/dbvisit/standbymp/conf/dbvagentmanager.ini'...

- - - Installation successful! - - -


To enable the installed Dbvisit StandbyMP components to run as system services, you will need to execute some commands as the "root" user in order to complete the setup.

To install the system service(s), you can run, substituting the name of the user to run as if it is different from the current user:
        sudo /u01/app/dbvisit/standbymp/bin/dbvagentmanager service install --user oracle
To start the system service(s), you can run:
        sudo /u01/app/dbvisit/standbymp/bin/dbvagentmanager service start

- - - Configuration Summary - - -

Install Directory:                                  /u01/app/dbvisit
Fully Qualified Domain Name for this host:          oraadserver
Fully Qualified Domain Name for the Control Center: oraadserver
Agent Communications Port:                          5533
Agent File Transfer Port:                           7890

- - - Installation Summary - - -

The following actions have been performed:
 -  Installed Dbvisit StandbyMP Agent software into: /u01/app/dbvisit/standbymp
 -  Agent settings are available in the configuration file: /u01/app/dbvisit/standbymp/conf/dbvagentmanager.ini
 -  Generated new security certificates in: /u01/app/dbvisit/standbymp/certificates

- - - INSTALLATION SUCCESSFUL - - -

oracle@oraadserver:/home/oracle/ [PROD (CDB$ROOT)]
As required in the installation, we have to create systemd services for dbagentmanager on the server oraadserver
[root@oraadserver ~]# /u01/app/dbvisit/standbymp/bin/dbvagentmanager service install --user oracle
[root@oraadserver ~]# /u01/app/dbvisit/standbymp/bin/dbvagentmanager service start

[root@oraadserver ~]# ps -ef | grep dbv
oracle   17082     1  0 13:10 ?        00:00:00 /u01/app/dbvisit/standbymp/bin/dbvagentmanager service run
root     17097 16928  0 13:10 pts/0    00:00:00 grep --color=auto dbv


[root@oraadserver ~]# systemctl status dbvagentmanager
● dbvagentmanager.service - The Dbvisit StandbyMP Agent provides connectivity to databases on this computer. This Agent is used & managed by the Dbvisit StandbyMP Control Center.
   Loaded: loaded (/etc/systemd/system/dbvagentmanager.service; enabled; vendor preset: disabled)
   Active: active (running) since Wed 2022-08-17 13:10:21 CEST; 56s ago
 Main PID: 17082 (dbvagentmanager)
   CGroup: /system.slice/dbvagentmanager.service
           └─17082 /u01/app/dbvisit/standbymp/bin/dbvagentmanager service run

Aug 17 13:10:21 oraadserver systemd[1]: Started The Dbvisit StandbyMP Agent provides connectivity to databases o...nter..
Aug 17 13:10:21 oraadserver dbvagentmanager[17082]: Changing to directory '/u01/app/dbvisit/standbymp'
Aug 17 13:10:21 oraadserver dbvagentmanager[17082]: Using log directory '/u01/app/dbvisit/standbymp/log'
Aug 17 13:10:21 oraadserver dbvagentmanager[17082]: Setting database directory to '/u01/app/dbvisit/standbymp/db'
Aug 17 13:10:21 oraadserver dbvagentmanager[17082]: Starting service *agentmanagersvc.agentManagerService
Hint: Some lines were ellipsized, use -l to show in full.
[root@oraadserver ~]# systemctl enable dbvagentmanager
[root@oraadserver ~]#
Remember that the agent should be installed on both database servers
Now we can install the dbvcontrol. As specified earlier we will install it on the primary server
oracle@oraadserver:/home/oracle/ [PROD (CDB$ROOT)] ./install-control-v11.1.0
+----------------------------------------------------------------------+
|          ____  _                  _ _           __  __ ____          |
|         / ___|| |_ __ _ _ __   __| | |__  _   _|  \/  |  _ \         |
|         \___ \| __/ _' | '_ \ / _' | '_ \| | | | |\/| | |_) |        |
|          ___) | || (_| | | | | (_| | |_) | |_| | |  | |  __/         |
|         |____/ \__\__,_|_| |_|\__,_|_.__/ \__, |_|  |_|_|            |
|          Copyright 2022                   |___/   By Dbvisit         |
+----------------------------------------------------------------------+

Welcome to Dbvisit StandbyMP setup version v11.1.0.

? Please carefully read the end-user license agreement at https://dbvisit.com/eula. Do you agree to the terms of this agreement? Yes
? Which directory should the software be installed into? /u01/app/dbvisit

- - - You are now configuring the Dbvisit StandbyMP Control Center - - -

The Control Center will listen on the following discovered addresses:
 -  127.0.0.1
 -  192.168.56.61
 -  10.0.3.15
 -  192.168.2.21
? Control Center Web Server Port: 4433
? Agent Communications Port: 5533
Each Dbvisit StandbyMP Agent and the Dbvisit StandbyMP Control Center must
be configured with the same passphrase. This is how we know that they are all
intended to be part of the same system. Please specify a strong passphrase - we
suggest at least 12 characters, containing at least 2 numbers and 2 symbols.
? Passphrase: ****
? Confirm Passphrase: ****

- - - Dbvisit StandbyMP Control Center configuration finished - - -


- - - Ready to perform installation - - -

? Do you wish to proceed with the setup using the supplied configuration options? Proceed with setup

- - - Performing installation - - -

Copying software files to '/u01/app/dbvisit'...
Writing Control Center configuration file '/u01/app/dbvisit/standbymp/conf/dbvcontrol.ini'...

- - - Installation successful! - - -


To enable the installed Dbvisit StandbyMP components to run as system services, you will need to execute some commands as the "root" user in order to complete the setup.

To install the system service(s), you can run, substituting the name of the user to run as if it is different from the current user:
        sudo /u01/app/dbvisit/standbymp/bin/dbvcontrol service install --user oracle
To start the system service(s), you can run:
        sudo /u01/app/dbvisit/standbymp/bin/dbvcontrol service start

- - - Configuration Summary - - -

Install Directory:              /u01/app/dbvisit
Control Center Web Server Port: 4433
Agent Communications Port:      5533

- - - Installation Summary - - -

The following actions have been performed:
 -  Installed Dbvisit StandbyMP Control Center software into: /u01/app/dbvisit/standbymp
 -  Control Center settings are available in the configuration file: /u01/app/dbvisit/standbymp/conf/dbvcontrol.ini
 -  Generated new security certificates in: /u01/app/dbvisit/standbymp/certificates

- - - INSTALLATION SUCCESSFUL - - -

oracle@oraadserver:/home/oracle/ [PROD (CDB$ROOT)]
Here also we have to create the dbvcontrol service for systemd
[root@oraadserver ~]# /u01/app/dbvisit/standbymp/bin/dbvcontrol service install --user oracle
[root@oraadserver ~]# /u01/app/dbvisit/standbymp/bin/dbvcontrol service start

[root@oraadserver ~]# ps -ef | grep dbv
oracle   17082     1  0 13:10 ?        00:00:10 /u01/app/dbvisit/standbymp/bin/dbvagentmanager service run
oracle   19345     1  3 13:49 ?        00:00:00 /u01/app/dbvisit/standbymp/bin/dbvcontrol service run
oracle   19356 17082  0 13:49 ?        00:00:00 /u01/app/dbvisit/standbymp/bin/dbvhelper -agentManagerId 2jec20xwekwqx -directorId 1ct8ttq080iqh -hostAddress oraadserver -natsAddress oraadserver -natsPort 5533 -configurationType Oracle -helperProcessKey 2jec20xwekwqx
root     19369 18150  0 13:49 pts/0    00:00:00 grep --color=auto dbv
[root@oraadserver ~]#

[root@oraadserver ~]# systemctl status dbvcontrol
● dbvcontrol.service - The Dbvisit StandbyMP Control Center provides centralized coordination for Dbvisit StandbyMP Agent operations, as well as the web-based management console.
   Loaded: loaded (/etc/systemd/system/dbvcontrol.service; enabled; vendor preset: disabled)
   Active: active (running) since Wed 2022-08-17 13:49:31 CEST; 1min 20s ago
 Main PID: 19345 (dbvcontrol)
   CGroup: /system.slice/dbvcontrol.service
           └─19345 /u01/app/dbvisit/standbymp/bin/dbvcontrol service run

Aug 17 13:49:31 oraadserver systemd[1]: Started The Dbvisit StandbyMP Control Center provides...e..
Aug 17 13:49:31 oraadserver dbvcontrol[19345]: Changing to directory '/u01/app/dbvisit/standbymp'
Aug 17 13:49:31 oraadserver dbvcontrol[19345]: Using log directory '/u01/app/dbvisit/standbymp/log'
Aug 17 13:49:31 oraadserver dbvcontrol[19345]: Setting database directory to '/u01/app/dbvisi...db'
Aug 17 13:49:31 oraadserver dbvcontrol[19345]: Starting service *natssvc.natsSvc
Aug 17 13:49:31 oraadserver dbvcontrol[19345]: Starting service *directorsvc.directorService
Aug 17 13:49:31 oraadserver dbvcontrol[19345]: Starting service *guisvc.guiService
Aug 17 13:49:31 oraadserver dbvcontrol[19345]: Starting service *notificationsvc.notification...ice
Aug 17 13:49:31 oraadserver dbvcontrol[19345]: Starting service *observersvc.observerService
Hint: Some lines were ellipsized, use -l to show in full.
[root@oraadserver ~]# systemctl enable dbvcontrol
[root@oraadserver ~]#
Standby Creation
Once dbvcontrol installed, we can access it via a browser on port 4433
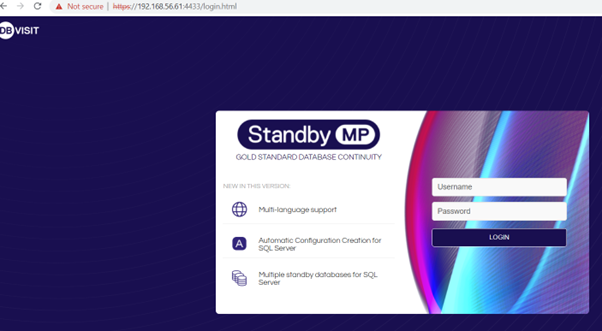
Log in with the default credentials admin/admin. There is yet no configuration.
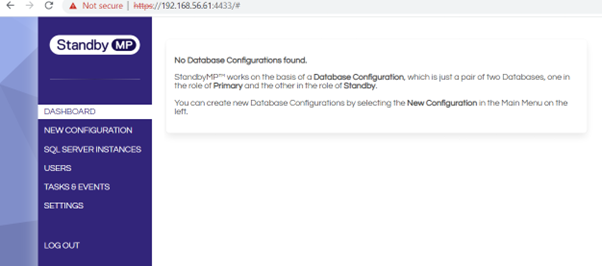
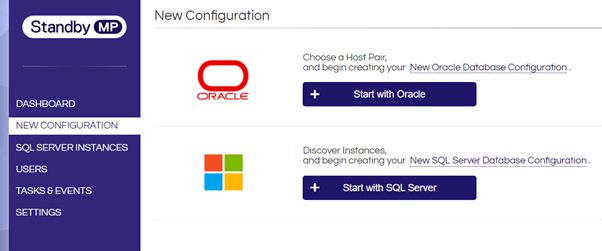
We can then create the configuration for the database PROD. Click on Start with Oracle
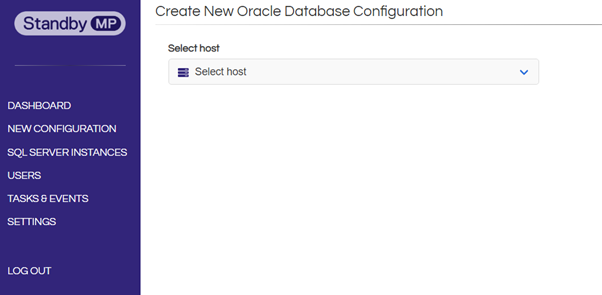
Select the primary server
Select the standby server and fill the information
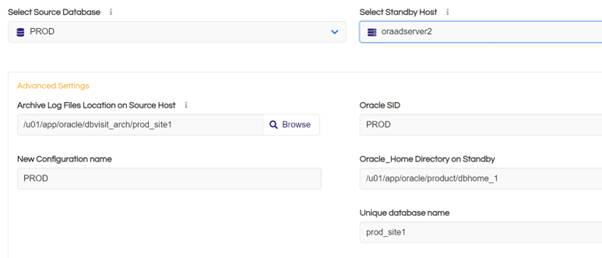
And create the configuration.
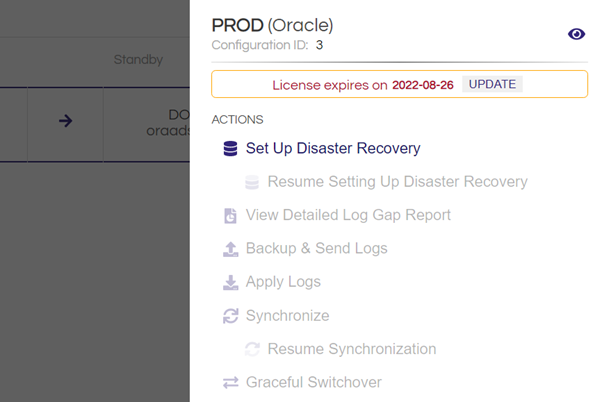
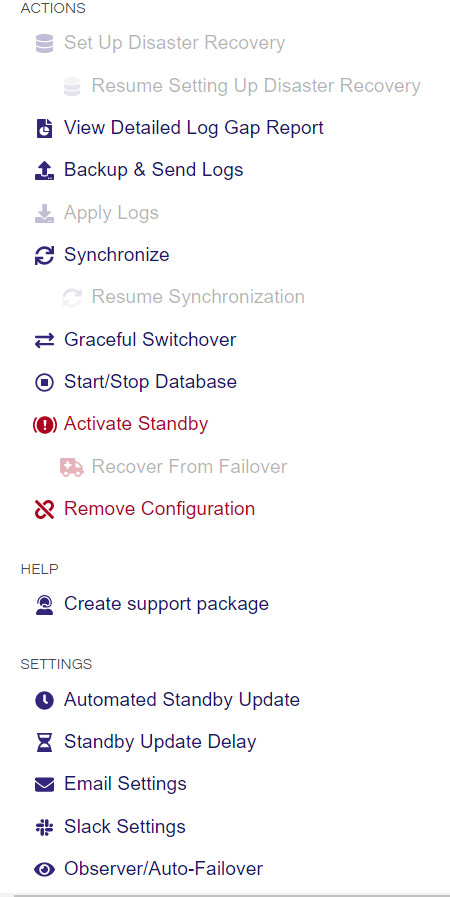
After select the configuration and then click on ACTIONS

We can can see on the right actions that we can do and let’s select the Set Up Disaster Recovery
Select your options
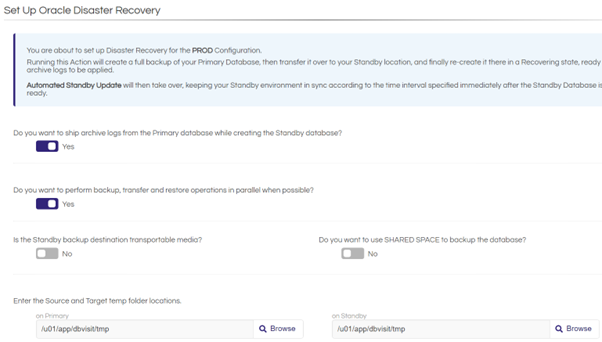
We also have to fill some information and then cick on Create Standby Database

We can follow the status of the job
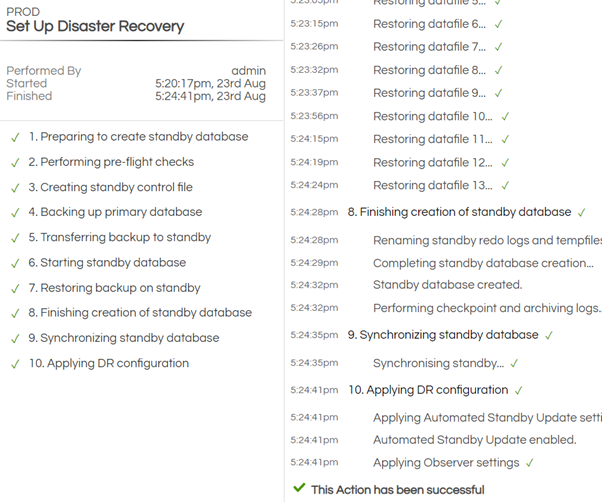
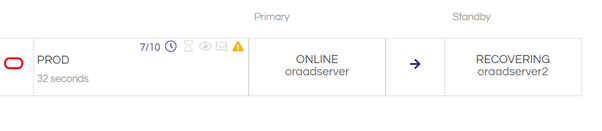
And if everything is fine we have now our standby done
On the actions in the right, we can see some tasks we can do.
For example, run a Gap report
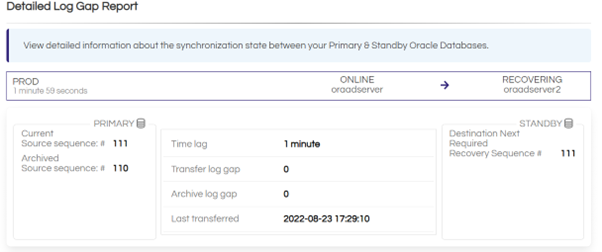
Of course, we can also check the Gap Report using the command line
Conclusion
Hope this blog will help.
![Thumbnail [60x60]](https://www.dbi-services.com/blog/wp-content/uploads/2022/12/oracle-square.png)
![Thumbnail [90x90]](https://www.dbi-services.com/blog/wp-content/uploads/2022/08/STH_web-min-scaled.jpg)
![Thumbnail [90x90]](https://www.dbi-services.com/blog/wp-content/uploads/2025/11/LTO_WEB.jpg)
![Thumbnail [90x90]](https://www.dbi-services.com/blog/wp-content/uploads/2022/08/MAW_web-min-scaled.jpg)
![Thumbnail [90x90]](https://www.dbi-services.com/blog/wp-content/uploads/2023/01/APY_web-scaled.jpg)