Introduction
I am currently setting up a new “Base Image” virtual machine (Red Hat Enterprise Linux 7.6) which will be used to create 6 brand new Oracle database servers requested by a customer. Besides installing and configuring the OS, I also have to install 3 Oracle Homes and one Cloud Control Agent 13c.
An OMS13c server already exists including an Agent patched with the EM-AGENT Bundle Patch 13.2.0.0.181031 (28680866) :
oracle@oms13c:/home/oracle/ [agent13c] opatch lsinventory | grep 28680866

Patch  28680866     : applied on Tue Nov 13 17:32:48 CET 2018

     28680866, 28744209, 28298159, 25141245, 28533438, 28651962, 28635152

oracle@oms13c:/home/oracle/ [agent13c]
However, when I wanted to deploy the CC13c Agent on my Master VM from the Cloud Control 13c web interface (Setup > Add Target > Add Targets Manually > Install Agent on Host), the Agent was successfully installed but… without the patch 28680866 🙁 . That means I will have to install the patch manually. Considering that the goal of creating a “Base Image” VM for this project is to quickly and easily delivering 6 database servers, having to install AND to patch the Agent on each server is not very efficient and doesn’t fit with what I want.
I had so to find a better way to deploy a patched Agent and the solution has been to use an Agent Gold Image. It allowed me to do exactly what I wanted.
In this post I will show how I have set this up.
Deploying the Agent
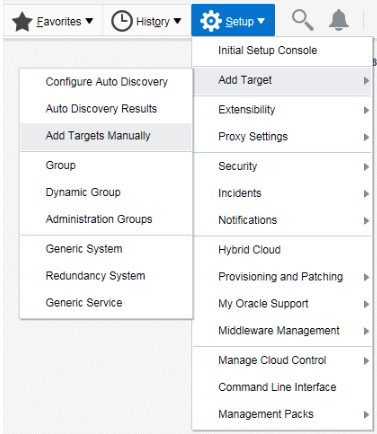
Here is how we can deploy the Agent on the Base Image VM. From Cloud Control 13c, we click on Setup > Add Target > Add Targets Manually > Install Agent on Host :
Then we insert the name of the target VM, we select the approriate platform…
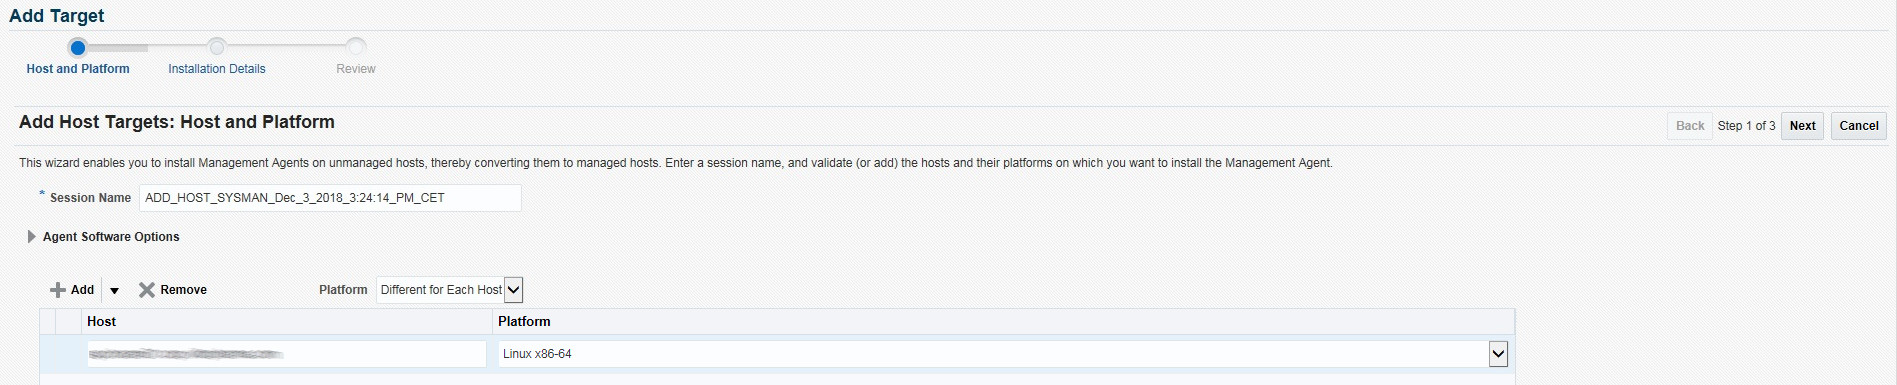
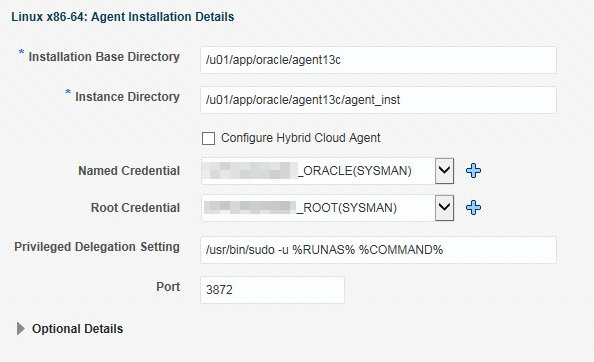
…and we specify the directory in which we want to install the Agent (Agent Home) :
Everything is now ready to start the deployment. We can click on Next to see the review of the deployment configuration and on Deploy Agent to start.
Once the Agent is correctly deployed, the status should be like that :

As explained above we can see that the Agent is not patched with the Bundle Patch of October 2018 :
oracle@basevm:/u01/app/oracle/agent13c/agent_13.2.0.0.0/OPatch/ [agent13c] ./opatch lsinventory | grep 28680866

oracle@basevm:/u01/app/oracle/agent13c/agent_13.2.0.0.0/OPatch/ [agent13c]
We must patch it manually…
Updating OPatch
Before installing a patch it is highly recommended to update the OPatch utility first. All version of the tool are available here. The current one my VM is 13.8.0.0.0 :
oracle@basevm:/u01/app/oracle/software/OPatch/oms13cAgent/ [agent13c] opatch version

OPatch Version: 13.8.0.0.0


OPatch succeeded.
We must use the following command to update OPatch :
oracle@basevm:/u01/app/oracle/software/OPatch/oms13cAgent/ [agent13c] unzip -q p6880880_139000_Generic.zip

oracle@basevm:/u01/app/oracle/software/OPatch/oms13cAgent/ [agent13c] cd 6880880/

oracle@basevm:/u01/app/oracle/software/OPatch/oms13cAgent/6880880/ [agent13c] $ORACLE_HOME/oracle_common/jdk/bin/java -jar ./opatch_generic.jar -silent oracle_home=$ORACLE_HOME

Launcher log file is /tmp/OraInstall2018-11-23_02-58-11PM/launcher2018-11-23_02-58-11PM.log.

Extracting the installer . . . . Done

Checking if CPU speed is above 300 MHz.   Actual 2099.998 MHz    Passed

Checking swap space: must be greater than 512 MB.   Actual 4095 MB    Passed

Checking if this platform requires a 64-bit JVM.   Actual 64    Passed (64-bit not required)

Checking temp space: must be greater than 300 MB.   Actual 27268 MB    Passed

Preparing to launch the Oracle Universal Installer from /tmp/OraInstall2018-11-23_02-58-11PM

Installation Summary

[...]

[...]

Logs successfully copied to /u01/app/oraInventory/logs.

oracle@basevm:/u01/app/oracle/software/OPatch/oms13cAgent/6880880/ [agent13c] opatch version

OPatch Version: 13.9.3.3.0


OPatch succeeded.

oracle@basevm:/u01/app/oracle/software/OPatch/oms13cAgent/6880880/ [agent13c]
You probably noticed that since OEM 13cR2 the way to update OPatch has changed : no more easy unzip, we have to use a Java file instead (don’t really understand why…).
Patching the Agent
As OPatch is now up to date we can proceed with the installation of the patch 28680866 :
oracle@basevm:/u01/app/oracle/software/agent13c/patch/ [agent13c] unzip -q p28680866_132000_Generic.zip

oracle@basevm:/u01/app/oracle/software/agent13c/patch/ [agent13c] cd 28680866/28680866/

oracle@basevm:/u01/app/oracle/software/agent13c/patch/28680866/28680866/ [agent13c] emctl stop agent

Oracle Enterprise Manager Cloud Control 13c Release 2

Copyright (c) 1996, 2016 Oracle Corporation.  All rights reserved.

Stopping agent ... stopped.

oracle@basevm:/u01/app/oracle/software/agent13c/patch/28680866/28680866/ [agent13c] opatch apply

Oracle Interim Patch Installer version 13.9.3.3.0

Copyright (c) 2018, Oracle Corporation.  All rights reserved.


Oracle Home       : /u01/app/oracle/agent13c/agent_13.2.0.0.0

Central Inventory : /u01/app/oraInventory

   from           : /u01/app/oracle/agent13c/agent_13.2.0.0.0/oraInst.loc

OPatch version    : 13.9.3.3.0

OUI version       : 13.9.1.0.0

Log file location : /u01/app/oracle/agent13c/agent_13.2.0.0.0/cfgtoollogs/opatch/opatch2018-11-23_15-33-14PM_1.log


OPatch detects the Middleware Home as "/u01/app/oracle/agent13c"


Verifying environment and performing prerequisite checks...

OPatch continues with these patches:   28680866


Do you want to proceed? [y|n]

y

User Responded with: Y

All checks passed.

Backing up files...

Applying interim patch '28680866' to OH '/u01/app/oracle/agent13c/agent_13.2.0.0.0'


Patching component oracle.sysman.top.agent, 13.2.0.0.0...

Patch 28680866 successfully applied.

Log file location: /u01/app/oracle/agent13c/agent_13.2.0.0.0/cfgtoollogs/opatch/opatch2018-11-23_15-33-14PM_1.log


OPatch succeeded.

oracle@basevm:/u01/app/oracle/software/agent13c/patch/28680866/28680866/ [agent13c]
Let’s restart the Agent and check that the patch has been applied :
oracle@basevm:/u01/app/oracle/software/agent13c/patch/28680866/28680866/ [agent13c] emctl start agent

Oracle Enterprise Manager Cloud Control 13c Release 2

Copyright (c) 1996, 2016 Oracle Corporation.  All rights reserved.

Starting agent ................... started.

oracle@basevm:/u01/app/oracle/software/agent13c/patch/28680866/28680866/ [agent13c] opatch lsinventory | grep 28680866

Patch  28680866     : applied on Mon Dec 03 17:17:25 CET 2018

     28680866, 28744209, 28298159, 25141245, 28533438, 28651962, 28635152

oracle@basevm:/u01/app/oracle/software/agent13c/patch/28680866/28680866/ [agent13c]
Perfect. The Agent is now patched but…
Installing the DB plugin
…what about its plugins ? We can see from the OMS13c server that the Agent doesn’t have the database plugin installed :
oracle@oms13c:/home/oracle/ [oms13c] emcli login -username=sysman

Enter password :


Login successful

oracle@oms13c:/home/oracle/ [oms13c] emcli list_plugins_on_agent -agent_names="basevm.xx.yyyy.com:3872"

The Agent URL is https://basevm.xx.yyyy.com:3872/emd/main/ -

Plug-in Name                                 Plugin-id                     Version [revision]


Oracle Home                                  oracle.sysman.oh              13.2.0.0.0

Systems Infrastructure                       oracle.sysman.si              13.2.2.0.0
This is normal. As no Oracle database are currently running on the VM, the DB plugin was not installed automatically during the Agent deployment. We have to install it manually using the following command :
oracle@oms13c:/home/oracle/ [oms13c] emcli deploy_plugin_on_agent -agent_names="basevm.xx.yyyy.com:3872" -plugin=oracle.sysman.db

Agent side plug-in deployment is in progress

Use "emcli get_plugin_deployment_status -plugin=oracle.sysman.db" to track the plug-in deployment status.

oracle@oms13c:/home/oracle/ [oms13c]
To check the status of the plugin installation :
oracle@oms13c:/home/oracle/ [oms13c] emcli get_plugin_deployment_status -plugin=oracle.sysman.db

Plug-in Deployment/Undeployment Status


Destination          : Management Agent - basevm.xx.yyyy.com:3872

Plug-in Name         : Oracle Database

Version              : 13.2.2.0.0

ID                   : oracle.sysman.db

Content              : Plug-in

Action               : Deployment

Status               : Success

Steps Info:

---------------------------------------- ------------------------- ------------------------- ----------

Step                                     Start Time                End Time                  Status

---------------------------------------- ------------------------- ------------------------- ----------

Submit job for deployment                11/23/18 4:06:29 PM CET   11/23/18 4:06:30 PM CET   Success


Initialize                               11/23/18 4:06:32 PM CET   11/23/18 4:06:43 PM CET   Success


Validate Environment                     11/23/18 4:06:44 PM CET   11/23/18 4:06:44 PM CET   Success


Install software                         11/23/18 4:06:44 PM CET   11/23/18 4:06:45 PM CET   Success


Attach Oracle Home to Inventory          11/23/18 4:06:46 PM CET   11/23/18 4:07:04 PM CET   Success


Configure plug-in on Management Agent    11/23/18 4:07:05 PM CET   11/23/18 4:07:28 PM CET   Success


Update inventory                         11/23/18 4:07:23 PM CET   11/23/18 4:07:28 PM CET   Success


---------------------------------------- ------------------------- ------------------------- ----------

oracle@oms13c:/home/oracle/ [oms13c]
Quick check :
oracle@oms13c:/home/oracle/ emcli list_plugins_on_agent -agent_names="basevm.xx.yyyy.com:3872"

The Agent URL is https://basevm.xx.yyyy.com:3872/emd/main/ -

Plug-in Name                                 Plugin-id                     Version [revision]


Oracle Database                              oracle.sysman.db              13.2.2.0.0

Oracle Home                                  oracle.sysman.oh              13.2.0.0.0

Systems Infrastructure                       oracle.sysman.si              13.2.2.0.0


oracle@oms13c:/home/oracle/ [oms13c]
The Agent is now exactly in the state in which we want to deploy it on all 6 servers (OPatch up to date, Agent patched, DB plugin installed).
It’s now time to move forward with the creation of an Agent Gold Image.
Creating the Agent Gold image
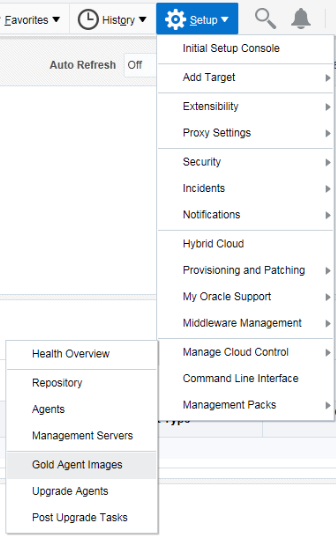
Going back to Cloud Control we can navigate to Setup > Manage Cloud Control > Gold Agent Images :
We click on Manage All Images…

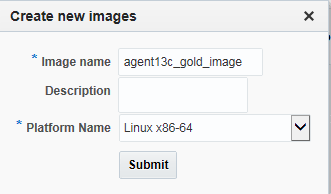
…then on Create and we give a name to our Image :
Once the Image created, we must create its 1st version. We click on the Image name and then on Action > Create. From here we can select the Agent configured earlier on the VM. It will be the source of the Gold Image :

The creation of the Gold Agent Image and its 1st version can be also done from command-line with the following emcli command :
oracle@oms13c:/home/oracle/ [oms13c] emcli create_gold_agent_image -image_name="agent13c_gold_image" -version_name="gold_image_v1" -source_agent="basevm.xx.yyyy.com:3872"

A gold agent image create operation with name "GOLD_AGENT_IMAGE_CREATE_2018_12_03_22_04_20_042" has been submitted.

You can track the progress of this session using the command "emcli get_gold_agent_image_activity_status -operation_name=GOLD_AGENT_IMAGE_CREATE_2018_12_03_22_04_20_042"


oracle@oms13c:/home/oracle/ [oms13c] emcli get_gold_agent_image_activity_status -operation_name=GOLD_AGENT_IMAGE_CREATE_2018_12_03_22_04_20_042

Inputs

------

Gold Image Version Name  : gold_image_v1

Gold Image Name          : agent13c_gold_image

Source Agent             : basevm.xx.yyyy.com:3872

Working Directory        : %agentStateDir%/install


Status

-------

Step Name                Status       Error  Cause  Recommendation

Create Gold Agent Image  IN_PROGRESS


oracle@oms13c:/home/oracle/
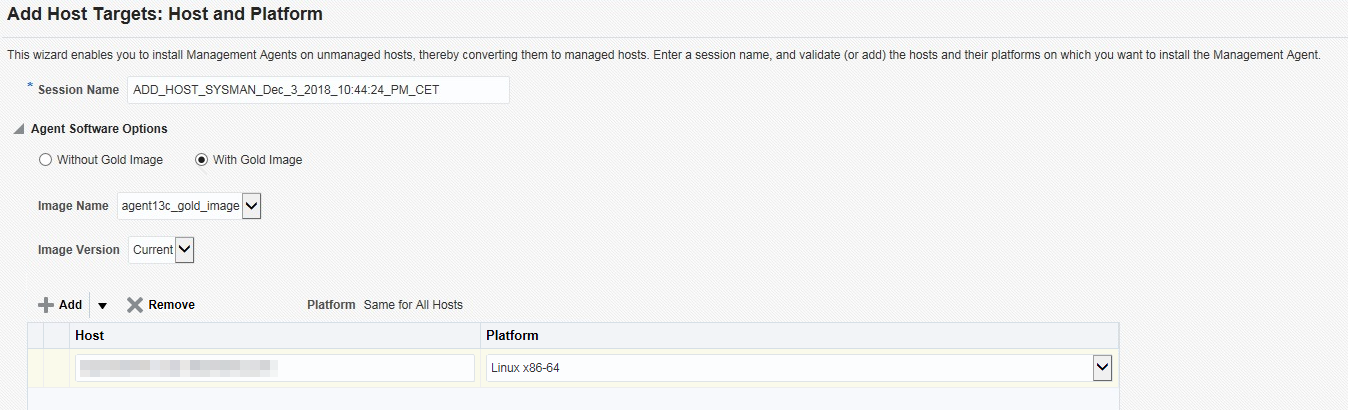
The Gold Agent Image is now created. We can start to deploy it on the others servers in the same way we did at the first deployment, but by selecting this time With Gold Image :
Once the Agent is deployed on the server we can see that OPatch is up to date :
oracle@srvora01:/u01/app/oracle/agent13c/ [agent13c] opatch version

OPatch Version: 13.9.3.3.0


OPatch succeeded.

oracle@srvora01:/u01/app/oracle/agent13c/ [agent13c]
The Agent Bundle Patch is installed :
oracle@srvora01:/u01/app/oracle/agent13c/ [agent13c] opatch lsinventory | grep 28680866

Patch  28680866     : applied on Mon Dec 03 17:17:25 CET 2018

     28680866, 28744209, 28298159, 25141245, 28533438, 28651962, 28635152

oracle@srvora01:/u01/app/oracle/agent13c/ [agent13c]
And the DB plugin is ready :
oracle@srvora01:/u01/app/oracle/agent13c/ [agent13c] ll

total 24

drwxr-xr-x. 31 oracle oinstall 4096 Dec  3 22:59 agent_13.2.0.0.0

-rw-r--r--.  1 oracle oinstall  209 Dec  3 22:32 agentimage.properties

drwxr-xr-x.  8 oracle oinstall   98 Dec  3 22:58 agent_inst

-rw-r--r--.  1 oracle oinstall  565 Dec  3 22:56 agentInstall.rsp

-rw-r--r--.  1 oracle oinstall   19 Dec  3 22:56 emctlcfg.rsp

-rw-r-----.  1 oracle oinstall  350 Dec  3 22:32 plugins.txt

-rw-r--r--.  1 oracle oinstall  470 Dec  3 22:57 plugins.txt.status

oracle@srvora01:/u01/app/oracle/agent13c/ [agent13c] cat plugins.txt.status

oracle.sysman.oh|13.2.0.0.0||discoveryPlugin|STATUS_SUCCESS

oracle.sysman.oh|13.2.0.0.0||agentPlugin|STATUS_SUCCESS

oracle.sysman.db|13.2.2.0.0||discoveryPlugin|STATUS_SUCCESS

oracle.sysman.db|13.2.2.0.0||agentPlugin|STATUS_SUCCESS

oracle.sysman.xa|13.2.2.0.0||discoveryPlugin|STATUS_SUCCESS

oracle.sysman.emas|13.2.2.0.0||discoveryPlugin|STATUS_SUCCESS

oracle.sysman.si|13.2.2.0.0||agentPlugin|STATUS_SUCCESS

oracle.sysman.si|13.2.2.0.0||discoveryPlugin|STATUS_SUCCESS

oracle@srvora01:/u01/app/oracle/agent13c/ [agent13c]
Conclusion
Using a Gold Image drastically ease the management of OMS Agents in Oracle environments. In addition to allowing massive deployment on targets, it is also possible to manage several Gold Images with different patch levels. The hosts are simply subscribed to a specific Image and follow its life cycle (new patch, new plugins, aso…).
Think about it during your next Oracle monitoring project !
![Thumbnail [60x60]](https://www.dbi-services.com/blog/wp-content/uploads/2022/08/JOC_web-scaled.jpg)
![Thumbnail [90x90]](https://www.dbi-services.com/blog/wp-content/uploads/2022/08/STH_web-min-scaled.jpg)
![Thumbnail [90x90]](https://www.dbi-services.com/blog/wp-content/uploads/2025/11/LTO_WEB.jpg)
![Thumbnail [90x90]](https://www.dbi-services.com/blog/wp-content/uploads/2022/08/MAW_web-min-scaled.jpg)
![Thumbnail [90x90]](https://www.dbi-services.com/blog/wp-content/uploads/2023/01/APY_web-scaled.jpg)