Getting started in the cloud is pretty easy but things can get a little messy pretty quickly. A few weeks ago, I faced a case where I suddenly lost the SSH access to an Ubuntu OCI instance used internally for Alfresco in the scope of our YaK testing. was suddenly not accessible anymore, neither through the browser nor SSH. This was just a quick testing environment, whose purpose is to get created and destroyed frequently. Therefore, it doesn’t include any backups or other recovery options. However, I found this case interesting and instead of just scratching the instance to have it back, I thought it could be good to investigate what happened and what can be done on OCI to get your instance back “online”.
1. Using the OCI local connection feature
I started looking into the documentation of OCI. I didn’t have the necessary permissions to use the “Console Connection”, so I asked a colleague to grant me the needed IAM Policies in the correct compartment:
Allow group <group_name> to manage instance-console-connection in tenancy
Allow group <group_name> to read instance in tenancy
Once that was done, I was able to create a new “local connection” SSH access for my Mac. Once the connection was created (simply click on “Create local connection”; generate or paste your public key and finally click on “Create console connection”), I was able to copy the SSH command to connect to my unavailable instance:

This is the SSH command generated by OCI to be able to connect to the system (where XXX is a random ID for the console connection host and YYY is the random ID of your instance OCID):
ssh -o ProxyCommand='ssh -W %h:%p -p 443 ocid1.instanceconsoleconnection.oc1.eu-zurich-1.XXX@instance-console.eu-zurich-1.oci.oraclecloud.com' ocid1.instance.oc1.eu-zurich-1.YYY
As described in the documentation, since I’m not using the default SSH key or ssh-agent, then I needed to update that command with my custom private key, to be able to connect. Therefore, the previous command became (add 2 times the “-i /path/to/private/key“):
ssh -i ~/.ssh/ocilocalshell -o ProxyCommand='ssh -i ~/.ssh/ocilocalshell -W %h:%p -p 443 ocid1.instanceconsoleconnection.oc1.eu-zurich-1.XXX@instance-console.eu-zurich-1.oci.oraclecloud.com' ocid1.instance.oc1.eu-zurich-1.YYY
2. Using the local connection to connect to the instance?
At this point, you should see a login prompt, asking you to enter a username. I did have a public/private key used to connect to the default Ubuntu account of this server but no username/password. So, when I saw the login prompt, I thought I had a problem with the public/private key used by the local connection and I tried to change it to use the exact same used by my “ubuntu” OS account for this server, hoping for a seamless login. But of course, that didn’t work. I tried to alter the SSH command in a few ways to understand how this is supposed to work but no luck. The documentation contains this statement:
In the Oracle Cloud Infrastructure Console, reboot the instance. You do not need to enter a username or password. If the instance is functional and the connection is active, the serial output appears in your console. If serial output does not appear in the console, the instance operating system is not booting.
Therefore, even if this note only talk about displaying the serial output in the console, I still tried to reboot the instance and see how it behaved. Of course, since the SSH connection to the instance was impossible, the reboot command took some time. OCI will wait up to 15 minutes to perform the power-off. The accumulation of all timeouts I assume. In any cases, once the instance reboots, you will see the shutdown and then the startup information. And that’s all that is indicated in the documentation… Because yes, it’s a documentation to have this output displayed on the prompt, not to recover the access to the system!
So, what to do then? Well, we are one step further, since we can see the startup, that means that we might be able to enter the Boot Menu (GRUB), and indeed, there seemed to be a lot of blogs/videos talking about that on google. I tried that, but without success, multiple times… After some time, I looked at google again and found the Oracle Doc ID 2987985.1 and other notes/comments that appear to mention that it’s not possible for Ubuntu by default (might be dependent on some versions or something). In conclusion, we need to be able to login to the instance to change the GRUB settings to be able to open the GRUB to fix the issue to be able to login to the instance, nice infinite loop!
That’s not a viable solution. At that point, I had already spent an hour on this issue and still couldn’t see any utilities/features provided by OCI to easily get a local connection to the instance, for ubuntu.
3. No possible OOTB? Let’s do it the old way then
Since all ports were suddenly closed on this instance, I strongly suspected a human error while trying to update the firewall rules. On OCI, Ubuntu instances comes with iptables by default, but you can add/enable ufw as well. However, it would still use iptables in the background… It can happen that, if someone flushes the iptables rules, all ports would then be closed (assuming ufw was configured to defaults to the DROP policy). Please note that unless you save the iptables rules, a simple reboot would allow you to revert to the old set of rules and therefore, have your system back online. To verify if that was indeed the root cause, I only had one solution left: attach the root partition of my faulty instance to another running instance so I can check what’s going on inside the configuration files.
Let’s start with this plan.
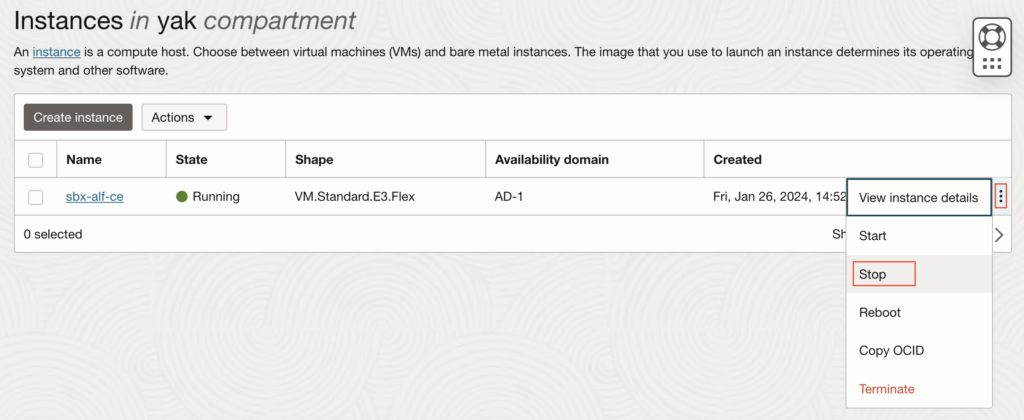
3.1. Shutdown the current OCI instance #1
Just trigger a shutdown of the faulty OCI instance #1 and let it do its thing. As mentioned, it can take several minutes (up to 15 minutes) if it is waiting for some OS commands, like un-mounting disks. In this example, I will use an instance named “sbx-alf-ce” as #1:
3.2. Detach the root partition from OCI instance #1
On the faulty Instance details page, scroll down to the bottom and on the left side, select “Boot volume” (Compute > Instances > Instance details > Boot volume). Then copy the “resource OCID”, which is the ID of the Boot volume. Mine looked like that: “ocid1.bootvolume.oc1.eu-zurich-1.ab5heljrrmrkc5e34behkrde5ce3k2flezhh3lsl2trkrs55svtmcos3ymya”
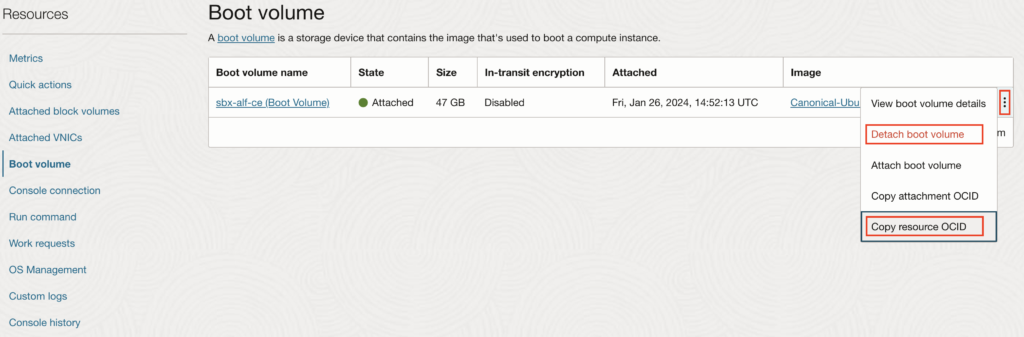
A few seconds after clicking on “Detach boot volume”, the State should switch to “Detached”.
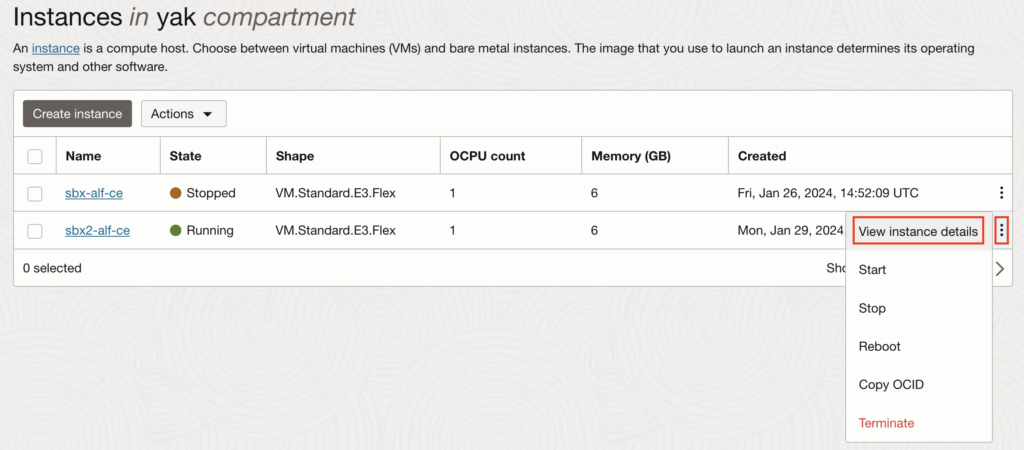
3.3. Create a new/empty OCI instance #2
For this example, I created a new instance “sbx2-alf-ce” as #2, still using our YaK. Once done, you can look at its details and make sure you can connect to it properly.
3.4. Attach the faulty root partition as a simple volume to the newly created OCI instance #2
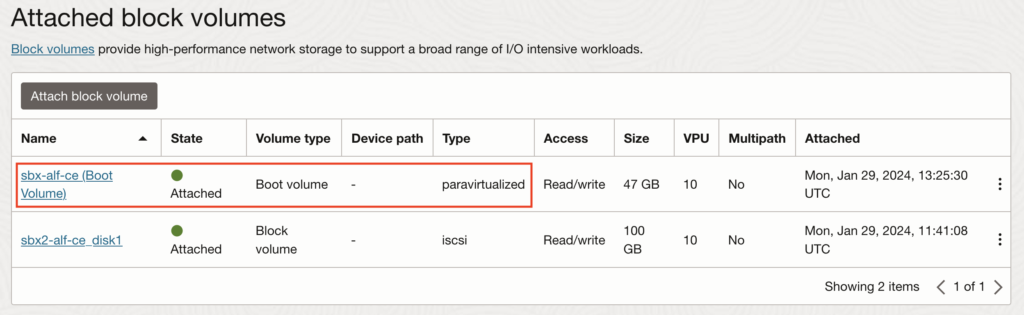
On the newly created Instance details page, scroll down to the bottom and on the left side, select “Attached block volumes” (Compute > Instances > Instance details > Attached block volumes). In my case, there is already a 100Gb volume created and setup by the YaK for my Alfresco component, but in this case, I don’t really care about it since I will not use this OCI instance for anything else than just fixing my first one. Of course, I could have removed this, so it’s not created to begin with.
On this page, click on “Attach block volume”. Then you can either select the volume from the list, if you know which one to choose. Or you can just paste the “resource OCID” I asked you to copy in section “3.2.” above. Select the “Attachment type” as “Paravirtualized” and leave the “Access” to the default “Read/write”, then click on “Attach”.
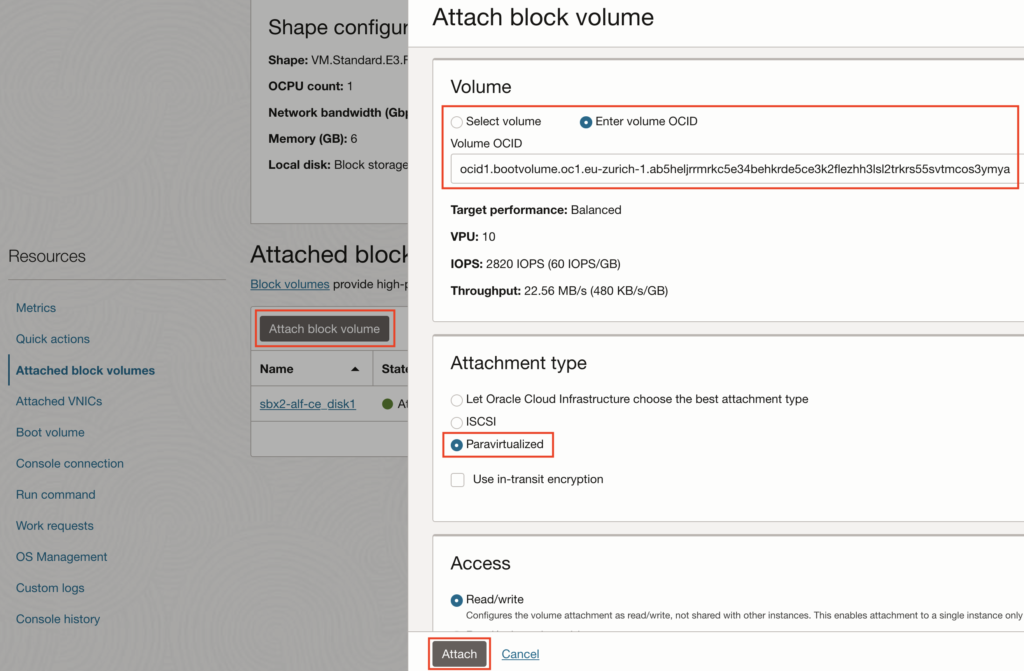
When it completes, you should then have the #1 Boot Volume attached as Block Volume of #2:
3.5. Mount the disk on OCI instance #2
Now, we can connect through SSH to the OCI instance #2 and mount the #1 Boot Volume so we can access its content (again, here I’m using the YaK but you can connect to it as you prefer, as long as you have root access in the end):
yak@6073e16b8a87:~$ ssh oci/sbx2-alf-ce
Welcome to Ubuntu 22.04.2 LTS (GNU/Linux 5.15.0-1038-oracle x86_64)
...
Last login: Mon Jan 29 13:15:41 2024 from xxx.xxx.xxx.xxx
ubuntu@sbx2-alf-ce:~$
ubuntu@sbx2-alf-ce:~$ sudo su -
root@sbx2-alf-ce:~$
root@sbx2-alf-ce:~$ lsblk
NAME                  MAJ:MIN RM   SIZE RO TYPE MOUNTPOINTS
loop0                   7:0    0  55.7M  1 loop /snap/core18/2785
loop1                   7:1    0 111.9M  1 loop /snap/lxd/24322
loop2                   7:2    0  63.4M  1 loop /snap/core20/1974
loop3                   7:3    0  38.7M  1 loop /snap/oracle-cloud-agent/58
loop4                   7:4    0  53.3M  1 loop /snap/snapd/19457
sda                     8:0    0  46.6G  0 disk
├─sda1                  8:1    0  46.5G  0 part /
├─sda14                 8:14   0     4M  0 part
└─sda15                 8:15   0   106M  0 part /boot/efi
sdb                     8:16   0   100G  0 disk
├─data-optalfresco    253:0    0    20G  0 lvm  /opt/alfresco
├─data-etcoptalfresco 253:1    0    10G  0 lvm  /etc/opt/alfresco
├─data-varoptalfresco 253:2    0    30G  0 lvm  /var/opt/alfresco
└─data-varlogalfresco 253:3    0    20G  0 lvm  /var/log/alfresco
sdc                     8:32   0  46.6G  0 disk
├─sdc1                  8:33   0  46.5G  0 part
├─sdc14                 8:46   0     4M  0 part
└─sdc15                 8:47   0   106M  0 part
root@sbx2-alf-ce:~$
root@sbx2-alf-ce:~$ ### --> Here it's sdc1 that needs to be mounted
root@sbx2-alf-ce:~$
root@sbx2-alf-ce:~$ mkdir /faulty_root_1
root@sbx2-alf-ce:~$ mount /dev/sdc1 /faulty_root_1
root@sbx2-alf-ce:~$
In case you don’t have an existing disk on your instance #2, then it would most probably be “sdb1” instead. To find it, just look at the “part” that isn’t “/” and that matches the size of the Boot volume we just attached.
3.6. Check the iptables configuration files inside the mounted disk on OCI instance #2 (not the OS files)
To check the iptables rules that have been saved, you can simply check for the files “/etc/iptables/rules.v*“. For the rules used on the OCI instance #1, the file would then be “/faulty_root_1/etc/iptables/rules.v4“:
root@sbx2-alf-ce:~$ cd /faulty_root_1
root@sbx2-alf-ce:/faulty_root_1$
root@sbx2-alf-ce:/faulty_root_1$ ls
bin  boot  dev  etc  home  lib  lib32  lib64  libx32  lost+found  media  mnt  opt  proc  root  run  sbin  snap  srv  sys  tmp  usr  var
root@sbx2-alf-ce:/faulty_root_1$
root@sbx2-alf-ce:/faulty_root_1$ cat /faulty_root_1/etc/iptables/rules.v4
# Generated by iptables-save v1.8.7 on Mon Jan 29 07:34:58 2024
*filter
:INPUT DROP [2:152]
:FORWARD DROP [0:0]
:OUTPUT ACCEPT [1:176]
:InstanceServices - [0:0]
:ufw-after-forward - [0:0]
:ufw-after-input - [0:0]
...
...
:ufw-user-logging-output - [0:0]
:ufw-user-output - [0:0]
COMMIT
# Completed on Mon Jan 29 07:34:58 2024
root@sbx2-alf-ce:/faulty_root_1$
3.7. If iptables was indeed the issue, fix it
As you can see above, it’s definitively this issue: the default policy is DROP and there are absolutely no rules present. Therefore, iptables would just reject all incoming requests. A similar issue could happen if your root partition is 100% full, in which case you would need to do some cleanup in this step, like removing old logs for example.
To “fix” the iptables, you can just modify the “rules.v4/6” files. You can look at the instance #2 file for an example but the minimal thing to add would be to re-enable at least port 22. You should just copy the whole “InstanceServices” chain section from the current instance #2 (/etc/iptables/rules.v4) and put it into the instance #1 file (/faulty_root_1/etc/iptables/rules.v4). If you aren’t sure about what you are doing, you can also switch the default policy from “DROP” to “ACCEPT” in this file. Here is an example of possible configuration:
root@sbx2-alf-ce:/faulty_root_1$ cat /faulty_root_1/etc/iptables/rules.v4
# Generated by iptables-save v1.8.7 on Mon Jan 29 07:34:58 2024
*filter
:INPUT ACCEPT [0:0]
:FORWARD ACCEPT [0:0]
:OUTPUT ACCEPT [463:49013]
:InstanceServices - [0:0]
-A INPUT -m state --state RELATED,ESTABLISHED -j ACCEPT
-A INPUT -p icmp -j ACCEPT
-A INPUT -i lo -j ACCEPT
-A INPUT -p udp --sport 123 -j ACCEPT
-A INPUT -p tcp -m state --state NEW -m tcp --dport 22 -j ACCEPT
-A INPUT -j REJECT --reject-with icmp-host-prohibited
-A FORWARD -j REJECT --reject-with icmp-host-prohibited
-A OUTPUT -d 169.254.0.0/16 -j InstanceServices
-A InstanceServices -d 169.254.0.2/32 -p tcp -m owner --uid-owner 0 -m tcp --dport 3260 -m comment --comment "See the Oracle-Provided Images section in the Oracle Cloud Infrastructure documentation for security impact of modifying or removing this rule" -j ACCEPT
-A InstanceServices -d 169.254.2.0/24 -p tcp -m owner --uid-owner 0 -m tcp --dport 3260 -m comment --comment "See the Oracle-Provided Images section in the Oracle Cloud Infrastructure documentation for security impact of modifying or removing this rule" -j ACCEPT
...
...
-A InstanceServices -d 169.254.0.0/16 -p tcp -m tcp -m comment --comment "See the Oracle-Provided Images section in the Oracle Cloud Infrastructure documentation for security impact of modifying or removing this rule" -j REJECT --reject-with tcp-reset
-A InstanceServices -d 169.254.0.0/16 -p udp -m udp -m comment --comment "See the Oracle-Provided Images section in the Oracle Cloud Infrastructure documentation for security impact of modifying or removing this rule" -j REJECT --reject-with icmp-port-unreachable
:ufw-after-forward - [0:0]
:ufw-after-input - [0:0]
:ufw-after-logging-forward - [0:0]
...
...
:ufw-user-logging-input - [0:0]
:ufw-user-logging-output - [0:0]
:ufw-user-output - [0:0]
COMMIT
# Completed on Mon Jan 29 07:34:58 2024
root@sbx2-alf-ce:/faulty_root_1$
Please note that OCI will add a lot of stuff inside the “Chain InstanceServices”, for its internal management (c.f. the “Oracle-Provided Images” section of the OCI documentation, here) and that’s also why it is recommended to not use UFW on OCI.
3.8. Un-mount the disk and detach it from OCI instance #2
Once you are satisfied with the status of the needed files (whether it’s iptables or logs for disk full cases), then the next step would be to go back into the initial situation. For that, we first unmount it:
root@sbx2-alf-ce:/faulty_root_1$ cd
root@sbx2-alf-ce:~$
root@sbx2-alf-ce:~$ umount /faulty_root_1
root@sbx2-alf-ce:~$
root@sbx2-alf-ce:~$ rmdir /faulty_root_1
root@sbx2-alf-ce:~$
And then we can detach it from the OCI instance #2:

3.9. Re-attach the root partition on OCI instance #1 and start again
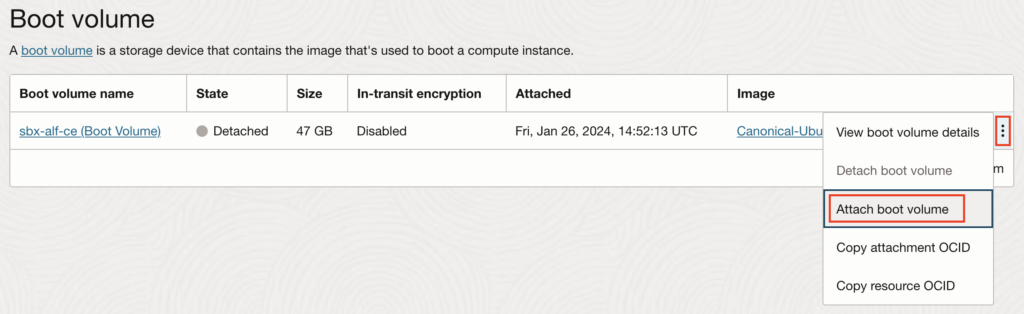
The last step, if everything went well, is to re-attach the Boot volume to where it belonged at the beginning. So go back to the Instance details page of the OCI instance #1, scroll down to the bottom and on the left side, select “Boot volume” (Compute > Instances > Instance details > Boot volume). You should still see in the “Detached” State. Just click on “Attach boot volume” to get it back in the “Attached” State:
Once re-attached, you can start your OCI instance #1 again and you should now be able to login as you did before the issue started:
yak@6073e16b8a87:~$ ssh oci/sbx-alf-ce
Welcome to Ubuntu 22.04.2 LTS (GNU/Linux 5.15.0-1038-oracle x86_64)
...
Last login: Mon Jan 29 07:25:22 2024 from xxx.xxx.xxx.xxx
ubuntu@sbx-alf-ce:~$
If you still have some issues, there was probably some errors done on the configuration files. You can restart the process again (shutdown #1, detach, attach on #2, etc…).
Note that it is also possible to script all that and use the OCI CLI (command line) instead. For that purpose, you will need the Instance #1 and #2 OCIDs as well as the Boot volume OCID. Then you can use commands such as:
- Detach from OCI Instance #1: oci compute boot-volume-attachment detach –boot-volume-attachment-id ${instance_1_OCID}
- Attach to OCI Instance #2: oci compute volume-attachment attach –instance-id ${instance_2_OCID} –volume-id ${boot_volume_OCID} –type paravirtualized
![Thumbnail [60x60]](https://www.dbi-services.com/blog/wp-content/uploads/2022/08/MOP_web-min-scaled.jpg)
![Thumbnail [90x90]](https://www.dbi-services.com/blog/wp-content/uploads/2024/03/AHI_web.jpg)
![Thumbnail [90x90]](https://www.dbi-services.com/blog/wp-content/uploads/2025/07/ALK_MIN.jpeg)
![Thumbnail [90x90]](https://www.dbi-services.com/blog/wp-content/uploads/2025/05/JDE_Web-1-scaled.jpg)
![Thumbnail [90x90]](https://www.dbi-services.com/blog/wp-content/uploads/2022/08/ADE_WEB-min-scaled.jpg)