by Alexandre Nestor
Manage SSH public Keys with Oracle Key Vault (2/2)
Introduction
Oracle Key Vault 21.7 introduce the SSH key support, a new type of endpoint(SSH server) and a new wallet type (SSH Wallet).
As prerequisites the OKV 21.7 need to be installed and a test vm (I named it tstokvcli) must exist.
The post will follow these steps:
- Configure and install the REST API on test server
- Declare and enroll the server endpoint using the REST API.
- Create wallets for the test server.
- Configure the server to use OKV to query the public key.
- Make a connection from one account to another on the same server using the public key from OKV.
OKV will provide two type of binaries. One for the REST API installed in /home/opc/okv, and the endpoint management which is installed in /opt/okvutil. All specified paths are not mandatory.
I preferred to use the REST API to make all configuration and not use the http console, in order to give a solution for scripting too. The full configuration cam be made from the web page as well.
About using the REST API
All REST API commands havent two work modes.
One mode by giving the options on command line, for instance:
[opc@tstokvcli ~]$ $OKV_HOME/bin/okv admin endpoint get --endpoint my_endpoint
and another mode by using an intermediate json file. For instance:
[opc@tstokvcli ~]$ $OKV_HOME/bin/okv admin endpoint get --generate-json-input > /tmp/my_endpoint.json
[opc@tstokvcli ~]$ cat /tmp/my_endpoint.json
{
  "service" : {
    "category" : "admin",
    "resource" : "endpoint",
    "action" : "get",
    "options" : {
      "endpoint" : "#VALUE"
    }
  }
}
Now change all #VALUE fields with correct values and execute againt the command:
[opc@tstokvcli ~]$ $OKV_HOME/bin/okv admin endpoint get --from-endpoint /tmp/my_endpoint.json
I preferred to use the second mode, by creating the json. Because first, I want to keep these files, second because it can be exploited with the jq tool and last but not least because some commands have a lot of parameters.
Configure the REST API
First download the binaries on the test server tstokvcli
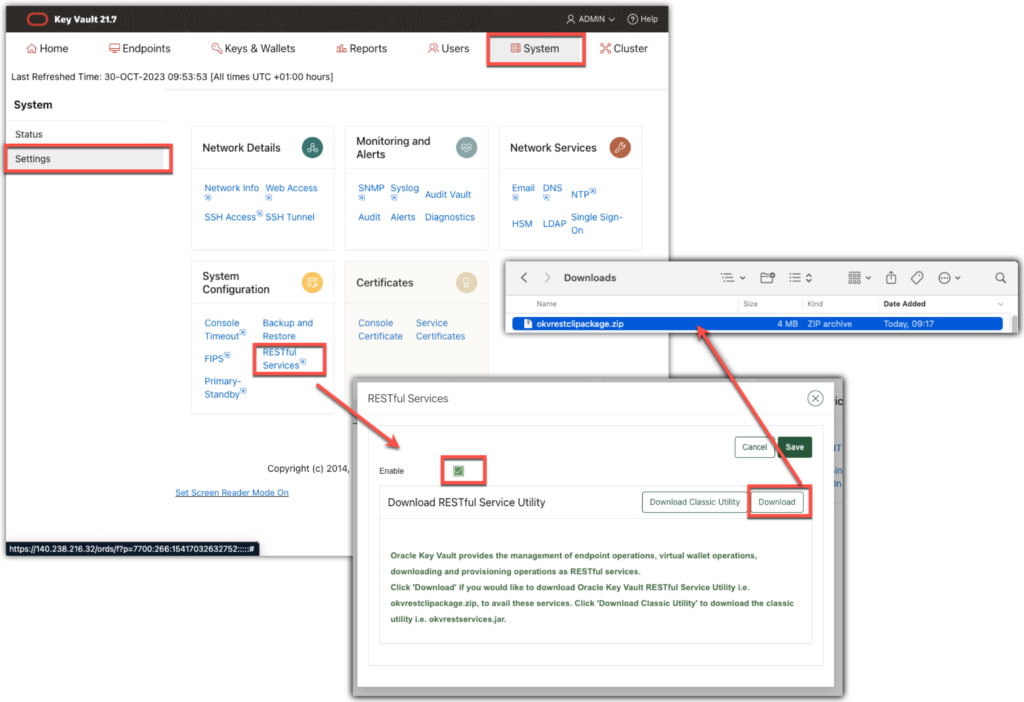
Or download directly on destination server tstokvcli, from OKV server:
[opc@tstokvcli ]$  curl -O -k https://172.168.0.42:5695/okvrestclipackage.zip
  % Total    % Received % Xferd  Average Speed   Time    Time     Time  Current
                                 Dload  Upload   Total   Spent    Left  Speed
100 3865k  100 3865k    0     0  89.8M      0 --:--:-- --:--:-- --:--:-- 89.8M
Install the REST API on destination server. I put all variables in a env file set_okv_rest_env.sh, in order to set the environnement easily.
[opc@tstokvcli ~]$  pwd
/home/opc

[opc@tstokvcli ~]$  mkdir okv
[opc@tstokvcli ~]$  unzip okvrestclipackage.zip -d okv

   creating: okv/bin/
  inflating: okv/bin/okv
  inflating: okv/bin/okv.bat
   creating: okv/conf/
  inflating: okv/conf/okvrestcli.ini
  inflating: okv/conf/okvrestcli_logging.properties
  inflating: okv/lib/okvrestcli.jar
[opc@tstokvcli ~]$  echo "export OKV_RESTCLI_CONFIG=/home/opc/okv/conf" >> set_okv_rest_env.sh
[opc@tstokvcli ~]$  echo "export JAVA_HOME=/usr/java/jdk-11.0.10" >> set_okv_rest_env.sh
[opc@tstokvcli ~]$  echo "export OKV_HOME=/home/opc/okv" >> set_okv_rest_env.sh
[opc@tstokvcli ~]$  source set_okv_rest_env.sh
Uncomment the line export OKV_RESTCLI_CONFIG=$OKV_RESTCLI_DIR/conf/okvrestcli.ini in the /home/opc/okv/bin/okv shell file to avoir error’s like:
{
  "result" : "Failure",
  "message" : "Invalid file: file extension .ini is required"
}
Edit okvresccli.ini and okvrestcli_logging.properties file to finish the configuration. I used the admin OKV user, but the best practice is to create a dedicated OKV user for all REST API usage.
[opc@tstokvcli ~]$ cat $OKV_HOME/conf/okvrestcli.ini
#Provide absolute path for log_property, okv_client_config properties
[Default]
log_property=/home/opc/okv/conf/okvrestcli_logging.properties
server=172.168.0.41
#okv_client_config=/home/opc/okv/conf/okvclient.ora
user=admin
client_wallet=/home/opc/okv/wallet

[opc@tstokvcli okv]$ $OKV_HOME/bin/okv
{
  "restCLIVersion" : "21.7.0.0.0"
}
Uncomment the line java.util.logging.FileHandler.pattern = /home/opc/okv/log/okv%u.log in the $OKV_HOME/conf/okvrestcli_logging.properties and create log directory:
[opc@tstokvcli okv]$ mkdir $OKV_HOME/log
Finally to avoid to tape the OKV admin user password at each command it is better to create a local wallet to keep this password:
[opc@tstokvcli okv] mkdir $OKV_HOME/wallet

[opc@tstokvcli okv]$ $OKV_HOME/bin/okv admin client-wallet add --client-wallet $OKV_HOME/wallet --wallet-user admin
Password: ******
{
  "result" : "Success"
}
Configure the endpoint
Next step is to add the test server tstokvcli as an endpoint to OKV in order to be able to make request to OKV server:
[opc@tstokvcli ~]$ $OKV_HOME/bin/okv admin endpoint create --generate-json-input > /tmp/t.json
[opc@tstokvcli ~]$ cat /tmp/t.json
{
"service" : {
"category" : "admin",
"resource" : "endpoint",
"action" : "create",
"options" : {
"endpoint" : "tstokvcli",
"description" : "Endpoint linus hostname tstokvcli",
"platform" : "LINUX64",
"type" : "SSH_SERVER",
"strictIpCheck" : "FALSE",
"sshServerHostName" : "tstokvcli"
}
}
}
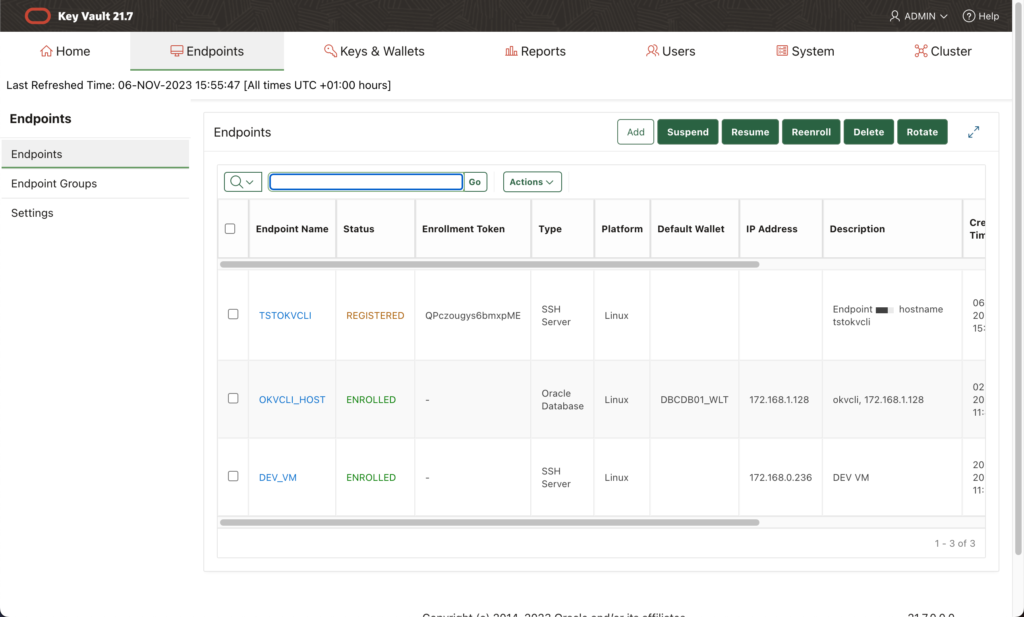
[opc@tstokvcli ~]$ $OKV_HOME/bin/okv admin endpoint create --from-json /tmp/t.json
./log/okv0.log.0.lck
{
"result" : "Success"
}
At this moment at OKV console the endpoint must be registered:
When we enroll the endpoint we need to give a path where to install the okvutil tool (/opt/okvutil for my test server).
If the endpoint is a database, additionally we need to have the $ORACLKE_HOME and $ORACLE_BASE defined and the WALLET_ROOT database parameter. In this case the okvutil will be installed in the WALLET_ROOT/okv path.
As this node will be ans SSH server there is no need for these variables.
[opc@tstokvcli ~]$  $OKV_HOME/bin/okv admin endpoint provision --generate-json-input  > /tmp/t.json

[opc@tstokvcli ~]$ cat /tmp/t.json
{
  "service" : {
    "category" : "admin",
    "resource" : "endpoint",
    "action" : "provision",
    "options" : {
      "endpoint" : "tstokvcli",
      "location" : "/opt/okvutil",
      "autoLogin" : "TRUE"
    }
  }
}

[opc@tstokvcli ~]$  $OKV_HOME/bin/okv admin endpoint provision --from-json /tmp/t.json
./log/okv0.log.0.lck
{
  "result" : "Success"
}
At the end the /opt/okvutil directory contains all files needed by okvutil. The okvutil will work in autologin ("autoLogin" : "TRUE")mode so there is a wallet created in ssl directory:
[opc@tstokvcli ~]$ tree /opt/okvutil
/opt/okvutil
├── bin
│   ├── ep_healthcheck.sh
│   ├── okveps.x64
│   ├── okv_ssh_ep_lookup_authorized_keys
│   ├── okvutil
│   └── root.sh
├── conf
│   ├── logging.properties
│   ├── okvclient.lck
│   ├── okvclient.ora
│   └── okvsshendpoint.conf
├── csdk
│   └── lib
│       └── liborasdk.so
├── jlib
│   └── okvutil.jar
├── lib
│   └── liborapkcs.so
├── log
│   └── okvutil.deploy.log
└── ssl
    ├── cwallet.sso
    └── ewallet.p12

8 directories, 15 files
And execute the root.sh:
[opc@tstokvcli ~]$ sudo su -

[root@tstokvcli ~]# /opt/okvutil/bin/root.sh
Now we need to configure the OKV REST api to get the correct okvclient.ora file from the okvutil:
[opc@tstokvcli ~]$ cat $OKV_HOME/conf/okvrestcli.ini
#Provide absolute path for log_property, okv_client_config properties
[Default]
log_property=/home/opc/okv/conf/okvrestcli_logging.properties
server=172.168.0.41
okv_client_config=/opt/okvutil/conf/okvclient.ora
user=admin
client_wallet=/home/opc/okv/wallet
At the end the endpoint is enrolled:
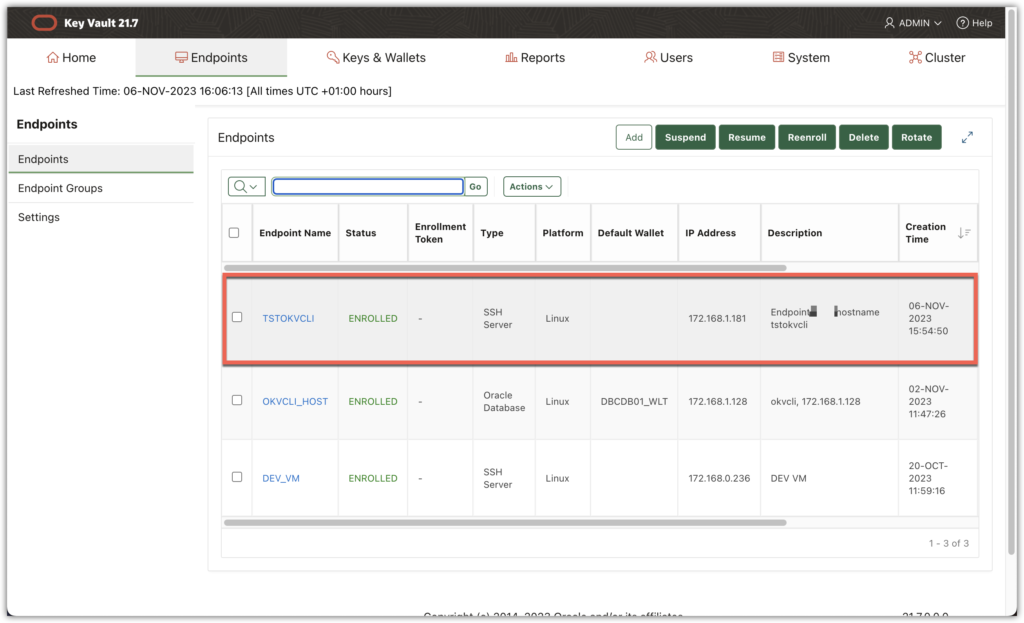
Next step is to create a dedicated wallet, named oracle_ssh_wallet in this example, (an ssh wallet type) for this endpoint and give the rights on this wallet to the endpoint.
We can use an SSH Server wallet to manage the authorisation for an SSH server host user on the multiple SSH servers if the same set of the SSH client users need to log in as that host user on all of these SSH servers. Such shared use of SSH Server wallets may further simplify the SSH access management at scale.
Create the ssh wallet
[opc@tstokvcli ~]$ $OKV_HOME/bin/okv manage-access wallet create --generate-json-input > /tmp/t.json

[opc@tstokvcli ~]$ cat /tmp/t.json
{
  "service" : {
    "category" : "manage-access",
    "resource" : "wallet",
    "action" : "create",
    "options" : {
      "wallet" : "oracle_ssh_wallet",
      "type" : "SSH_SERVER",
      "description" : "ssh wallet for user oracle on servers tstokvcli and ...",
      "sshServerHostUser" : "oracle"
    }
  }
}

[opc@tstokvcli ~]$  $OKV_HOME/bin/okv manage-access wallet create --from-json /tmp/t.json
./log/okv0.log.0.lck
{
  "result" : "Success"
}
Note that the parameter sshServerHostUser was set to oracle: "sshServerHostUser" : "oracle". The ssh connection will be made as oracle user:
The wallet must be present at the OKV console too:

Next step is to grant access to the wallet for the endpoint:
[opc@tstokvcli ~]$ $OKV_HOME/bin/okv manage-access wallet add-access --generate-json-input > /tmp/t.json

[opc@tstokvcli ~]$ cat /tmp/t.json
{
  "service" : {
    "category" : "manage-access",
    "resource" : "wallet",
    "action" : "add-access",
    "options" : {
      "wallet" : "oracle_ssh_wallet",
      "endpoint" : "tstokvcli",
      "access" : "RM_MW"
    }
  }
}

[opc@tstokvcli ~]$ $OKV_HOME/bin/okv manage-access wallet add-access --from-json /tmp/t.json
./log/okv0.log.0.lck
{
  "result" : "Success"
}
When the endpoint was enrolled the okvutil command was downloaded in the /opt/okvutil path.
We need to configure the okvutil to use the oracle_ssh_wallet with the oracle user.
[opc@tstokvcli ~]$ cat /opt/okvutil/conf/okvsshendpoint.conf
# Configuration file for Oracle Key Vault SSH server endpoints
[ oracle ]
ssh_server_wallet=oracle_ssh_wallet
At this moment we have an enrolled endpoint okvcli which is an ssh server, an wallet oracle_ssh_wallet for oracle user, and the enrolled endpoint which have access to manage the wallet.
In the next post we are going to load the ssh keys into OKV and make a connection using these keys
![Thumbnail [60x60]](https://www.dbi-services.com/blog/wp-content/uploads/2022/12/oracle-square.png)

![Thumbnail [90x90]](https://www.dbi-services.com/blog/wp-content/uploads/2022/08/MAW_web-min-scaled.jpg)
![Thumbnail [90x90]](https://www.dbi-services.com/blog/wp-content/uploads/2025/05/JDE_Web-1-scaled.jpg)
Amin
10.01.2024Hi
how did opc was able to write to /opt in step $OKV_HOME/bin/okv admin endpoint provision
Thanks
Hello, the /opt directory is arbitrary. If you don't have rights on this path choose one on which you can make changes.