In the past years, I actively have been involved in securing MSSQL Instances (and other services).
This lead me to use the Managed Service Accounts (MSA) and the grouped Managed Service Accounts (gMSA)
The MSA have been introduced in Windows Server 2008 R2 and the gMSA in Windows Server 2012.
I. What exactly are MSA or gMSA
MSA (Managed Service Accounts) or gMSA (group Managed Service Accounts) are Active Directory Managed Accounts used to start services (Service Accounts).
They have several advantages though they are still not permanently used (at least from what I saw at most of my customers).
- They are linked to a single server (MSA) or to a group of Server (gMSA) and cannot be used on other server than the ones they are dedicated to.
- They cannot be used to gain access to the server as they can’t be used to login (no privilege escalation is possible).
They simplify the management of Service Principle Names (SPN) as the SPN for the related service is automatically generated when the service starts the first time.
This is obviously a huge advantage in terms of security as Kerberos Authentication is factually running on the go.
II. Implementation / Configuration of MSA/gMSA
II.1 Prerequisites:
In order to create a MSA or a gMSA you will need to go the Powershell way.
Normally the setup will be performed on a Server which is not an AD Server.
Therefore the first step will be to install the RSAT Tools:
On Windows Server:
Install-WindowsFeature RSAT-AD-PowerShell
On Windows 10/11: Add-WindowsCapability -Name Rsat.ActiveDirectory.DS-LDS.Tools -Online
The creation of both types can easily be performed with simple scripts though this requires AD Admin permissions (or at least a delegation for creating Accounts)
II.2 Create a MSA:
New-ADServiceAccount -Name NAME -Enabled $true -Description “Managed Service Account for xxxx” -DisplayName “MSA 1 – xxxx” -RestrictToSingleComputer

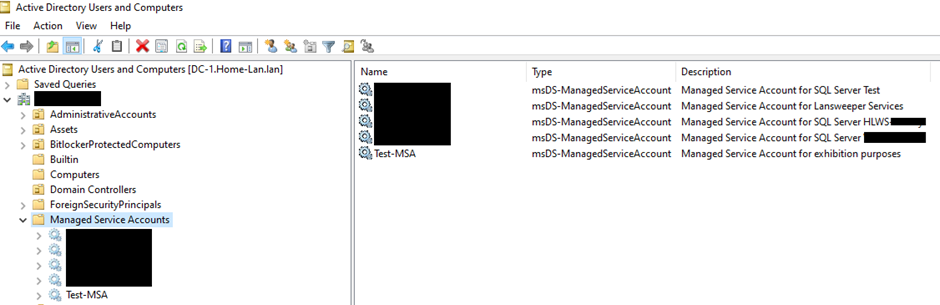
Once the account got created, it will be added in Active Directory under Managed Service Accounts:
II.3 Create a gMSA:
gMSA creation is slightful different as there’s a need to create the Account and grant the defined computer Objects to use it. Fortunately, this can als easily be done with a single PS Query:
New-ADServiceAccount -Name msa_exhib2 -DNSHostName DNS Server -PrincipalsAllowedToRetrieveManagedPassword Server1$, Server2$
Here it is important to add the $ sign at the end of the device name as the query gives the permissions to the Computer Object.


III. Installation and Usage of the MSA / gMSA:
III.1 Installation of the created Account
Once the Account got created it will need to be installed on the target server (Requires the RSAT AD Tools to be installed as mentioned previously):
Install-ADServiceAccount -Identity ServiceName
Be Aware that the MSA is restricted only to one server. Therefore, it can only be installed once. Trying to install it on another server will end with the error:
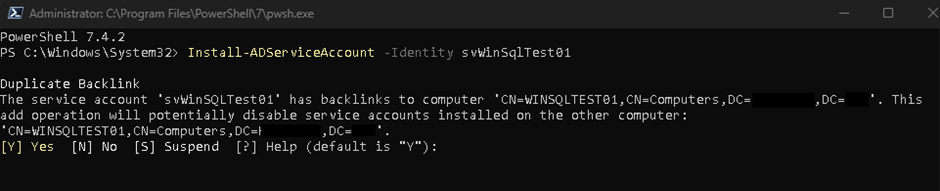
If the action gets confirmed, the MSA will be removed from it’s original server and the services relying on it will be stopped.
The issue will not exist with gMSA as it can be installed on all Server / Computer which have been granted the access to it.
III.2 Grant the permissions to the MSA / gMSA
The created accounts need to be granted segregated permissions. As my Colleague Stéphane Haby already mentioned in this Article, for security reasons a SQL Server Service Account should never be granted the Local Administrator Permissions.
This can be performed on several ways:
- GPO: This requires the Domain Architect to define the GPOs properly
- By managing the Local Security Policies:
Under Local Policies\User Rights Assignment add the created account to all relevant permissions (Basically, for a SQL Server: Logon as a Batch Job, Logon as a service, Perform Volume Maintenance Tasks (eventually Lock Pages in Memory if this is required by the software using MSSQL)
- By using a powershell script:
# Variables used - change as required
$TempLocation = "C:\Service"
$SQLServiceAccount = $ServiceName #Account used for the SQL Service

## This lines are required to change in the cfg file
$ChangeFrom = "SeManageVolumePrivilege = "
$ChangeFrom2 = "SeLockMemoryPrivilege = "
$ChangeFrom3 = "SeBatchLogonRight = "
$ChangeFrom4 = "SeServiceLogonRight = "
$ChangeFrom5 = "SeAuditPrivilege = "

## Build the new lines
$ChangeTo = "SeManageVolumePrivilege = $SQLServiceAccount,"
$ChangeTo2 = "SeLockMemoryPrivilege = $SQLServiceAccount,"
$ChangeTo3 = "SeBatchLogonRight = $SQLServiceAccount,"
$ChangeTo4 = "SeServiceLogonRight = $SQLServiceAccount,"
$ChangeTo5 = "SeAuditPrivilege = $SQLServiceAccount,"


## Set a name for the Security Policy cfg file.
$fileName = "$TempLocation\SecPolExport.cfg"

## export currect Security Policy config
Write-Host "Exporting Security Policy to file: $filename"
secedit /export /cfg $filename
Copy-Item $filename -Destination "$filename.save_before"
Write-Host "make a copy of initial Security policy export: $filename.save_before"
Write-Host "start to modify Security Policy Export file"

## delete the last 4 lines in the export file; this is needed if some attrubutes are not yet set and they are added at the end of the file; after this end-section (last 4 lines) the secpol is not importing it, so delete these values and add them at the end of the script
$content = get-content $filename
$content[0..($content.length-4)] | out-file $filename


# Use Get-Content to change the text in the cfg file and then save it

# As the line for the option only exists if there is something already in the group
# this will check for it and add your $SQLServiceAccount or use Add-Contect to append option and your $SQLServiceAccount

#Option SeManageVolumePrivilege (Perform maintenance volumne tasks)
IF ((Get-Content $fileName) | where { $_.Contains("SeManageVolumePrivilege") })
{
Write-Host "Appending line containing SeManageVolumePrivilege with $SQLServiceAccount"
(Get-Content $fileName) -replace $ChangeFrom, $ChangeTo | Set-Content $fileName
}
else
{
Write-Host "Adding new line containing SeManageVolumePrivilege"
Add-Content $filename "`nSeManageVolumePrivilege = $SQLServiceAccount"
}

## Option SeLockMemoryPrivilege (Lock Pages in Memory)
## This is optinal depending on the requirements
## IF ((Get-Content $fileName) | where { $_.Contains("SeLockMemoryPrivilege") })
## {
## Write-Host "Appending line containing SeLockMemoryPrivilege with $SQLServiceAccount"
## (Get-Content $fileName) -replace $ChangeFrom2, $ChangeTo2 | Set-Content $fileName
## }
## else
## {
## Write-Host "Adding new line containing SeLockMemoryPrivilege"
## Add-Content $filename "`nSeLockMemoryPrivilege = $SQLServiceAccount"
## }

#Option SeBatchLogonRight (Log on as Batch job)
IF ((Get-Content $fileName) | where { $_.Contains("SeBatchLogonRight") })
{
Write-Host "Appending line containing SeBatchLogonRight with $SQLServiceAccount"
(Get-Content $fileName) -replace $ChangeFrom3, $ChangeTo3 | Set-Content $fileName
}
else
{
Write-Host "Adding new line containing SeBatchLogonRight"
Add-Content $filename "`nSeBatchLogonRight = $SQLServiceAccount"
}


#Option SeServiceLogonRight (log on as a service)
IF ((Get-Content $fileName) | where { $_.Contains("SeServiceLogonRight") })
{
Write-Host "Appending line containing SeServiceLogonRight with $SQLServiceAccount"
(Get-Content $fileName) -replace $ChangeFrom4, $ChangeTo4 | Set-Content $fileName
}
else
{
Write-Host "Adding new line containing SeServiceLogonRight"
Add-Content $filename "`nSeServiceLogonRight = $SQLServiceAccount"
}
III.3 Configure the services to use the MSA / gMSA
Once the Accounts have been granted the required permissions, the services need to be configured to use them.
This can be performed by using a command of the DBATools Module :
Update-DbaServiceAccount -ServiceName 'MSSQLSERVER','SQLSERVERAGENT' -UserName 'Domain\MSAName$'IV. An easy way to configure everything in one shot
One of my teacher once told me that a good administrator is a lazy administrator. With these words he meant everything what can be scripted or automated should be.
That’s why you will find a complete script to perform the above mentioned tasks below:
## Install DbaTools (Requires the Server to have an Internet Connection

Write-Host "Now let's install DBATools"
Install-Module DBATools -Scope AllUsers
read-host "If no error occured, press any key to continue"
## Create Service Folder

Write-Host "Creation of the Service Folder"
if (Test-Path "C:\Service") {
    # Folder exists - Do something here
    Write-host "Folder Exists!" -f Green
}
else {
    # Folder does not exist - Do something else here
    New-Item -ItemType Directory -Path C:\Service
}

## Install AD Powershell Tools

Write-Host "First we install the AD Powershell Tools"
Install-WindowsFeature RSAT-AD-PowerShell
read-host "RSAT Tools installed - press enter to continue"

## Define Variables

$ServerName = hostname
$ServiceName = 'sv'+ $ServerName ## Here you can define your own naming convention for the MSA
#Create MSA for SQL Server

Write-Host "Creation of the Managed Service Account for this Server"
if (!(Get-ADServiceAccount -Filter "Name -like '$ServiceName'")) {
New-ADServiceAccount -Name $ServiceName -Enabled $true -Description "Managed Service Account for SQL Server $ServerName" -DisplayName "MSA - $ServerName" -RestrictToSingleComputer
Write-Host "Service Account has been created"
}
else {
Write-host "Service Account already exists"
}

read-host "Service Account created - please press enter to continue"

#Install MSA on Local Server

Write-Host "Installation of the MSA on this Server"
Install-ADServiceAccount -Identity $ServiceName
read-host "Service Account installed - Press Enter to continue"

## Adding sql service account to local policy
write-host "Local Security Policies will be applied according to the default SQL settings"
#read-host "this is only for debug purporsed - please press enter to proceed"

# Variables used - change as required
$TempLocation = "C:\Service"

## This lines are required to change in the cfg file
$ChangeFrom = "SeManageVolumePrivilege = "
$ChangeFrom2 = "SeLockMemoryPrivilege = "
$ChangeFrom3 = "SeBatchLogonRight = "
$ChangeFrom4 = "SeServiceLogonRight = "
$ChangeFrom5 = "SeAuditPrivilege = "

## Build the new lines
$ChangeTo = "SeManageVolumePrivilege = $ServiceName,"
$ChangeTo2 = "SeLockMemoryPrivilege = $ServiceName,"
$ChangeTo3 = "SeBatchLogonRight = $ServiceName,"
$ChangeTo4 = "SeServiceLogonRight = $ServiceName,"
$ChangeTo5 = "SeAuditPrivilege = $ServiceName,"


## Set a name for the Security Policy cfg file.
$fileName = "$TempLocation\SecPolExport.cfg"

## export currect Security Policy config
Write-Host "Exporting Security Policy to file: $filename"
secedit /export /cfg $filename
Copy-Item $filename -Destination "$filename.save_before"
Write-Host "make a copy of initial Security policy export: $filename.save_before"
Write-Host "start to modify Security Policy Export file"

## delete the last 4 lines in the export file; this is needed if some attrubutes are not yet set and they are added at the end of the file; after this end-section (last 4 lines) the secpol is not importing it, so delete these values and add them at the end of the script
$content = get-content $filename
$content[0..($content.length-4)] | out-file $filename


# Use Get-Content to change the text in the cfg file and then save it

# As the line for the option only exists if there is something already in the group
# this will check for it and add your $ServiceName or use Add-Contect to append option and your $ServiceName

#Option SeManageVolumePrivilege (Perform maintenance volumne tasks)
IF ((Get-Content $fileName) | where { $_.Contains("SeManageVolumePrivilege") })
{
Write-Host "Appending line containing SeManageVolumePrivilege with $ServiceName"
(Get-Content $fileName) -replace $ChangeFrom, $ChangeTo | Set-Content $fileName
}
else
{
Write-Host "Adding new line containing SeManageVolumePrivilege"
Add-Content $filename "`nSeManageVolumePrivilege = $ServiceName"
}

## Option SeLockMemoryPrivilege (Lock Pages in Memory)
## This is optinal depending on the requirements
## IF ((Get-Content $fileName) | where { $_.Contains("SeLockMemoryPrivilege") })
## {
## Write-Host "Appending line containing SeLockMemoryPrivilege with $ServiceName"
## (Get-Content $fileName) -replace $ChangeFrom2, $ChangeTo2 | Set-Content $fileName
## }
## else
## {
## Write-Host "Adding new line containing SeLockMemoryPrivilege"
## Add-Content $filename "`nSeLockMemoryPrivilege = $ServiceName"
## }

#Option SeBatchLogonRight (Log on as Batch job)
IF ((Get-Content $fileName) | where { $_.Contains("SeBatchLogonRight") })
{
Write-Host "Appending line containing SeBatchLogonRight with $ServiceName"
(Get-Content $fileName) -replace $ChangeFrom3, $ChangeTo3 | Set-Content $fileName
}
else
{
Write-Host "Adding new line containing SeBatchLogonRight"
Add-Content $filename "`nSeBatchLogonRight = $ServiceName"
}


#Option SeServiceLogonRight (log on as a service)
IF ((Get-Content $fileName) | where { $_.Contains("SeServiceLogonRight") })
{
Write-Host "Appending line containing SeServiceLogonRight with $ServiceName"
(Get-Content $fileName) -replace $ChangeFrom4, $ChangeTo4 | Set-Content $fileName
}
else
{
Write-Host "Adding new line containing SeServiceLogonRight"
Add-Content $filename "`nSeServiceLogonRight = $ServiceName"
}


#Option SeAuditPrivilege (Generate security audits)
## Optional: Only required if a Log Management Server is configured and you want to generate Audit Files
## IF ((Get-Content $fileName) | where { $_.Contains("SeAuditPrivilege") })
## {
## Write-Host "Appending line containing SeAuditPrivilege with $ServiceName"
## (Get-Content $fileName) -replace $ChangeFrom5, $ChangeTo5 | Set-Content $fileName
## }
## else
## {
## Write-Host "Adding new line containing SeAuditPrivilege"
## Add-Content $filename "`nSeAuditPrivilege = $ServiceName"
## }


# Import new Security Policy cfg (using '1> $null' to keep the output quiet)
Write-Host "Importing Security Policy..."
secedit /configure /db secedit.sdb /cfg $fileName 1> $null
Write-Host "done: local security policies changed according to SQL Standards"

## Set the SQL Services to run with the new Managed Service account
Update-DbaServiceAccount -ServiceName 'MSSQLSERVER','SQLSERVERAGENT' -UserName $ServiceName![Thumbnail [60x60]](https://www.dbi-services.com/blog/wp-content/uploads/2022/12/microsoft-square.png)
![Thumbnail [90x90]](https://www.dbi-services.com/blog/wp-content/uploads/2025/05/martin_bracher_2048x1536.jpg)
![Thumbnail [90x90]](https://www.dbi-services.com/blog/wp-content/uploads/2022/08/DWE_web-min-scaled.jpg)