In my previous blog I’ve detailed the tests we did regarding SSO in Kubernetes using Azure AD. I’ve described all the steps of our research on this topic in order to give our readers a real idea of how implementing a new solution happens. It is not a straight forward process and you have to explore several leads, do a lot of research and perform many tests in order to reach a satisfying solution that can be used on a production network.
Summary of our first working scenario
Below is a summary of the working scenario that used HTTP as URL in Kubelogin as covered in my previous blog:
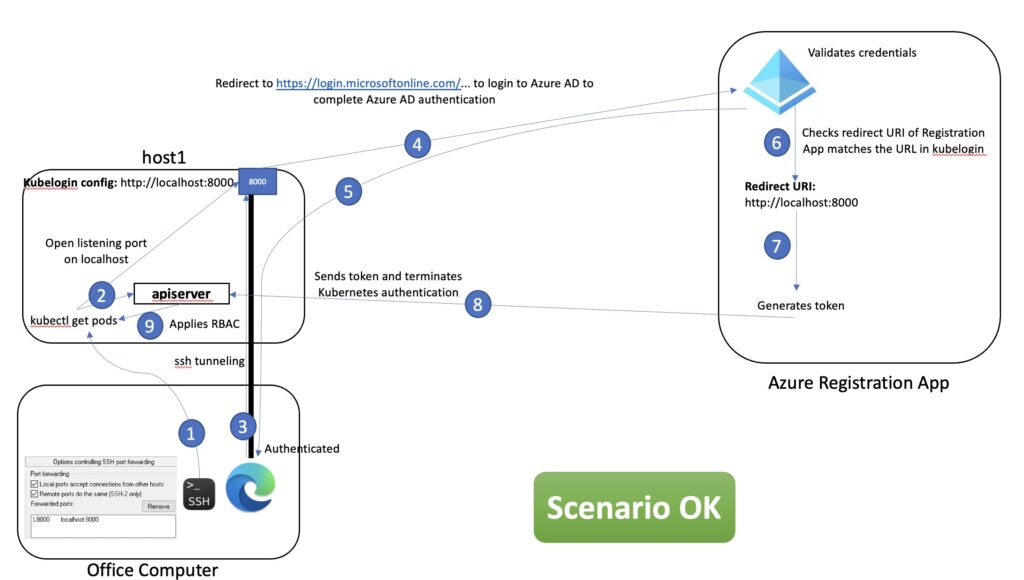
Let’s quickly summarize it in order to understand why this solution is OK for testing but wasn’t satisfying enough as a production one.
On the Office Computer we had to connect to host1 using an SSH Tunnel in order to be able to use a Web Browser from this computer to reach the URL configured in Kubelogin (steps 1,2,3).
From this URL we are redirected to Azure in order to authenticate and if successful, the Redirect URI parameter is compared to what is used as URL in Kubelogin. If both match then Azure generates a token that is sent to the apiserver (steps 4,5,6,7,8).
This token will be active for a period of time and finally RBAC rules are applied in order to control the actions this user can do on this cluster (step 9).
This scenario was not satisfying for the following reasons. By using HTTP we had no other option in Azure to set a different Redirect URI than localhost. As host1 has no Graphical User Interface (GUI) we had to connect to it using an SSH Tunnel which is not great for our users as you have to keep this tunnel open while opening the Web Browser during the authentication process. This looks more like a testing solution than a production one so we kept pushing for a better solution.
A Production Solution
As in Azure we can set any Redirect URI as long as it is HTTPS, the ideal solution would be to use HTTPS in Kubelogin as well, so we could set any URL that could be useful in our cluster environment. In my previous blog we thought only HTTP was available for Kubelogin and we didn’t find any clear information regarding HTTPS. An old GitHub issue on this topic even showed it was not supported. Kudos to Arnaud Berbier (our DevOps Delivery Manager with years of experience as Senior Consultant and Platform Solution Architect at dbi-services) for figuring out the last missing bit of information required in Kubelogin for activating HTTPS which is then indeed supported! He is the boss for a reason and it will cost me a bottle of rhum but that is very well deserved!
In our case we wanted to use the Fully Qualified Domain Name (FQDN) of host1 as a URL and Redirect URI as this address is reachable from our Office Computer without the need of using an SSH Tunnel to host1. So this address will need to use HTTPS and 2 steps are required to achieve this: First generate the SSL certificates on host1 and secondly use Kubelogin to use those newly generated certificates.
You can create certificates on host1 by using OpenSSL for example that will generate 2 files: host1.pem and host1.key.
host1.pem is the public key and host1.key is the private key. You can now copy them in a folder that is secured and change the mode of both files to 400. Only the Kubernetes user on this host should be able to just read those files.
Once done, you can set the credentials with kubectl as follows:
kubectl config set-credentials <user_name> \
--exec-api-version=client.authentication.k8s.io/v1beta1 \
--exec-command=kubectl \
--exec-arg=kubectl-oidc_login \
--exec-arg=get-token \
--exec-arg=--oidc-issuer-url="https://sts.windows.net/.../" \
--exec-arg=--oidc-client-id=... \
--exec-arg=--oidc-client-secret=...
--exec-arg=--local-server-cert=/certificate-path/host1.pem
--exec-arg=--local-server-key=/certificate-path/host1.key
It looks so simple when we know the solution! It is just a matter of using the 2 parameters local-server-cert and local-server-key that point to the certificates we have just generated.
Now when you need to authenticate you can see the beautiful URL below:
$ kubectl get pods

Please visit the following URL in your browser manually: https://host1:8000
Yes! HTTPS! So when you set that same address as Redirect URI on the Azure side it will authenticate and validate the Redirect URI and voilà!
Let’s summarize this solution in the diagram below:
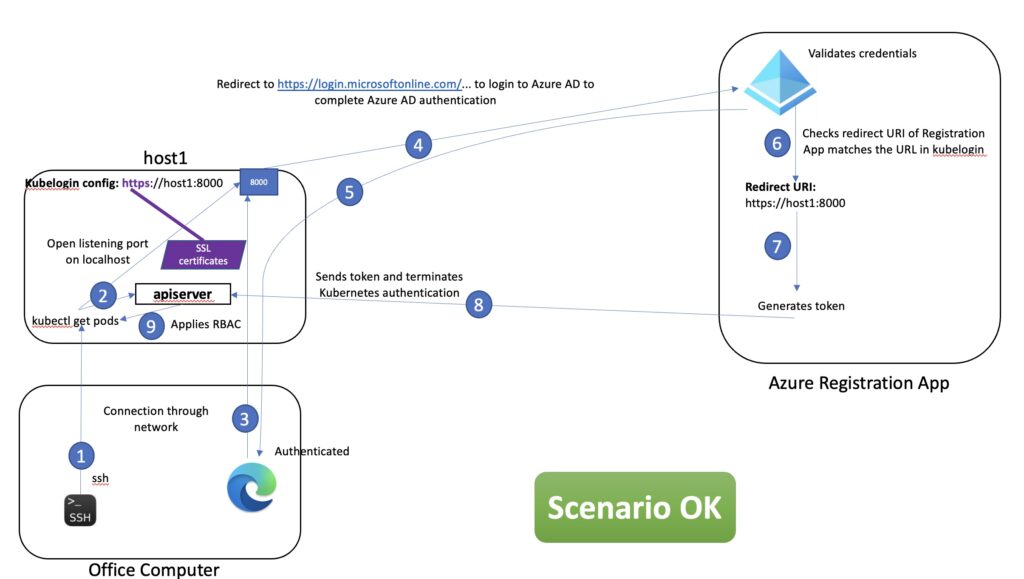
What is different from the HTTP scenario is that Kubelogin is using the certificates generated and stored on host1 and that the URL and Redirect URI are now using HTTPS with host1 FQDN. Also now from the Office Computer we can use only SSH to connect to host1 with no tunnels and the Web Browser can open the URL without requiring a tunnel for authenticating. This is exactly what we wanted!
Conclusion
We now have a solution we can deploy on production and I hope that you too will benefit from the information of this blog in order to implement a similar solution in your production cluster. With this blog and my previous one, you should now be a Subject Matter Expert on this topic!

![Thumbnail [90x90]](https://www.dbi-services.com/blog/wp-content/uploads/2022/08/GRE_web-min-scaled.jpg)
![Thumbnail [90x90]](https://www.dbi-services.com/blog/wp-content/uploads/2022/08/ADE_WEB-min-scaled.jpg)
![Thumbnail [90x90]](https://www.dbi-services.com/blog/wp-content/uploads/2024/03/AHI_web.jpg)
![Thumbnail [90x90]](https://www.dbi-services.com/blog/wp-content/uploads/2025/07/ALK_MIN.jpeg)
Br
04.06.2023That was one outstanding article , I was wondering how did manage to configure the app registration