Kubernetes certificates is a very important subject matter as it protects the communication of the components inside your cluster. However it is not a very popular topic as it could be quite confusing and adds more complexity to an already complex Kubernetes architecture. In this blog I’ll try to clarify it and give an example of a single certificate regeneration. If you have no or limited knowledge on that topic and want to learn more, this blog is for you. I’ll explain it the simpler I can. Please read on!
Kubernetes Certificates Architecture
I’ll use a vanilla Kubernetes cluster installed with kubeadm. Below you’ll see an overview of its certificates architecture known as a Public Key Infrastructure (PKI). In short, the PKI is the management of your certificates in the cluster:
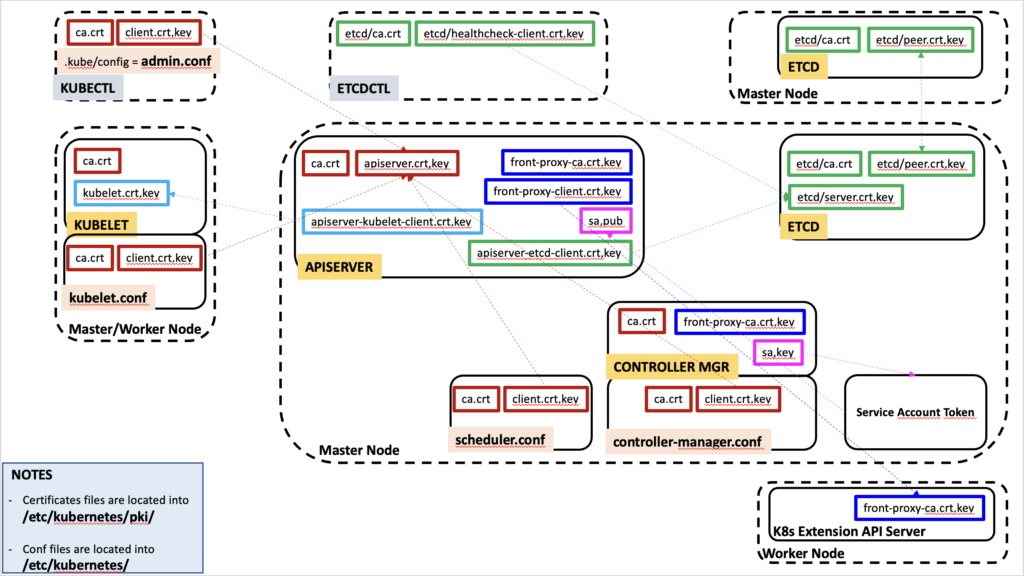
Kubernetes requires certificates for authentication over Transport Layer Security (TLS). This authentication is mandatory before a component can communicate with another one. TLS is using asymmetric encryption with a public and private key for this authentication. A public and private key are computed together and are called a certificate pair. This authentication process ensures that the communication between 2 components is legit. Once it is completed, the communication is then encrypted which means it is protected against eavesdropping. The PKI diagram shown above focus on this authentication part between the components of a Kubernetes cluster by using certificate pairs.
There are 2 sides for those certificate pairs: The client and the server. Each side has then a pair of keys, one public (.crt file) and one private (.key file). Those certificates are signed by the same certificate authority (CA) that is trusted by all components in the cluster. This is how we can make sure the certificates are valid and authorized in our Kubernetes cluster. The same CA is used by all components in the cluster (and so the same ca.crt file is used by each component).
When the certificate pair name contains “client”, the component on the client side uses them to initiate a communication with the server certificate of another component. A client uses the public crt file of the server to encrypt its request. Only that server can decrypt this request by using its associated private key of the pair. The server then authenticates this client is legit by checking its client certificate has been signed by the same CA as itself.
In the diagram above, the same line color of the box shows certificates of components that are designed to communicate together in a Kubernetes cluster. In red we can see for example that clients are kubectl, kubelet, scheduler and controller-manager. Their certificates are one of the parameters that can be found in their respective .conf file. Those clients communicate with the apiserver who is the server side of these communications. All use the same ca.crt file. So for example when the kubelet needs to communicate with the apiserver, it uses its certificates from the kubelet.conf file and the public apiserver.crt file of the apiserver. However when the apiserver needs to communicate with the kubelet, it uses its apiserver-kubelet-client certificate with the public kubelet.crt certificate of the kubelet component.
I feel you need a break from this flow of knowledge so let’s tackle an easier piece of information. On the master node, the certificates are stored in the /etc/kubernetes/pki folder. All the configuration files of the components of the cluster are stored into the /etc/kubernetes folder of the master node. In these configuration files, you’ll find the public and private key themselves or a path to those key files stored on the host. Simple and easy!
By understanding this PKI you can also learn which components are communicating together. The front-proxy certificate are used for a specific case. Also the etcd component communicates with another one when you are using multiple etcd in your cluster. Otherwise only the apiserver component communicates with the etcd. The etcdctl tool, when used, also communicates with the etcd.
The service account component is a special case of certificate as it is not signed by the CA.
Finally let’s wrap up this section by checking our understanding of how those certificates work using an example. In a vanilla Kubernetes installation, we use the tool kubectl (read the “Wrap up” section at the end of my blog KubeCon 2023 – Day 3 if you want to check how you pronounce it!). kubectl is a client that communicate with the apiserver and so it uses its client keys from its configuration file (admin.conf) to communicate with the public key (.crt file) of the apiserver. kubectl client key is signed with the same CA as the apiserver and this can be checked by using the public CA certificate (ca.crt) that is also part of kubectl configuration file (admin.conf). Easy enough?
If that is not so easy or so-so, let me provide you with more details about it. This kubectl configuration file is copied locally to any user authorized to connect to this Kubernetes cluster. So this admin.conf file is copied locally and renamed as .kube/config for this authorized user. If you edit it you’ll see the following:
clusters:
- cluster:
    certificate-authority-data: <ca.crt certificate>
...
users:
- name: ...
  user:
    client-certificate: <client.crt certificate>
    client-key: <client.key certificate>
You can see now how the certificates are linked and stored into the configuration file of the component or tool as shown in the diagram above.
Congrats if you’ve read this far, that is a lot to process if you are quite new to it. If you feel up to it, you can read more details about those certificates in the Kubernetes documentation.
Regeneration of the apiserver certificate
So you’ve got this vanilla Kubernetes cluster you’ve installed with kubeadm. You’ve also configured the certificates infrastructure and all is working well.
You are currently using 2 master nodes but you want to add a third one because you’ve learned that this is the proper number to use to support the loss of one of them. So you need to regenerate the apiserver certificates because you need to add this new master as per this example. I didn’t mention it in the previous overview section but now you are a subject matter expert and we can push it a little bit further! In addition to the signed certificate (done by the CA) and those certificates communication process there is also some information inside the certificate (public key file). This is an additional protection that allows only communication to a host declared here. Listing all hosts in the certificate allows multiple hostnames to be protected by a single certificate. So in our example all apiserver will use the same field called Subject Alternate Name (or SAN) in the certificate that list the hostname of each apiserver.
This SAN list is a configmap associated with kubeadm which is then called kubeadm-config. This configuration can be seen as follows on a master node:
$ kubectl -n kube-system get cm kubeadm-config -o yaml
...
    apiServer:
      certSANs:
      - hostname1
      - hostname2
This configuration can then be exported with the following command into a yaml file:
$ kubectl get cm kubeadm-config -n kube-system -o jsonpath='{.data.ClusterConfiguration}' > kubeadm.yaml
Modify this kubeadm.yaml file by adding the hostname of the new apiserver as follows:
    apiServer:
      certSANs:
      - hostname1
      - hostname2
      - hostname3
Then you have to delete the current apiserver certificates:
$ rm -f /etc/kubernetes/pki/apiserver.*
You can now regenerate the apiserver certificates that will take into account the new hostname you’ve just added:
$ kubeadm init phase certs apiserver --config kubeadm.yaml
Then you have to restart the apiserver pods in order to use those new generated certificates. However you must do it on the container level and not on the pod level (by using kubectl). We use containerd in our Kubernetes cluster and so we use the crictl tool:
$ crictl pods|grep kube-apiserver|cut -d' ' -f1
$ crictl stopp <pod-id>
$ crictl rmp <pod-id>
You can check the content of the new generated certificate with the following command:
$ openssl x509 -in /etc/kubernetes/pki/apiserver.crt -text -noout
You are all set and you’ll need to repeat this operation on all master nodes.
Summary
I hope this blog helped you better understand the certificates architecture in Kubernetes. This topic is already a bit advanced. If you want to start your journey or consolidate your knowledge in Docker containers and Kubernetes, have a look at our Workshop on this topic. You’ll learn everything you need to get started and have plenty of opportunities to practice on a live lab. See you there!
![Thumbnail [90x90]](https://www.dbi-services.com/blog/wp-content/uploads/2022/08/GRE_web-min-scaled.jpg)
![Thumbnail [90x90]](https://www.dbi-services.com/blog/wp-content/uploads/2022/08/ADE_WEB-min-scaled.jpg)
![Thumbnail [90x90]](https://www.dbi-services.com/blog/wp-content/uploads/2022/08/NME_web-min-scaled.jpg)