I bought a mini PC last year and I use it as a home lab to test things and play around.
So I thought, why not install a RKE2 Kubernetes cluster and deploy my own YaK instance on it?
Let’s dive-in.
In this article, I will explain how I installed a single node Kubernetes cluster with SUSE RKE2 and deployed my own local YaK instance.
Here is my setup:
- Intel NUC 13 Pro (with Intel Core i5-1340P)
- 64GB of RAM DDR4
- 1TB SSD
I’m using Proxmox as a virtualisation platform on this mini PC, and I’ve chosen SUSE Leap 15.6 as the operating system for the virtual machine that will host my RKE2 installation.
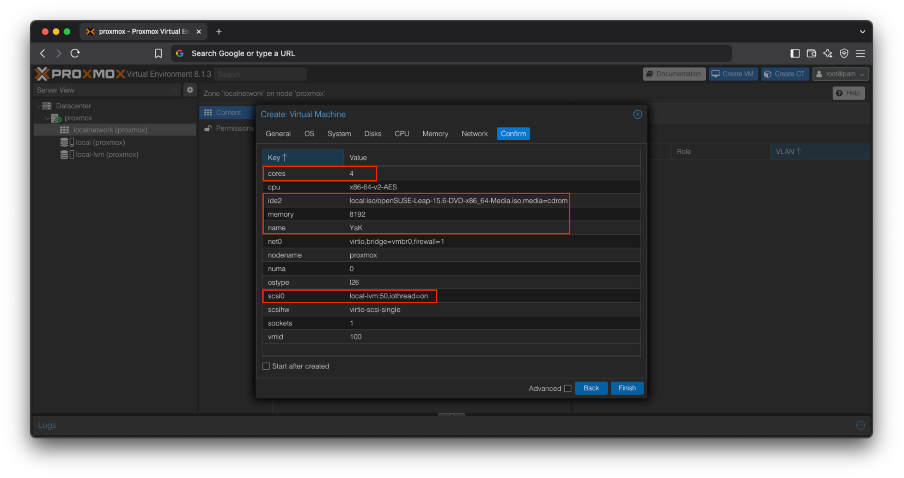
Create my VM in Proxmox
First, I created a VM and dedicated some resources to my instance.
SUSE recommends at least 8GB of RAM and 4vCPU for RKE2 to run smoothly.
Let’s start with that, I can adjust later if the system struggles.
I added 50GB of storage, that should be more than enough (that’s a lot of storage, we really don’t need that much for the YaK itself, but I might reuse this VM for other purposes too)
I’m passing the installation steps of SUSE Leap in server mode, as they are straightforward.
But, just in case, I’m adding the links to Proxmox and to SUSE Leap install docs here.
Install packages
First of all, we need to install the following packages on the VM hosting the YaK:
- Tar
- Git
- Helm
Let’s check what is already installed by default with SUSE Leap 15.6:
localhost:~ # zypper se --installed-only tar
Loading repository data...
Reading installed packages...

S  | Name                    | Summary                                          | Type
---+-------------------------+--------------------------------------------------+--------
i  | cantarell-fonts         | Contemporary Humanist Sans Serif Font            | package
i  | deltarpm                | Tools to Create and Apply deltarpms              | package
i  | shared-python-startup   | Startup script shared by all Python interpreters | package
i  | star                    | POSIX.1-2001-Compliant Tar Implementation        | package
i  | star-rmt                | Magnetic tape control and server                 | package
i  | tar                     | GNU implementation of ((t)ape (ar)chiver)        | package
i  | tar-lang                | Translations for package tar                     | package
i  | tar-rmt                 | Remote tape drive control server by GNU          | package
i  | zypper-needs-restarting | needs-restarting compatibility with zypper       | package

localhost:~ # zypper se --installed-only git
Loading repository data...
Reading installed packages...
No matching items found.

localhost:~ # zypper se --installed-only helm
Loading repository data...
Reading installed packages...
No matching items found.
As you can see, Tar is already installed but not Git nor Helm. Let’s install them:
localhost:~ # zypper install git
localhost:~ # zypper install helm
Stop firewalld
As a pre-requisite, Firewalld must be stopped.
Let’s check its status:
localhost:~ # systemctl status firewalld
● firewalld.service - firewalld - dynamic firewall daemon
     Loaded: loaded (/usr/lib/systemd/system/firewalld.service; enabled; preset: disabled)
     Active: active (running) since Wed 2025-04-30 12:12:43 CEST; 2h 7min ago
       Docs: man:firewalld(1)
   Main PID: 743 (firewalld)
      Tasks: 2 (limit: 4915)
        CPU: 349ms
     CGroup: /system.slice/firewalld.service
             └─743 /usr/bin/python3 /usr/sbin/firewalld --nofork --nopid

Apr 30 12:12:43 localhost systemd[1]: Starting firewalld - dynamic firewall daemon...
Apr 30 12:12:43 localhost systemd[1]: Started firewalld - dynamic firewall daemon.
Firewalld is active. I need to stop and disable the service so that it does not restart at system startup:
localhost:~ # systemctl stop firewalld
localhost:~ # systemctl disable firewalld
Install RKE2
Next, I installed RKE2. To do so, I simply followed the official procedure: https://docs.rke2.io/install/quickstart
localhost:~ # curl -sfL https://get.rke2.io | sh -
localhost:~ # systemctl enable rke2-server.service
localhost:~ # systemctl start rke2-server.service
As mentioned in the RKE2 documentation: “additional utilities will be installed at /var/lib/rancher/rke2/bin/. They include: kubectl, crictl, and ctr.
Note that these are not on your path by default.”
I’m adding the repository to my default PATH (this step can be done temporarily or permanently, by editing your ~/.bashrc file). I chose to make it permanent by editing my ~/.bashrc file, but it’s up to you.
export PATH="/var/lib/rancher/rke2/bin:$PATH"
RKE2 install writes a kubeconfig file to /etc/rancher/rke2/rke2.yaml.
Again, I’m adding this into my ~/.bashrc file
export KUBECONFIG=/etc/rancher/rke2/rke2.yaml
I check that the Kubernetes cluster is up and pods are running:
localhost:~ # kubectl get nodes
NAME        STATUS   ROLES                       AGE   VERSION
localhost   Ready    control-plane,etcd,master   22m   v1.31.7+rke2r1

localhost:~ # kubectl get pods -A
NAMESPACE     NAME                                                    READY   STATUS      RESTARTS      AGE
kube-system   cloud-controller-manager-localhost                      1/1     Running     1 (23m ago)   22m
kube-system   etcd-localhost                                          1/1     Running     0             22m
kube-system   helm-install-rke2-canal-nxphw                           0/1     Completed   0             23m
kube-system   helm-install-rke2-coredns-2whps                         0/1     Completed   0             23m
kube-system   helm-install-rke2-ingress-nginx-9mpwb                   0/1     Completed   0             23m
kube-system   helm-install-rke2-metrics-server-t8g27                  0/1     Completed   0             23m
kube-system   helm-install-rke2-runtimeclasses-nbq2v                  0/1     Completed   0             23m
kube-system   helm-install-rke2-snapshot-controller-crd-fmwqh         0/1     Completed   0             23m
kube-system   helm-install-rke2-snapshot-controller-nqq5g             0/1     Completed   1             23m
kube-system   kube-apiserver-localhost                                1/1     Running     0             22m
kube-system   kube-controller-manager-localhost                       1/1     Running     0             22m
kube-system   kube-proxy-localhost                                    1/1     Running     0             22m
kube-system   kube-scheduler-localhost                                1/1     Running     0             22m
kube-system   rke2-canal-qlk8b                                        2/2     Running     0             22m
kube-system   rke2-coredns-rke2-coredns-autoscaler-596dcdf688-dsjjz   1/1     Running     0             22m
kube-system   rke2-coredns-rke2-coredns-cf7df985b-zqwqn               1/1     Running     0             22m
kube-system   rke2-ingress-nginx-controller-b52nh                     1/1     Running     0             21m
kube-system   rke2-metrics-server-58ff89f9c7-dndfb                    0/1     Running     0             21m
kube-system   rke2-snapshot-controller-58dbcfd956-srw5z               1/1     Running     0             21m
Add a persistent volume
We need some storage, don’t we?
By default, RKE2 does not provide persistent volumes.
However, “Local Path Provisioner” provides a way for the Kubernetes users to utilize the local storage in each node (https://github.com/rancher/local-path-provisioner). Let’s use that.
localhost:~ # kubectl apply -f https://raw.githubusercontent.com/rancher/local-path-provisioner/v0.0.31/deploy/local-path-storage.yaml
namespace/local-path-storage created
serviceaccount/local-path-provisioner-service-account created
role.rbac.authorization.k8s.io/local-path-provisioner-role created
clusterrole.rbac.authorization.k8s.io/local-path-provisioner-role created
rolebinding.rbac.authorization.k8s.io/local-path-provisioner-bind created
clusterrolebinding.rbac.authorization.k8s.io/local-path-provisioner-bind created
deployment.apps/local-path-provisioner created
storageclass.storage.k8s.io/local-path created
configmap/local-path-config created
Install YaK
Alright, I now have a fully functional Kubernetes cluster.
Let’s install the YaK on it now.
- Create a namespace:
kubectl create ns yak
- Add yak repo
helm repo add yak https://gitlab.com/api/v4/projects/63133284/packages/helm/stable && helm repo update
- Create the yak.values.yaml definition file
localhost:~ # vi yak.values.yaml
global:
  hostname: yak.lab
  admin_credentials:
    password: "ABCdef1234@" #default password to be changed to your need

yak-postgres:
  postgresPassword: "" # Randomly generated if not set
  persistence:
    size: 20Gi
    storageClassName: "local-path" # Uses default if empty

yak-graphile:
  # Archive storage stores the component types archives at import time
  persistence: &archives_storage
    size: 20Gi
    storageClassName: "local-path" # Uses default if empty
  # If using a multi-node cluster, uncomment these 2 lines:
    #accessModes:
     # - ReadWriteMany

  # If you want to expose the rest API at https://hostname/data/graphql and have the postgraphile UI at https://yak.my-domain.local/data/graphiql
  ingress:
    enabled: true
    className: "" # Uses default if empty
    tls:
     - secretName: yak-tls-secret
       hosts:
       - yak.lab

yak-runner:
  image:
    pullPolicy: Always
  persistence:
  # Runner shares the archives storage with graphile
    graphile: *archives_storage
    components:
      enabled: true
      storageClassName: "local-path" # Uses default if empty
      size: 8Gi
    sshconfig:
      enabled: true
      storageClassName: "local-path" # Uses default if empty
      size: 1Gi

yak-ui:
  # Mandatory if you want to access the UI through ingress
  ingress:
    enabled: true
    className: "" # Uses default if empty
    tls:
     - secretName: yak-tls-secret
       hosts:
       - yak.lab
- Run Helm install YaK
helm install yak yak/yak -f yak.values.yaml -n yak
- Check that YaK is properly deployed (all 4 pods should be Running after a few minutes)
localhost:~ # kubectl get pods -n yak
NAME                            READY   STATUS    RESTARTS   AGE
yak-graphile-5b5454fd64-hmk2c   1/1     Running   0          1m
yak-postgres-7bcf4f9897-7mrdg   1/1     Running   0          1m
yak-runner-6669948599-9ggwn     1/1     Running   0          1m
yak-ui-7f6d77c765-spgfn         1/1     Running   0          1m
Connect to the YaK with https
Finally, let’s connect to our web app!
- Update your local
/etc/hostsfile and add your YaK server, in my case:
192.168.10.185 yak.lab
- Open a web browser and navigate to your URL : https://yak.lab
- Default credentials :
- User: admin
- Password: ABCdef1234@
- Default credentials :

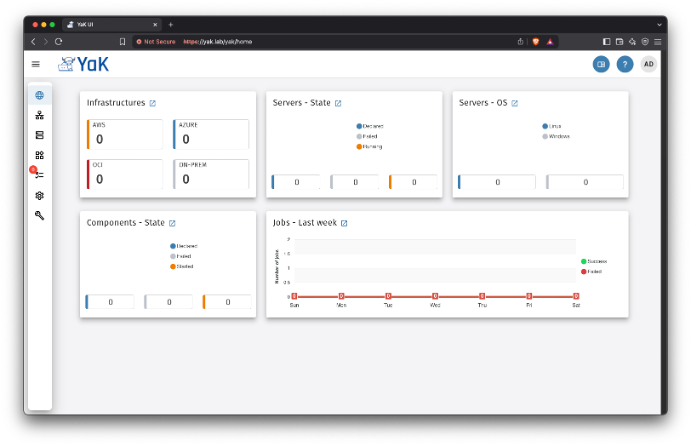
Voilà!!
I’ve now got a local YaK on RKE2 running at home, ready to deploy infrastructures, servers and components wherever I want.
For more info about the YaK, visit yak4all.io
And if you can’t be bothered installing your own YaK, you can bring up a fully functional YaK demo environment, within minutes : yak4all.io/demo
Feel free to play around and explore our use cases
Happy YaKing 😉 !
![Thumbnail [60x60]](https://www.dbi-services.com/blog/wp-content/uploads/2022/08/GRE_web-min-scaled.jpg)
![Thumbnail [90x90]](https://www.dbi-services.com/blog/wp-content/uploads/2022/08/FRJ_web-min-scaled.jpg)
![Thumbnail [90x90]](https://www.dbi-services.com/blog/wp-content/uploads/2022/08/DWI_web-min-scaled.jpg)
![Thumbnail [90x90]](https://www.dbi-services.com/blog/wp-content/uploads/2022/08/HER_web-min-scaled.jpg)