Mistakes or accidental data deletions can sometimes happen on a productive MariaDB Galera Cluster and this can be disastrous.
There are so many cases I have heard by customers and hereafter are some of the most common:
– dropping one column of a table
– dropping one table
– updating a big table without a where clause
What if it was possible to restore online a subset of data without downtime?
Restoring & recovering using either mysqldump or mariabackup is not satisfying when you have just to recover a subset of data.
In both case, there will be a downtime and it will be a very long process.
– with mysqldump: you will have first to stop the application, restore the latest Full backup and then apply all the binary logs until the guilty command.
– with mariabackup, you will also have to stop the application but additionally the cluster, then restore the latest Full backup on one node, restart the cluster (galera_new_cluster), apply all the binary logs and finally restart the other members in order to be synchronized.
Having a test server where you can restore/recover a logical backup can help, you just have then to export the needed data, copy them on the productive host and reload them but still, it will take a lot of time.
MariaDB Galera Cluster preparation
“On a souvent besoin d’un plus petit que soi” was saying Jean de La Fontaine in his fable: Le lion et le rat
Let’s use this proverb to implement this solution, we will need some help from Docker.
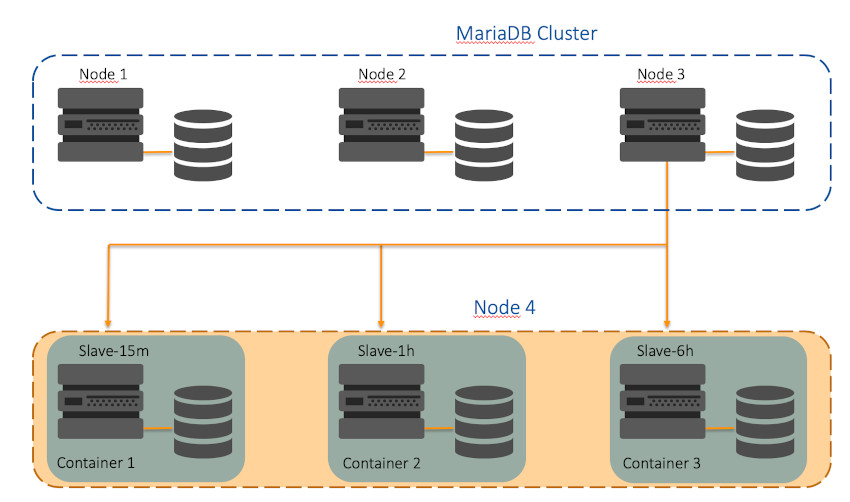
Using a fourth node (the helper), we will deploy 3 containers with a delayed replication of 15minutes, 1hour and 6hours but of course you can choose your own lags.
Here is an overview of my environment.
As it is mandatory for the replication (Master/Slave), the first step is to activate the binary logs (binlogs) in the option file (my.cnf) on every master node.
Why?
Because they are not activated by default on a Galera Cluster, writesets (transactions) are written to a Galera cache (Gcache) and in case of recovery/resynchronisation, Galera will perform an Incremental State Transfer by using the Gcache.
[mysqld]
# REPLICATION SPECIFIC
server_id=3
binlog_format=ROW
log_bin = /var/lib/mysql/binlog
log_slave_updates = ON
expire_logs_days = 7

$ sudo systemctl restart mariadb
The second step is to create a dedicated user with the “REPLICATION SLAVE” privilege for the replication.
We only need to create it once as it is automically duplicated on the other members
MariaDB > create user rpl_user@’192.168.56.%' IDENTIFIED BY 'manager';
MariaDB > GRANT REPLICATION SLAVE ON *.* TO rpl_user@'%’;
MariaDB > show grants for 'rpl_user'@'’192.168.56.%';
+-------------------------------------------------------------------------------------+
| Grants for rpl_user@%                                                               |
+-------------------------------------------------------------------------------------+
| GRANT REPLICATION SLAVE ON *.* TO 'rpl_user'@'’192.168.56.%' IDENTIFIED             |
+-------------------------------------------------------------------------------------+
The third step is to create a Full backup of one of the master node and transfer it on the docker host
$  mysqldump -uroot -p \
--flush-privileges --hex-blob --single-transaction \
--triggers --routines --events \
--all-databases | gzip -6 -c > mysqldump_complete.sql.gz
$  scp mysqldump_complete.sql.gz [email protected]:/tmp
Docker Host preparation
Now on the Docker host, we create 3 directories for each container
– mariadb.conf.d: store MariaDB configuration file, mapped into the container under /etc/mysql/mariadb.conf.d
– datadir : store the MariaDB data, mapped to /var/lib/mysql
– sql : backup file (dump) & script files to automate replication configuration and startup
$ for val in 15m 1h 6h
$ do
$  sudo mkdir -p /storage/mariadb-slave-${val}/mariadb.conf.d
$  sudo mkdir -p /storage/mariadb-slave-${val}/datadir
$  sudo mkdir -p /storage/mariadb-slave-${val}/sql
$ done
We prepare the MariaDB configuration for every slave & insert the following parameters
$ vi /storage/mariadb-slave-15m/mariadb.conf.d/my.cnf
[mysqld]
server_id=10015
binlog_format=ROW
log_bin=binlog
log_slave_updates=1
relay_log=relay-bin
expire_logs_days=7
read_only=ON
For the next step, we need to create two scripts for every delayed slave. The first one will only contain the following statement
RESET MASTER;
This will delete all old binary log files & start a new binary log file sequence with a suffix of “.000001”
The second one will setup & start the replication. The most important parameter is “MASTER_DELAY” as it determines the amount of time in seconds the slave should lag behind the master.
CHANGE MASTER TO MASTER_HOST = '192.168.56.203’, \

MASTER_USER = 'rpl_user', MASTER_PASSWORD = 'manager’, \

MASTER_DELAY=900;

START SLAVE;
Last we copy the backup (dump) on every slave “sql” directory and renamed it 2_mysqldump.sql.gz
$ cp ~/mysqldump_complete.tar.gz /storage/mariadb-slave-15m/sql/2_mysqldump.tar.gz
$ cp ~/mysqldump_complete.tar.gz /storage/mariadb-slave-1h/sql/2_mysqldump.tar.gz
$ cp ~/mysqldump_complete.tar.gz /storage/mariadb-slave-6h/sql/2_mysqldump.tar.gz
The final look of every “sql slave directory has to be as following
$ ll /storage/mariadb-slave-{15m,1h,6h}/sql
-rw-r--r-- 1 mysql mysql     14 Feb 13 14:35 1_Reset_master.sql
-rw-r--r-- 1 mysql mysql 843584 Feb 13 14:44 2_mysqldump.tar.gz
-rw-r--r-- 1 mysql mysql    134 Feb 13 14:35 3_setup_slave.sql

-rw-r--r-- 1 mysql mysql 14 Feb 13 14:35 1_Reset_master.sql
-rw-r--r-- 1 mysql mysql 843584 Feb 13 14:44 2_mysqldump.tar.gz
-rw-r--r-- 1 mysql mysql 134 Feb 13 14:35 3_setup_slave.sql

-rw-r--r-- 1 mysql mysql 14 Feb 13 14:35 1_Reset_master.sql
-rw-r--r-- 1 mysql mysql 843584 Feb 13 14:44 2_mysqldump.tar.gz
-rw-r--r-- 1 mysql mysql 134 Feb 13 14:35 3_setup_slave.sql
We prefix the SQL scripts with an integer because it determines the execution order when Docker initializes the MariaDB container.
Containers deployment
Everything is in place, let’s start and run the 3 MariaDB containers. One last thing, MYSQL_ROOT_PASSWORD must be the same as the MariaDB root password on the master.
$ for val in 15m 1h 6h
$ do
$  docker run –d \
--name mariadb-slave-$val \
--hostname mariadb$val \
-e MYSQL_ROOT_PASSWORD=manager \
-v /storage/mariadb-slave-$val/datadir:/var/lib/mysql \
-v /storage/mariadb-slave-$val/mariadb.conf.d:/etc/mysql/mariadb.conf.d \
-v /storage/mariadb-slave-$val/sql:/docker-entrypoint-initdb.d  \
mariadb
We first check if all containers are started.
$ docker ps –a
CONTAINER ID        IMAGE               COMMAND                  CREATED             STATUS              PORTS               NAMES
f0f3d674c2f5        mariadb             "docker-entrypoint.s…"   3 minutes ago       Up 3 minutes        3306/tcp            mariadb-slave-15m
393145021a84        mariadb             "docker-entrypoint.s…"   3 minutes ago       Up 3 minutes        3306/tcp            mariadb-slave-1h
9d3bc9bd214c        mariadb             "docker-entrypoint.s…"   3 minutes ago       Up 3 minutes        3306/tcp            mariadb-slave-6h
We then check the log file to see it the slave is connected.
$ docker logs -f mariadb-slave-15m
...
2019-03-11 10:01:08 0 [Note] mysqld: ready for connections.
Slave I/O thread: connected to master '[email protected]:3306',replication started in log 'FIRST' at position 4
Finally we check the replication status and the delay.
$ docker exec -it mariadb-slave-15m mysql -uroot -p -e 'show slave status\G’
Slave_IO_State: Waiting for master to send event
Master_Host: 192.168.56.203
...
Slave_IO_Running: Yes
Slave_SQL_Running: Yes

SQL_Delay: 900
...
Slave_SQL_Running_State: Slave has read all relay log; waiting for the slave I/O thread to update it
Conclusion
So, set up is now over, we will see in another blog post with a typical case how we can restore efficiently and online from such a situation.
![Thumbnail [60x60]](https://www.dbi-services.com/blog/wp-content/uploads/2022/05/open-source-author.png)
![Thumbnail [90x90]](https://www.dbi-services.com/blog/wp-content/uploads/2023/01/APY_web-scaled.jpg)
![Thumbnail [90x90]](https://www.dbi-services.com/blog/wp-content/uploads/2022/08/FRJ_web-min-scaled.jpg)