No need to explain what is a snapshot and restore, how much they are important to any platform, software, database, aso. In this blog, I will show you how to take snapshots of your Elasticsearch cluster and how to restore.
A snapshot is a backup of a running Elasticsearch cluster, it could be used to:
- Regularly back up a cluster with no downtime
- Recover data after deletion or a hardware failure
- Transfer data between clusters
- Reduce your storage costs by using searchable snapshots in the cold and frozen data tiers.
Please note that this blog has been written based on Elasticsearch version 8.8. The snapshot and restore methodology would different from an older version.
Snapshot repository
Elasticsearch stores snapshots in an off-cluster storage location called a snapshot repository. Before you can take or restore snapshots, you must register a snapshot repository on the cluster. Elasticsearch supports several repository types with cloud storage options, including: AWS S3, Google Cloud Storage (GCS), and Microsoft Azure.
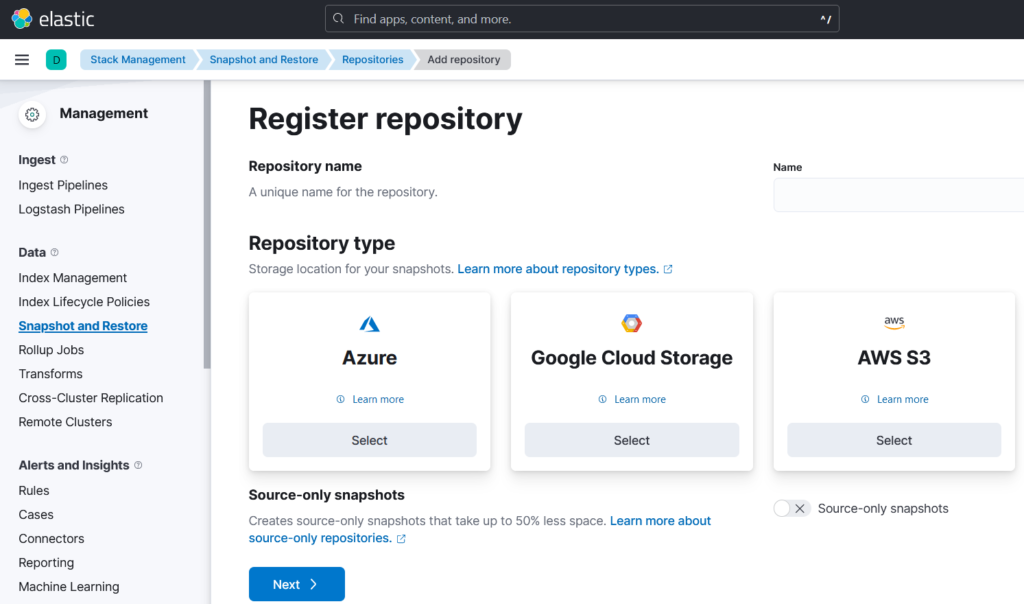
To register a repository, it is so easy with new Elasticsearch versions, it could be done from Stack Management. As you can see below, you can choose from Azure, Google, or AWS.
Snapshot contents
By default, a snapshot of a cluster contains the cluster state, all regular data streams, and all regular indices. In fact, the cluster state includes:
- Persistent cluster settings
- Index templates
- Legacy index templates
- Ingest pipelines
- ILM policies
Please note that you can also take snapshots of only specific data streams or indices in the cluster.
In all cases, snapshots don’t contain or back up:
- Transient cluster settings
- Registered snapshot repositories
- Node configuration files
- Security configuration files
Manually take a snapshot
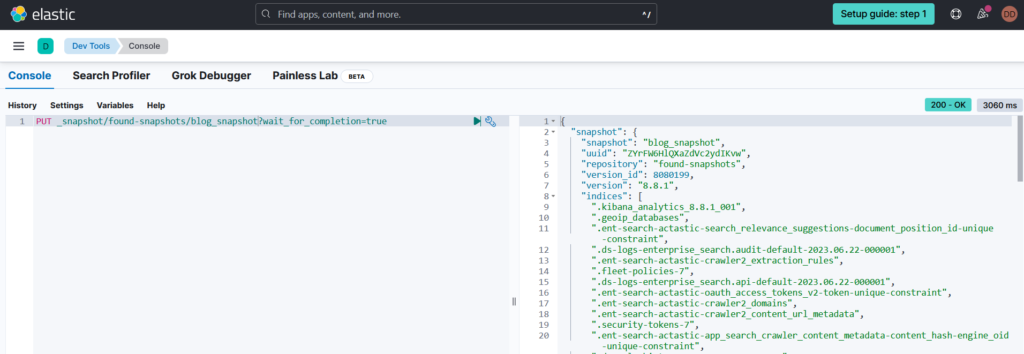
You can use the create snapshot API to create snapshot manually, Depending on its size, a snapshot can take a while to complete. By default, the create snapshot API only initiates the snapshot process, which runs in the background. To block the client until the snapshot finishes, set the wait_for_completion query parameter to true.
Snapshot Lifecycle Management (SLM)
Snapshot lifecycle management (SLM) is the easiest way to regularly back up a cluster. An SLM policy automatically takes snapshots on a preset schedule. The policy can also delete snapshots based on retention rules you define.
To keep this blog readable, we will talk about SLM in a dedicated blog 😉
Snapshot compatibility
I already mentioned that in a previous blog, let’s talk about quickly here as it is a very critical topic.
In fact, any index you restore from a snapshot must also be compatible with the current cluster’s version. So, if you try to restore an index created in an incompatible version, the restore attempt will fail.
Please find below the compatibility between index creation version and the cluster version:
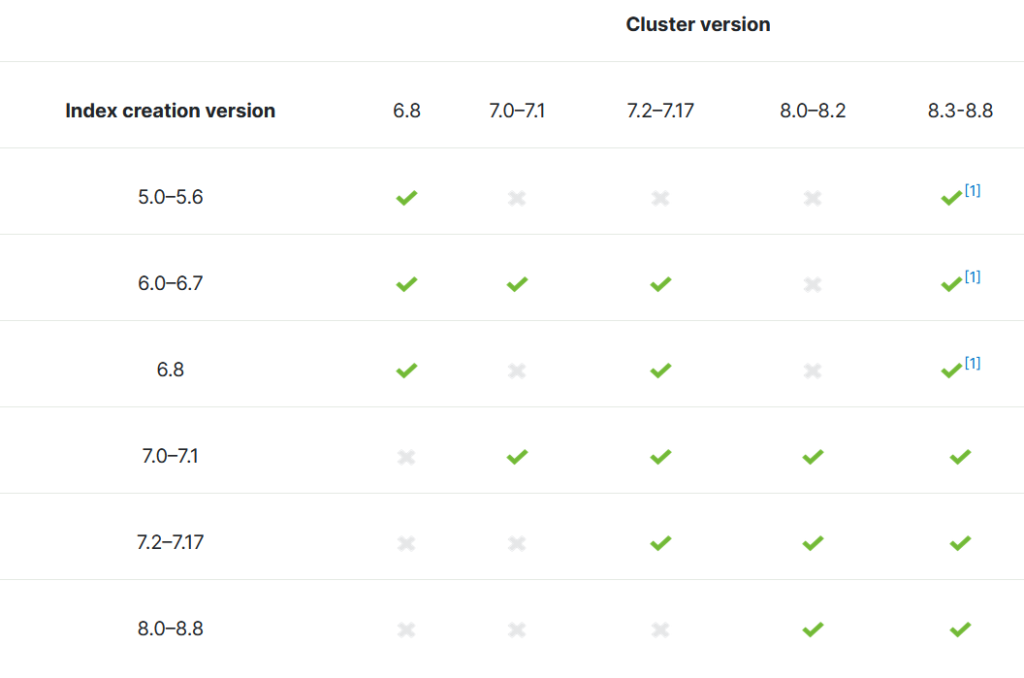
Please note that we are talking about “Index creation version” and not “snapshot creation version”, which means that if you take a snapshot with version 6.8 of an index created in 5.6. The snapshot will not be compatible with 7.1! So, please be careful 🙂
Restore a snapshot
By default, a restore request attempts to restore all regular indices and regular data streams in a snapshot. In most cases, you only need to restore a specific index or data stream from a snapshot. However, you can’t restore an existing open index!
If it is your case, you can use one of the following methods to avoid conflicts with existing indices and data streams:
Delete and Restore
The simplest way to avoid conflicts is to delete an existing index or data stream before restoring it. To prevent the accidental re-creation of the index or data stream, I recommend you temporarily stop all indexing until the restore operation is complete.
# Delete an index
DELETE my-index

# Restore the index
POST _snapshot/my_repository/my_snapshot_2023.06.22/_restore
{
  "indices": "my-index"
}
Rename on restore
If you want to avoid deleting existing data, you can instead rename the indices and data streams you restore. You typically use this method to compare existing data to historical data from a snapshot. For example, you can use this method to review documents after an accidental update or deletion.
Before you start, ensure the cluster has enough capacity for both the existing and restored data!
POST _snapshot/my_repository/my_snapshot_2023.06.22/_restore
{
  "indices": "my-index",
  "rename_pattern": "(.+)",
  "rename_replacement": "restored-$1"
}
Stay connected for the next blog about SLM, in the meantime, please don’t hesitate to ask question or share your experience with Snapshot and Restore.
![Thumbnail [60x60]](https://www.dbi-services.com/blog/wp-content/uploads/2022/09/DDI_web-min-scaled.jpg)