Currently we begin to see customer adopting containerization for SQL Server databases (mainly driven by CI/CD and DevOps trends). A lot of them are using RedHat OpenShift as container management platform. From my side, I didn’t want to setup a complete OpenShift infrastructure on my lab to test only my SQL Server pod deployment on such infrastructure. I rather installed MiniShift that comes with one OpenShift node cluster which perfectly meets my requirements.

I’ll be running MiniShift on my Windows 10 laptop and I will use Hyper-V as the hypervisor for Minishift. I used the following MiniShift configuration settings. Just remember that SQL Server memory requirement is 2GB so I had to increase the default setting value to 6GB to be more comfortable running my SQL Server pod. I also setup my MiniShift default folders location to another disk.
[dab@DBI-LT-DAB:#]> minishift config set vm-driver hyperv
[dab@DBI-LT-DAB:#]> minishift config set hyperv-virtual-switch Internet
[dab@DBI-LT-DAB:#]> minishift config set memory 6GB
$env:MINISHIFT_HOME="T:\minishift\"
Let’s start MiniShift:
[dab@DBI-LT-DAB:#]> minishift start
-- Starting profile 'minishift'
-- Check if deprecated options are used ... OK
-- Checking if https://github.com is reachable ... OK
-- Checking if requested OpenShift version 'v3.9.0' is valid ... OK
-- Checking if requested OpenShift version 'v3.9.0' is supported ... OK
-- Checking if requested hypervisor 'hyperv' is supported on this platform ... OK
-- Checking if Hyper-V driver is installed ... OK
-- Checking if Hyper-V driver is configured to use a Virtual Switch ...
   'Internet' ... OK
-- Checking if user is a member of the Hyper-V Administrators group ... OK
-- Checking the ISO URL ... OK
-- Checking if provided oc flags are supported ... OK
-- Starting the OpenShift cluster using 'hyperv' hypervisor ...
-- Starting Minishift VM ................................................ OK
-- Checking for IP address ... OK
-- Checking for nameservers ... OK
-- Checking if external host is reachable from the Minishift VM ...
   Pinging 8.8.8.8 ... OK
-- Checking HTTP connectivity from the VM ...
   Retrieving http://minishift.io/index.html ... OK
-- Checking if persistent storage volume is mounted ... OK
-- Checking available disk space ... 10% used OK
-- OpenShift cluster will be configured with ...
   Version: v3.9.0
-- Copying oc binary from the OpenShift container image to VM ... OK
-- Starting OpenShift cluster ...........
Deleted existing OpenShift container
Using nsenter mounter for OpenShift volumes
Using public hostname IP 192.168.0.17 as the host IP
Using 192.168.0.17 as the server IP
Starting OpenShift using openshift/origin:v3.9.0 ...
OpenShift server started.

The server is accessible via web console at:
    https://192.168.0.17:8443

…
I also needed to configure docker and oc environment to get access on them from my PowerShell console.
& minishift docker-env | Invoke-Expression
& minishift oc-env | Invoke-Expression
Configuration done. Let’s start creating my first project then:
[dab@DBI-LT-DAB:#]> oc new-project mssqlserver --description="mssqlserver deployment on Minishift" --display-name="mssqlserver project"
Now using project "mssqlserver" on server "https://192.168.0.17:8443".
Let’s get a list of existing projects:
[dab@DBI-LT-DAB:#]> oc projects
You have access to the following projects and can switch between them with 'oc project <projectname>':

  * mssqlserver - mssqlserver project
    myproject - My Project

Using project "mssqlserver" on server "https://192.168.0.17:8443".
I will need to use an OpenShift private registry for my tests:
[dab@DBI-LT-DAB:#]> minishift openshift registry
172.30.1.1:5000
My OpenShift registry contains the following images by default:
[dab@DBI-LT-DAB:#]> docker images
REPOSITORY                         TAG                 IMAGE ID            CREATED             SIZE
openshift/origin-web-console       v3.9.0              aa12a2fc57f7        8 weeks ago         495MB
openshift/origin-docker-registry   v3.9.0              8e6f7a854d66        8 weeks ago         465MB
openshift/origin-haproxy-router    v3.9.0              448cc9658480        8 weeks ago         1.28GB
openshift/origin-deployer          v3.9.0              39ee47797d2e        8 weeks ago         1.26GB
openshift/origin                   v3.9.0              4ba9c8c8f42a        8 weeks ago         1.26GB
openshift/origin-pod               v3.9.0              6e08365fbba9        8 weeks ago         223MB
For my tests, I picked up my custom dbi services image for SQL Server used for our DMK maintenance tool. Next steps consisted in building, tagging and uploading the corresponding image to my OpenShift integrated registry. Image tagging was done with the [registry_ip]:[port]/[project]/[image]/[tag] pattern:
[dab@DBI-LT-DAB:#]> docker tag dbi/dbi_linux_sql2017:2017-CU4 172.30.1.1:5000/mssqlserver/dbi_linux_sql2017:2017-CU4
[dab@DBI-LT-DAB:#]> docker images
REPOSITORY                                TAG                 IMAGE ID            CREATED             SIZE
172.30.1.1:5000/mssqlserver/dbi_linux_sql2017   2017-CU4            d37ecabe87e8        22 minutes ago      1.42GB
dbi/dbi_linux_sql2017                     2017-CU4            d37ecabe87e8        22 minutes ago      1.42GB

[dab@DBI-LT-DAB:#]> docker push 172.30.1.1:5000/mssqlserver/dbi_linux_sql2017:2017-CU4
The push refers to a repository [172.30.1.1:5000/mssqlserver/dbi_linux_sql2017]
2e3c7826613e: Pushed
66ccaff0cef8: Pushed
…
My custom image is now available as image stream on OpenShift.
Go ahead and let’s try first to deploy my SQL Server pod from the mssqlserver project through the web console. The task is easy. You just have to choose deployment from an image and search then the corresponding image available as imagestream in your OpenShift integrated registry. In my case deployment was ok after configuring some environment variable values.
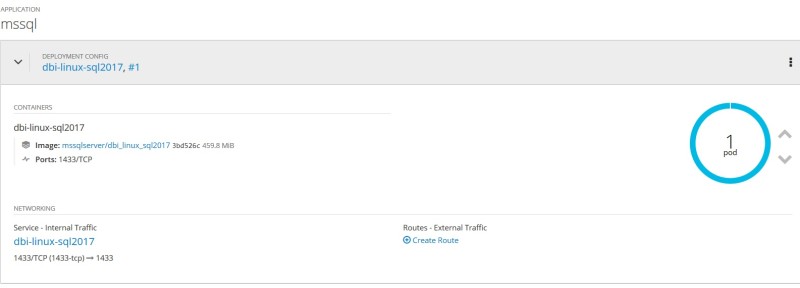
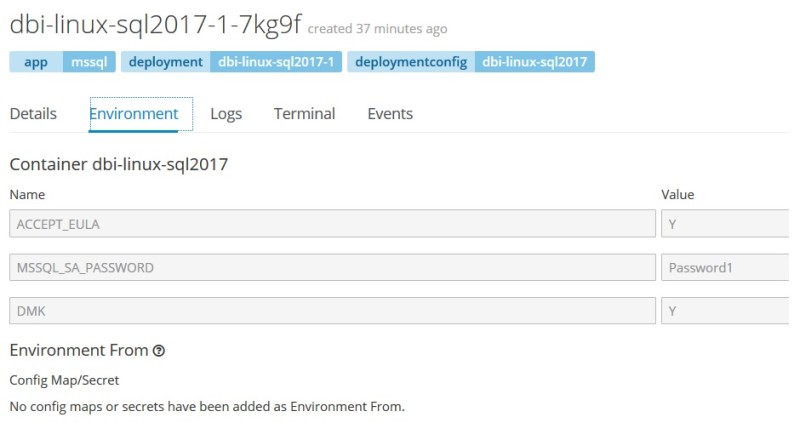
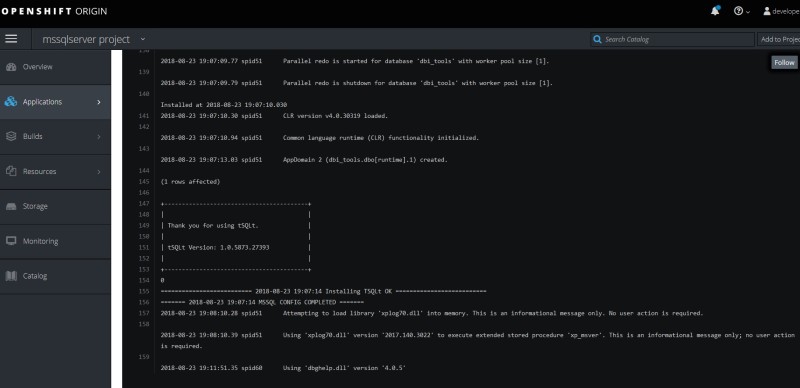
From the web console you have access to pod logs. In my case, it corresponds to the SQL Server error log during the startup phase. My custom image includes creating a custom dbi_tools database as well as installing tSQLt framework.
The final step consists in exposing the SQL Server pod to outside world (not by default):
[dab@DBI-LT-DAB:#]> oc get pod
NAME                        READY     STATUS    RESTARTS   AGE
dbi-linux-sql2017-1-9vvfw   1/1       Running   0          1h

C:\Users\dab\Desktop
[dab@DBI-LT-DAB:#]> oc port-forward dbi-linux-sql2017-1-9vvfw 1433:1433
Let’s try a connection from mssql-cli tool:
[dab@DBI-LT-DAB:$]> mssql-cli -S 127.0.0.1 -U sa -P Password1
Version: 0.15.0
Mail: [email protected]
Home: http://github.com/dbcli/mssql-cli
master> select *
....... from sys.dm_os_host_info;
+-----------------+---------------------+----------------+---------------------------+------------+-----------------------+
| host_platform   | host_distribution   | host_release   | host_service_pack_level   | host_sku   | os_language_version   |
|-----------------+---------------------+----------------+---------------------------+------------+-----------------------|
| Linux           | Ubuntu              | 16.04          |                           | NULL       | 0                     |
+-----------------+---------------------+----------------+---------------------------+------------+-----------------------+
(1 row affected)
Time: 0.405s
master>
Done!
This is my first deployment but we can do better here. Indeed, in my previous scenario, I didn’t setup persistent volume to host my database files or I didn’t use OpenShift secrets to protect my credential information. Let’ do it!
Let’s create first a persistent volume. Developer user doesn’t have permissions to manage volume on the cluster so let’s switch to the system user:
[dab@DBI-LT-DAB:#]> oc login -u system:admin
Logged into "https://192.168.0.17:8443" as "system:admin" using existing credentials.
OpenShift runs on the top of K8s which is object-oriented. Objects can be deployed from deployment files as well and this is definitely my favorite path currently for many reasons. I configured both PersistentVolume and PersistentVolumeClaim objects in a deployment file as follows. Note the hostPath value corresponds to a local path in the MiniShift cluster I setup in a previous step.
kind: PersistentVolume
apiVersion: v1
metadata:
  name: pv-data-sql
spec:
  capacity:
    storage: 5Gi
  accessModes:
    - ReadWriteOnce
  storageClassName: slow
  hostPath:
    path: /mnt/sda1/var/lib/minishift/openshift.local.pv/pv0069
---
kind: PersistentVolumeClaim
apiVersion: v1
metadata:
  name: pv-claim-data-sql
spec:
  accessModes:
    - ReadWriteOnce
  resources:
    requests:
      storage: 5Gi
  storageClassName: slow
selector:
  name: pv-data-sql
Let’s deploy both my persistent volume and persistent volume claim …
[dab@DBI-LT-DAB:#]> oc create -f .\docker_openshift_storage.yaml
persistentvolume "pv-data-sql" created
persistentvolumeclaim "pv-claim-data-sql" created
… and get status of my persistent volume deployment
[dab@DBI-LT-DAB:#]> oc get pvc
NAME                STATUS    VOLUME        CAPACITY   ACCESS MODES   STORAGECLASS   AGE
pv-claim-data-sql   Bound     pv-data-sql   5Gi        RWO            hostpath       1m
[dab@DBI-LT-DAB:#]> oc get pv
NAME          CAPACITY   ACCESS MODES   RECLAIM POLICY   STATUS      CLAIM                           STORAGECLASS   REASON    AGE
pv-data-sql   5Gi        RWO            Retain           Bound       mssqlserver/pv-claim-data-sql   hostpath                 1m
…
“Bound” status indicates that everything seems to be ok.
Let’s continue and let’s add an OpenShift secret from my deployment file:
apiVersion: v1
kind: Secret
metadata:
  name: mssql-env
stringData:
  MSSQL_SA_PASSWORD: Password1
…
[dab@DBI-LT-DAB:#]> oc create -f .\docker_openshift_mssql_secret.yaml
secret "mssql-env" created
C:\Users\dab\Desktop
[dab@DBI-LT-DAB:#]> oc get secret
NAME                       TYPE                                  DATA      AGE
…
mssql-env                  Opaque                                1         1h
At this step, you have different ways to deploy a pod so I finally use a deployment configuration file as follows:
apiVersion: apps.openshift.io/v1
kind: DeploymentConfig
metadata:
  labels:
    app: mssql
  name: dbi-linux-sql2017
  namespace: mssqlserver
spec:
  replicas: 1
  selector:
    app: mssql
    deploymentconfig: dbi-linux-sql2017
  strategy:
    type: Rolling
  template:
    metadata:
      labels:
        app: mssql
        deploymentconfig: dbi-linux-sql2017
    spec:
      containers:
        - env:
            - name: ACCEPT_EULA
              value: 'Y'
            - name: DMK
              value: 'Y'
            - name: MSSQL_SA_PASSWORD
              valueFrom:
                secretKeyRef:
                  key: MSSQL_SA_PASSWORD
                  name: mssql-env
          envFrom:
            - secretRef:
                name: mssql-env
          image:
            172.30.1.1:5000/mssqlserver/dbi_linux_sql2017:2017-CU4
          imagePullPolicy: Always
          name: dbi-linux-sql2017
          ports:
            - containerPort: 1433
              protocol: TCP
          volumeMounts:
            - mountPath: /var/opt/mssql/
              name: volume-x1d5y
      dnsPolicy: ClusterFirst
      restartPolicy: Always
      volumes:
        - name: volume-x1d5y
          persistentVolumeClaim:
            claimName: pv-claim-data-sql
  triggers:
    - type: ConfigChange
    - imageChangeParams:
        automatic: true
        containerNames:
          - dbi-linux-sql2017
        from:
          kind: ImageStreamTag
          name: 'dbi_linux_sql2017:2017-CU4'
          namespace: mssqlserver
      type: ImageChange
… To deploy my SQL Server pod:
[dab@DBI-LT-DAB:#]> oc create -f .\deployment-config-mssql.yml
deploymentconfig "dbi-linux-sql2017" created
Once again, I exposed the corresponding service port to connect from my laptop and connection to my SQL Server pod was successful again. Note that the pod is different from the first time. Updating my configuration led K8s to spin-up another container in this case.
[dab@DBI-LT-DAB:#]> oc get pod
NAME                        READY     STATUS    RESTARTS   AGE
dbi-linux-sql2017-1-9ddfbx   1/1       Running   0          1h

C:\Users\dab\Desktop
[dab@DBI-LT-DAB:#]> oc port-forward dbi-linux-sql2017-9ddfbx 1433:1433
Forwarding from 127.0.0.1:1433 -> 1433
Finally let’s take a look at the MiniShift cluster storage layer to get a picture of my SQL Server database files including data, log and secrets under /var/opt/mssql:
[dab@DBI-LT-DAB:#]> minishift ssh

[root@minishift ~]# ll /mnt/sda1/var/lib/minishift/openshift.local.pv/pv0069/
total 0
drwxr-xr-x. 2 root root 202 Aug 23 15:07 data
drwxr-xr-x. 2 root root 232 Aug 23 15:18 log
drwxr-xr-x. 2 root root  25 Aug 23 15:06 secrets
I was quick on some topics in this write-up that deserves probably to dig further into details and there are other ones to investigate. I will get other opportunities to share my thoughts on it in a context of SQL Server database scenarios. Stay tuned!
By David Barbarin
![Thumbnail [60x60]](https://www.dbi-services.com/blog/wp-content/uploads/2022/12/microsoft-square.png)
![Thumbnail [90x90]](https://www.dbi-services.com/blog/wp-content/uploads/2023/01/APY_web-scaled.jpg)
![Thumbnail [90x90]](https://www.dbi-services.com/blog/wp-content/uploads/2022/08/FRJ_web-min-scaled.jpg)