
Deploying an SQL Server database to a Windows Azure virtual machine is a feature introduced with SQL Server 2014. It can be useful for an organization that wants to reduce its infrastucture management, simplify the deployment, or have a fast virtual machine generation.
Concept
This new feature is a wizard which allows either to copy or migrate an On-Premise SQL Server database to a Windows Azure virtual machine.
The following schema explains the main process of the feature:
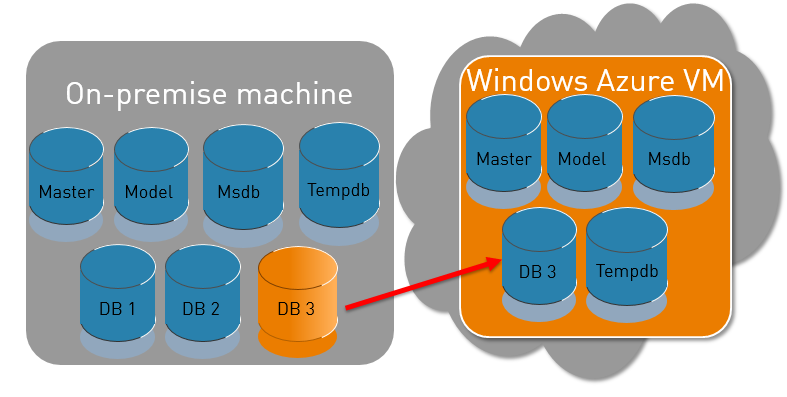 An existing SQL Server instance is present on an On-Premise machine of an organization, hosting one or several user databases.
Once the new feature is used, a copy of the on-premise database will be available on the SQL Server instance in the Cloud.
Prerequisites
Azure Account Creation
Obviously, the first requirement is an Azure account! To create an Azure account, go to the official Azure website.
Azure Virtual Machine Creation
Once the Azure account has been set, a Windows Azure virtual machine has to be created.
There are two ways to create a Virtual Machine: by a “Quick Create” or by a “Custom Create”. It is recommended to perform a “Custom Create” (from gallery) because it offers more flexibility and control on the creation.
This example is done with “FROM GALLERY”. So the creation of the virtual machine will be performed with a wizard in four steps.
The first step of the wizard is the selection of the virtual machine type.
Unlike prejudices, Windows Azure offers a large panel of virtual machines, which do not only come from the Microsoft world.
See more details about Virtual Machines on the Microsoft Azure website.
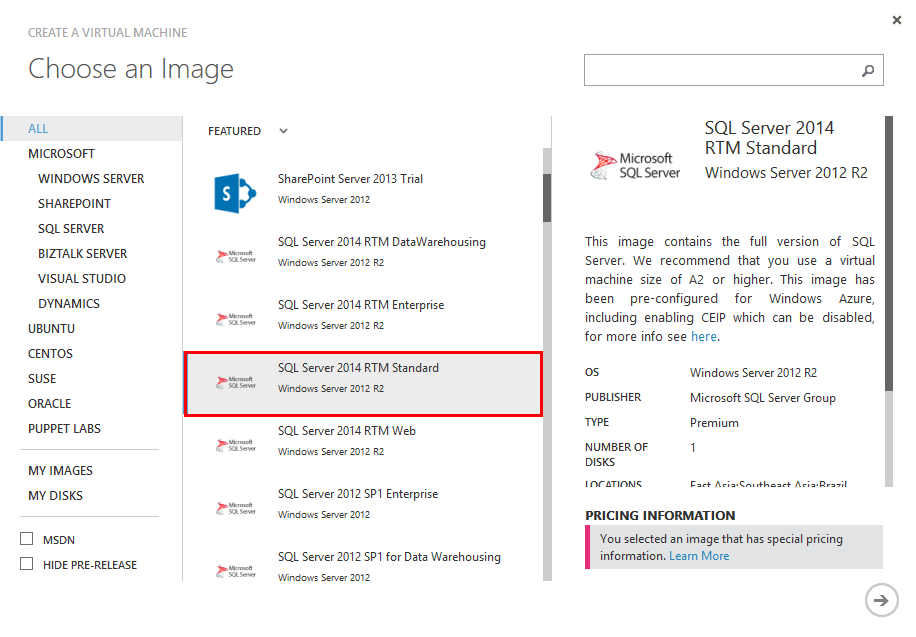
The targeted feature is only available on SQL Server 2014, so a virtual machine including SQL Server 2014 has to be created. This example will be made with a Standard edition to have the more restrictive edition of SQL Server 2014.
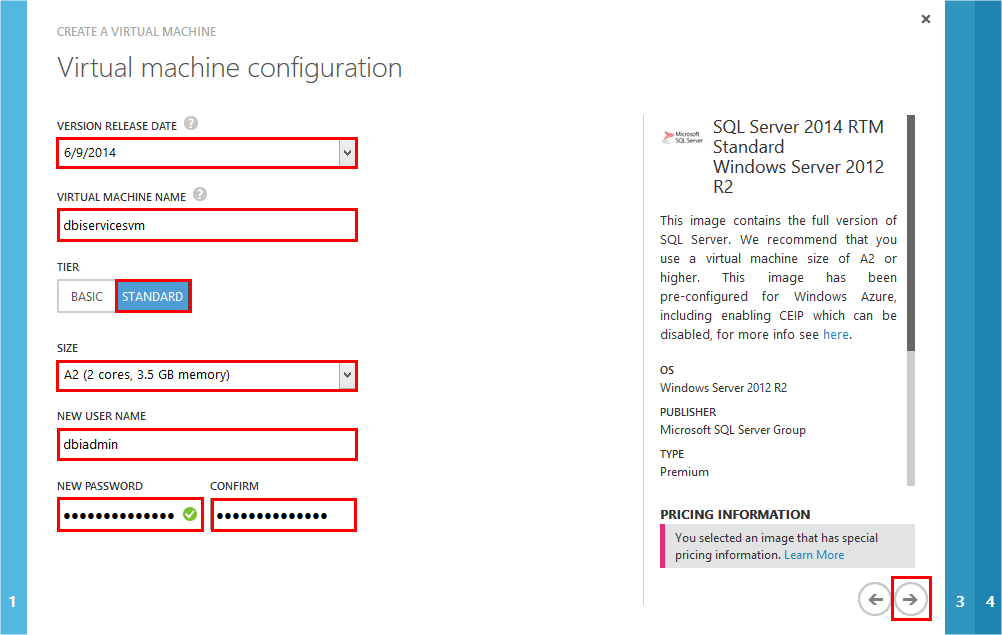
The first step of the wizard is configured as follows:
For this example, default settings are used. Indeed the configuration of the virtual machine is not the main topic here, and can change depending on one’s need.
The release date from June is selected, so the SP1 will be included for SQL Server 2014.
The “Standard Tier” is selected so load-balancer and auto-scaling will be included. See more details about Basic and Standard Tier on the Microsoft Azure website.
The virtual machine will run with 2 cores and 3.5 GB memory, which will be enough for this demo. See more details about prices and sizes on the Microsoft Azure website.
The virtual machine is named “dbiservicesvm” and the first (admin) user is “dbiadmin”.
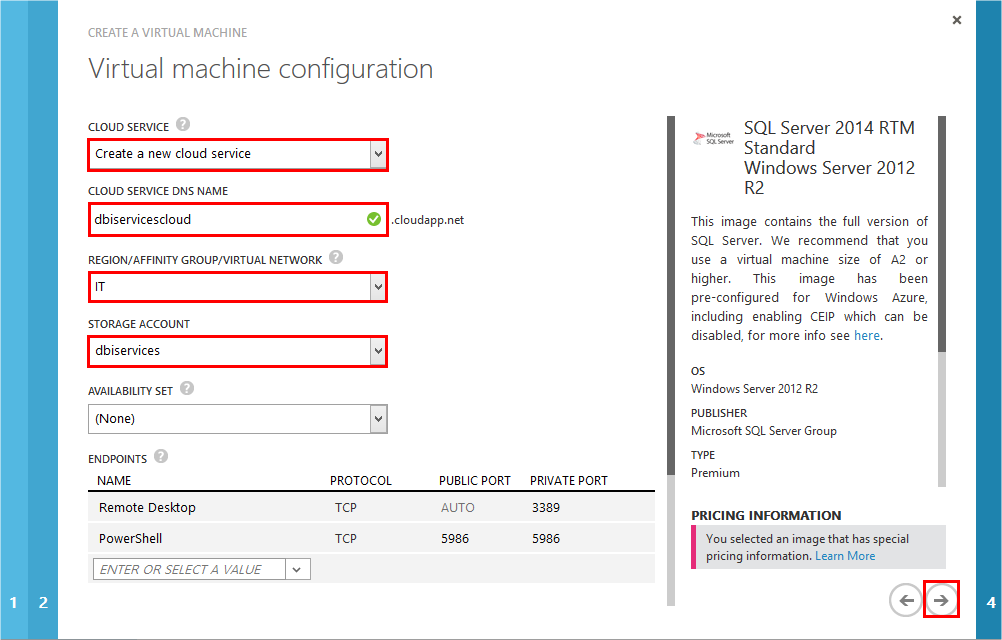
The second step of the wizard is configured as follows:
The creation of a virtual machine in Azure requires a cloud service, which is a container for virtual machines in Azure. See more details about Cloud Service on the Microsoft Azure website.
Furthermore, a storage account (“dbiservices”) and an affinity group (“IT”) are also required to store the disk files of the virtual machine. To create a storage account and an affinity group, see the Azure Storage Account Creation part from a previous blog.
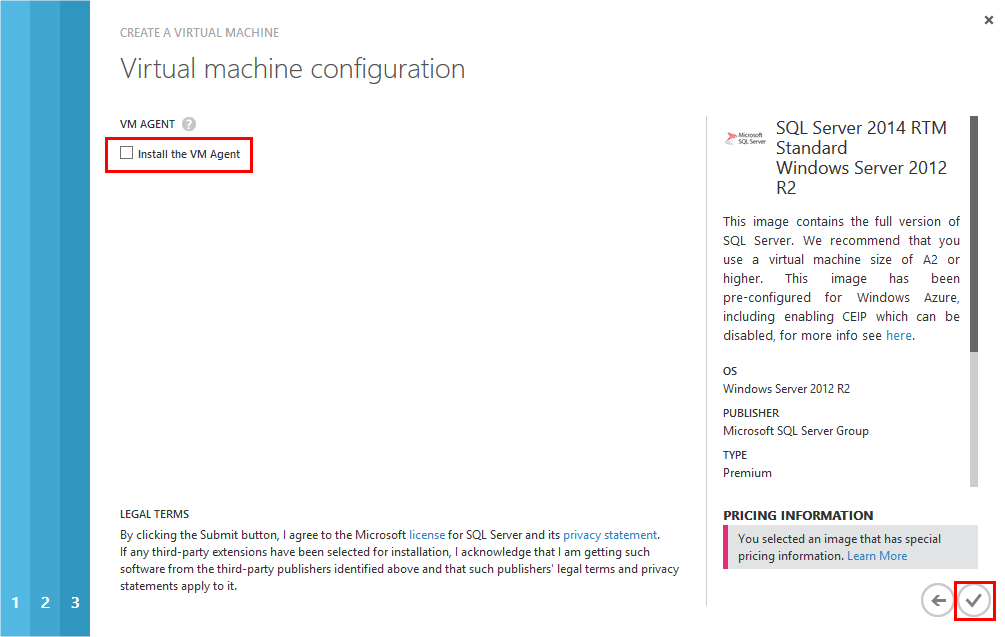
The third step of the wizard is configured as follows:
This screen offers the possibility to install extensions for the virtual machine. Virtual machine extensions simplify the virtual machine management. By default, VM Agent is installed on the virtual machine.
The Azure VM Agent will be responsible for installing, configuring and managing VM extensions on the virtual machine.
For this example, VM extensions are not required at all, so nothing is selected.
Deploy a database to the Windows Azure VM wizard
Launch the wizard
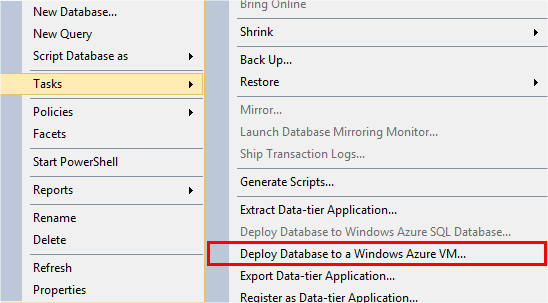
The wizard can be found with a right-click on the targeted database, then “Tasks” and finally “Deploy Database to a Windows Azure VM…”
In fact, it does not matter from which user databases the wizard is launched, because the wizard will ask to connect to an instance, and then it will ask to select a database.
Use the wizard
The first step is an introduction of the wizard, which is quite without interests.
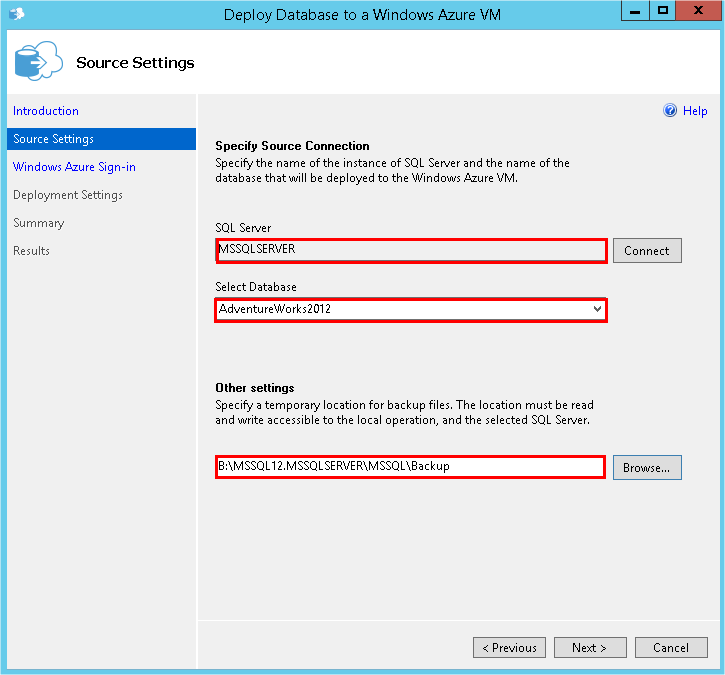
The second step needs three fields: the SQL Server instance (source instance), the SQL Server database (source database) and the folder to store the backup files.
The “SQL Server” field is the SQL Server instance hosting the SQL Server database which is planned to be deployed to Azure.
The “Select Database” field must obviously reference the database to deploy.
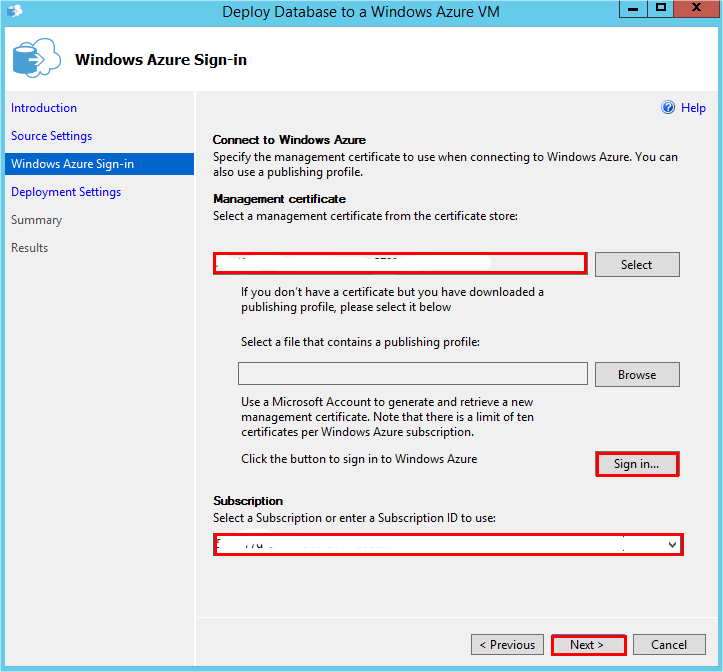
The third step needs two fields: the authentication to the Azure account and the selection of the subscription.
After clicking on the Sign in… button, a pop-up will require the Administrator privilege from the Azure account.
As soon as the credentials are entered to connect to the Azure account, a certificate will be generated.
If several subscriptions are linked to the Azure account, select the correct subscription ID. In this example, there is only one subscription linked to the Azure account.
For more information, see what’s the difference between an Azure account and a subscription on TechNet.
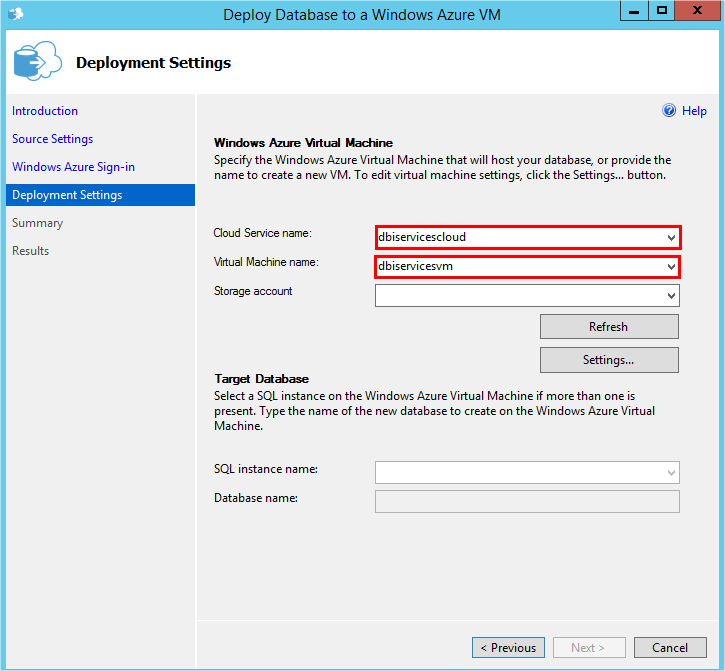
The fourth step of the wizard is divided in several parts. First, there is the virtual machine selection, as follows:
The cloud service (“dbiservicescloud”) needs to be selected. Then, the virtual machine (“dbiservicesvm”) can be selected.
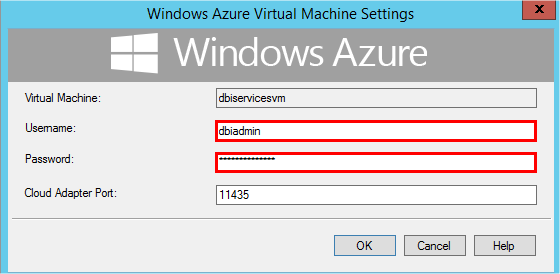
Credentials to connect to the virtual machine must be provided, as follows:
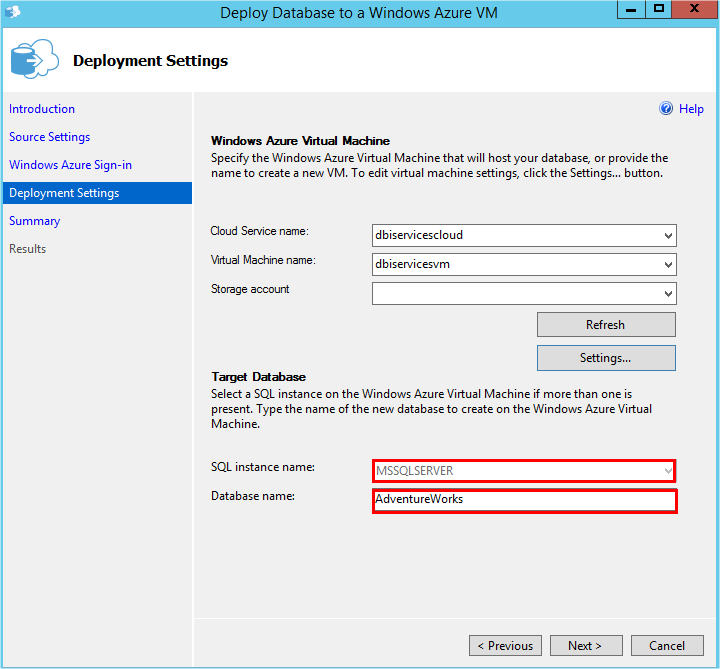
The SQL Server instance name and the database name need to be filled, as follows:
Finally, all information are filled for the wizard, the deployment can be launched. The deployment finished successfully!
After the deployment
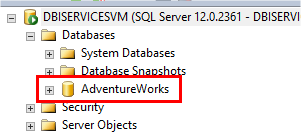
First, the On-Premise database used for the deployment is still present on the SQL Server instance.
Then, the folder used to store the temporary file is still present. In fact, this is a “bak” file because the mechanism behind the wizard is a simple backup and restore of the database from an On-Premise SQL Server instance to an Azure SQL Server instance.
So do not forget to delete the bak file after the deployment because this file uncessarly fills your storage space for big databases.
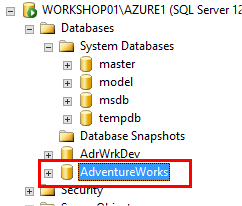
Finally, the deployed database can be found on the Azure SQL Server instance!
Standard Errors
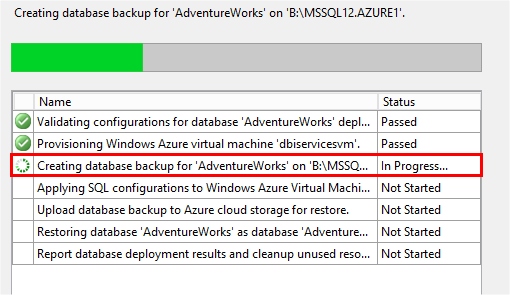
At the SQL Server level, an On-Premise SQL user with Backup Operator privilege is required on the targeted Azure database. Of course the user must be mapped with a SQL Server login to be able to connect to the SQL Server instance.
If the user does not have the Backup Operator privilege, the process will be blocked at the database backup creation step:
Moreover, an Azure account with Administrator Service privilege linked to the subscription containing the Windows Azure virtual machine is also required. Without this account, it is impossible to retrieve the list of Windows Azure virtual machines available on the Azure account, so the SQL Server Windows Azure virtual machine created previously.
Finally, the end point of the Cloud Adapter must be configured to access the virtual machine during the execution of the wizard. If not, the following error message will occur:
The Cloud Adapter is a service which allows the On-Premise SQL Server instance to communicate with the SQL Server Windows Azure virtual machine. More details about Cloud Adapter for SQL Server on TechNet.
To configure the Cloud Adapter port, the Azure administrator needs to access to the Endpoints page in the SQL Server Windows Azure virtual machine on the Azure account. Then a new endpoint needs to be created as follows:
Now, the SQL Server Windows Azure virtual machine allows to connect to the Cloud Adapter port.
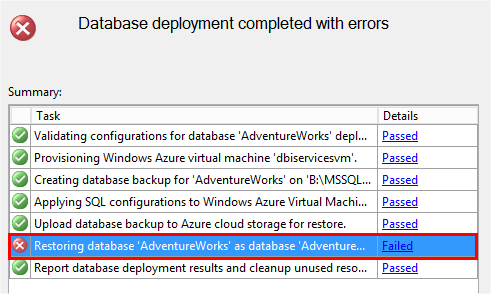
The credentials of a Windows administrator user are also required on the Windows Azure virtual machine to connect to the virtual machine in Azure. This administrator also needs a SQL Server login. If these two requirements are not met, the following error message will occur:
The login created in the SQL Server instance in Azure must also have the dbcreator server role, otherwise the following error message will occur:
Limitations
The first limitation of this new feature is the database size of this operation: it cannot exceed 1 TB.
Moreover, it does not support hosted services that are associated with an Affinity Group.
The new feature does not allow to deploy all versions of SQL Server database. Indeed, only SQL Server 2008 database versions or higher are allowed to be deployed.
Similar features
If this new feature, for any reason , does not meet the organization’s need, two similar features exist.
SQL database in Azure
This feature introduced with SQL Server 2012 is quite similar to the feature presented in this blog, because the SQL Server database and the Windows Azure virtual machine are hosted on Azure.
However, the management of the infrastructure is much more reduced: no virtual machine management nor sql server management. A good comparison between these two functionalities is available: Choosing between SQL Server in Windows Azure VM & Windows Azure SQL Database.
More details about SQL Database on Azure.
SQL Server data files in Azure
This is a new feature introduced with SQL Server 2014, which allows to store data files from the SQL Server database in Azure Blob storage, but the SQL Server instance runs On-Premise.
It simplifies the migration process, reduces the On-Premise space storage and management, and simplifies the High Availability and recovery solutions…
More details about SQL Server data files in Azure on TechNet.
Conclusion
With this feature, Microsoft simplifies the SQL Server database deployment process from On-Premise to Azure.
Azure is a rather attractive and interesting tool that is highly promoted by Microsoft.




![Thumbnail [60x60]](https://www.dbi-services.com/blog/wp-content/uploads/2022/08/NAC_web-min-scaled.jpg)
![Thumbnail [90x90]](https://www.dbi-services.com/blog/wp-content/uploads/2022/10/STS_web-min-scaled.jpg)
![Thumbnail [90x90]](https://www.dbi-services.com/blog/wp-content/uploads/2022/08/STH_web-min-scaled.jpg)
![Thumbnail [90x90]](https://www.dbi-services.com/blog/wp-content/uploads/2024/01/HME_web.jpg)