After more than 2 years of experience in Kubernetes cluster administration, I am deeply convinced that one of the most important things to have as an ops guy is a sandbox cluster at your disposal. This can be either a sleeping cluster or a new fresh installation with all your standards replicated on it to perform your series of tests.
In this blog post, we consider that you have an AWS account with limited credits, it’s the reason why we are using Ansible to provision automatically the instances and install the cluster with the possibility to scratch it when no longer need it.
Prerequisistes
Before starting you should meet the following prerequisites:
- Active AWS account with permissions to create resources
- ansible installed on your local environment
- boto3 (python) library installed in your system
EC2 Instances Provisionning
The first step is to create an Ansible playbook for launching 3 EC2 instances in AWS. Before make sure you have your AWS key-pair in your local workspace, if not please create your key-pair (https://docs.aws.amazon.com/AWSEC2/latest/UserGuide/ec2-key-pairs.html).
Export your AWS credentials as follows:
export AWS_ACCESS_KEY_ID="xxxxxxxxx"
export AWS_SECRET_ACCESS_KEY="xxxxxxxxx"
Create an ansible hosts file with the follow parameters:
[local]
localhost ansible_connection=local

[all:vars]
ansible_python_interpreter=/usr/local/bin/python3
Now create your ec2-provision.yaml playbook with the following content:
ansible-galaxy init ec2-provision

vi ec2-provision/tasks/main.yml
---
  - name: launch Master Node AWS cloud
    ec2:
          key_name: "aws-k8s"
          instance_type: "t2.micro"
          image: ami-0ea894d798b111f33
          wait: yes
          count: 1
          vpc_subnet_id: "subnet-xxxxxx"
          group_id: sg-xxxxxx
          assign_public_ip: yes
          region: "eu-central-1"
          state: present
          aws_access_key: "{{ lookup('env', 'AWS_ACCESS_KEY') }}"
          aws_secret_key: "{{ lookup('env', 'AWS_SECRET_KEY') }}"
          instance_tags: {"Name": "Master", "Cluster": "k8s Cluster"}
  - name: launch Worker Node on AWS cloud
    ec2:
          key_name: "aws-k8s"
          instance_type: "t2.micro"
          image: ami-0ea894d798b111f33
          wait: yes
          count: 2
          vpc_subnet_id: "subnet-xxxxxx"
          group_id: sg-xxxxxx
          assign_public_ip: yes
          region: "eu-central-1"
          state: present
          aws_access_key: "{{ lookup('env', 'AWS_ACCESS_KEY') }}"
          aws_secret_key: "{{ lookup('env', 'AWS_SECRET_KEY') }}"
          instance_tags: {"Name": "Worker", "Cluster": "k8s Cluster"}
Create the ec2-provision playbook. It will execute the ec2-provision role:
vi ec2-provision.yml
- hosts: all
  remote_user: root
  roles:
      - ec2-provision
Execute the playbook:
➜ ansible-playbook -i hosts ec2-provision.yml
This Playbook will launch 3 EC2 Instances for Kubernetes Cluster one Master Node and two Worker Nodes.
Verify your instances has been properly created in AWS Management Console:

Ansible Dynamic Inventory
Create a dynamic inventory directory under your ansible deployment, cd into the directory and create an inventory file aws_ec2.yml.
➜  mkdir -p dynamic_inventory
➜  cd dynamic_inventory
➜  vi aws_ec2.yml
 ---
plugin: aws_ec2
aws_access_key: "{{ lookup('env', 'AWS_ACCESS_KEY') }}"
aws_secret_key: "{{ lookup('env', 'AWS_SECRET_KEY') }}"
regions:
  - eu-central-1
keyed_groups:
  - key: tags
    prefix: tag
  - prefix: instance_type
    key: instance_type
  - key: placement.region
    prefix: aws_region
hostnames:
  - private-ip-address
# Doc. https://docs.aws.amazon.com/cli/latest/reference/ec2/describe-instances.html#options
Export your AWS_ACCESS_KEY and AWS_SECRET_KEY in your current shell environnement.
➜  export AWS_ACCESS_KEY_ID="XXXXXXXXX"
➜  export AWS_SECRET_ACCESS_KEY="XXXXXXXXX"
➜  export AWS_SESSION_TOKEN="XXXXXXXXX"
Inside your ansible.cfg configuration file, enable the aws_ec2 plugin under the inventory section.
[inventory]
enable_plugins = aws_ec2
Now let’s test the dynamic inventory configuration by listing the ec2 instances.
ansible-inventory -i dynamic_inventory/aws_ec2.yaml --list
The above command returns the list of ec2 instances with all its parameters in JSON format.
One of the most interesting use cases of the Ansible dynamic inventory is to execute Ansible playbooks against a single or group of categorized or grouped instances based on tags, regions, or other ec2 parameters. Based on that you can easily dynamically find the instance you created and execute playbooks on it.
➜  ansible-inventory -i dynamic_hosts/aws_ec2.yml --graph | grep -e Master -e Worker -A 2
  |--@tag_Name_Master:
  |  |--172.21.9.11
  |--@tag_Name_Worker:
  |  |--172.21.9.37
  |  |--172.21.9.53
For testing purposes, we execute a ping command with the Master instance of our cluster. As per my configuration, the dynamic group name is tag_Name_Master.
➜  ansible -i dynamic_hosts/aws_ec2.yml tag_Name_Master -m ping

172.21.9.11 | SUCCESS => {
    "ansible_facts": {
        "discovered_interpreter_python": "/usr/bin/python"
    },
    "changed": false,
    "ping": "pong"
}
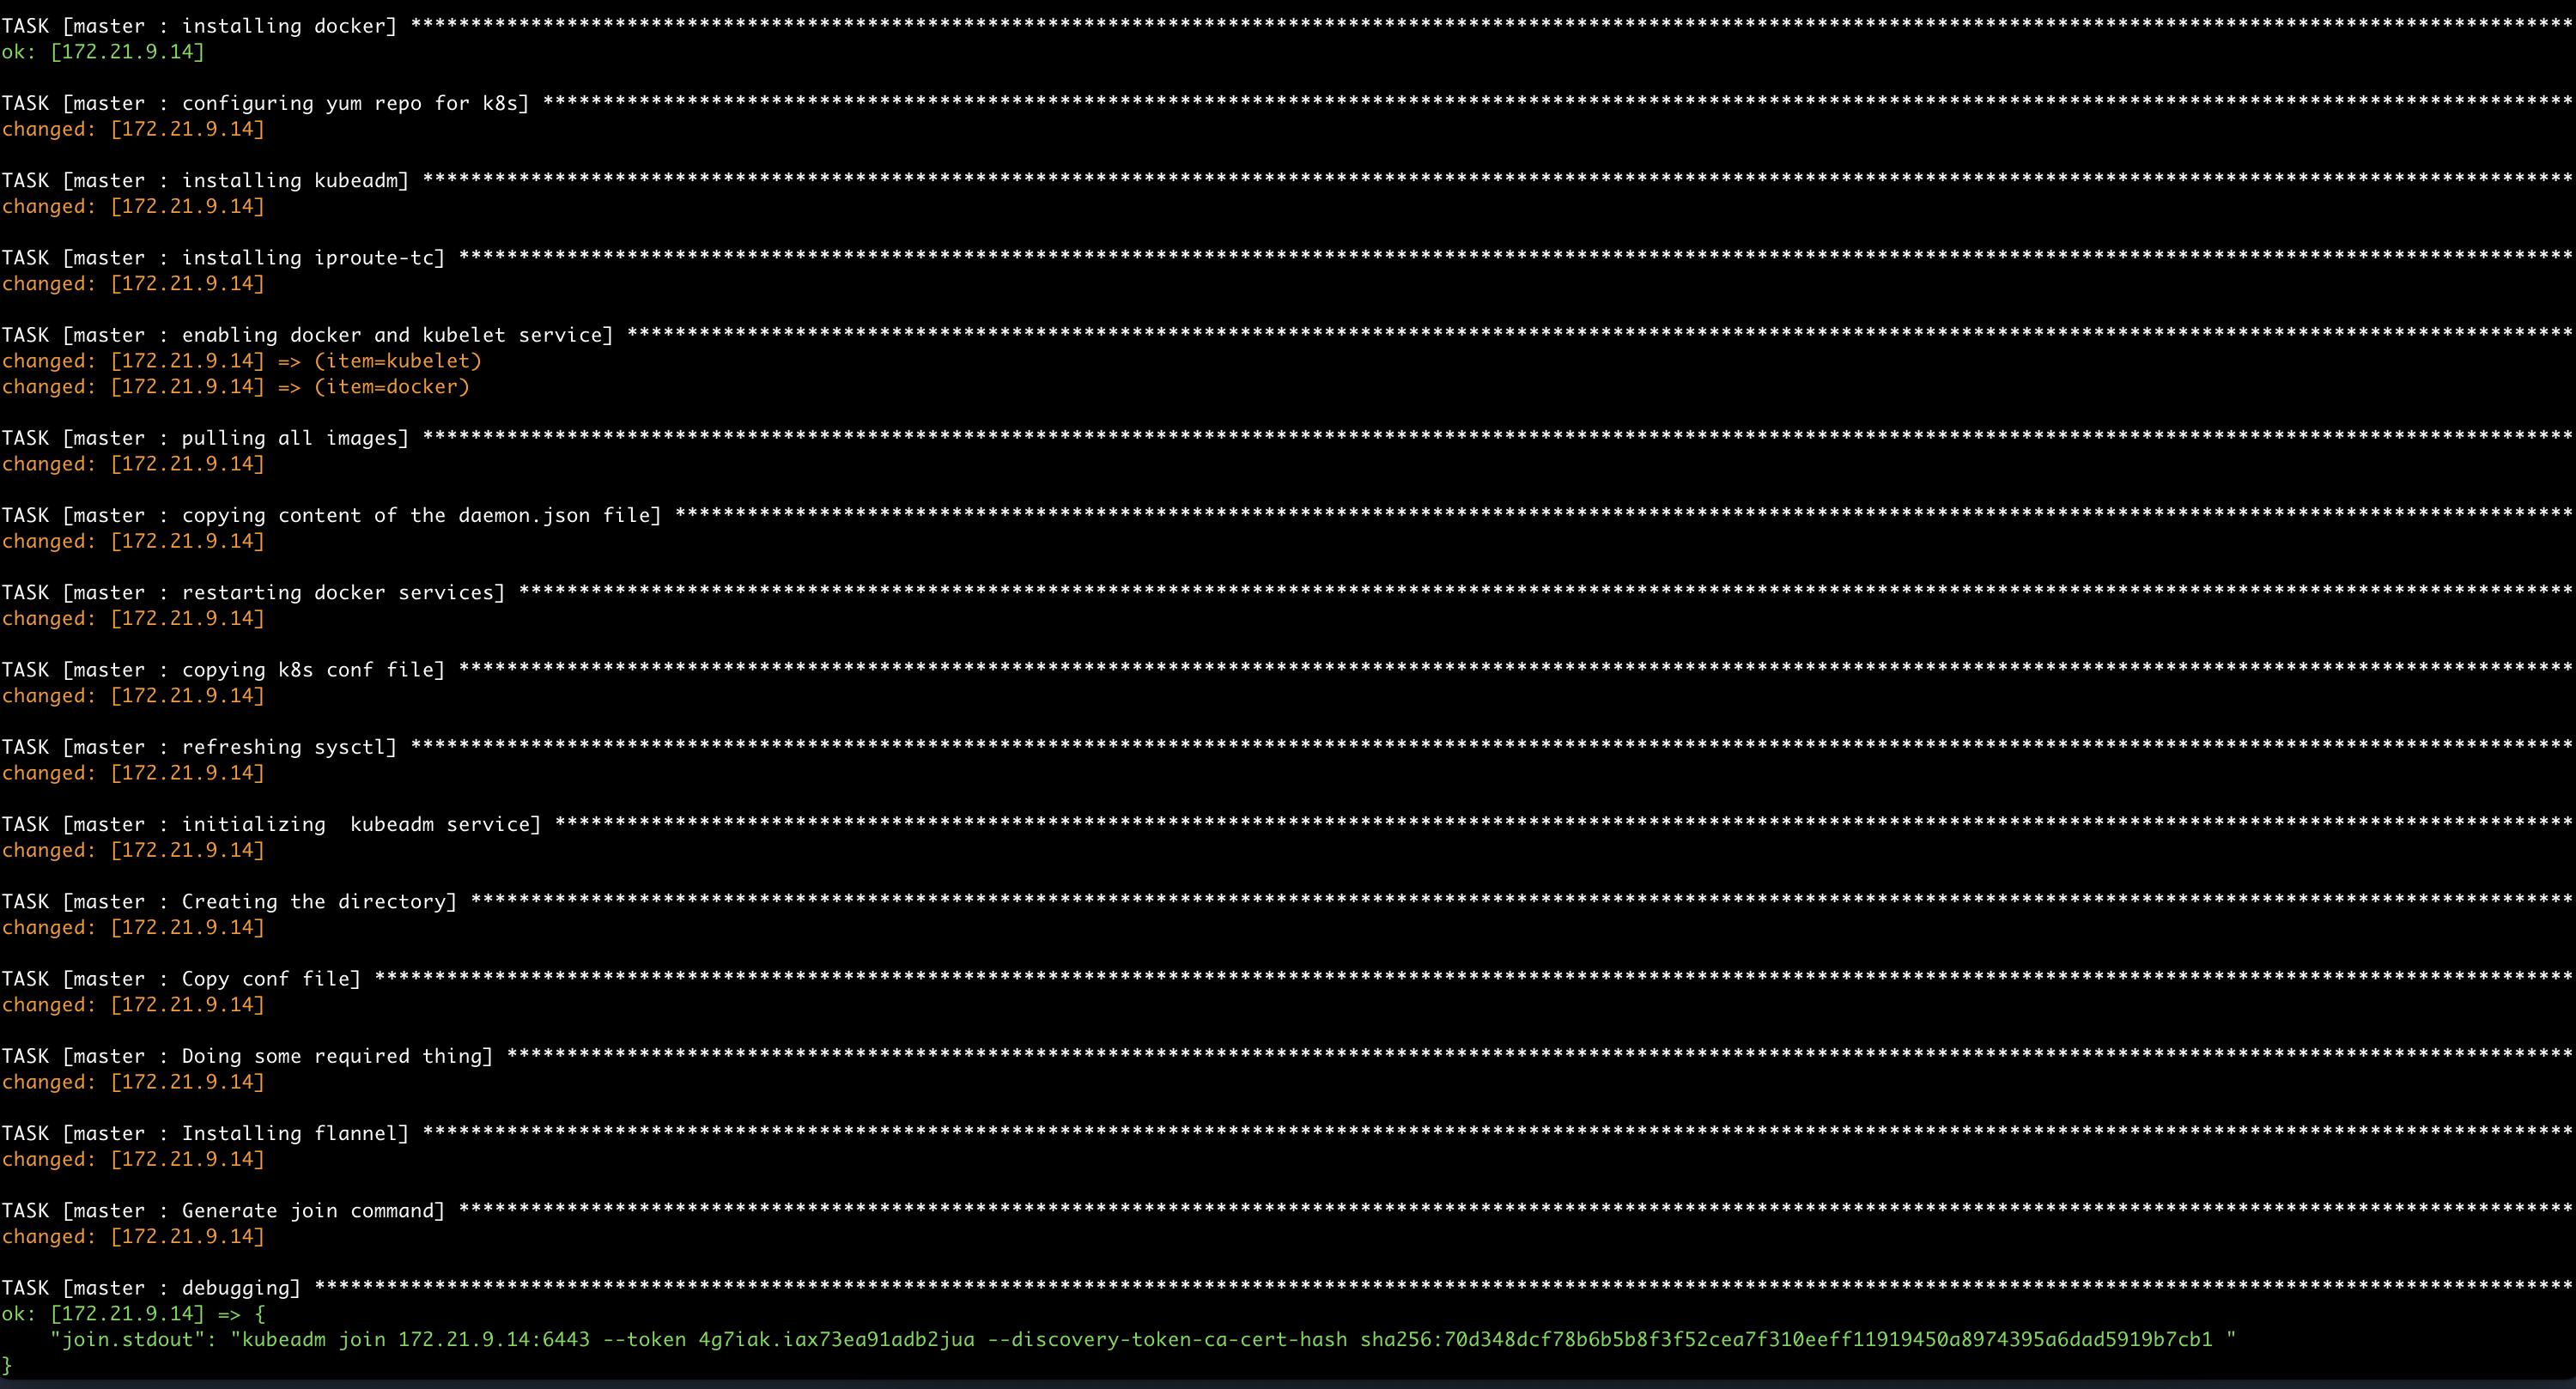
Kubernetes cluster deployment
Once your instances have been properly created in AWS and the Ansible dynamic inventory is configured, we gonna now install our Kubernetes cluster on top.
First, create the master and workers roles, as follows:
➜ ansible-galaxy init master
➜ ansible-galaxy init workers
The master role will perform the following tasks:
- Docker installation and configuration
- Kubeadm installation and init
- Flannel CNI installation
- Generate the Kubeadm join command for workers
Workers role will perform the following tasks:
- Docker installation and configuration
- Kubeadm installation and configuration
- Kubeadm join cluster
Main cluster.yml playbook:
---
- hosts: tag_Name_Master
  become: yes
  remote_user: root
  roles:
      - master

- hosts: tag_Name_Worker
  become: yes
  remote_user: root
  roles:
      - workers
Execute the cluster.yml playbook
➜ ansible-playbook -i dynamic_hosts/aws_ec2.yml cluster.yml
You can find all the reference in the following GitHub repository: https://github.com/MehB/ansible-aws-k8s
Once completed, connect to the master node instance as root user and execute the following command:
[root@ip-172-21-9-14 ~]# kubectl get nodes -o wide
NAME                                           STATUS   ROLES                  AGE   VERSION   INTERNAL-IP   EXTERNAL-IP   OS-IMAGE         KERNEL-VERSION                  CONTAINER-RUNTIME
ip-172-21-9-14.eu-central-1.compute.internal   Ready    control-plane,master   15m   v1.22.1   172.21.9.14           Amazon Linux 2   4.14.243-185.433.amzn2.x86_64   docker://20.10.7
ip-172-21-9-74.eu-central-1.compute.internal   Ready                     33s   v1.22.1   172.21.9.74           Amazon Linux 2   4.14.243-185.433.amzn2.x86_64   docker://20.10.7
ip-172-21-9-96.eu-central-1.compute.internal   Ready                     68s   v1.22.1   172.21.9.96           Amazon Linux 2   4.14.243-185.433.amzn2.x86_64   docker://20.10.7
Your sandbox Kubernetes cluster on AWS is ready to use 🙂
![Thumbnail [90x90]](https://www.dbi-services.com/blog/wp-content/uploads/2022/08/GRE_web-min-scaled.jpg)
![Thumbnail [90x90]](https://www.dbi-services.com/blog/wp-content/uploads/2024/03/AHI_web.jpg)
![Thumbnail [90x90]](https://www.dbi-services.com/blog/wp-content/uploads/2022/08/NAC_web-min-scaled.jpg)
![Thumbnail [90x90]](https://www.dbi-services.com/blog/wp-content/uploads/2022/08/ADE_WEB-min-scaled.jpg)