One of our oldest partners, DBVISIT, recently released their product StandbyMP for PostgreSQL. The goal of this product is to provide a graphical user and management interface over a PostgreSQL streaming replication cluster. In this post we’re going to set this up, and in a follow up post we’ll see how this product can be used to easily switchover to a replica and recover from failures.
We’ll be using three SLES 15 nodes for this setup (system requirements here), and this is how it is going to look like:
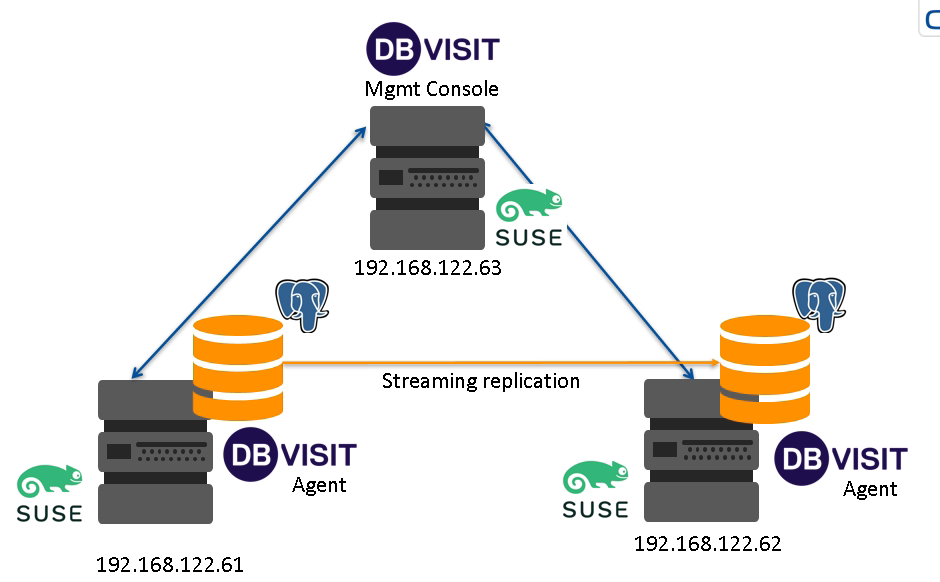
There needs to be an agent installed on the database nodes, and a management console either on a third node (preferred) or on the replica node.
The only requirement to get started is, that the operating systems are already running (of course), the PostgreSQL binaries are installed on the database nodes and a PostgreSQL instance is already running on one of the database nodes.
Taking the picture from above, a PostgreSQL instance is already running on the left database node:
postgres@sles15-dbvisit-db1:/home/postgres/ [PG1] psql -c "select version()";
                                                version
-------------------------------------------------------------------------------------------------------
 PostgreSQL 16.0 on x86_64-pc-linux-gnu, compiled by gcc (SUSE Linux) 7.5.0, 64-bit
(1 row)
The next step is to install the agent on both the database nodes (software can be downloaded from here).
We’re going to install the product into a dedicated directory:
postgres@sles15-dbvisit-db1:/home/postgres/ [PG1] mkdir /u01/app/postgres/product/dbvisit
As it is not recommended to run the installer from the target directory we’ll start from /tmp:
postgres@sles15-dbvisit-db1:/home/postgres/ [PG1] cd /tmp/
15:03:55 postgres@sles15-dbvisit-db1:/tmp/ [PG1] unzip Dbvisit_StandbyMP-v11.5.0-linux.zip
Archive:  Dbvisit_StandbyMP-v11.5.0-linux.zip
  inflating: standby-v11.5.0.tar.gz
15:04:02 postgres@sles15-dbvisit-db1:/tmp/ [PG1] ls
Dbvisit_StandbyMP-v11.5.0-linux.zip  systemd-private-9042516f97e94fdaa06816cca20aa6ee-systemd-logind.service-rHTenh
standby-v11.5.0.tar.gz
15:04:09 postgres@sles15-dbvisit-db1:/tmp/ [PG1] tar axf standby-v11.5.0.tar.gz
15:04:36 postgres@sles15-dbvisit-db1:/tmp/ [PG1] ls
Dbvisit_StandbyMP-v11.5.0-linux.zip  standby-v11.5.0.tar.gz
install-agent-v11.5.0                systemd-private-9042516f97e94fdaa06816cca20aa6ee-systemd-logind.service-rHTenh
install-control-v11.5.0
This gives us two installers, one for the agent and another one for the console. As we’re on a database node we start with the agent installer. We’ll just run it and follow the instructions:
postgres@sles15-dbvisit-db1:/tmp/ [PG1] ./install-agent-v11.5.0
+----------------------------------------------------------------------+
|          ____  _                  _ _           __  __ ____          |
|         / ___|| |_ __ _ _ __   __| | |__  _   _|  \/  |  _ \         |
|         \___ \| __/ _' | '_ \ / _' | '_ \| | | | |\/| | |_) |        |
|          ___) | || (_| | | | | (_| | |_) | |_| | |  | |  __/         |
|         |____/ \__\__,_|_| |_|\__,_|_.__/ \__, |_|  |_|_|            |
|          Copyright 2022                   |___/   By Dbvisit         |
+----------------------------------------------------------------------+

Welcome to Dbvisit StandbyMP setup version v11.5.0.

? Please carefully read the end-user license agreement at https://dbvisit.com/eula. Do you agree to the terms of this agreement? Yes
? Which directory should the software be installed into? /u01/app/postgres/product/dbvisit

- - - You are now configuring the Dbvisit StandbyMP Agent - - -

The Agent will listen on the following discovered addresses:
 -  127.0.0.1
 -  192.168.122.61
? Agent File Transfer Port: 7890
? Fully Qualified Domain Name for this host: sles15-dbvisit-db1.it.dbi-services.com
? Fully Qualified Domain Name for the Control Center: sles15-dbvisit-mgmt.it.dbi-services.com
? Agent Communications Port: 5533
Each Dbvisit StandbyMP Agent and the Dbvisit StandbyMP Control Center must
be configured with the same passphrase. This is how we know that they are all
intended to be part of the same system. Please specify a strong passphrase - we
suggest at least 12 characters, containing at least 2 numbers and 2 symbols.
? Passphrase: ********
? Confirm Passphrase: ********

- - - Dbvisit StandbyMP Agent configuration finished - - -


- - - Ready to perform installation - - -

? Do you wish to proceed with the setup using the supplied configuration options? Proceed with setup

- - - Performing installation - - -

Copying software files to '/u01/app/postgres/product/dbvisit'...
Writing Agent configuration file '/u01/app/postgres/product/dbvisit/standbymp/conf/dbvagentmanager.ini'...

- - - File creation complete - - -


To enable the installed Dbvisit StandbyMP components to run as system services, you will need to execute some commands as the "root" user in order to complete the setup.

To install the system service(s), you can run, substituting the name of the user to run as if it is different from the current user:
        sudo /u01/app/postgres/product/dbvisit/standbymp/bin/dbvagentmanager service install --user postgres
To start the system service(s), you can run:
        sudo /u01/app/postgres/product/dbvisit/standbymp/bin/dbvagentmanager service start

- - - Installation successful! - - -


- - - Configuration Summary - - -

Install Directory:                                  /u01/app/postgres/product/dbvisit
Fully Qualified Domain Name for this host:          sles15-dbvisit-db1.it.dbi-services.com
Fully Qualified Domain Name for the Control Center: sles15-dbvisit-mgmt.it.dbi-services.com
Agent Communications Port:                          5533
Agent File Transfer Port:                           7890

- - - Installation Summary - - -

The following actions have been performed:
 -  Installed Dbvisit StandbyMP Agent software into: /u01/app/postgres/product/dbvisit/standbymp
 -  Agent settings are available in the configuration file: /u01/app/postgres/product/dbvisit/standbymp/conf/dbvagentmanager.ini
 -  Generated new security certificates in: /u01/app/postgres/product/dbvisit/standbymp/certificates

- - - INSTALLATION SUCCESSFUL - - -
Finally register the service and start it up, as described in the output of the installer:
postgres@sles15-dbvisit-db1:/tmp/ [PG1] sudo /u01/app/postgres/product/dbvisit/standbymp/bin/dbvagentmanager service install --user postgres
15:15:45 postgres@sles15-dbvisit-db1:/tmp/ [PG1] sudo /u01/app/postgres/product/dbvisit/standbymp/bin/dbvagentmanager service start
postgres@sles15-dbvisit-db1:/tmp/ [PG1] systemctl list-unit-files | grep dbv
dbvagentmanager.service                                                   enabled         disabled
postgres@sles15-dbvisit-db1:/tmp/ [PG1] systemctl status dbvagentmanager.service
● dbvagentmanager.service - The Dbvisit StandbyMP Agent provides connectivity to databases on this computer. This Agent is used & ma>
     Loaded: loaded (/etc/systemd/system/dbvagentmanager.service; enabled; vendor preset: disabled)
     Active: active (running) since Fri 2023-10-27 15:15:54 CEST; 39s ago
   Main PID: 18210 (dbvagentmanager)
      Tasks: 7
     CGroup: /system.slice/dbvagentmanager.service
             └─ 18210 /u01/app/postgres/product/dbvisit/standbymp/bin/dbvagentmanager service run
Once it is up and running repeat all the steps on the remaining database node.
The installation of the console (or the control center) on the third node is very much the same, except that the other installer is used:
postgres@sles15-dbvisit-mgmt:/tmp> ./install-control-v11.5.0
+----------------------------------------------------------------------+
|          ____  _                  _ _           __  __ ____          |
|         / ___|| |_ __ _ _ __   __| | |__  _   _|  \/  |  _ \         |
|         \___ \| __/ _' | '_ \ / _' | '_ \| | | | |\/| | |_) |        |
|          ___) | || (_| | | | | (_| | |_) | |_| | |  | |  __/         |
|         |____/ \__\__,_|_| |_|\__,_|_.__/ \__, |_|  |_|_|            |
|          Copyright 2022                   |___/   By Dbvisit         |
+----------------------------------------------------------------------+

Welcome to Dbvisit StandbyMP setup version v11.5.0.

? Please carefully read the end-user license agreement at https://dbvisit.com/eula. Do you agree to the terms of this agreement? Yes
? Which directory should the software be installed into? /u01/app/postgres/product/dbvisit

- - - You are now configuring the Dbvisit StandbyMP Control Center - - -

The Control Center will listen on the following discovered addresses:
 -  127.0.0.1
 -  192.168.122.63
? Control Center Web Server Port: 4433
? Agent Communications Port: 5533
Each Dbvisit StandbyMP Agent and the Dbvisit StandbyMP Control Center must
be configured with the same passphrase. This is how we know that they are all
intended to be part of the same system. Please specify a strong passphrase - we
suggest at least 12 characters, containing at least 2 numbers and 2 symbols.
? Passphrase: ********
? Confirm Passphrase: ********

- - - Dbvisit StandbyMP Control Center configuration finished - - -


- - - Ready to perform installation - - -

? Do you wish to proceed with the setup using the supplied configuration options? Proceed with setup

- - - Performing installation - - -

Copying software files to '/u01/app/postgres/product/dbvisit'...
Writing Control Center configuration file '/u01/app/postgres/product/dbvisit/standbymp/conf/dbvcontrol.ini'...

- - - File creation complete - - -


To enable the installed Dbvisit StandbyMP components to run as system services, you will need to execute some commands as the "root" user in order to complete the setup.

To install the system service(s), you can run, substituting the name of the user to run as if it is different from the current user:
        sudo /u01/app/postgres/product/dbvisit/standbymp/bin/dbvcontrol service install --user postgres
To start the system service(s), you can run:
        sudo /u01/app/postgres/product/dbvisit/standbymp/bin/dbvcontrol service start

- - - Installation successful! - - -


- - - Configuration Summary - - -

Install Directory:              /u01/app/postgres/product/dbvisit
Control Center Web Server Port: 4433
Agent Communications Port:      5533

- - - Installation Summary - - -

The following actions have been performed:
 -  Installed Dbvisit StandbyMP Control Center software into: /u01/app/postgres/product/dbvisit/standbymp
 -  Control Center settings are available in the configuration file: /u01/app/postgres/product/dbvisit/standbymp/conf/dbvcontrol.ini
 -  Generated new security certificates in: /u01/app/postgres/product/dbvisit/standbymp/certificates

- - - INSTALLATION SUCCESSFUL - - -
Same procedure here: Create and start the service:
postgres@sles15-dbvisit-mgmt:/tmp> sudo /u01/app/postgres/product/dbvisit/standbymp/bin/dbvcontrol service install --user postgres
postgres@sles15-dbvisit-mgmt:/tmp> sudo /u01/app/postgres/product/dbvisit/standbymp/bin/dbvcontrol service start
postgres@sles15-dbvisit-mgmt:/tmp> systemctl list-unit-files | grep dbv
dbvcontrol.service                                                        enabled         disabled
postgres@sles15-dbvisit-mgmt:/tmp> systemctl status dbvcontrol.service
● dbvcontrol.service - The Dbvisit StandbyMP Control Center provides centralized coordination for Dbvisit StandbyMP Agent operation>
     Loaded: loaded (/etc/systemd/system/dbvcontrol.service; enabled; vendor preset: disabled)
     Active: active (running) since Fri 2023-10-27 15:25:29 CEST; 17s ago
   Main PID: 3885 (dbvcontrol)
      Tasks: 11
     CGroup: /system.slice/dbvcontrol.service
             └─ 3885 /u01/app/postgres/product/dbvisit/standbymp/bin/dbvcontrol service run
lines 1-7/7 (END)
That’s it, the management console should be available over https on port 4433 the third node:
The default user name and password is admin/admin and once you logged in you’ll land on the default screen:
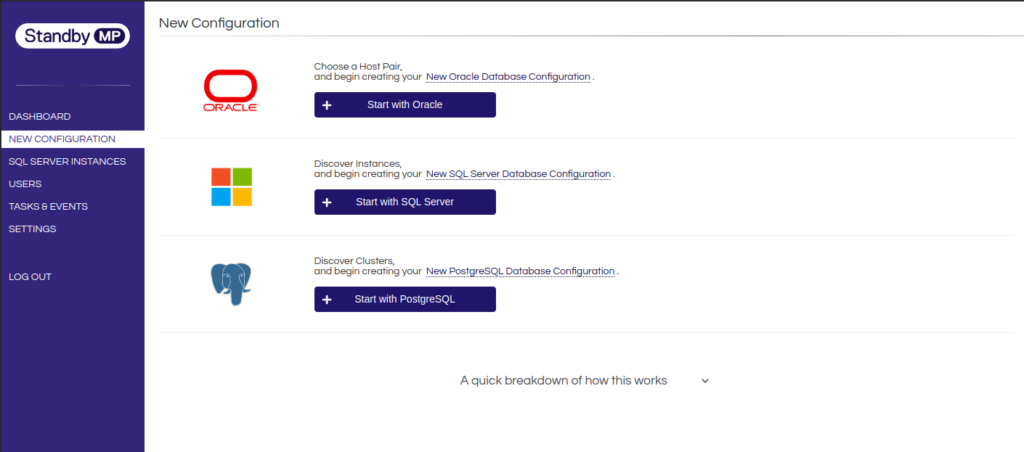
Here you can already see, what could be an advantage of using StandbyMP: It gives you one management interface for Oracle, SQL Server and PostgreSQL clusters.
That’s it for now, in the next post we’re going to create a new “PostgreSQL Configuration”.
![Thumbnail [60x60]](https://www.dbi-services.com/blog/wp-content/uploads/2022/08/DWE_web-min-scaled.jpg)
![Thumbnail [90x90]](https://www.dbi-services.com/blog/wp-content/uploads/2023/01/APY_web-scaled.jpg)
![Thumbnail [90x90]](https://www.dbi-services.com/blog/wp-content/uploads/2022/08/FRJ_web-min-scaled.jpg)