We’ve finished the last post with a working Network (Neutron) service on the controller and compute node. In this post we’ll setup the final service which is Horizon, the OpenStack dashboard. Once more, looking back at what we need at a minimum, we’ve done most of it by now:
- Keystone: Identity service (done)
- Glance: Image service (done)
- Placement: Placement service (done)
- Nova: Compute service (done)
- Neutron: Network service (done)
- Horizon: The OpenStack dashboard
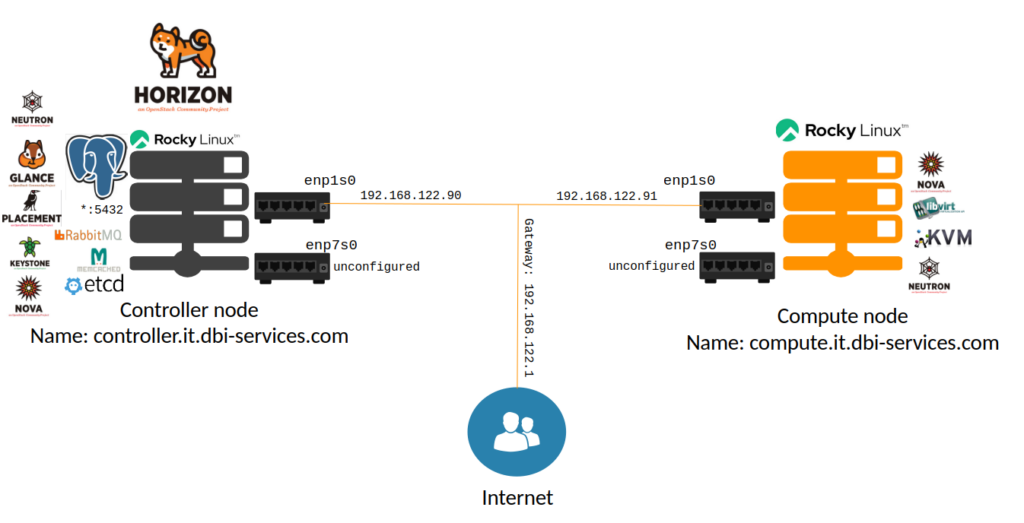
Currently, the overview of our playground looks like this:
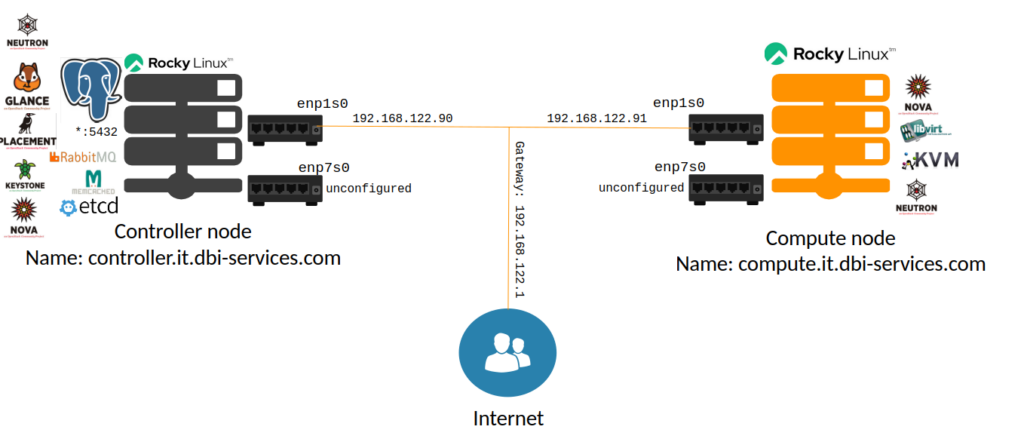
Today we’re going to setup Horizon on the controller node, which is the final part of this little blog series about creating your own OpenStack playground.
Compared to the installation and configuration of the other services, the process for getting Horizon up and running is pretty simple. Horizon comes as a Django web application and we anyway have the web server already running on the controller node.
All we need to do is to install the operating system packages and do a little bit of configuration afterwards.
There are only two packages to install on the controller node:
[root@controller ~]$ dnf install python3-django openstack-dashboard -y
… and there are only two configuration files to adapt:
- /etc/openstack-dashboard/local_settings
- /etc/httpd/conf.d/openstack-dashboard.conf
Here is the content of the “local_settings” file (the “LOGGING” and “SECURITY_GROUP_RULES” blocks are kept out to keep this small):
[root@controller ~]$ egrep -v "^#|^$" /etc/openstack-dashboard/local_settings
import os
from django.utils.translation import gettext_lazy as _
from openstack_dashboard.settings import HORIZON_CONFIG
DEBUG = False
ALLOWED_HOSTS = ['*']
LOCAL_PATH = '/tmp'
SECRET_KEY='903bceffe2420fd6b5ac'
CACHES = {
    'default': {
        'BACKEND': 'django.core.cache.backends.memcached.PyMemcacheCache',
        'LOCATION': 'controller:11211',
    },
}
SESSION_ENGINE = 'django.contrib.sessions.backends.cache'
EMAIL_BACKEND = 'django.core.mail.backends.console.EmailBackend'
OPENSTACK_HOST = "controller"
OPENSTACK_KEYSTONE_URL = "http://%s:5000/identity/v3" % OPENSTACK_HOST
TIME_ZONE = "Europe/Zurich"
LOGGING = {
   ...
}
SECURITY_GROUP_RULES = {
    ...
    },
}
OPENSTACK_KEYSTONE_MULTIDOMAIN_SUPPORT = True
OPENSTACK_KEYSTONE_DEFAULT_DOMAIN = "Default"
OPENSTACK_KEYSTONE_DEFAULT_ROLE = "user"
OPENSTACK_NEUTRON_NETWORK = {
    'enable_router': False,
    'enable_quotas': False,
    'enable_distributed_router': False,
    'enable_ha_router': False,
    'enable_fip_topology_check': False
}
OPENSTACK_API_VERSIONS = {
    "identity": 3,
    "image": 2,
    "volume": 3,
}
WEBROOT = '/dashboard'
The configuration for the web server is:
[root@controller ~]$ cat /etc/httpd/conf.d/openstack-dashboard.conf
WSGIDaemonProcess dashboard
WSGIProcessGroup dashboard
WSGISocketPrefix run/wsgi
WSGIApplicationGroup %{GLOBAL}

WSGIScriptAlias /dashboard /usr/share/openstack-dashboard/openstack_dashboard/wsgi.py
Alias /dashboard/static /usr/share/openstack-dashboard/static

<Directory /usr/share/openstack-dashboard/openstack_dashboard/>
  Options All
  AllowOverride All
  Require all granted
</Directory>

<Directory /usr/share/openstack-dashboard/static>
  Options All
  AllowOverride All
  Require all granted
</Directory>
The only thing left to do is to restart the web server and MemcacheD:
[root@controller ~]$ systemctl restart httpd.service memcached.service
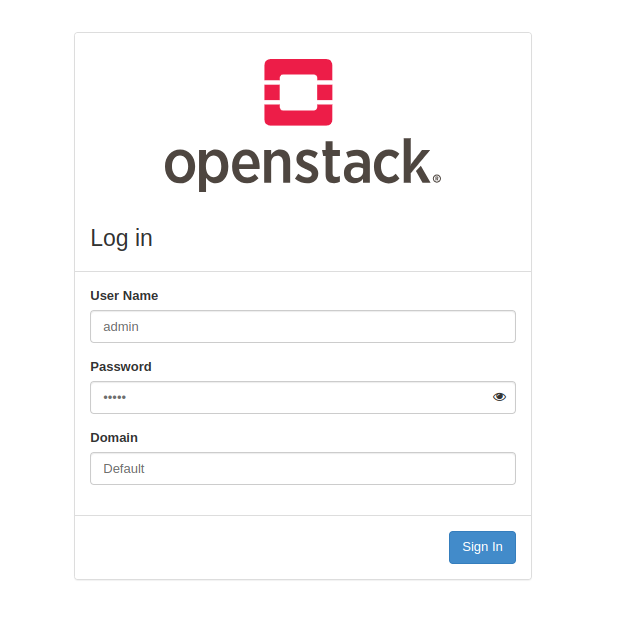
The dashboard is now available at http://controller/dashboard:

As we did not configure additional domains or users, the login credentials are (if you used the same passwords as in this blog series, the password is “admin”):
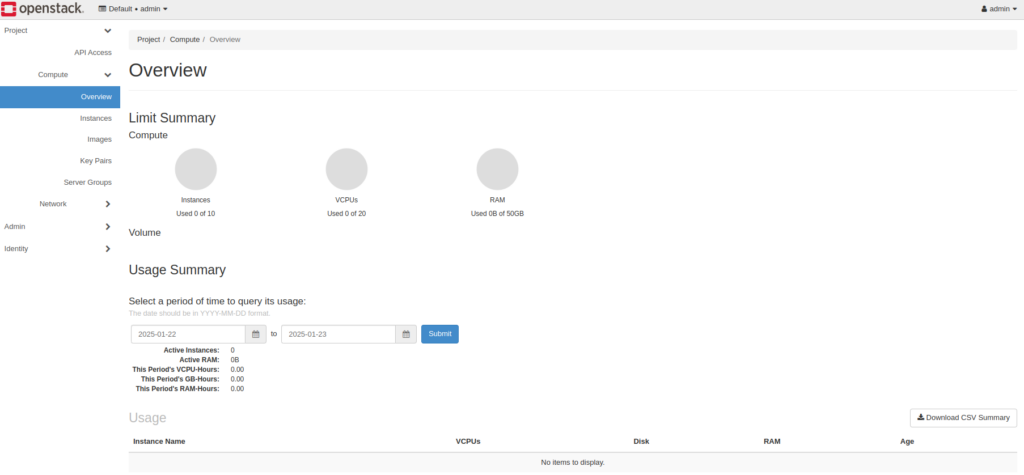
This will bring you to the “Overview”
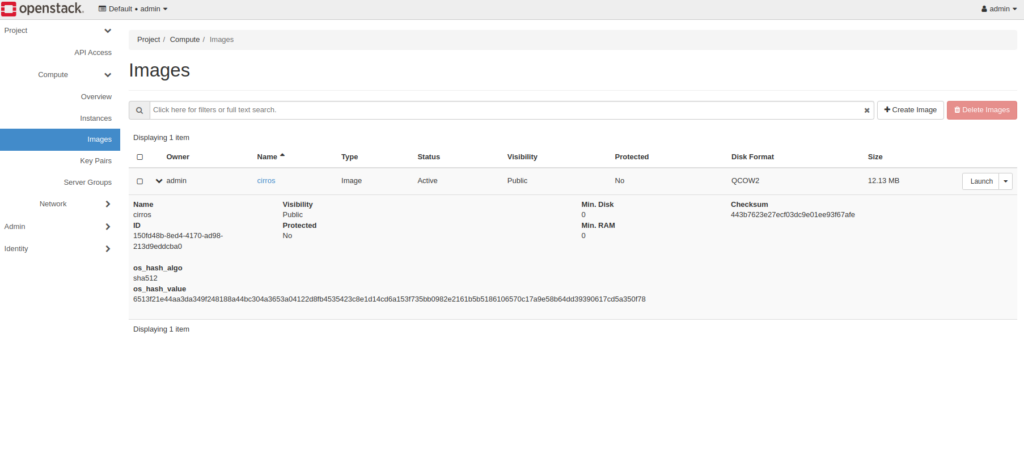
… and from there you can dive into the various sections and have a look at the currently available components, e.g. you might have a look at the image we’ve uploaded when we did the setup of Glance (Image Service):
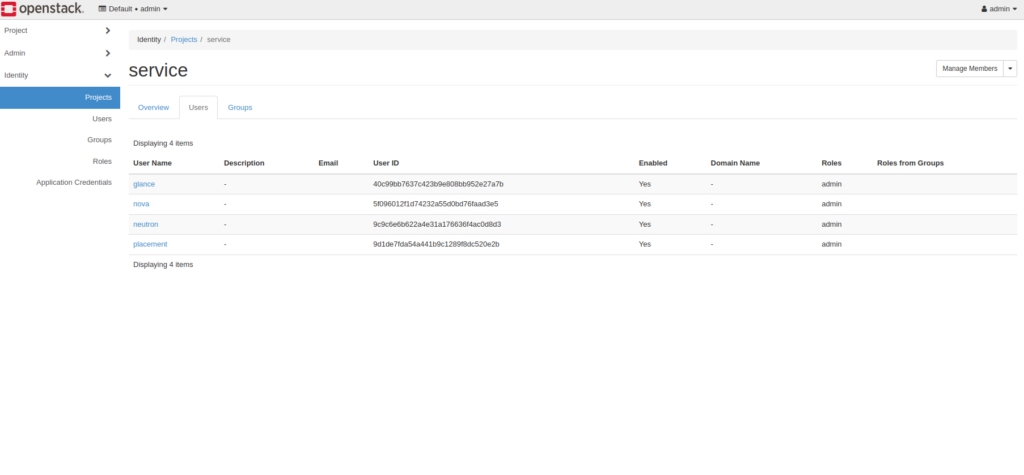
… or the service project we’ve created previously:
To finalize this series, here is the complete overview of what we did:
Happy testing with OpenStack.
![Thumbnail [60x60]](https://www.dbi-services.com/blog/wp-content/uploads/2022/08/DWE_web-min-scaled.jpg)
![Thumbnail [90x90]](https://www.dbi-services.com/blog/wp-content/uploads/2022/08/FRJ_web-min-scaled.jpg)
![Thumbnail [90x90]](https://www.dbi-services.com/blog/wp-content/uploads/2022/08/GRE_web-min-scaled.jpg)
![Thumbnail [90x90]](https://www.dbi-services.com/blog/wp-content/uploads/2023/01/APY_web-scaled.jpg)
![Thumbnail [90x90]](https://www.dbi-services.com/blog/wp-content/uploads/2025/03/OBA_web-scaled.jpg)