Nowadays the market for cloud providers is very competitive. Large companies are fighting a very hard battle over the services they provide. Each offers a wide range of more or less identical products with specific features for each.
In my point of view, having deployed Kubernetes clusters in several environments (Cloud and On-Premise), I pay particular attention to Google Cloud for its Google Kubernetes Engine offer. The deployment of a Kubernetes cluster is very fast and allows us to have a test/production environment in a few minutes.
Therefore, in this blog post, we will explain how to create a Kubernetes cluster in Google Cloud with some useful additional resources.
Prerequisites
A Google account is needed. You can create one by following the sign-up link: https://cloud.google.com. Otherwise, you can use the free tier account: https://cloud.google.com/free/?hl=en.
Create your project
Go to the cloud portal through the following link: https://console.cloud.google.com/home/dashboard
The first step is the creation of a project. Before creating a resource, you will need to create a project in order to encapsulate all your resources within it. To properly create a project, follow the below steps:

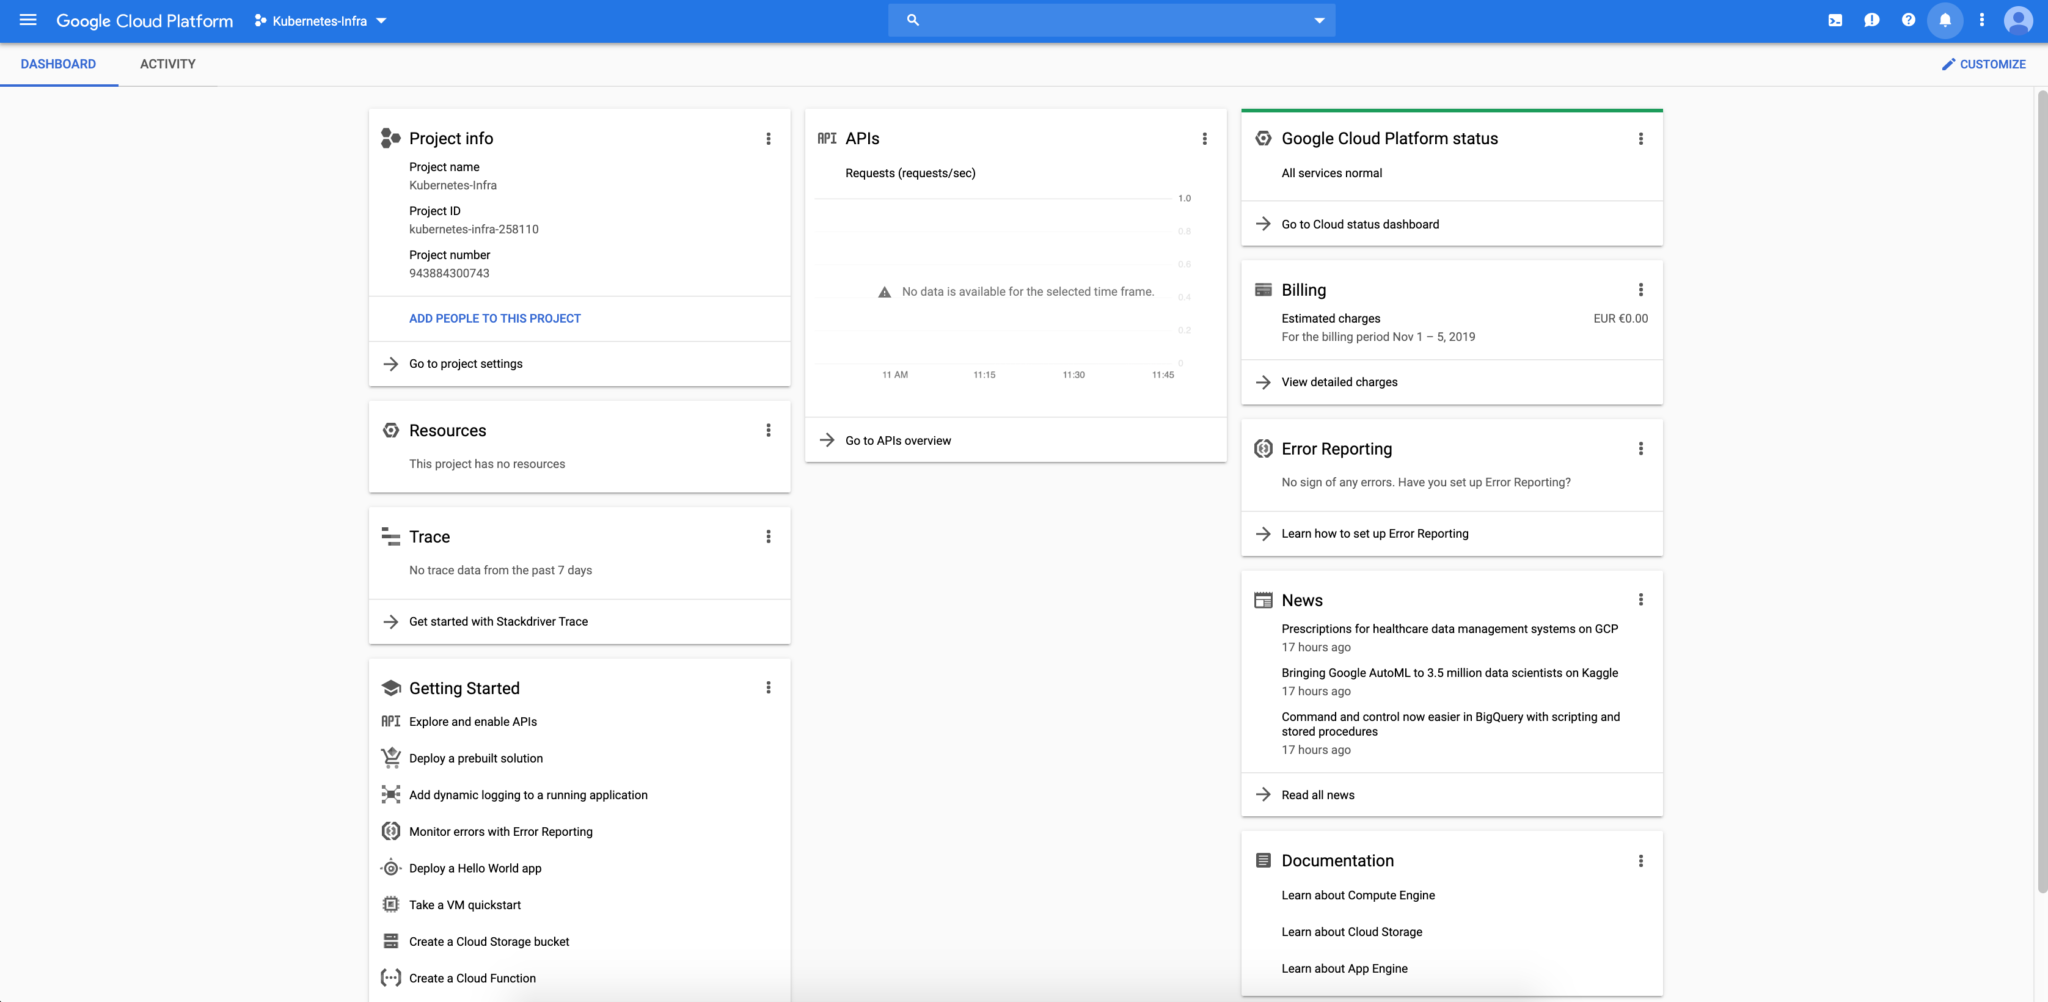
Enter your project name and click on create:

After a few seconds, your project will be created, and you will have access to the home dashboard:
Create your cluster
Once the project is created and ready to use, let’s create now our Kubernetes cluster. Click on the Kubernetes Engine menu and clusters sub-menu to begin the creation process.
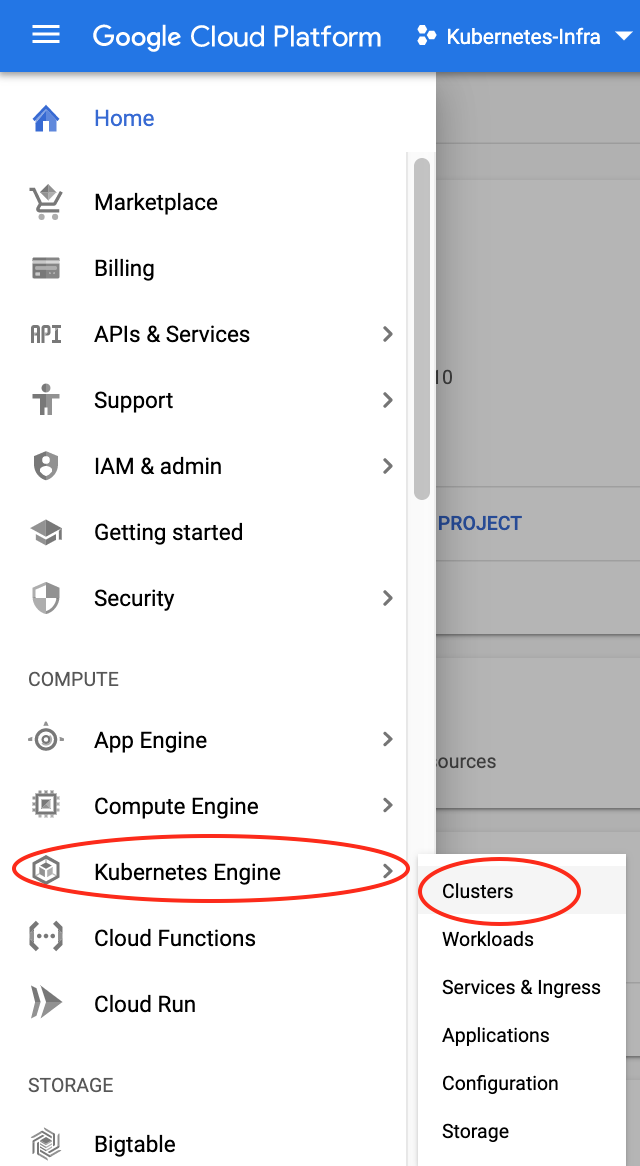
Once the Kubernetes Engine API is enabled, we can click on the create cluster button and configured our cluster as needed.
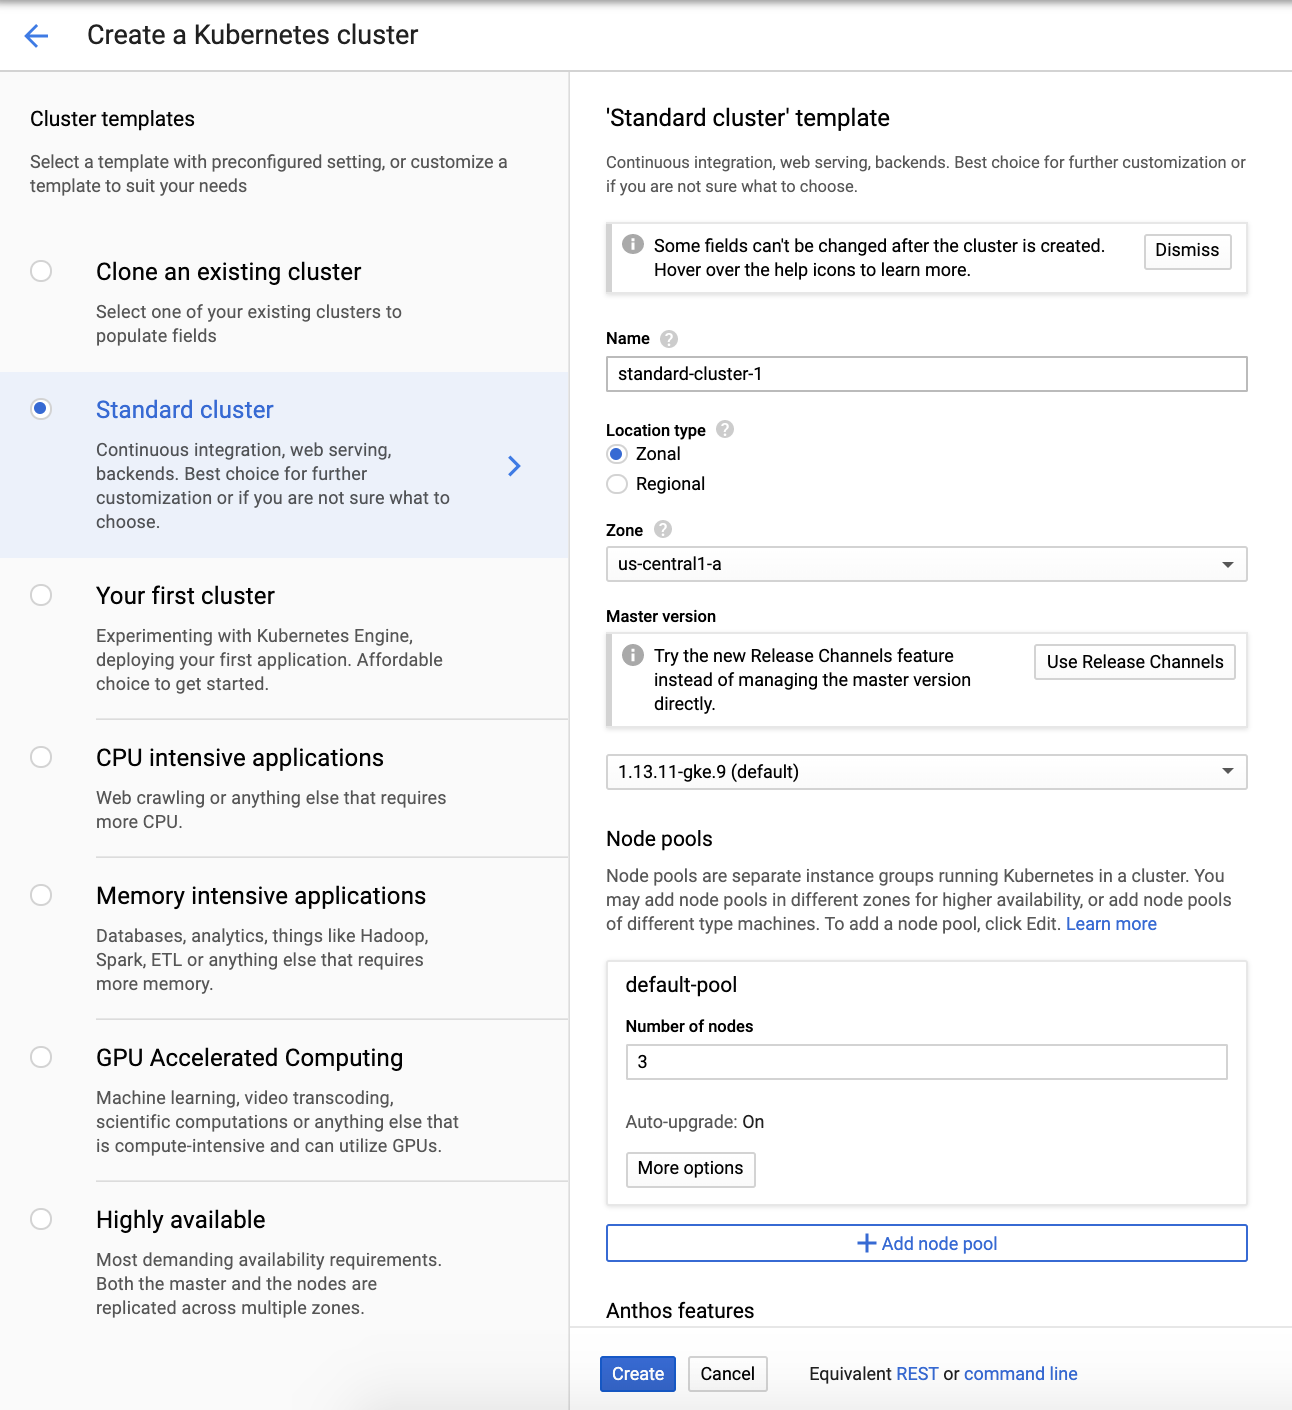
We choose a standard cluster with 3 cluster nodes. You can edit the resources of your cluster according to your needs. For our example, we kept the default configuration provided by the API.
Click on the create button and after a few minutes, your cluster is ready for usage.
Start using your Kubernetes cluster
Google SDK is needed to use your Kubernetes cluster in your favorite client platform. To install Google SDK follow the instructions here: https://cloud.google.com/sdk/docs/downloads-interactive
SDK Cloud is properly installed, we can now initialize our environment by the following steps:
mehdi@MacBook-Pro: gcloud init
Welcome! This command will take you through the configuration of gcloud.

Settings from your current configuration [default] are:
core:
  account: [email protected]
  disable_usage_reporting: 'True'
  project: jx-k8s-2511

Pick configuration to use:
 [1] Re-initialize this configuration [default] with new settings
 [2] Create a new configuration
Please enter your numeric choice:  1

Your current configuration has been set to: [default]

You can skip diagnostics next time by using the following flag:
  gcloud init --skip-diagnostics

Network diagnostic detects and fixes local network connection issues.
Checking network connection...done.
Reachability Check passed.
Network diagnostic passed (1/1 checks passed).

Choose the account you would like to use to perform operations for
this configuration:
 [1] [email protected]
 [2] Log in with a new account
Please enter your numeric choice:  1

You are logged in as: [[email protected]].

Pick cloud project to use:
 [1] kubernetes-infra-258110
 [2] Create a new project
Please enter numeric choice or text value (must exactly match list
item):  1

Your current project has been set to: [kubernetes-infra-258110].

Do you want to configure a default Compute Region and Zone? (Y/n)?  Y

Which Google Compute Engine zone would you like to use as project
default?
If you do not specify a zone via a command-line flag while working
with Compute Engine resources, the default is assumed.

Please enter numeric choice or text value (must exactly match list
item):  8
Login now to gcloud :
mehdi@MacBook-Pro: gcloud auth login
…
You are now logged in as [[email protected]].
Your current project is [kubernetes-infra-258110].  You can change this setting by running:
  $ gcloud config set project PROJECT_ID
Update your ~./kube/config file with the credentials of the new cluster created before:
mehdi@MacBook-Pro: gcloud container clusters get-credentials standard-cluster-1
Fetching cluster endpoint and auth data.
kubeconfig entry generated for standard-cluster-1.
Your kubectl client is now connected to your remote GKE cluster.
mehdi@MacBook-Pro: kubectl get nodes -o wide
NAME                                                STATUS   ROLES    AGE   VERSION          INTERNAL-IP   EXTERNAL-IP     OS-IMAGE                             KERNEL-VERSION   CONTAINER-RUNTIME
gke-standard-cluster-1-default-pool-1ac453ab-6tj4   Ready       56m   v1.13.11-gke.9   10.128.0.3    34.70.191.147   Container-Optimized OS from Google   4.14.145+        docker://18.9.7
gke-standard-cluster-1-default-pool-1ac453ab-s242   Ready       56m   v1.13.11-gke.9   10.128.0.4    35.188.3.165    Container-Optimized OS from Google   4.14.145+        docker://18.9.7
gke-standard-cluster-1-default-pool-1ac453ab-w0j0   Ready       56m   v1.13.11-gke.9   10.128.0.2    34.70.107.231   Container-Optimized OS from Google   4.14.145+        docker://18.9.7
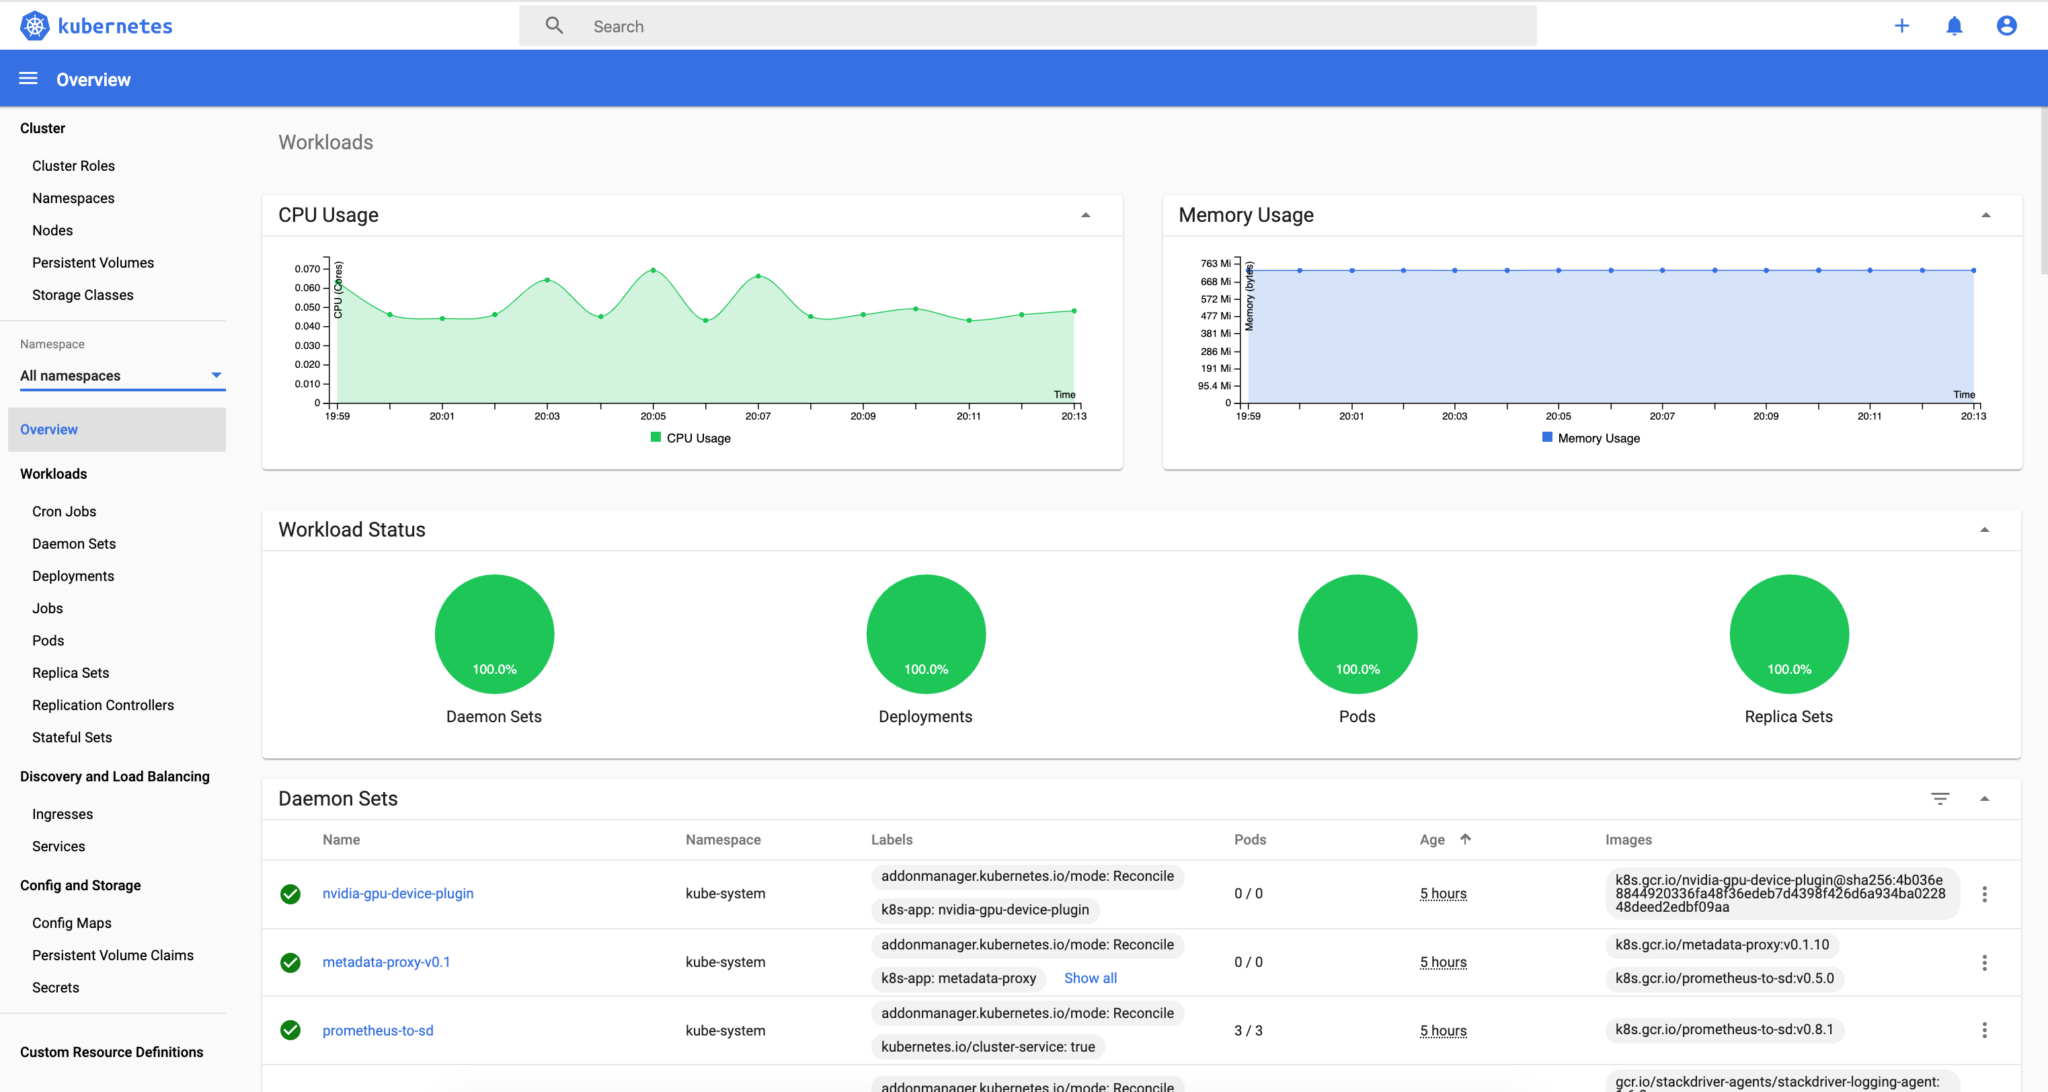
Deploy Kubernetes Dashboard
After configuring the kubectl client we can start deploying resources on the Kubernetes cluster. One of the most popular resources in Kubernetes is the dashboard. It allows users and admin having a graphical view of all cluster resources.
Download the dashboard deployment locally:
curl -o dashboard.yaml https://raw.githubusercontent.com/kubernetes/dashboard/v2.0.0-beta4/aio/deploy/recommended.yaml
Then apply the deployment:
mehdi@MacBook-Pro: kubectl apply -f dashboard.yaml
namespace/kubernetes-dashboard created
serviceaccount/kubernetes-dashboard created
service/kubernetes-dashboard created
secret/kubernetes-dashboard-certs created
secret/kubernetes-dashboard-csrf created
secret/kubernetes-dashboard-key-holder created
configmap/kubernetes-dashboard-settings created
role.rbac.authorization.k8s.io/kubernetes-dashboard created
clusterrole.rbac.authorization.k8s.io/kubernetes-dashboard created
rolebinding.rbac.authorization.k8s.io/kubernetes-dashboard created
clusterrolebinding.rbac.authorization.k8s.io/kubernetes-dashboard created
deployment.apps/kubernetes-dashboard created
service/dashboard-metrics-scraper created
deployment.apps/dashboard-metrics-scraper created
Create an admin Service Account and Cluster Role Binding that you can use to securely connect to the dashboard with admin-level permissions:
mehdi@MacBook-Pro: vi admin-sa.yaml

apiVersion: v1
kind: ServiceAccount
metadata:
  name: admin
  namespace: kubernetes-dashboard
---
apiVersion: rbac.authorization.k8s.io/v1beta1
kind: ClusterRoleBinding
metadata:
  name: admin
roleRef:
  apiGroup: rbac.authorization.k8s.io
  kind: ClusterRole
  name: cluster-admin
subjects:
- kind: ServiceAccount
  name: admin
  namespace: kubernetes-dashboard

mehdi@MacBook-Pro: kubectl apply -f admin-sa.yaml
serviceaccount/admin created
clusterrolebinding.rbac.authorization.k8s.io/admin created
First, retrieve the authentication token for the admin service account, as below:
mehdi@MacBook-Pro: kubectl -n kubernetes-dashboard describe secret $(kubectl -n kubernetes-dashboard get secret | grep admin | awk '{print $1}')
Name:         admin-token-dpsl9
Namespace:    kubernetes-dashboard
Labels:
Annotations:  kubernetes.io/service-account.name: admin
              kubernetes.io/service-account.uid: 888de3dc-ffff-11e9-b5ca-42010a800046

Type:  kubernetes.io/service-account-token

Data
====
ca.crt:     1119 bytes
namespace:  20 bytes
token:      eyJhbGciOiJSUzI1NiIsImtpZCI6IiJ9.eyJpc3MiOiJrdWJlcm5ldGVzL3NlcnZpY2VhY2NvdW50Iiwia3ViZXJuZXRlcy5pby9zZXJ2aWNlYWNjb3VudC9uYW1lc3BhY2UiOiJrdWJlcm5ldGVzLWRhc2hib2FyZCIsImt1YmVybmV0ZXMuaW8vc2VydmljZWFjY291bnQvc2VjcmV0Lm5hbWUiOiJhZG1pbi10b2tlbi1kcHNsOSIsImt1YmVybmV0ZXMuaW8vc2VydmljZWFjY291bnQvc2VydmljZS1hY2NvdW50Lm5hbWUiOiJhZG1pbiIsImt1YmVybmV0ZXMuaW8vc2VydmljZWFjY291bnQvc2VydmljZS1hY2NvdW50LnVpZCI6Ijg4OGRlM2RjLWZmZmYtMTFlOS1iNWNhLTQyMDEwYTgwMDA0NiIsInN1YiI6InN5c3RlbTpzZXJ2aWNlYWNjb3VudDprdWJlcm5ldGVzLWRhc2hib2FyZDphZG1pbiJ9.DBrfylt1RFDpHEuTy4l0BY-kRwFqm9Tvfne8Vu-IZVghy87vVWtsCatjt2wzCtMjX-I5oB0YAYmio7pTwPV-Njyd_VvbWupqOF7yiYE72ZXri0liLnQN5qbtyOmswsjim0ehG_yQSHaAqp21cQdPXb59ItBLN7q0-dh8wBRyOMAVLttjbmzBb02XxtJlALYg8F4hAkyHjJAzHAyntMylUXyS2gn471WUYFs1usDDpA8uZRU3_K6oyccXa-xqs8kKRB1Ch6n4Cq9TeMKkoUyv0_alEEQvwkp_uQCl2Rddk7bLNnjfDXDPC9LXOT-2xfvUf8COe5dO-rUXemHJlhPUHw
Copy the token value.
Access to the Kubernetes dashboard using the kubectl proxy command line.
mehdi@MacBook-Pro: kubectl proxy
Starting to serve on 127.0.0.1:8001
The dashboard is now available in the following link: http://localhost:8001/api/v1/namespaces/kubernetes-dashboard/services/https:kubernetes-dashboard:/proxy/#/login
Choose the token authentication and paste the value from the previous output.
You have now access to the Kubernetes dashboard and deployed your first Kubernetes resource!
Deploy an Ingress Load Balancer
In order to access your cluster service externally, we need to create an ingress load balancer for our GKE cluster. The ingress load balancer will make HTTP/HTTPS applications accessible publicly through the creation of an external IP address for the cluster.
Before creating the ingress, we need to deploy a test application for our example. Let’s deploy an NGINX server.
mehdi@MacBook-Pro: vi nginx-deployment.yaml

apiVersion: apps/v1beta2
kind: Deployment
metadata:
  name: nginx-deployment
spec:
  selector:
    matchLabels:
      app: nginx
  replicas: 2
  template:
    metadata:
      labels:
        app: nginx
    spec:
      containers:
      - name: nginx
        image: nginx
        ports:
        - containerPort: 80
---
apiVersion: v1
kind: Service
metadata:
  name: nginx
  labels:
    app: nginx
spec:
  type: NodePort
  ports:
    - port: 80
  selector:
    app: nginx


mehdi@MacBook-Pro: kubectl apply -f nginx-deployment.yaml

deployment.apps/nginx-deployment unchanged
service/nginx created
Create the ingress resource and deploy it as following:
mehdi@MacBook-Pro: vi basic-ingress.yaml
apiVersion: extensions/v1beta1
kind: Ingress
metadata:
name: basic-ingress
spec:
rules:
- http:
paths:
- backend:
serviceName: nginx
servicePort: 80

mehdi@MacBook-Pro: kubectl apply -f basic-ingress.yaml
ingress.extensions/basic-ingress created
Verify the status of the ingress:
mehdi@MacBook-Pro: kubectl get ing -o wide
NAME            HOSTS   ADDRESS         PORTS   AGE
basic-ingress   *       34.102.214.94   80      8h
The ingress resources have been properly created. We can see the result directly from the Google Cloud dashboard.
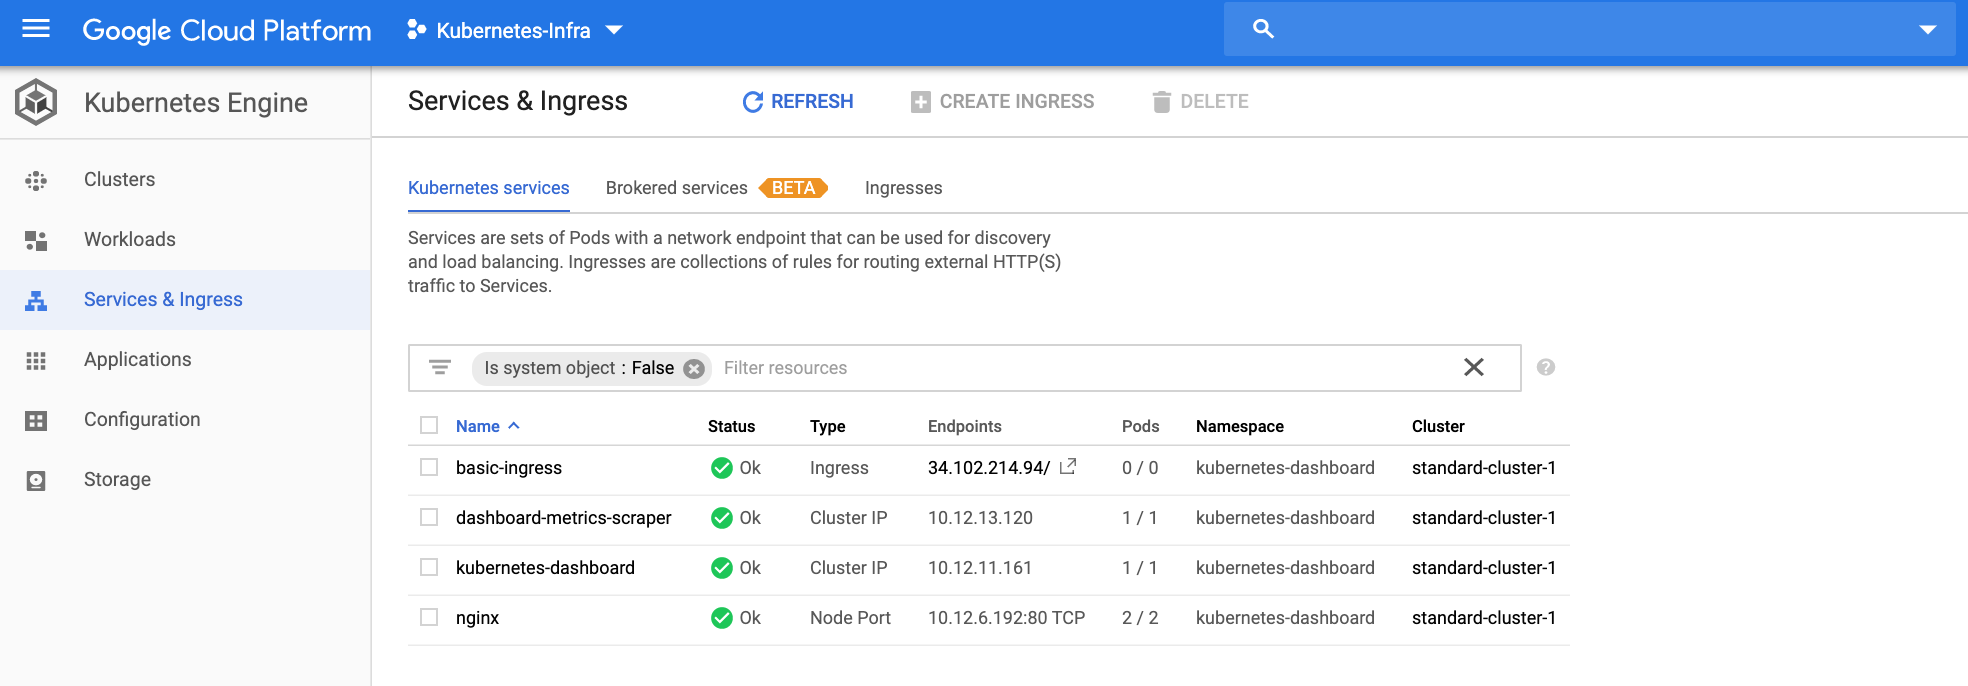
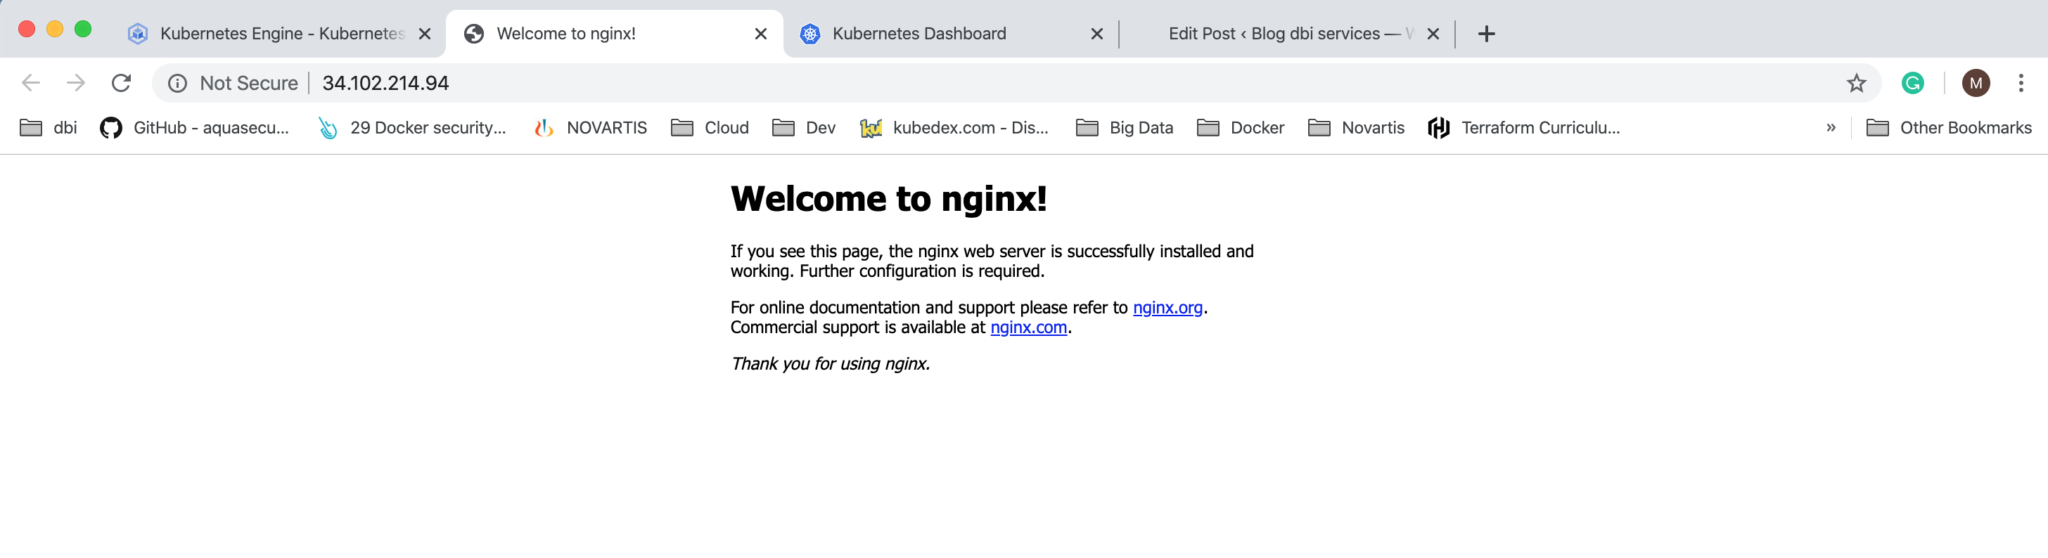
The NGINX service is now available via the Ingress Load Balancer and can be accessed through:
![Thumbnail [90x90]](https://www.dbi-services.com/blog/wp-content/uploads/2022/08/STH_web-min-scaled.jpg)
![Thumbnail [90x90]](https://www.dbi-services.com/blog/wp-content/uploads/2025/11/LTO_WEB.jpg)
![Thumbnail [90x90]](https://www.dbi-services.com/blog/wp-content/uploads/2023/01/APY_web-scaled.jpg)
![Thumbnail [90x90]](https://www.dbi-services.com/blog/wp-content/uploads/2022/08/FRJ_web-min-scaled.jpg)